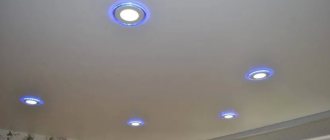
Spotlights for plasterboard ceilings have their own design features, which allow them to be installed quickly and easily. The modern range of lamps is represented by a wide variety of models, but built-in models are the most widespread. Most lighting fixtures for suspended structures are connected to a 220V network thanks to the presence of a built-in driver. LED spotlights for plasterboard ceilings have low heating during operation, which allows them to be used also for stretched fabrics.
Types of products
When choosing a lamp for a plasterboard ceiling, it is important to take into account many factors. The modern assortment offers such different lighting sources that in order to decide, you first need to familiarize yourself with the characteristics of all types.
There are such categories of lighting devices, differing:
- by voltage;
- by the presence of a rotating mechanism;
- by type of lamps.
Based on the types of lamps, the following types of devices are distinguished:
- incandescent lamps;
- energy saving;
- LED;
- halogen.
Spotlights can be:
- overhead (installed on top of the surface);
- built-in (embedded into a suspended structure).
Overhead types are not presented in such a wide range.
Built-in models are:
- stationary;
- rotary.
The second type of lighting fixtures is the most widely used, because they allow you to easily change the direction of light, which has not only a functional meaning, but also a decorative one.
Also, ceiling lights built into plasterboard can be:
- external;
- internal.
In the first case, the lamp partially protrudes above the ceiling surface. Internal models are installed almost flush with the ceiling surface.
Types of ceiling lamps
Drywall lamps come in several varieties, which differ from each other in the types of lamps, voltage consumption and installation method. As for the last criterion, there are two positions: built-in and overhead.
- recessed - these are lighting fixtures, the technical part of which is located between the plasterboard and the base ceiling surface, and the decorative part is below the gypsum plasterboard ceiling;
- overheads are installed on the surface of a plasterboard ceiling, and the method of attaching them is practically no different from installing a chandelier.
Additionally, structurally, lamps for plasterboard ceilings differ in other qualities:
- single and block;
- rotating and fixed.
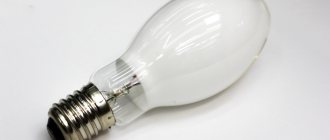
Regarding lamps, it should be noted that these light sources contain all types of lighting elements:
- incandescent lamps;
- halogen;
- LED;
- fluorescent energy saving.
Different types of ceiling lamps in plasterboard
According to the voltage consumption, lamps are divided mainly into two groups: 220, 24 and 12 V. Installation of lamps in plasterboard (halogen) at 24 and 12 V requires the presence of a step-down transformer, which is mounted in the interceiling space. Today, LED lamps are becoming more and more popular.
Types of LED lamps
Selecting a suitable lamp
When choosing ceiling lights built into a plasterboard structure, it is best to opt for LED lamps.
They provide bright lighting, consume little electricity, and their body does not heat up during operation, which is especially valuable when using tension fabrics. LED devices differ from their analogues in that the brightness of their radiation depends on the type of crystals used in the design. If the quality of the emitters is poor, then such lamps will not last long. To purchase a high-quality light source, pay attention to the brand of the product. Well-known brands, as a rule, use high-quality crystals, so their products last for years and produce a bright luminous flux. In addition, well-known manufacturers always provide a guarantee for their products.
Typically, LED lamps for plasterboard ceilings are sold with a lamp.
Connection and installation of lamps
After wiring, plasterboard sheets are installed on the constructed frame. Then once again, now on the plasterboard ceiling, the locations of the lighting fixtures are indicated. It is necessary to make holes in them for the light source.
Please note that even at the stage of forming the distribution scheme of lamps on the ceiling surface, it is necessary to strictly take into account that the lighting device does not fall on an element of the metal frame. Because in this case there is no possibility of installation; the metal profile will simply interfere with the installation.
Problems when installing ceiling lights
There is one subtle point here - the diameter of the spotlights for drywall should match the diameter of the hole in the ceiling. The manufacturer must indicate the first parameter on the box (packaging), but it is better to check it.
Therefore, this size is applied to the plasterboard ceiling where the devices are installed. For this it is better to use a compass. Now you need to cut the holes according to the applied markings. There are several ways how this can be done:
- The simplest is to drill holes with a drill, onto which a crown with a diameter equal to the diameter of the circle drawn on the ceiling is installed.
- Through holes are drilled around the circumference with a small drill in increments of 1-1.5 cm. After which a piece of drywall is simply pressed inward. True, the edges of the hole will have to be modified with a sharp knife or jigsaw.
- You can use a ballerina. To do this, the cutter is adjusted to the radius of the hole.
All that remains is to pull the wires out of the cut holes and connect the lamps to them.
Installation of a ceiling lamp
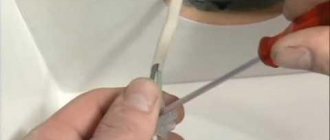
There are many connection methods, or rather, devices with which the connection is made. The simplest, but also most reliable, are terminal blocks with clamping screws or modern WAGO terminals.
This terminal allows you to connect different types of wires
The wires from the lighting device must be inserted into it on one side, clamping them with screws, and the power wiring on the other side.
All that remains is to install the lamps in the plasterboard ceiling. The design of the devices has special clamping strips (antennae), which are spring-loaded on one side. That is, in a free state they are turned outward, and accordingly protrude beyond the technical part of the device. That is, the spread of the antennae is greater than the cut diameter of the hole on the plasterboard ceiling. Therefore, the mounting strips must be pressed to insert them into the hole.
Sometimes it’s not easy to do this by hand because the drywall itself gets in the way. Therefore, experienced craftsmen do this - they tie the tendrils together with wire, and after installing the spotlight in the drywall, they cut it with wire cutters or pliers. The antennae straighten under the action of springs and rest on the outer side of the ceiling, preventing the lamp from falling.
Using wire we hold the tendrils of the springs
Some designs of recessed plasterboard ceiling lamps are collapsible. That is, the decorative part is disconnected from the technical part. Therefore, the sequence of installation work here is slightly different:
- The device is being disassembled.
- The technical part is installed in a plasterboard ceiling, that is, in a hole, exactly the same as in the case described above.
- The device is connected to the power cable, which is pulled out through the cartridge. After which the wire is recessed.
- The decorative part is attached to the technical part.
How to choose a lamp
In order for the lighting of the house to meet all the requirements of the owner, it is important to take into account the entire set of basic parameters of lighting fixtures, as well as the features of the room, ceiling decoration and much more. In particular, you need to pay attention to the following points:
- Type of lighting fixture (stationary, rotating, with a remote diffuser, etc.) Stationary models can be purchased at a very affordable price, as they are less functional.
- Mounting method: overhead, built-in. The first option is installed on the surface, the second is cut into the plasterboard ceiling, for which you need to make a hole of the appropriate diameter in the sheet in advance. Thus, the dimensions of the lighting device, as well as the level of its heating during operation, also play an important role.
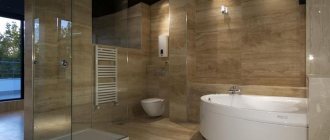
- Degree of protection. Models IP20, IP23 are suitable for living rooms and kitchens. In the bathroom and other rooms with high humidity, models with protection IP57 and higher are needed. For these premises, it is much safer to install low-voltage devices here.
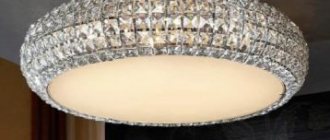
- Design and material type: plastic, metal, glass, etc. Plastic models are the most inexpensive, however, for the home it is still better to opt for chrome, glass and crystal models.
- Quality of fasteners. Built-in models are equipped with a special fastening system called “springs”. This mechanism makes it possible to quickly and easily install and remove the lighting device if necessary.
Recommendations for placement and calculation
Before embedding LED lamps into a plasterboard ceiling, it is necessary to correctly mark the installation of profiles and the lighting sources themselves.
This should be done before installing the ceiling structure for two reasons:
- so that the elements of the suspended structure do not block the light source;
- in order to hide the wiring under the ceiling.
For wiring, a cable with a cross-section of 0.75 to 1.5 mm is used, the wiring is attached to the profile frame. At the future locations of the lamps, I leave a wire reserve of about 15 cm.
Lighting sources should not be placed far from each other (more than 1 meter), unless you intend to install a chandelier in the center. To connect the wires, use terminal blocks.
Requirements for installation of lamps
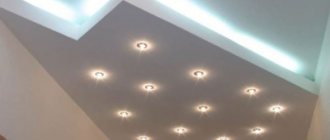
The placement of ceiling lights built into plasterboard on the ceiling itself is not limited by any rules or requirements. That is, the configuration can be very different. But most often the devices are positioned so that the lighting in the room is full or partial. Therefore, designers use three schemes:
- In rows perpendicular to the wall on which the window is located. In this case, the distance from the wall to the first device should not be less than 60 cm. And the installation step of the rows is 1 m.
- In a checkerboard pattern. The same requirements apply here.
- Installation of spotlights in plasterboard is carried out along the periphery. That is, point light sources in this case act as additional lighting of the space. The main device here is the chandelier.
All three schemes are quite simple and universal, but, as practice shows, today they are often not used. Since there are no restrictions in the arrangement of spotlights, there are a huge number of variations in this case. This especially applies to plasterboard ceilings built in two tiers.
Options for placing lamps on the ceiling
Installation
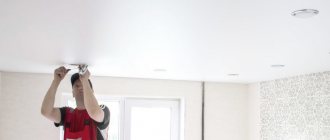
Before installing spotlights, you need to make appropriate holes in the plasterboard ceiling.
More precisely, all this must be done in sheets of drywall before attaching them to the frame. The holes should be slightly cone-shaped - wide at the base and narrower in the outer ring of the device. The most convenient way to make such holes is with a wood crown. The next stage is connecting the lamps to the power supply. To do this, you need to take out the cable that was left specifically for connection and connect it to the power wire.
All recessed luminaires have a special fastening. It allows you to simply install the device into the hole; you just need to press the clamps onto the device until it is in the right place. After this, the springs are released and a click can be heard, indicating that the device is locked.
The process of installing spotlights
First of all, it is planned according to what scheme the installation will be carried out. Experienced craftsmen draw the diagram on paper, determine on a scale the distance between the devices and their exact location on the ceiling. Then mark with crosses the places on the ceiling where the lamp will be located, this is necessary for the ceiling.
Next, the wires (cables) are laid out. This stage must be carried out after assembling the frame of metal profiles on the ceiling. Although some craftsmen first do the wiring and then assemble the frame. But in this case, you will have to first determine the installation locations of direct hangers, applying marks to the ceiling surface taking into account the distance between the fasteners. Because it may happen that the wire ends up under the place where the suspension is attached. But there is no way to do this.
Corrugated wire on the ceiling
There is a second difficulty in wiring for ceiling lights built into plasterboard before installing the frame. Wires (cables) will have to be attached to the base ceiling. And these are additional costs for fastening and time spent. While laying wires along the assembled frame is a simple fastening to the suspensions using an insulated core of the wire itself in the form of a twist.
In any case, the cables must be laid by passing them through a corrugated installation hose. This is additional protection that increases the life of the wires.
Before you start wiring, you need to mark the locations of the lamps on the ceiling.
The connection diagram can be serial or parallel. In the latter case, there may be several parallel sections, depending on how the lamps will be switched on in groups. This is at the discretion of the customer.
Double switch circuit
Single switch circuit
As for the cable (choosing its cross-section). There is no need to calculate this parameter taking into account power consumption. The best option is a cross section of 1.5 mm² PVA. It is better to purchase soft copper wire. Find out the best ways to connect stranded wires.
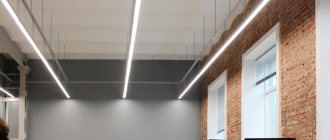
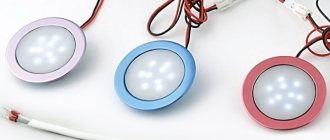
LED strip lighting
LED strip has many advantages, both functional and aesthetic.
Functional benefits include:
- ease of installation,
- long service life,
- various colors,
- economical - consumes very little electricity.
- unbreakable body - since this type of lighting device is presented in the form of a transparent strip with LEDs, it is very problematic to break or otherwise damage it;
- There are waterproof tapes that are used not only in the bathroom, but even under water to illuminate swimming pools.
The aesthetic advantages include the fact that such a lighting source is hidden from view - the tape itself is not visible, only diffused light is visible. This effect is used to add zest to the interior, as well as to create soaring ceilings.
If you install special controllers, you can adjust the lighting intensity, and in the case of using multi-colored tape, change the color.
How to hide LED strip
There are many ways to install diode strips; very often they are used in multi-tiered ceiling structures to emphasize each fragment. But even if you have an ordinary flat ceiling, you can also play with it in an interesting way. You can install such lighting even alone. In this case, you will need a special wide cornice for LED lighting.
Let's take a closer look at the algorithm of actions:
- Using a building level, mark the line for the location of the cornice, 10 cm from the ceiling.
- Glue the cornice using liquid nails, titanium or acrylic putty.
- Carefully glue the joints between the cornice strips, especially in the corners.
- Run the wiring into the cornice and connect the power supply that needs to be secured to the wall.
- Connect the LED strip to power. If you need to connect more than 5 meters of tape, then each section is connected to the power supply in parallel.