Attaching a chandelier to the ceiling is a responsible task that requires care and minimal electrical knowledge. First, you need to completely assemble it. The design of most of these lighting devices is not very complicated, and there are always manufacturer’s instructions. In short, this task can be handled easily, so we will move directly to the technical part of installing the chandelier on the ceiling.
Basic methods
First, let's figure out what options there are for installation on the ceiling. Today there are two types of fasteners:
- Hook - used for old-style chandeliers, as well as very heavy lamps
- A mounting strip or bracket is a modern fastener that is used for light chandeliers and lamps
The specified types of fastening involve working with a concrete slab. Therefore, you cannot do without special tools. Next - details on how to attach a chandelier using the above methods.
Hook mount for chandelier
A more difficult task is installing a chandelier on concrete ceilings on special hooks. To begin with, let’s make a reservation that the hooks are as follows:
- With regular thread
- With anchor bolt
A threaded hook is used for mounting lightweight chandeliers (3-4 kilograms) - only in this case can the fastener cope well with the task. For heavy lamps weighing more than five kilograms, hooks on anchor bolts are used.
Some useful tips for hanging any chandelier on a concrete ceiling
Our tips will help you quickly and efficiently install a chandelier on a concrete base:
Kawabanga! How to make concrete reinforcement
— If you need to hang a heavy chandelier, you should use anchor fastening. It is also best not to do the work yourself, but to use the help of a partner
— When installing a chandelier anchor hook, it is recommended to carefully match its diameter with the diameter of the hole so that it can be screwed tightly
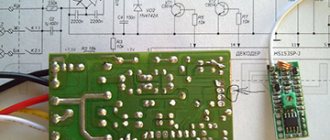
— Use special electric screwdrivers to install the chandelier, which will signal if current is supplied through the wire. This will simplify and speed up your work and protect you from surprises when installing the chandelier
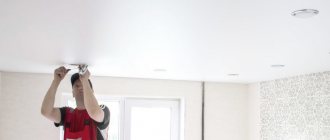
Preliminary work before installing spots in the ceiling
Preliminary work before installing spots in the ceiling
The work begins by installing the branch boxes in the most convenient and subsequently accessible places, since sometimes during the operation of the spots, you may need access to the branch box. Boxes are mounted for each group of lamps.
Wires are routed from the boxes in the direction of the location of the spots themselves. Pull the wiring through the corrugation - this helps protect the thin cable from damage and direct contact with the metal parts of the suspended ceiling covering body. The wiring is cut with a margin of about 20-30 centimeters.
If you are installing a spot with low power bulbs (about 12 volts), you will also need to install a transformer. This device, in turn, must have the power that all the lamps together will produce. The main power (220 volts) is supplied to the transformer, and the lighting equipment wires are connected from its output.
It is most convenient to install the transformer next to the first lamp - this will make it easier to reach it if necessary.
Now let's talk in more detail about installing lamps in different types of ceilings - suspended and suspended.
Types and methods of fastening
When choosing your lamp, even in the store you need to pay attention to the mounting methods.
Modern ceiling lighting fixtures are available with several types of chandelier mounting options:
- a loop on the luminaire fixture that allows it to be installed on a ceiling hook. This is one of the main types of mounting a ceiling chandelier. In this case, the base should be as strong as possible, for example, concrete floors.
- a reliable I-beam platform for mounting a massive, heavy chandelier. Allows fastening at several points.
Having considered the types and methods of fastening, you can decide how to install the chandelier on the ceiling correctly, without unnecessary and unpleasant consequences.
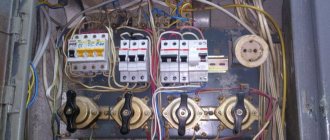
Wiring connection
In both options for mounting the device, you will have to deal with the wires, namely stripping them and connecting them to the chandelier:
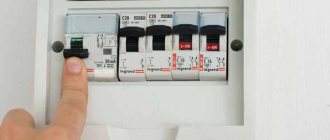
- Turn off the electricity at the panel.
- Inspect the wiring in the ceiling. There are usually two or three wires: phase, neutral and ground.
- Match the wires of the lighting fixture. The phase will be a red or black wire, zero will be blue, ground will be yellow with a green stripe. Use an indicator for accurate verification by touching the wires one by one, after turning on the electricity. The indicator will light up if a phase is found, which means there is current there.
- Connect wires of the same color using terminals. In their absence, twist the bundles and insulate them with electrical tape or other devices. If there is no ground connection, simply insulate the wires.
Installation using a mounting strip
Before attaching the chandelier to the ceiling using a mounting strip, it must be:
- Markings are made for fastening the strip. To do this, the plank is applied to the ceiling and outlined with a pencil so that the attached elements do not interfere with the connection to the electrical network. Mark the drilling locations. Plastic dowels are carefully driven into the drilled holes. The plastic should be ribbed, which will prevent it from becoming loose over time and starting to fall out of the nest;
- Using screws or self-tapping screws, the fastening strip is attached to the ceiling.
- After installing the connecting wires, the bowl or other decorative element is applied to the installed bar, aligning the connecting holes.
- Tighten the entire structure with decorative nuts, after which you can screw in the light bulbs and install shades or other components of the lamp.
It is worth noting that hanging a chandelier from the ceiling can be difficult alone. Another hand is needed to connect the wires. Therefore, when connecting a lamp to the mains, one person holds the chandelier, the other handles the wires.
You can mount a chandelier on the ceiling with your own hands without any problems, the main thing is to prepare the necessary material and tools, study the included connection instructions and always have an assistant.
On the hook
Before attaching a lighting fixture to a concrete ceiling with a built-in hook, the first step is to check the strength of its installation. To do this, select a weight the size of the selected chandelier, secure it, and then pull it with force. A poorly installed fastener will begin to wobble or fall out completely; in this case, the hook will need to be replaced.
To install the hook, you need to make a hole in the ceiling using a hammer drill and install a collet, followed by mounting the fastening element into it. A pin is placed in the collet and a hook is hung; it is also possible to screw the hook directly into the collet. Before screwing the hook into the thread, you need to lubricate the hole with a thin layer of thick lubricant and screw two copper wires. Next, one hundred grams of gypsum solution is prepared, which in consistency will resemble thick sour cream
After which the hole is filled with a stick, it is important to remember that the gypsum mixture hardens quickly, so filling the solution into the thread should be carried out accordingly
The hook is immediately placed into the solution before it has time to harden and the excess mixture is removed. Wait until the solution cools to room temperature; this will happen after 2 hours or more. After the final setting of the gypsum mixture, they begin to fasten the lighting fixture.
Types and methods of mounting chandeliers: features, advantages and disadvantages
To attach the lamp, make a hole in the base, insert a dowel, and then screw the hook into it.
Kawabanga! 10 Best Bitumen Removers
Butterfly hook
The butterfly dowel consists of a self-tapping screw and plastic “wings”. After twisting, the clip of the product opens and rests against the back of the base. And thanks to the ribbed sections, the dowel does not scroll or fold inside.
Its design allows the load to be evenly distributed. This element is suitable for drywall and plastic.
However, a butterfly hook is rarely used, since it can hold products no heavier than 3 kg.
Make a tunnel in the drywall or plastic panel. Screw the dowel into the cage, turning it several times. Then insert the hook and tighten.
Bar for mounting a chandelier
Mounting to a strip is a neater installation method because the light fits tightly to the ceiling, so the wires are not visible.
However, the bar for attaching the chandelier is suitable for products no heavier than 2 - 3 kg. In addition, the installation process is more complex than in the case of a hook.
Installation of the lamp on the bar occurs according to the following plan:
- There are 2 holes made in the base into which dowels are inserted and screws are screwed in.
- The lamp body is fixed to the bar with nuts.
For mounting heavy lighting devices, a cross-shaped bar is used. It is installed in the same way as a regular one, however, its installation requires a larger base, in addition, it has more attachment points.
Threaded hanger
This type of fastener is used for concrete floor slabs. If the lamp needs to be attached to a plasterboard or PVC ceiling, then before installing them you need to prepare a platform on the old ceiling, which will ensure the rigidity of the structure.
To secure the lamp, insert the spring-loaded petals into the hole, after which they will open inside the base. Using the threaded connection, adjust the height and fix the product body.
Anchor suspension
This is a large anchor-shaped hook with a spacer that expands inside the ceiling. The anchor can withstand heavy loads and provides reliable fastening to a concrete base.
However, the hook does not look aesthetically pleasing, so it is suitable for lamps with a decorative trim.
To install an anchor suspension, drill a hole of the required diameter, insert the anchor with the hook until it stops (hammer if necessary), make 3 - 5 turns.
Collet mount
The collet provides a rigid and durable fixation. This is a brass pin with a spacer along one edge. It is suitable for plasterboard and tension coverings. Collets for light and heavy products are available for sale.
To install a chandelier on a collet, you need to prepare a mortgage in advance.
To attach the collet, drill a tunnel in the platform, drive the collet, and tighten the pin.
Kawabanga! What are the methods for dismantling concrete?
Screw with half ring
It is enough to simply screw in the screw with or without preliminary drilling (depending on the diameter of the element and the base material).
However, the hook screw is only suitable for light chandeliers.
Where can ceiling spots be used?
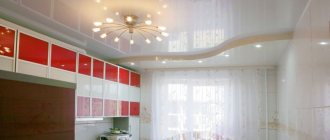
Spot spots in the interior design of the living room
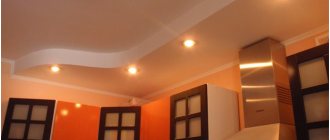
Spot spots are an ideal option for rooms with a small area, because they will not only completely illuminate the entire space, but also make it visually larger and wider. Spot ceiling lights are perfect for installation in corridors and bathrooms - rooms where bright and directional light is needed.
Since spots do not necessarily come in the ceiling variety, they are also widely used to illuminate technical and specialized spaces - swimming pools, store windows, staircases. Spots are also used in the arrangement of street lighting.
What and how to attach to a plasterboard sheet
The ceiling chandelier is attached to the gypsum board using anchors or collet pins, which are used for the heaviest products. Such fasteners must be fixed to the base ceiling. A threaded hook and spring dowel are used for lighter models.
Required materials and tools
To mount a chandelier on a gypsum board, you need to prepare a hammer drill, screwdrivers, wrenches, and a hammer. In addition, you will need pliers, electrical tape, terminal blocks, a knife, a stepladder, and selected fasteners.
Instructions for installing the lamp on a plasterboard ceiling
If you bought a heavy lighting structure, then attach it to an anchor suspension:
- Drill a hole (30 - 60 mm) in the gypsum board.
- Make a hole in the base for the hook, taking into account its diameter.
- Loosen the nut a little, pull out the stud, and insert the fastener.
- Tighten the nut.
If necessary, this mount can be extended using a metal rod.
The lamp is installed using the same principle using a threaded hook and a spring dowel.
A lightweight lamp (up to 3 kg) is mounted on plasterboard, reinforced with a profile frame:
The profile frame relieves the load on the plasterboard ceiling.
Brief characteristics of spot lighting devices
Overhead spotlights in the interior
These lighting devices also have a second short and succinct name – spots. In Russia, spots entered the lighting equipment market relatively recently, but immediately won demand and love among consumers. This popularity is easily explained by the fact that with the help of spot spots you can not only ideally illuminate a dark space, but also make the flow of light directed, thereby creating various advantageous accents and nuances in the interior.
Spots can be installed both as basic (main) lighting and as background lights. No other type of lighting technology can boast such an advantage, which is why spots are so in demand in the field of business and apartment interior design.
The advantages of spotlights include the following characteristics:
- Spots perfectly illuminate the room without leaving dark areas in it.
- With the help of spotlights, you can visually enlarge and expand your living or office space.
- It is easy to install such lamps: there are no special restrictions either on the installation location or on the distance between the devices.
- Convenient forms of spotlights allow you to illuminate even the most remote corners of the room to the required degree.
- Spots provide ample design opportunities.
Having listed the main advantages of ceiling lamps of this type, we can move on to considering the places where their positive qualities are optimally in demand, as well as to reviewing the main types of spots that modern lighting stores offer consumers.
Electrical wiring: how to avoid getting tangled in wires
The wires are connected according to the instructions that come with the lamp. However, problems often arise at this stage.
Wiring phasing
When checking phasing, you only need to work with one hand; holding the wire even by an insulated section is strictly prohibited! This poses a risk of electric shock. For the same reason, you should not touch the tip of the tester during operation.
It is recommended to carry out phasing while standing on a rubber mat.
To check that the wires are connected correctly, turn off the light at the switch (there is no need to turn off the circuit breaker). Touch the tester tip to the phase conductor; if everything is correct, the light bulb will not light up.
Calling
If you don’t know exactly how the wires run, and you need to make a hole to mount the lamp, then you need to carry out a test. Otherwise, you may damage the cable.
To find the wires, follow this plan:
Then disassemble the structure and begin installation work.