Easy or difficult?
Yes and no. The main thing is not to rush, because if you are not standing on the floor, you can lose your balance and fall, either by yourself or with a chandelier in your hands. Remember the famous joke about why a man who was removing a chandelier fell from his chair.
Usually in old apartments, builders inserted a small hook into the slab in the center of the room, and hung a chandelier on it. He covered the hook with a cap; it was installed on almost all Soviet and imported multi-lamp lamps.
In short, you first need to study everything in detail and, if necessary, prepare the necessary tools.
Hanging on a hook
A hanging hook is the simplest option for attaching a chandelier. First you need to make a hole in the ceiling
next to the wires coming out of it, with a diameter of at least 8 mm. To do this, use an impact drill or hammer drill.
It is recommended to install the hook using anchor systems. There are different types of anchors.
If the chandelier is small, weighing 1-1.5 kg, you can use a regular hook with a screw thread, which is screwed into a plastic plug - dowel. For heavier chandeliers, expansion metal anchors are required, with a length of 50 mm and a cross-section of 10 mm.
When using plastic dowels, it is better to take corrugated ones, with a length of 40 mm. Smooth dowels do not hold well in the slab. After fixing the dowel, a hook is screwed into it, or an expansion anchor is installed. The hook should be insulated with two layers of electrical tape.
Next, the chandelier wires need to be connected to the wires coming from the switch using a special block with clamping bolts - a terminal block. To tighten the bolts you will need a slotted screwdriver with a narrow blade. This block is included with the chandelier. If it is not there, the wires are twisted and wrapped with insulating tape.
Then you need to move the decorative cup close to the ceiling, moving it along the tubular base of the chandelier, and fix it. The decorative cover will hide the electrical wiring terminals and wire connections. The disadvantage of this type of fastening is that sometimes the height of the decorative cup is not enough, and an unsightly gap remains between it and the ceiling. Before fixing the decorative cup, you need to check the quality of the chandelier connection.
Under no circumstances should the hook be attached to sheets of drywall, as it may not support the weight of the chandelier. When installing a ceiling made of plasterboard or suspended ceiling, you need to leave a hole in it for the hook to come out along with the wires.
Step-by-step instructions for dismantling the hall lamp
Turn off the electricity in the input distribution panel for the entire apartment or room, if there is a zone wiring. This is a safety precaution for removing a chandelier.
Avoid electric shock, because rarely does anyone wear rubber dielectric gloves during such a technical operation.
Play it safe and check the current in the chandelier sockets with a special probe, which should always be in the apartment.
Remove lamp shades and fragile decorative elements, including light bulbs.
Features of choosing building materials for a homeWhat should you pay attention to when choosing the type of rolled metal for a classic seam roof?
- Why do you need to play sports from childhood?
Unscrew the fasteners of the cap that hides the terminals for connecting the chandelier to the 220 volt network.
Separate the wires of the sides, and if you return the chandelier to its place or change it only after repair, then wrap the network contacts with electrical tape.
The work is now complete. And you managed to remove the chandelier with your own hands.
Dismantling options
Depending on the purpose, the chandelier can be removed for:
- replacing lighting lamps;
- cleaning decorative elements;
- complete replacement of the lighting device;
- finishing or upgrading the ceiling covering.
In this case, the dismantling option will be completely different for each case. So, to replace a light bulb, it is not at all necessary to remove the entire structure; it is enough to remove the lampshade, which can be dismantled by unscrewing the bolts, unscrewing the threads, removing the spacers or pressing the clamps.
If you need to wash a chandelier or perform finishing work, and the device is removed temporarily, and a socket with a light bulb is installed for the period of cosmetic repairs. In this option, dismantling is also partial, since it is advisable to leave some elements in place. You only need to release the power wires to which you connect a temporary lighting fixture.
In the case of a complete replacement, all elements are dismantled. And if the fastening structures interfere with the newly installed equipment, they are also removed.
Setting temporary backlight
Apartment renovations are carried out not only during daylight hours. Therefore, there must be lighting in the hall. It can be created from a piece of electrical wiring about forty centimeters long.
- Do-it-yourself safe wiring in a bathhouse - step-by-step instructions
- How to choose a phase meter - review, purpose, principle of operation, scope of application + instructions for use with photos
How to make a transformer with your own hands - step-by-step instructions, diagram, drawings, list of materials + photo of a finished homemade transformer
Having exposed the ends of the wires on all sides, screw the pair to a simple socket, but only this way: the neutral wire (the probe will show it to you) to the lamp base.
At the top, secure the part of the wire of the temporary lamp by simply bending it onto the hook, and insert the contacts into the hanging blocks. If there are no blocks, then make twists with hanging phases, separating them and wrapping each separately with electrical tape.
Safety precautions
The first thing you should pay special attention to is your own safety, since you will be working in an active electrical installation. Therefore, it is initially necessary to ensure that voltage is removed from current-carrying elements. To do this, it is not enough to turn off the switch key, since for a number of reasons it can break the neutral conductor instead of the phase conductor. As a result, a dangerous potential will be present at the cartridge contacts.
To remove the chandelier safely, follow these steps:
- Disconnect the input circuit breaker on the distribution panel; it will be good if it is a two-pole switch that simultaneously breaks both the phase and neutral conductors.
- If the machine is single-pole or you are operating not an input machine, but a dedicated machine, be sure to check the absence of voltage. The easiest way is to turn on the switch; if the chandelier does not light up, the circuit breaker has broken the circuit. But this does not guarantee the absence of potential if the machine breaks zero instead of phase. Therefore, it is more advisable to use an indicator screwdriver.
- When performing work to remove or replace a chandelier, it is necessary to install a stepladder so that all work is carried out to the side of you. Since when you are under the device, there is a possibility of small particles and debris getting into your eyes.
- If nothing is immediately connected to the supply wire after dismantling the chandelier, it is better to insulate the wires. This will ensure that you don't get an accidental electric shock from touching them.
What if the chandelier has a different mount?
For example, when a hood or dish lamp is installed. They are not hung on a standard hook, but on their own mount. If the hook gets in the way, cut it off with a hacksaw.
The plate has three bolts securing it to the base. They match the decor of the fastening rim of such a chandelier. Use a Phillips screwdriver to unscrew them, leave the lampshade on the table or floor, and use the holes in the base to mark the places where they are attached to the concrete.
Drill holes according to the marks, and secure with any fasteners, and after covering the base with glass, attach it too.
Ceiling and wall chandeliers
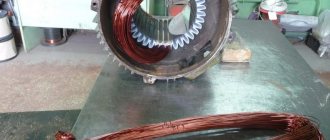
Most chandeliers are made using the same technology. There are three or five lamps, like petals, spreading to the sides on legs of different shapes. This design allows the parts of the chandelier placed to the sides to maintain balance. A technical solution option is shown in the photo:
- Each chandelier lamp is surrounded by an opaque glass shade. This allows you to hide unsightly light bulbs from view, while at the same time the light enters the room relatively freely.
- The chandelier shades are secured with a wide plastic nut screwed onto the socket. A narrow brush is required to perform the necessary dismantling operations.
- When the nut is removed, it is better to set the lampshade aside; the internal structure of the lamp will become visible: the part of the socket with an E27 thread for the light bulb can be easily unscrewed, exposing the ceramic-based contact group.
- In this design of the chandelier, two clips are visible at the bottom of the bowl, holding the decorative bottom of the lamp bowl. Having removed it, we open access to two nuts (see photo), one holds the base of the socket on the frame, the second holds the entire lamp on a leg branching from the center of the chandelier.
Access to clamps
When disassembling a chandelier, it is strongly recommended not only to turn off the light, but also to unscrew the plugs. For a simple reason: often a phase is connected to the cartridges, not a neutral wire. Then the first thing you should do is unplug the power connector, and then remove the chandelier from the ceiling. Old versions hang on hooks embedded directly into the concrete and wood floors. In the new version, the base of the chandelier, hidden by a removable base, is screwed with two bolts to a steel plate.
Chandelier on a custom ceiling
In residential premises, plastering, wallpapering or PVC tiles on the top of the room are replaced by suspended and stretched ceilings.
- Which hidden wiring detector is better? TOP 10 best manufacturers with photos and descriptions
Technological maps in construction - what is it?
- How to fix a laptop that won't charge
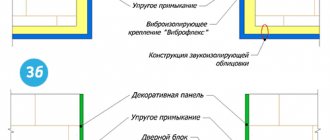
The first ones are mounted on strips nailed into the walls or concrete ceiling with dowels, on which all kinds of decor are attached. Most often used for indirect illumination of a room.
The second are panels made of fabric, artificial soft materials, stretched on four sides on metal baguettes attached to strong places on the ceiling. One interesting variety of it is Starry Sky.
As you can imagine, removing chandeliers from them for washing is not at all easy. Tearing through the fabric, making holes in the pendant?
In such conditions, chandeliers are hung either on fastening hooks stretched in these decorative materials, or they are not removable until they are completely replaced. Therefore, removing a chandelier from a stretch ceiling is either possible or not.
Installation with transfer
How to change a chandelier on a suspended ceiling if a new installation location has been chosen for it? To perform this procedure, the old lampshade is also first dismantled. Next, the suspended ceiling itself is removed for a while. Of course, you should not carry out this procedure yourself. To do this you will need to hire professionals.
After the suspended ceiling is removed, wiring is pulled to the new installation location of the chandelier. Next, hang the PVC film in place. To install the chandelier in it, of course, you will need to make a hole and reinforce it with a plastic ring. After access to the reinforced concrete ceiling slab is opened, a hook is hung on it:
- drill a hole in the ceiling using a hammer drill;
- screw a hook into it (such elements are supplemented with threads);
- secure the hook with a spring latch.
Next, a new chandelier is hung on the ceiling using standard technology. Before performing this procedure, the film must, of course, be carefully leveled in height.
How to hang a chandelier on such a ceiling initially
After all, such ceilings can be installed by any man who knows how to fasten anything with dowels. Existing methods allow you to perform quickly and firmly
Make a hole for the hanging hook, secure it in it, hiding the ends of the slot in a decorative cone or ball, or cap.
It is unlikely that the owners of such an apartment will start renting out the chandelier within 5–6 years. Wipe at height.
Replacing MR16, GU5.3 lamps
Suspended ceiling lamps have two main parts:
functional
decorative
By functional we mean the frame and clamps. The lamp replacement process itself takes 4 steps step by step:
power cut
First of all, it is necessary to de-energize the room in which the replacement will be made. To do this, turn off the circuit breaker for the lighting circuit of the room in which the lamp is located.
You can, of course, simply turn off the light switch itself, but if you are far from electricity, you may not know that often (due to an error by installers), these same switches break not a phase, but a zero.
The phase wire continues to be energized on the wires and contacts, even after the lights are turned off. Therefore, in order not to take risks, it is better to do all disconnections in your electrical panel.
dismantling an old lamp
Remove the main retaining ring, which acts as a retainer. To do this, squeeze two antennae
and the light bulb itself will fall out of the housing, hanging on the contact socket.
After which, you easily pull it out of the contacts by pulling it towards you (MR16) or turning it counterclockwise (GU10).
installing a new lamp
Before installing a new one, be sure to check the power and voltage data on the old bulb. For example, for products of the same shape, the supply voltage may not be 220V, but 12V.
And the power should match or at least not exceed the previous one. Otherwise, the lamp may overheat or the power supply may overload (if provided).
If everything matches, plug the plug connectors of the new light bulb into the contact sockets of the socket.
all that remains is to install it in the old place and fix it there
Fixation occurs using the same locking ring. To do this, squeeze its ears again, insert them into the grooves and release them.
The light bulb is fixed, you can turn on the light. There are models without locking rings. In this case, you will have to remove the entire lamp from the suspended ceiling.
How to do this will be discussed below.
Some people sometimes have problems with the fastening steel rim. For some reason he doesn’t want to hold on and constantly falls out.
This happens because the lamp does not sit in its place in the lamp. Accordingly, the grooves for the ring are closed by the body itself.
deformation of the lamp body by springs
the springs are of the wrong size and rest heavily on the body
the suspended ceiling is fixed at too short a distance from the main one and the lamp together with the socket rests against the plaster
Photo tips on how to remove a chandelier from the ceiling
Did you like the article? Share
0
Tips to make the process easier
If the ceiling lamp is heavy, it is better to remove it with two people. Do not cut the stretch ceiling fabric to get to the fasteners and wiring. It is unlikely that it will be possible to restore it after this, and replacing it with a new one will cause additional financial and time expenses.
By following the sequence of steps and taking your time, you can remove the lighting fixture yourself without the help of a professional electrician. The main thing is to remember basic safety rules.
Dismantling the elements that make up the chandelier
When you have collected all the necessary tools, visually examine the chandelier. Once again, make sure that there is no voltage, and then begin to remove all hanging elements from the device, which include glass decorations, lampshades, etc.
Be sure to unscrew the light bulbs from the sockets and remove the cover under which the wires are hidden.
The remaining parts used to connect the device to the electrical network are located under a decorative cap secured to the base of the ceiling with a screw.
Another way to clean a dirty crystal chandelier
You can clean crystal parts with an alcohol solution (100 grams of alcohol diluted in five liters of water). After rinsing the frame and pendants in running water, the chandelier is assembled and returned back to the hook.
Here are two more tips on “How to clean a crystal chandelier with pendants”:
- Half a glass of mustard powder, half a glass of vinegar and the same amount of alcohol are diluted in three liters of water. The chandelier, removed from the ceiling, is simply lowered along with the pendants into the resulting detergent. After allowing the water to drain, the pendants are wiped dry with a dry and soft cloth.
- Ten potatoes are boiled “in their jackets” in three liters of water. The chandelier, removed from the ceiling, is lowered into a chilled potato solution and, after standing for some time, is immersed in a rinse aid prepared with one’s own hands: two tablespoons of ammonia and a tablespoon of vinegar are dissolved in a container with two liters of cold water. As in the previous tip, allow the remaining product to drain from the pendants, and then wipe them dry with a dry cloth.
How to clean a frosted glass ceiling light
To follow the recommendations below, you do not need to remove the lamp from the ceiling. Cleaning consists of treating the contaminated surface first with starch and then with a weak solution of potassium permanganate (or vinegar).
It is necessary to cover the entire surface of the lamp with starch diluted in water. In the absence of starch, you can use potatoes: cutting off part of the peel and exposing the starchy part of the potato, rub it on the surface of the lamp. As soon as the “body” of the potato absorbs the dirt from the lamp, the used part is cut off, revealing a fresh portion of starch.
A lamp treated with starch must be left alone for a while so that the starch absorbs the dirt. And after a few minutes, armed with a soft cloth soaked in a solution of potassium permanganate or vinegar, wash off the starch layer. The lamp, washed from dirt, is wiped dry with a dry cloth.
Expert opinion
Viktor Pavlovich Strebizh, lighting and electrical expert
Any questions ask me, I will help!
In the first case, everything is much simpler than in the second, where there is a need for additional tools and wrenches of the required sizes. If there is something you don’t understand, write to me!
Dismantling methods depending on the type of fastening
Chandeliers can be attached using a hook or a cross-shaped strip.
Removing a chandelier hanging on a hook
The simplest option. After removing the protective cap, insert your hand into the hole and remove the chandelier hanging on the hook. Be sure to de-energize the room or the entire house/apartment first.
All that remains is to disconnect the wires and install a new product.
Removing a chandelier from a cross-shaped strip
In this case, after removing the protective cap, a different picture is observed. The fastening system is hidden under it. The plank can be either cross-shaped or rectangular. First, unscrew the screws or dowels with which this strip is attached to the ceiling.
Incorrect dismantling
There are many articles on the Internet that provide incorrect instructions for dismantling a ceiling chandelier. Some “specialist authors” recommend cutting the canvas around the circumference of the lamp in order to quickly and without any effort remove the lighting device. This approach is wrong and very dangerous. And that's why:
- It is almost impossible to restore the ceiling structure after this.
- It is not always necessary to completely dismantle the product - often the device requires a simple replacement of the light bulb.
- When cutting the fabric, you can touch the wires, which will cause an electric shock.
- It will not be possible to install a new lamp of the same size in place of the old lamp. In this case, you will only have to hang a chandelier with a larger diameter.
- As a result of such actions, it may be necessary to completely replace the stretch ceiling.
Possible problems during dismantling
Lighting fixtures do not always leave their installation location freely. Problems especially often arise when dismantling spotlights. The most common of them are:
- overly compressed springs, leading to destruction of the contours of the grooves or crumbling of the thermal ring made of plastic;
- electric shock if the room was not de-energized before starting work;
- injury to fingers due to spring-type latches when removing the lamp from its seat;
- damage to the ceiling structure due to careless removal of the lamp.
Dismantling a chandelier or any other lighting fixture is not fraught with difficulties. The main thing is to follow basic electrical safety rules and clearly follow the designated sequence of actions. If you do not have experience working with electrical appliances or do not have basic knowledge, then this task should be entrusted to a specialist.
Anyone can skillfully and correctly hang a chandelier on their own, without being an electrician or calling in specialists. Of course, installing a chandelier under the ceiling is a very serious task, but it does not require a high level of special training.
There are several different ways to mount a decorative lighting fixture – a chandelier – under the ceiling. The tactics are determined, first of all, by the total weight of the product. It is logical that a heavier chandelier requires solid, thoughtful mounting.
Let's consider the most effective, frequently used techniques.
Useful tips
In cases where the nuts are stuck to the metal and cannot be removed even with considerable force, a special WD-40 solution is applied to them.
- If after cutting the cable it becomes too short, you can free up 1-2 centimeters by scraping out the plaster to increase the length.
- It is not recommended to reuse disposable dowels; the reliability of fixation may be impaired.
- In most cases, it is not necessary to remove the old hook; you can simply bend it over one of the free sides.
Possible problems during dismantling and ways to eliminate them
Most of the problems that arise during dismantling are associated with work to remove point light sources.
Thus, too much clamping of the staples can damage the integrity of the housing or thermal ring. Fingers are often slightly injured by the latches when trying to remove the device from the mounting socket. Beginners trying to sharply pull out the structure can damage the stretch ceiling fabric.
First of all, don't rush. If the point device does not come out of the socket, then perhaps one of its spacers is not pressed down enough. When releasing wires from the terminal blocks, you should press the spring harder, for which you can use a thin needle or toothpick. When cutting off the insulation, you must try not to damage the contacts, but the main thing is to make sure in advance that they are de-energized.
Installing and removing the lampshade
In the first picture, the lampshade is screwed into the body of the lighting fixture. Do not tighten the connections too much, then it will be difficult to unscrew them back. This design was popular in Soviet times, but is rare on modern models. Sometimes the lampshade is mounted by screwing in bolts or a latch. Here it is important to calculate the forces and not squeeze the plastic or glass, which can crack.
In models from 10-20 years ago you can find a lampshade with a fastening system in the form of two springy plastics mounted under a cartridge. They securely hold a plastic or glass lampshade, pressing it to the seat. In order to remove the lampshade, you need to unscrew the light bulb, press the plates against the socket and pull it towards you. Installation occurs in reverse order. You just need to hold the lampshade well so that the plates do not damage it with a sharp blow. Lampshades on a metal tripod are less common.
The most common method of attaching the lampshade is a plastic ring screwed into the cartridge thread. Sometimes when unscrewing the ring, the insulating part of the cartridge is unscrewed along with it, so you need to be extremely careful.
Key aspects to consider when installing a chandelier
For safety, important points must be taken into account:
- use high-quality materials and devices that comply with safety standards;
- turn off the power to the room;
- put on gloves;
- work with insulated cables;
- check the operation of the device after completing all actions;
- Do not drill near the switch, because there is a high probability of touching the wires.
Before electrical installation work, it is necessary to carry out preparatory measures:
- selecting an area for installation (when the lamp is mounted on a new one, install wiring there);
- checking electrical wiring (replacement or repair if necessary); installation of fasteners.
For fastening the following are used:
- hook - the simplest type of fastener, intended only for pendant lamps;
- standard universal strip - used in 90% of cases of mounting chandeliers, usually included in the package;
- cross-shaped strip - necessary for round, oval, square, rectangular lamps;
- “I-beam” - for large-sized products.
Hook, Universal strip, Cross-shaped strip, I-beam
The correct choice of lamp is also important:
- Do not purchase a disc-shaped chandelier made of thin metal. Its body heats up quickly, which is bad for suspended ceilings. If you decide to buy a disc-shaped product, it should be made of thick material that reflects light well.
- There should be no shades or incandescent lamps inside the lamp. They will heat the ceiling, which will cause stains on any material.
- It is best to choose chandeliers with LED or energy-saving lamps. They do not heat the surface.
- There should be no sharp elements on the lamp so as not to spoil the surface of the canvas.
- For convenience, choose a chandelier with a large bowl, an elongated and simple pendant.
After familiarizing yourself with the safety rules and making preparations, you can begin installation work.
Ceiling structures
Before you try to remove the shade from a ceiling light, you need to understand what it is attached to and act accordingly. The simplest option is threading, and in this case the main thing is not to use excessive force so as not to tear it off.
Important! As a rule, the lampshade is unscrewed counterclockwise, and screwed clockwise.
How to remove the shade from a plate chandelier?
As a rule, this design is secured with bolts. They are slightly recessed, so you won't be able to unscrew them without a tool. Phillips screwdriver needed:
- Disconnect the chandelier from the power supply.
- Stand on the stepladder, asking an assistant to secure you, and at the same time pick up the fasteners when you remove them.
- Carefully unscrew the bolts while holding the chandelier with your other hand.
Important! The bolts can be quite fragile, so you need to unscrew them smoothly, without much stress.
How to remove the shade from a spotlight?
In spotlights, an extremely simple mounting option is often used. No fasteners, no threads. The part is simply inserted into the base.
To remove an element, you need to pull it towards you. This requires some effort, but not too much. It is extremely undesirable to squeeze the lampshade, as well as to press it too hard when inserting it.
Watch a video with useful recommendations for installing and connecting a chandelier
Installation issues have been addressed and now you can proceed to the most difficult stage - creating an electrical system with switches. Usually the chandelier kit is supplied ready-made, but sometimes you have to make your own corrections or completely redo the local wiring.
Single-key switches
There are no special unclear moments here. From each lamp comes a pair of wires of the same color or different (this is not critical). One cord from all lampshades must be brought together into a single contact, and the others into a second combined twist. Now we bring one connection to the phase wire, and the second to the neutral wire, which together come from the switch.
Two-gang switch
In fact, such a relay is a combination of two single-key devices that has three outputs (a common one and two separate ones).
First, let's deal with the wires, of which we will have 4: two two-wire wires from the lampshades, a three-wire wire from the switch and a double wire from the electrical panel.
— one conductor from each lamp and a neutral wire from the electrical panel are combined into one twist;
— the phase conductor from the shield is connected to the common contact of the two-key switch;
— the remaining wire from each lamp is connected to the output of one of the keys;
— careful check of contacts for errors;
Thus, a network is obtained in which, when one key is turned on, the lamp connected to it by one wire will be illuminated. The same goes for the second button. When both relays are turned on, current is supplied to all lamps.
Attach the chandelier hook
It is necessary to hang a heavy (about 8 kg) chandelier. The ceiling is a concrete slab. Previously, a “scoop” plate hung for 40 years. When changing the chandelier, it turned out that 1) the wire from the switch was rotten, removed, the broach was left 2) the hook was not held firmly, when rocked, the piece of mortar in which the hook sits “moved” a little. I was afraid to move too much so as not to tear up the floor of the neighbors above. The hole in which the hook sticks out is about 10 cm deep. Above is a piece of mortar and linoleum from the neighbors above. In the slab, a channel with wiring passes through this hole at a depth of approximately 4 cm. Question
03/29/2006 at 18:50
iale wrote: it is better to step back 2-3 cm to the side and drill a hole for a new anchor hook
I just think you need more than 3 cm + try a hammer-in anchor. There are also chemical anchors.
There was a topic about the hook - a forum search.
03/29/2006 at 19:23
Place a piece of reinforcement parallel to the wire, and hang the chandelier on it. Break off the old hook.
03/29/2006 at 19:45
- The slab is hollow - the hole is only on your side
- above the slab there is a layer of expanded clay, and only then a screed, and then linoleum, etc.
see post above - break out the old hook, throw the solution out of the hole (I can’t call it anything else), put an iron bar (200 nail, etc.) into the void near the stove and hang the device on it.
03/29/2006 at 19:58 03/29/2006 at 20:09
- The slab is hollow - the hole is only on your side
- above the slab there is a layer of expanded clay, and only then a screed, and then linoleum, etc.
see post above - break out the old hook, throw the solution out of the hole (I can’t call it anything else), put an iron bar (200 nail, etc.) into the void near the stove and hang the device on it.
The slab is monolithic, there is a hole right through it. The floor itself was repaired by my mother-in-law (she needs to hang a chandelier). Above the smooth factory reinforced concrete slab there is only a layer of old linoleum, then a layer of apartment air. The diameter of the channel with wiring is 15-17 millimeters, back then APPV was installed everywhere, but it didn’t need much space. The idea with the fittings in the channel is interesting, but I can’t imagine how to fit it in, and not damage the wire.
03/29/2006 at 20:24
Maybe look for a healthy anchor with drop-down petals?
03/30/2006 at 11:45
The easiest way is to drill a new hole, insert a NAT 8 or NAT 8L dowel and screw in a hook-screw.
03/30/2006 at 13:53
You take a nail at 200 and insert it at an angle into the hole and push it through the void in the slab to the side almost to the end, that is, the nail should lie in the void in the slab and the tip of 1-2 cm should be visible from the hole in the ceiling. You take a chandelier, insert its hook into the hole in the ceiling, so that its hook fits directly into the hole in the ceiling. You hold the chandelier with one hand, and with two fingers of the other you carefully move the nail along the empty slab in the other direction. The nail naturally passes through the chandelier mount. You move it about 10 cm to the side and it turns out that the chandelier hangs approximately in the middle of the 200 nail, which lies in the void of the slab. In this way, 4 chandeliers have been hanging in the cottage for 11 years. Good luck.
03/30/2006 at 15:15
magn wrote: You take a nail at 200 and stick it at an angle into the hole and push it along the void in the slab to the side almost to the end, that is, you get a nail that should lie in the void in the slab and the tip should be visible from the hole in the ceiling 1- 2 cm. You take a chandelier, insert its hook into the hole in the ceiling, so that its hook fits directly into the hole in the ceiling. You hold the chandelier with one hand, and with two fingers of the other you carefully move the nail along the empty slab in the other direction. The nail naturally passes through the chandelier mount. You move it about 10 cm to the side and it turns out that the chandelier hangs approximately in the middle of the 200 nail, which lies in the void of the slab. In this way, 4 chandeliers have been hanging in the cottage for 11 years. Good luck.
This is all clear, just one nuance. The nail enters the channel at an angle of 45 degrees, rests against the upper wall of the channel and that’s it, it will go further only if the nail is bent in an arc. Here I completed the picture with a nail, the scale almost exactly reflects the real picture.
Will you be able to assemble a chandelier yourself?
Let's look at a typical design - it includes a glass lampshade, which determines the main part of the cost. Previously, incandescent light bulbs got very hot during operation. To withstand such heat, appropriate material was required. There was no alternative other than glass. Today, touch a 75W equivalent LED bulb after running for an hour: it's cold!
Once upon a time, lighting in London theaters was done in the form of gas jets. And when the first incandescent light bulbs began to appear, they were applauded:
- fireproof;
- do not waste oxygen;
- do not emit heat.
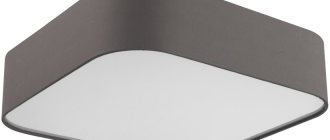
The chandeliers also changed according to the devices. We began to weigh less and work better. Today it is logical to start producing new lampshades, which is already being done. Look at the photo of the bathroom lamp. The base is made of plastic. An incandescent light bulb would simply look dangerous against the background of plastic. The only fact is that there is an LED light bulb inside. We took into account the nuances before purchasing; it was known in advance that the wall lamp would contain an energy-saving light source.
As a result, everything works great. The low price in the store at the time of the visit played in favor of the choice. The lampshade is made in the same way. Chinese lanterns are known to everyone: the paper will not light up at a temperature of 50 degrees Celsius, which the LED bulb reaches.
For construction you will need:
- Wire for making a frame.
- Paper or fabric for every taste and color.
- Scissors for cutting material.
- Soldering iron to carefully assemble the frame into the desired shape.
- Glue for giving paper and fabric a digestible appearance.
There are plenty of instructions on the Internet, we are not going to give a master class here, but appreciate the advantages: the cost of such a chandelier tends to zero. To lay wires, it is permissible to use, for example, bamboo fishing rods from the store. On their basis, spirals of incandescent light bulbs were made for a long time. Bamboo will not withstand glass shades. But in our case, the danger of overload simply disappears.
Such a chandelier design is inexpensive and will be useful, for example, in bars that sell sushi, which are so fashionable these days. We believe that China will soon realize its prospects in the mentioned field and will begin to produce cheap chandeliers of decent quality. If only the paper does not fade, given that the intensity of the light flux is considerable.