The Energomer CE-102 electricity meter is a single-phase multi-tariff electricity meter that allows you to take readings at day/night tariffs. All information is displayed on the meter's electronic display.
There are several varieties of Energy Meters CE-102 and they differ in the types of housings, if you look through the eyes of an ordinary ordinary user who has this meter installed in his house or apartment. The housing options are: S6, S7, R5 and R8. Numerical variations of counter models 145, 245, 148, 248.
Viewing display modes can be done either automatically or manually.
- In automatic mode, the data on the display is displayed sequentially and cyclically with a short interval.
- In manual mode, you need to use the control button to select the necessary information. Depending on the model, there are FRAME buttons or an optical view button [PRSM] to switch modes between indicators. For convenience and quick search, all information on the Energomer CE-102 meter was divided into groups. Each group has its own indicators.
The transition between menu groups is carried out by long pressing the control button [FRAME] or [PRIM], and viewing parameters within the group is carried out by short pressing the same button.
Counter readings are recorded to the decimal point.
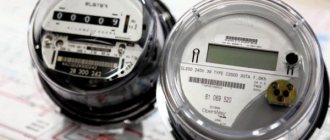
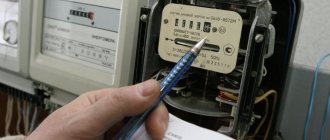
Taking readings from induction meters
Induction meters can be distinguished by a spinning wheel, which is located just below the frame with numbers. These numbers are the meter readings. The number of digits depends on the model.
How to take readings from an inductive and electronic electricity meter
How many numbers to write off
Typically, the induction meter display has 5, 6 or 7 digits. In most cases, the last digit, less often two, are separated by a comma, color, or differ in size. We do not take into account all numbers after the decimal point when taking readings . They show tenths and hundredths of a kilowatt and should not be taken into account. That is, we do not take into account all the numbers after the decimal point.
There are models with three “significant” digits and two after the decimal point
There are electricity meters that do not have decimal numbers. Then, when taking readings, write down all the numbers
But it is worth remembering that there are counter models that do not have a comma. In this case, when taking readings, you must write off all the numbers. If you don’t do this, sooner or later you will have to pay the difference, and it usually turns out to be very large. So be careful.
If you are unsure whether your meter has a comma, write down the model, name and call the customer service of the organization that supplies electricity. Let them clarify how many numbers in your case need to be written off when taking readings. You can also call an inspector to your home or check this data with the electrician of the management company.
How to shoot
Immediately after installing the meter, you were given a certificate in which the initial numbers are indicated. When you come to take readings from the light meter, take a piece of paper and copy down the current readings there (without taking into account the numbers separated by a comma). You can also not rewrite the zeros that appear at the beginning - up to the first digit (see photo).
Example of induction meter readings
For further calculations, data for the previous month is required. In the first month of use, you take them from the installation report, and in the future you need to either keep receipts or keep an accounting log. Where and how they will be stored is your choice.
Some subscriber services work in such a way that you don’t even need to count anything, you just need to transfer data within a certain period of time. Their automated system will write it to your personal account (or the operator will do it), then make the charges independently and generate a receipt. All you have to do is pay the invoice. But even in this case, for control, you can calculate how much you should pay for electricity yourself. Of course, it is unlikely that computers will make a mistake (they think), but you never know...
How to count
To calculate the electricity on the meter yourself, subtract the one that was there before from the number you just wrote. You get the number of kilowatts consumed over the last period.
For example, consider the readings in the photo above. Let the previous ones be 4852, the current ones 5101 (we ignore the numbers after the decimal point). We calculate the electricity consumption: 5101 - 4852 = 249 kW. To find out how much you need to pay, you need to multiply the resulting number of kilowatts (in this case 249 kW) by the tariff. Get the amount you have to pay for the light.
If the counter stands for a long time, sooner or later it will “reset to zero” - zeros will appear in the first positions. How to calculate electricity consumption in this case? Everything is very simple. This time you will have to rewrite the readings with all zeros, and put a “1” in front of the first one. For example, you asked to take readings from the meter, but only the last digits are different from zero. Or, as in the photo below, it costs only one.
After zeroing, there may be a picture like this, or there may be two digits other than zero, or three...
You rewrite the value as is, with all zeros (but we don’t write numbers after the decimal point), put a unit in front of the first zero, and then count as before. Let's count the readings in the photo. We write off the reading, putting “1” in front: 100001. Let the last reading be 99863. Subtract 100001 - 99863 = 138 kW. Total consumption for the reporting period was 138 kW. In the future, you write off the electric meter readings as before, without leading zeros and without substituting a unit.
Basic connection types
For a specialist, connecting the TsE6803V energy meter does not present any particular difficulties. As a matter of fact, already on the terminal cover on the back side there is a diagram for connecting a meter of a specific modification. To see it, the cover must be removed.
Energomera devices can be connected according to three schemes.
The most popular option is to connect the meter directly:
In other schemes, a three-phase meter is connected using transformers.
The figure below shows a diagram with the connection of three transformers:
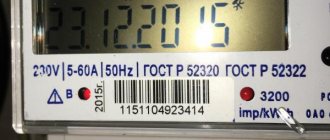
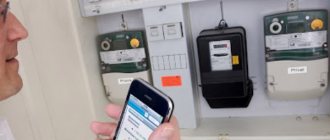
Readings of electronic electricity meters
Electronic electricity meters do not have a mechanical display with “jumping” numbers, but an electronic one. It can display not only numbers showing how many kilowatts were spent, but also the date, operating time of the meter, and some other data. In most electronic light meters, these data replace each other after a few seconds. If the meter is multi-zone, readings for each zone are displayed sequentially (T1, T2, T3, T4).
To take readings from an electronic electricity meter, you can wait until the necessary information appears and write it off. The second option is to press the “enter” button. You may have to click more than once until the required information appears. It can be distinguished by the icons displayed on the screen. Usually this is T1, T2, T3, T4 or the word TOTAL.
For example, in the photo below, on the screen in the upper left corner we see the T1 icon and a little further on there are larger numbers - 72.69. If you look closely, there are units of measurement behind them - kWh. This is the consumed electricity in the first zone T1 (daily tariff).
Example of electronic meter readings
After the necessary data is displayed, they are recorded on the receipt and then calculations are carried out (described above). If the data simply needs to be transferred to the subscriber service, they can be written down on a piece of paper.
Be careful! Here, too, you only need to rewrite the whole part, not taking into account the decimal places. For example, in this case (in the photo above) it is necessary to transmit or carry out calculations only with the number 72 without a “tail”.
The Energomera looks a little different on the electronic meter
How to take readings from the Mercury 200 meter
There are single-tariff Mercury meters (in the specification they are designated as 200.00), and multi-tariff ones (with numbers after the dot other than zeros, for example Mercury 200 01, there may also be 02 or 03). They differ in the number of zones, as well as the presence/absence of a control panel.
Regardless of the model, the readings are taken the same way. You just have to press the “enter” button a different number of times or wait for more numbers to appear.
Mercury 200 electricity meters alternately show time, date, then tariffs by zone. First, the time is displayed in the usual rate - hours, minutes, seconds are shown a little higher. Then after a few seconds the date appears on the screen. It is also displayed in the standard format: day, month, year.
Time and date
After this, the display of tariffs begins. The name of the tariff appears in the upper left corner: T1, T2, T3 or T4. Their number depends on the model you have installed. They are all highlighted one by one. At this stage they can be written down (the whole part, without decimal places).
Readings of a two-tariff meter Mercury 200
After all tariffs, the checksum of all tariffs appears. Then the cycle repeats - time, date, tariffs, total value, etc.
The last one to appear is the sum of all tariff readings
The numbers on the screen change every 5-10 seconds, depending on the settings. It’s quite possible to have time to write it down. But if you didn’t have time, you can switch to tariffs manually. To do this, you must press the “enter” button at any time. In the photo it is under the red LED. Press the button (press/release) until the value you require appears. To switch to the next one, click again. It's not difficult at all.
It will be a little more difficult with the calculations, since you will have to calculate the number of kilowatts consumed for each zone. This is where all the difficulties will end. You now know how to take readings from a multi-tariff electricity meter. All other models of Mercury meters are not much different in this regard. Even their buttons look the same and are located in the same place.
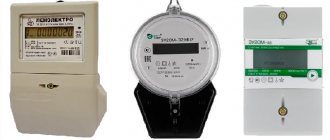
Energy meters
Taking readings from the Energy Meter day-night electricity meter (two-tariff or multi-tariff) occurs in exactly the same way. The difference is that the button on these electricity meters is called “PRSM” (view). There may be two or three buttons, depending on the modification.
Electricity meter Energomera CE301
When you click on this button, numbers appear showing how many kilowatts were “increased” for each tariff zone. There are no more differences.
Take readings from the Micron electricity meter
In Mikron multi-tariff electronic electricity meters, there is only one button on the case, and you need to press it to display the required readings on the screen. Only in this case, you need to wait until “checkmarks” appear on the display above the letters “T1” and “R+” (see photo). This will be the reading for the first tariff.
How to take readings from the Micron electric meter model SEB-1TM.02M
Then click on the same button until the checkmarks appear above T2 and R+, if there are more zones, click further. This is how readings are taken from this day/night meter.
Saiman counters
Now in many regions they replace old induction meters with electronic ones free of charge and most often install devices from Saivan. These are very simple devices; they do not have buttons that can be used to forcefully “scroll through” the readings. You just have to wait until the required value is displayed. That is, in this case, take readings from the electricity meter - just wait until the required value (TOTAL) is displayed and write it down on the receipt (or transfer it to the appropriate service).
To make it easier to navigate, here is the order in which the data is displayed in this electric meter:
- date of;
- time;
- meter number;
- gear ratio (1600);
- TOTAL - readings of a single-tariff meter or are displayed sequentially T1, T2, TOTAL for day/night type meters (two-tariff).
It is necessary to record the TOTAL or T1 and T2 readings and also the general TOTAL readings on the receipt. Let us remind you once again that you only need to write down the whole part, without taking into account the numbers after the decimal point. You can watch the same information in video format.
Life time
The manufacturer guarantees that the TsE6803V meter will be guaranteed to operate for 30 years.
But there are a number of conditions:
- The device must be installed correctly;
- Recommended safety regulations have been followed;
- There should be no emergency overloads.
Important! The manufacturer initially provided a guarantee for the operation of the meter for four years of continuous operation. The warranty period begins from the date of manufacture of the electric meter.
How to take readings from three-phase meters
There are two types of three-phase electricity meters - the old type, which requires transformers, and electronic direct connection (without transformers). If an electronic one is installed, the electricity meter readings must be taken in the same way as described above. Simply write down the values, wait until the necessary information is displayed on the screen, or “scroll” the data to the required page.
Connecting an electric meter in a three-phase network via current transformers
If a large amount of power is allocated or an old-style meter is installed, a transformer is installed on each of the phases. To take readings in this case, you need to know the transformation ratio. The readings taken must be multiplied by this coefficient. The resulting figure will be the actual expense.
But in general, you need to read the contract. The calculation procedure must be prescribed there - in some organizations they write out readings, put down the transformer data or transformation ratio, and the actual calculations are made by the operator himself. So, if you have a 3-phase meter, check the form and procedure for calculations when installing and sealing the metering device and putting it into operation.
Device versions
The device is available in two main versions:
- CE102-S, housing version with combined installation.
- CE102-R, housing version with rail mounting.
In addition, there are versions for various types of data transmission channels - this characteristic is indicated in the device labeling:
“Energomera” in our case is the name of the device manufacturer. CE102 device model, marked on the legend with the number 1.
- Execution of the case.
- Accuracy class.
- Rated voltage.
- Maximum current.
- Additional options, in this case the presence of an optical interface is shown (TM - telemetry output).
The Energy Meter CE102-R5148-P is a model CE-102, with a housing design with DIN rail mounting, 1st accuracy class, rated voltage 230V, rated/maximum current – 10/100A, information transmission channel – RLC modem.
Interverification interval is 16 years. Operating time with periodic maintenance is 160,000 hours.
We recommend: Electric meter Neva MT 323 - description, characteristics
The average service life is indicated as 30 years, with the clarification that this is the period of operation before major repairs of the device. The warranty period is 5 years from the date of issue.