The main thing is safety!
Before you begin repairing an electrical appliance, you should remember simple safety rules.
First you need to find out what the reason for the replacement is. If the device simply doesn’t fit well into the wall, then just tighten the screws. A pungent odor, smoke or electric shock indicates that installing a new outlet is simply necessary.
Rules to avoid injury when changing sockets:
- Turn off the power to the entire apartment. This is quite easy to do. The shield is usually located in the corridor or entrance. If the meter is an old model and has plugs, then pressing them will cut off power to the entire apartment. Many homes now have electrical panels in the form of boxes. In this case, you need to find the levers on it and move them to the off position. Some craftsmen believe that they know all the wiring well and neglect this simple rule. Often the consequences in such cases are dire.
- Carry out all work during the daytime. The only exception is when repairs are necessary at a given time, and the normal functioning of the family depends on it. You can use a flashlight and rubber gloves. In other options, it is better to postpone dismantling until daylight hours.
- Both the installation tools and the socket itself must be of excellent quality.
- If you are installing electrical equipment for the first time , then you should definitely study the step-by-step instructions for replacement and installation. Detailed guidance is described in this article.
Removing the old socket
Replacing an outlet yourself without the participation of a specialist should be done with at least minimal knowledge in the field of electricity. To install a new outlet, you must first remove the old one. The first thing to do is disconnect the power to the wires leading to this outlet. This can be done by completely turning off the electricity in the house. If there is a distributor in the house, then turn off the toggle switch exactly in the area of the room where the work will be carried out. It is better to change sockets during daylight hours, so everything can be seen, and you don’t have to figure out where to put the flashlight because... your hands will be busy.
Before replacing the old outlet at home, you need to have a new one on hand so you can install it right away. You will also need the appropriate tools: pliers, a screwdriver suitable for the bolts and phase indicators. If you have everything you need at hand, dismantling the socket will be easy and quick. Next, we proceed directly to filming.
- Remove the decorative cover. Modern covers are secured with latches or screws, while Soviet ones were secured with screws. Then you need to unscrew it and carefully remove the case. For these purposes you will need a flathead or Phillips screwdriver. It happens that the bolts do not want to unscrew on their own due to broken threads. In this case, you should help them by loosening the lid.
- Once again, using an indicator screwdriver, check the wires for the presence of current in them. If everything is de-energized, you can continue working. You should loosen the screws that hold the wires and pull out the wires themselves.
- The screws are unscrewed and the claws holding the socket are released. The mechanism is pulled out of the niche.
- The spacers that hold the socket in the wall are unscrewed and the device itself with all its internals is removed.
The socket panel keeps the socket structure from loosening.
If the work is carried out in an apartment of an old building, then most likely the socket was simply mounted into the wall without a socket panel. This may result in weakening of the structure itself or incorrect operation of the outlet. For a new outlet, it is better to purchase a special outlet box.
Instructions for dismantling the socket
- Removing the protective cover of electrical equipment. To do this, you need to take a sacral or flat-head screwdriver. As a rule, there is always one screw and it is located between two holes for supplying electricity. If the socket is double, then there are two screws, unscrew both. Carefully remove the panel.
- The next step is to check for voltage. There are 2 types of wire: contact and neutral. We alternately connect the phase to each of them. Once you are completely sure that there is no voltage, you can continue working.
- Dismantling the mechanism. No matter which socket is on the outside, there are 2 screws on the internal equipment on 2 sides. They hold the legs that connect the two components. There are a couple more bolts at the top and bottom; they secure 2 wires. Unscrew all 4 bolts one by one. You can throw them away, because... Most likely they already scroll poorly. For a new installation, it is better to buy new screws.
- There should be 2 cables left in the wall hole. If they are bare, then you need to wrap them with electrical tape.
- The last step of dismantling will be to check the size of the new socket box. If it does not completely fit into the wall in depth, then you can trim it. This option is suitable for plastic samples. If the equipment is made of metal, you will have to deepen the hole in the wall.
It should be noted that during dismantling you may find that the socket box is missing. Such sockets were often installed in old houses in order to save money.
Of course, this is wrong and you should not repeat the mistakes of others. In this case, there is no need to get lost, you just need to carefully disconnect the outer part.
What you need to know about electrical wires
New electrical installations (type TN-S) require three conductors:
- linear (phase) L – black or brown insulation,
- neutral N – blue cover, permanently connected to the neutral conductor in the internal supply line (vertical),
- protective PE – in green-yellow or multi-colored insulation.
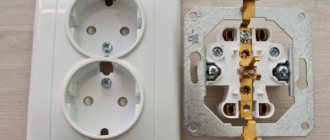
In such networks only grounded sockets are used. It is necessary to pay attention to the correct connection of the wires. The phase wire is connected to the left terminal (looking at the socket from the front), the protective upper (PE) and neutral (also called zero) - to the right.
If our task is to replace an old type socket (TN-C), remember that there will only be two wires in the wall, without protection. If we want to install a grounded socket in this wiring, then the neutral conductor is connected to the protective pin.
What kind of lighting do you prefer?
Built-in Chandelier
Preparing a new outlet
A socket box is not always required during installation.
This depends on the design of the new electrical equipment. Some modern designs use the central part itself as protection. Let's take a closer look at this option.
The appearance of this option is different in that there is a special metal frame around it, and the mechanism is initially attached to the rim itself.
Such equipment is sold whole, i.e. the outer panel, frame and mechanism are interconnected. To begin installation, you need to disconnect the outer part from the protective frame. The fastening is carried out using bolts, so you just need to unscrew them.
All that remains is the bezel and the mechanism.
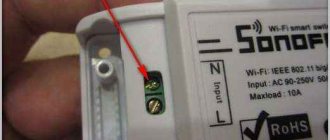
Upon closer examination of the mechanism, you can see that it no longer has 4, but 5 screws. The latter is located at the top between the two contacts. This bolt holds a special plate.
It presses the contact wires more firmly, which allows you to install the plug firmly. This also serves as additional protection against electrical shock.
Basic rules for wiring sockets
The rules for installing sockets and the tools that may be needed in the process are regulated by SNiP (building codes and regulations) and GOST.
When installing electrical wiring and working with sockets, you must familiarize yourself with the Electrical Installation Rules (RUE):
- wiring elements (distribution box, meter, sockets, switches) must be easily accessible;
- sockets are installed at a distance of 50-80 centimeters from the floor. The rule is taken for safety purposes when the premises are flooded;
- if there are gas or electric stoves in the room, as well as heating radiators and pipes, sockets are installed at a distance of 50 centimeters or more from grounded equipment;
- wires to devices are laid from bottom to top;
- sockets in the room are installed at a rate of no more than 1 per 6 square meters. You can connect more sockets only in the kitchen;
- equipment cannot be installed in the toilet;
- The wiring is laid at a distance of 10-15 centimeters from pipes, floor beams and ceilings. The height of the wiring from the floor should be 15-20 cm;
- wiring and connection of wires are carried out inside the distribution box;
- “Ground” and “Zero” are connected to the devices with a bolted connection.
This is all the information you may need when connecting a double socket yourself. Having mastered the necessary rules, anyone can connect a new device with their own hands. Experts recommend that beginners pay special attention to following safety rules, since they will have to work with contacts that conduct current.
You can once again familiarize yourself with the features of the double socket installation process by watching the video:
Installation instructions
device
Installing a European socket:
- Remove the electrical tape. We measure the depth of the hole intended for the cable. If the size does not match, you need to peel off the protective layer of rubber. The exposed cable should protrude quite slightly from the hole;
- Using the clamping screw, insert the first wire. The fixation must be very reliable. If this does not happen, the outlet will stop working quite quickly. To do this, the cable must be pulled carefully, it should not move from side to side;
- We repeat the same procedure with the second wire . We must not forget to be careful when exposing wires.
- If equipment with grounding was purchased, a special cable is required . It is not available in all homes. In new houses or apartments after renovation, such a cable is usually present. The cable is inserted into the upper hole of the mechanism. If the house is old and there is no grounding wire, then this step is not required. It must be taken into account that equipment without a grounding wire will not be able to supply electricity to all types of plugs. Therefore, it is worth thinking about carrying it out;
- The main network connection is complete. Next, you should install the mechanism in the hole in the wall and secure it using quick claws. A protective plastic panel is installed on the outside.
Installation requiring a new socket box:
- A new box is required when it is impossible to fix the tabs on the old socket. It was stated above that during dismantling it is checked whether the new box fits into the old recess. Therefore, at the installation stage, the new structure must fit perfectly into the wall. In order for the socket box to hold tightly, you need to fill it with a special solution, such as glue.
- The fixation of the new mechanism depends on the design. These will be quick tabs or screws that are screwed to the box itself.
- We expose the wires . This is done as in the first option.
- We connect the cables to the common mechanism. The protective frame is not removed and remains attached to the equipment.
- We fasten the screws on the top and sides. We install the outer plastic panel and frame. Installation is complete.
How to understand that the socket needs to be replaced
If everything is clear about the aesthetic considerations that prompt you to replace the outlet in the apartment with a new one, then the remaining motives require a little explanation.
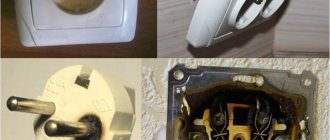
As we have already noted, the socket needs to be replaced if it fails. This can be noticed by the following characteristic features:
- burning of holes intended for inserting a plug, or blackening of external elements caused by overheating and sparking;
- significant heating of the outlet when connecting electrical appliances to it;
- damage to the decorative panel or its cracking and melting due to overheating;
- socket falling out of the wall.
It is necessary to think about how to change the outlet in the apartment, whether it is worth inviting a specialist for this or doing it yourself by reading the necessary information or watching the corresponding video, even when you understand that it does not meet modern requirements. A characteristic indicator of such a discrepancy is, for example, the insufficient size of the holes, which does not allow turning on some electrical appliances. Of course, an adapter-attachment to the fork can temporarily solve the problem. However, only installing the “correct” outlet will be its final and completely logical solution.
Features of installing a double socket
There are 2 mechanisms for connecting such equipment. The first implies 2 power outputs from one point. This is an extremely unsafe option.
This is due to the fact that the current remains unchanged, but the voltage and load increase. It follows from this that this option is short-lived. In addition, the mechanism has significantly fewer fasteners than the single version, so the contact with the fork will be weaker.
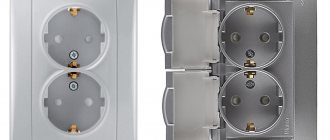
It is better to make double holes from different points. This means that the outer panel will be double and connected together, but the power sources inside will be different.
In this case, the risk of voltage surges and electric shock is the same as with single sockets, i.e. almost equal to zero.
It is also necessary to take into account where exactly such a mechanism will be installed.
So, for example, when installing in a concrete wall, a small number of mounting holes does not matter, because the base is very strong.
Walls made of chipboard, OSB or fiberboard will not be able to hold such equipment for a long time; over time, the mechanism will begin to fall out.
Important parameters when choosing an outlet
It is necessary to select a replacement socket or other electrical installation product not only by appearance, but also by technical parameters.
Modern sockets are designed for a current of 16 A, which corresponds to a maximum load of approximately 3.6 kW; they cannot be used to connect electric stoves and other powerful appliances. When selecting, consider whether you will need an outlet with or without grounding.
Expert opinion
Viktor Pavlovich Strebizh, lighting and electrical expert
Any questions ask me, I will help!
When you check both contacts of the socket and the light does not light up, then you have truly completely de-energized the line, and you can safely replace the socket without using any protective measures. If there is something you don’t understand, write to me!
Necessary equipment
Socket
It is best to choose new samples. Namely European production. In them, the forks are held more firmly, and the structure itself is very stable. Devices made in Russia are also of good quality.
It should be noted that if the apartment has old Soviet-style sockets, then replacement must be carried out. Such equipment can fail at any time.
Socket box
As a rule, they have a standard diameter of 7 cm. Larger options are also available, but they are required for old-style sockets. Therefore, if drilling the wall is not included in the plans for repairing the socket, you need to measure the hole before purchasing the socket box.
The material used for using this electrical equipment varies. Is it plastic or metal. If the wall is concrete, brick or any other non-combustible material, then you can safely install metal socket boxes. Wood, plywood or plasterboard are very fragile. Therefore, to install an outlet in such rooms, you need to use a plastic base.
Screwdriver
Basic equipment for installation and dismantling. All sockets are attached with bolts and screws, which is why it is impossible to imagine such a repair without a screwdriver.
Insulating tape
Used as wire insulation to eliminate the risk of electric shock. Required for extending old wires.
Voltage indicator
It is necessary to check whether there is voltage left in the circuit. Both contacts need to be checked. If the indicator has not changed, then you can safely get to work.
Gloves
Both fabric and rubber samples are used. In the case where there is absolutely no voltage, you can use the first option. Rubber gloves are used if there is no voltage indicator available, because rubber practically does not conduct electric current. It is inconvenient to work in them.
Video text
How to replace an old-style socket in an apartment with your own hands if it falls out. How to lengthen a short wire. Channel Your own Master: https://www.youtube.com/channel/UCv8x. #Self-Master#how to replace a socket#sockets#repair
In order to replace an old-style socket from the #USSR era, you need to purchase: 1. #Socket box for concrete walls, 2. 3 self-tapping screws with a press washer, 3. A socket (for convenience, two sockets with one mechanism to get rid of tees).
If your apartment has aluminum wire, then in addition you will need: 1. #Terminal blocks from VAGO with paste, two-wire 2273-242 or three-wire 2273-243 designed for aluminum and copper conductors.2. 30 cm of copper wire with a cross section of 2.5 sq. mm.
Tools:1. Screwdriver2. Side cutters3. Scissors4. Knife5. Screwdriver6. Voltage indicator.
We check the functionality of the indicator, and then go to the panel located on the entrance platform to turn off the circuit breaker.
We check the absence of voltage with the indicator and proceed to dismantling the old socket. First, you need to unscrew the screw holding the socket cover with a screwdriver, then loosen the screws of the spacers of its mechanism. After this, loosen the bolted contacts and remove the socket from the wire.
If the depth of the metal cup is sufficient to install a plastic socket inside it, then we can secure it with several screws in the area of the rear wall, removing the side connecting elements from it.
If the depth of the metal cup is not enough, as in my case, then in addition to the connecting elements, we also remove the back part of the plastic socket box, taking into account the required size. The fasteners can be made with self-tapping screws to the sides of the metal cup at three points.
Instead of metal scissors, you can use side cutters, a sharp knife or stationery scissors to remove the connecting elements of the socket box.
Depending on the location of the wire, it is necessary to make a cutout in the wall of the socket box, taking into account the horizontal location of the mounting holes for the socket. To do this, just cut the jumpers around the hole with a knife. After this, we proceed to remove the back wall of the socket box. All that remains is to remove all the protruding elements around the perimeter of the socket box, which will prevent it from being inserted into the old mounting hole.
If the plastic of the socket bursts, do not be upset, it will not affect anything. The three-point fastening will hold it very well.
When inserting the socket box, pay attention to the horizontal or vertical arrangement of the mounting holes for the socket. The socket box you prepared should fit into the metal cup without much effort. Parts of the socket box that protrude beyond the plane of the wall can be easily removed with a knife
All that remains is to secure the plastic socket box with self-tapping screws and a press washer. The wire rises upward, which means it is necessary to tighten the screws in places away from the wire and into those places in the socket where there are no gaps or cracks, into its solid wall.
Despite the fact that the bolts and nuts of the terminal connections of the socket are iron, and press the wire on one side, we will connect small pieces of copper wire, with a cross-section of 2.5 sq. mm, using VAGO terminal blocks, designed for connecting both copper and aluminum conductors , this will undoubtedly be more reliable. By the way, you can extend a short wire in the same way if its length is not enough to connect an outlet or switch. You will only need 2 of these flints.
To conveniently connect the socket, you need pieces of copper wire 10-12 cm long, from both sides of which you need to remove approximately 12 mm of insulation.
Thanks to the transparent part of the terminal block, you can make sure that the wire has passed its contact. We prepare both pieces of copper wire for installation, and then we prepare the aluminum wire for connection. We cut off the excess part of the wire without insulation and put a terminal block on it, while holding the wire with pliers.
Carefully bending it, we lay the aluminum wire to the back wall of the socket box.
Having connected the copper wires to the bolt terminals of the socket, and carefully bending them like an accordion, we insert the socket into its place, making sure that the wire is not in the way of the socket spacers.
We fix the socket with self-tapping screws from the socket box kit. Sometimes this fastening is enough. But it won’t hurt if you secure the socket with spacers for the socket mechanism.
Blitz tips
- If there is no grounding cable in your house , you should not refuse to buy a mechanism with such a hole. They cost a little more. But at the same time, the structure is installed more firmly in the wall, which extends its service life. The contact with the plug is also much stronger;
- You should carefully measure the contact of the bare wire. If it comes out of the hole too much or, conversely, is not visible at all, then the socket will not last long. You will have to repeat the procedure in the near future.
- If it is possible not to install a double panel from one point , then it is better to install two single mechanisms with different connections;
- When all the wiring in the house is changed , the height of the sockets should be changed. It should be about 20 cm from the floor.
Network connection
The working mechanism of the socket is connected to the current-carrying conductors by inserting the ends into the terminals. Since the conductors “ground”, “phase” and “zero” must be located separately in the box, and in the cable they are combined by common insulation, you first need to remove the latter connecting them.
To do this, remove the insulation from the wire cores and cut off the excess ends. Experienced experts advise not to remove the excess, but to leave a reserve of 20 cm and hide it in the socket.
All manipulations must be carried out very carefully to reduce the risk of damage to the cores. If you do not have a special stripper (a tool for stripping conductors from the insulating sheath), you can use a stationery knife or a sharp kitchen knife. Some home craftsmen remove the braid by heating the conductor with a lighter.
The relevant regulatory documents indicate that the marking of cores is carried out in accordance with GOST. Thus, the phase is often indicated by white, zero by blue or blue, and ground by yellow-green.
When working with Soviet wiring, where predominantly white or black conductors are located, the supply conductor must be checked before connecting it to the product. To avoid mistakes, it is often highlighted with a marker.
The final step is to install the outer panel. The cover is connected to the inside of the socket with a bolt in the middle. You should not tighten the fastener too much, so as not to damage the fragile plastic.
To check the strength of fixation of the device, you need to insert the plug of any electrical appliance into it. If the socket is loose, remove the outer cover and tighten the spacer bolts tighter. At the end of the procedure, install the decorative panel, and then turn on the power.
Replacing an outlet yourself is not as difficult as it might seem at first glance
The most important thing is to take precautions and follow the instructions when carrying out the procedure.
Replacing products on plasterboard surfaces
Drywall is a fragile material, you need to work with it carefully.
Replacing sockets installed on plasterboard walls requires a special approach, since this material is fragile and quickly deteriorates. When dismantling an old product, you must very carefully remove the screws securing it to the body of the plastic box.
If cracks or chips are found on the sheets in the fixation area, it is better to move the installation location to a main wall, first dismantling the plasterboard covering. To do this, it is more convenient to use a surface-mounted socket mounted on a socket box. After this, you should widen the connection hole so that the plug fits in there along with the fingers holding it.
How to replace the socket yourself? Detailed instructions with photos.
Socket box
A standard socket box (the so-called mounting box in the wall into which electrical installation products are installed) has a diameter of 65-70 mm, and its depth can be from 46 to 80 mm from different manufacturers and in different series. Therefore, when choosing a replacement product, it makes sense to first dismantle the old outlet and find out what the dimensions of the outlet box are in your case.
If several outlets are installed in a common housing, you will need to purchase a frame for them, which is usually sold separately. In addition, the sockets must have additional connectors for connecting a connecting jumper (a wire connecting a pair of sockets into one circuit).
Useful tips Connection diagrams Principles of operation of devices Main concepts Meters from Energomer Precautions Incandescent lamps Video instructions for the master Testing with a multimeter