- UTP internet cables and telephone wires
- cable for the “Smart Home” system
- wires for acoustics
- alarm and video surveillance
- TV cable
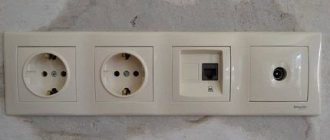
If earlier all this was simply thrown along the floor, behind furniture, in baseboards, today when renovating an apartment, walls are also tapped for low current and special sockets are installed.
Let's take a closer look at the installation of TV sockets from companies such as Schneider Electric (Unica series) and Legrand.
Installing a TV outlet is a must!
In a modern house there are often 2-3 TVs, and it is no longer fashionable to entangle the TV with cables in the room. Previously, when there was one collective TV antenna and one TV, residents put up with a TV cable through the entire apartment. As a last resort, the antenna cable was laid in or under the baseboard.
Now, in the age of television and the Internet, there are too many wires to not take care to keep them out of sight.
I preach the following truth to my clients: it is better, along with electrical wires before plastering (the first stage of electrical installation work), to lay an antenna cable, as well as wires for connecting the telephone and the Internet, and other low-current devices, such as security, fire, video surveillance and smart home. At the same time, given that this is planned to be done “forever,” the low-current wires must be of high quality and laid accordingly. I recommend laying the cable for the TV signal SAT 703, or another high-quality one (ask in the store, just not RG-6 and especially not RK), it can be laid under the plaster without additional protection.
It is better not to do this on your own, without experience, but to call an electrician or an antenna specialist.
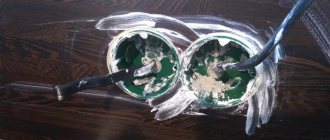
Since the article is about the antenna cable and antenna sockets (sockets for a TV), for example, the photo below shows the installation of wires going to the installation site of the TV - antenna, for the TV socket, and power supply, for the 220V socket.
Laying the TV antenna cable
Not the best example, and not because of the method of fastening and the quality of the photo, but because it is better not to lay the signal antenna cable and the power cable next to each other in parallel, the distance between them is better to be at least 3 cm. Although, in modern TVs, 50 Hz interference is easily cut off , better to play it safe. If you use a high-quality antenna cable with good braiding, this requirement is not very critical.
After completing the second stage, this place for connecting the TV looked like this:
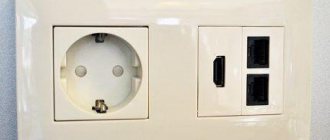
Installation of sockets for the TV - power and antenna.
If you need more 220V sockets (connecting an additional tuner, player, etc.), then the place where the TV is mounted may look like this:
TV socket and 2 power sockets on the Viko wall
Or this, if funds allow:
TV socket and 2 power supplies on the wall Visage deluxe
Well, if there is a lot of equipment, then behind the large-diagonal TV there will be the following collection of sockets:
TV socket and 5 power points on Visage wall.
Why is the antenna socket separate in the last photo? It's simple, because there is no frame for 6 points. Although, such an installation makes sense, because it is generally better to conduct a low-current (HF signal) separately from the supply networks.
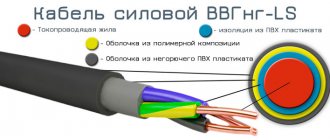
How to choose a TV cable
Definitely in terms of signal transmission quality and insulation strength. The attenuation in the cable should be minimal, and the insulation should reliably protect the core from external influences. For hidden installation, only the best representatives are suitable. These are cables SAT 703, SAT 50, DG113, F1160BVM COMMSCOPE (RG-11).
| SAT 703 cable | SAT 50 cable | Cable F1160BVM COMMSCOPE (RG-11) |
These are single-core copper cables with an insulating foam layer and a durable sheath that will feel great under plaster.
An RG-6 cable is suitable for outdoor installation, but if you want to get a better signal, choose cables from the first list. An RG-6 cable can be used to connect the TVs themselves to sockets.
How to connect a TV cable to an outlet
The power antenna cable is connected to the socket in a special socket using a screw. The central core is carefully removed from the insulation and secured in the hole. For better fixation, a part of the braided cable is secured with a second screw through a special plate. This ensures that there is no movement and protects the central core from fracture.
Helpful advice! If you are far from electricians, then it is better not to lay television cables yourself. Trust the specialists with the job, they know all the tricks and subtleties. For example, they will not forget that distances must be maintained between antenna cables and power supplies. Lay at intervals of at least 3 centimeters. Otherwise there will be interference, especially on cables like RG-6 and similar.
Connection diagrams for TV sockets
Connecting TV sockets according to the “star” scheme
There is only one entrance to the apartment, but there are 2-3 TVs in a modern apartment. To connect two or more TVs, use a special splitter device - splitter , which has one input and 2-3-4 outputs. Then the connection diagram for TV sockets for televisions will be called star :
Connection diagram for TV antenna sockets with a star
It is assumed that the apartment is supplied with a cable with a cable television signal, in which the signal is quite strong. If you want to connect 2 or more TVs, it is better to ask your cable TV provider (or your neighbors) in advance whether the signal strength is enough. The signal level can be raised at your request; usually there is a resource for this. In addition, in some places you have to pay for connecting additional TVs, and for unauthorized additional connection you have to pay a fine.
If there are concerns that the power may not be enough, then it is necessary to provide space and power for installing a TV amplifier. It is indicated on the connection diagram with a star and a dash as an optional element. It is best to place the amplifier as close as possible to the signal source - at the entrance to the apartment or, better yet, at the television distribution panel in the entrance.
The “Star” scheme for connecting several TVs to one antenna is most widely used, as it has the following advantages:
- Cables to all sockets come out of one junction box, which is convenient for installation and maintenance,
- Minimum attenuation of the television signal,
- If one of the signal lines or sockets malfunctions, the rest operate normally.
The only downside is the high consumption of the antenna cable, which is insignificant, especially with optimal wiring. The peculiarity of this scheme is that the input and output cables should not lie next to each other so that there are no problems with signal quality.
Antenna splitter box. The antenna cable outputs for 3 TVs are at the top. On the side is the antenna input and, in the future, the Internet input. Everything is done with SAT 703 cable. Everything is then plastered, with only a cover on top for access to the splitter.
By the way, the same star connection scheme is used when wiring power supply circuits, and is the most preferable.
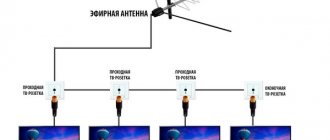
Connecting TV sockets using a pass-through design
This connection is also called a “ daisy chain ” connection diagram.
Connection diagram for TV antenna sockets with a cable
If the sockets are not shown with a star on the diagram, then they are required in the pass-through diagram. TV sockets in a daisy chain circuit must be used only through ones . The last socket in the daisy chain connection must be the terminal socket .
It is logical that the signal at the input of the first TV will be more powerful than the last one. But you don’t need to worry too much about this. The fact is that the cable television signal level is high enough to support all televisions. When using a high-quality television cable and the correct connection (F - connectors), the picture on the screens will be indistinguishable in quality.
In addition, modern televisions have a long-established amplification and automatic signal level control circuit.
How to install a TV socket
Yes, just like any other, neatly and in its place.
Let's start with the height where to put it darling. Let’s say right away - drive away the advisers, lovers of European standards and their “15 centimeters from the floor.” Our task is to hide the tails of the power and antenna cables behind the TV so that it is beautiful and convenient. And according to the European standard, you will then have to hang the TV on the floor and watch from there.
Of course, there are also those who like to set up home cinemas, but there are far fewer of them than those whose TV hangs at a normal height.
Therefore, focus on the edges of the TV screen so that no sockets or cords stick out. And if, in addition to the TV set, other devices will be connected, install sockets in convenient accessibility. Or you will have to pretend to be a monkey, trying to reach the treasured food point.
Connecting digital television (IPTV)
In addition to connecting to analogue television, many television providers now have the opportunity to connect to digital television. The quality there is much higher. Digital television connection diagram - star only.
The fundamental differences are that a digital (computer) cable is used, a star connection; instead of a splitter, a digital splitter (router or hub) is used, which has one input and several outputs. One TV is connected to one output. The TV must understand the digital IPTV signal - have a CAM module. If your TV does not receive a digital TV signal, you need a special SD set-top box. In both cases, a smart card is purchased from the provider for charging and managing services.
Ask your provider if digital television (DVB) is the future. In apartment buildings in large cities, analog television will last a couple more years.
And the ethereal antennas have already died. Remember, 5-10 years ago all the windows, balconies and roofs of apartment buildings were covered with antennas?
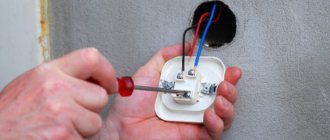
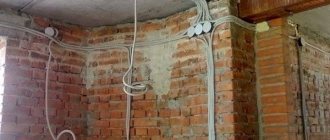
Installation of socket boxes in drywall
To work with drywall, you will need a special type of mounting box with a special claw, which will allow you to press it to the sheet like a vice or clamp. To carry out installation, you need to drill a hole. This can be done with a special core drill for drywall. You can cut a circle with a mounting knife. Since the wires are hidden behind the drywall, no gating is required. The embedded cable should be pulled out into the resulting hole and inserted into the broken window of the socket box. You need to insert the mounting box into the wall and tighten the screws, retracting the clamping tab.
Fastening the socket box in plasterboard
Types of TV sockets
There are three types of television sockets: pass-through, terminal and single (simple).
Pass-through TV sockets have an input, an output (socket for connecting a TV) and another output to the next socket. Each pass-through socket introduces attenuation into the branch signal, which is approximately an order of magnitude greater than that of the end socket.
Final and simple TV socket - what's the difference?
In a star circuit, terminal or simple (single) TV sockets are used. There is no difference between them if a TV is connected to them. If the TV is not connected, then in the case of a simple socket, distortion of the image on the screen in the form of repetitions is possible. This happens because the terminal socket has a line impedance of 75 ohms. But a simple one does not have it, and the resistance in the line is equalized due to the input resistance of the connected TV. It does not matter at all whether the TV is connected to the 220 V power supply or not.
The terminal sockets are structurally designed to have a characteristic impedance equal to the characteristic impedance of the line, 75 Ohms.
Connecting the cable
To connect the cable, remove the insulation from the central core by 6-8mm. In this case, you need to retreat another couple of millimeters from the edge of the outer shell to the point where stripping begins.
Next, insert the TV wire into the socket and check through the viewing window that the central core goes all the way into the connector.
In the Unica series it is self-clamping, there is no need to tighten anything here. Other brands may have a clamping screw, which will need to be loosened first and then tightened with a screwdriver.
Pay special attention so that the “hairs” of the screen do not touch the central core anywhere.
All that remains is to tighten the cable itself with the central screw and put the outer cover in place.
If something is not clear and does not work out, you can always refer to the instructions.
Installation and connection of a TV outlet
The photo below shows how to connect a TV outlet with your own hands. In this case, this is the terminal socket. Step-by-step photos are provided; installation features depend on the specific design.
Installation boxes for antenna socket and 220V power socket
Installation boxes for antenna socket and 220V power socket. 220 socket installed
Preparing the TV cable before installing the socket
Preparing the TV cable before installing the antenna socket. 2nd stage of cleaning. The latch is pre-attached, but on the wrong side)
Preparing the TV cable before installing the TV socket. Third stage of cleaning
TV cable installation
Installing a TV cable - connecting a socket for a TV cable. Step 2
Installing a TV outlet - final installation of the cable. The black latch is now seated correctly
We carefully roll up the excess length of the cable without sharp bends. Could have left less.
That's it, all that remains is to put on the frame
Installing a TV outlet. Repeat of the photo shown at the beginning of this article
Below is another option for installing sockets for a TV. It’s clear that it’s better to hide everything behind the TV, isn’t it?
TV sockets - installation option
Fastening
The assembled socket is secured with spacer legs, which are included in the design. Additionally, mounting screws are suitable. Before these actions, you need to make sure that the product is level and, if necessary, adjust the legs.
Hide the “extra” cable in the socket - do it in such a way that there are no creases or kinks, otherwise the signal will become much worse. Many users are wondering at what height to make a TV socket - everything is extremely simple here.
It is necessary to calculate in advance at what height the receiver will be located, as well as its dimensions. Your task is to make all the wires invisible and from here select the desired position of the device.
If you plan to mount the TV on a bracket, make a small margin so that the structure is installed without any obstacles.
- A little about antibiotics.
- Speed converter - where is it used?
- Replacing the timing gear
Antenna socket device
And finally - photographs of the terminal socket in disassembled form.
TV socket disassembled from the front
TV socket assembly rear view
TV socket disassembled rear view
That's all I wanted to tell you about installing TV outlets . If anything is not clear or you have something to add, ask and write in the comments. If you are interested in what I will publish next on the SamElectric blog, subscribe to receive new articles.
PS I consulted Legrand salespeople by phone about the difference between simple and terminal TV sockets. They said the following. “ Terminal sockets are used in conjunction with pass-through sockets, and simple sockets are used if with a splitter.” To be honest, I cannot confirm the information, since I have always installed only passing and end ones. And when asked about simple TV sockets, sellers look surprised and say that such things have never been on sale. All the better.
Device installation procedure
- A round hole is made in the wall. The size must match the dimensions of the TV outlet. An impact drill or hammer drill is used.
- Installing an electrical outlet and fixing it with screws and dowels.
- Carefully remove the insulation from the wire. With these types of work, there is no need to allow damage to the main core. Otherwise, the cable may bend and break.
- Strengthening the installed socket with a screw.
- Secure with outer cover.
The TV socket is ready for use.
TV socket TV+FM+SAT Passage Legrand Valena white 774437
- RUB 1,701.00 RUB 1,190.70
- Description
- Characteristics
- Reviews (0)
Socket Legrand Valena TV-FM-SAT pass-through
TV socket mechanism, pass-through TV-R-SAT 774437 is sold without frame. The installation frame is purchased separately. The Legrand Valena TV-FM-SAT outlet 774437 is a TV-Radio-SAT outlet with an attenuation of 10dB and is designed for a “loop” type wiring diagram. With this type of wiring, the television cable runs sequentially from one television outlet to another. At the beginning and in the middle of such a chain, pass-through TV sockets are installed, and the last one (at the end of the television cable) is a terminal socket. This wiring diagram saves cable. Direct connection to the TV-R-SAT 774437 socket mechanism itself occurs with one television cable. Signals from terrestrial television, radio and a satellite dish are connected by a special mixing unit in the distribution board and come to the TV-R-SAT socket with one cable, and the socket itself separates these signals into the corresponding connectors of its mechanism.
Socket 774437 is equipped with connectors with a diameter of 9.5 mm:
- TV-out - plug (“male”)
- Radio output (radio) - socket ("mother")
- SAT output (Satellite)-IF+IF2
The Legrand Valena TV-FM pass-through socket is the simplest TV-Radio-SAT socket with an attenuation of 10dB and is designed for a “loop” type wiring diagram. Frequencies passed by the socket:
- TV plug 4-862 MHz
- Radio jack 87.5-108 MHz
- SAT output (Satellite) 950–2400 MHz
The socket is installed in a standard flush-mounted mounting box. For wall mounting of the mechanism, use special open-mounted boxes (article 776181). The mechanisms of all sockets are equipped with reliable fastening with screws and clamps. The frame snaps onto the mechanism. Its design allows you to adjust the planting depth up to 2 mm (for example: if the mechanism is installed in a wall with a fabric covering). The front panel of the socket and frame should be cleaned with a damp cloth. The use of aggressive and corrosive chemicals is prohibited.
The switch front panel and frame should be cleaned with a damp cloth. The use of aggressive and corrosive chemicals is prohibited.
The switch support is made of galvanized steel.
Contact group - AgNi (without cadmium content, which is an element that pollutes the environment).
Socket front panel color: white (RAL 9003)
Pinout of RJ 45 Legrand socket
But in order to implement such a scheme, you need to connect those ends of the cables that go outside in the room to a special Internet outlet into which a patch cord will be plugged in to connect to the computer. I will tell you using the example of the popular Legrand model, a well-known manufacturer of various small items for repairing indoor wiring. This is how it looks externally when assembled and already installed on the wall.
And here it is - disassembled.
To connect cables to it, you must first remove the braid and disconnect the twisted pairs from each other. At the same time, be careful not to damage the cables; they are very thin and easily break even with a small cut. After this, we take the socket and turn the latch so that the top cover to which this latch is attached is removed.
Legrand socket connection diagram (RJ-45)
How to do this is clearly shown in the manufacturer's official diagram. Just before doing this, pay attention to how the colors of the wires are located in relation to the base mount, so that later, when installing it in place, you do not put this box upside down and thereby confuse the cables. In the model I am describing, the blue color is directed towards that part of the base of the rosette that is located on the “elevation”, and the brown color is on the lower part.
After removing the top part, we insert our network cable from the side of the white latch - so that the braid goes inside it to prevent the colored wires from bending. Now let's look carefully at this little gray box. It has special grooves for these cables, and on the outside there are color and numerical designations indicating which wire should be fixed in which color. Confusion for beginners is caused by the fact that in these color designations the manufacturer tried to combine both type “A” and type “B”. Both of these types with color numbering are demonstrated in the instruction picture above. So, it will be easier to navigate by matching the wire numbers marked on the connector with the cell numbers on this box for crimping the socket.
In this case, you need to choose exactly the type with which the opposite ends of the cables with connectors that will be connected to the router were or will be crimped, that is, both ends must have the same crimp type - either A or B.
We decided on the type and after that we arrange the colors according to the numbers on the socket. I would like to point out that there was an error in the official instructions - in the picture, brown and white-brown are reversed in relation to the actual color of the socket.
Next, we take the box with the inserted wires and easily place it on the base of the mount - while remembering that the blue colors look towards the elevation. And we tighten the latch until it clicks - at the same time, sharp contact plates cut through the braid and the wires are connected to the contact cores on the external connector of the socket. It should be noted here that this does not always happen correctly - I had cases when the braid was not cut through and one of the wires did not make contact, as a result of which the connection between the PC and the router did not work.
In order to determine this, you need to “ring” each contact for the passage of an electrical signal between the two ends of the cable. This can be done either using a universal device that is used by all electricians. Or using a special tester for checking Internet connections - I ordered one from China and showed it to you in a video review. In this case, to connect an outlet to the device, use a known working patch code, for example, which came with the router.
If everything works, then you can fix the RJ-45 Internet socket in the socket box and install an external decorative frame. That's it - turns out it's not that difficult. For starters, watch a video on how to test the performance of cables.
Installation of sockets with screw and screwless terminals
To install a socket with a screw terminal, you must secure the wire with a screw between the terminals. This type of clamp is suitable for both aluminum and copper wires. After some time, the wire may become slightly deformed at the attachment point due to temperature effects. This may disrupt contact. But this problem can be easily fixed by tightening the screw. Sockets with screw terminals are presented in the Legrand Oteo and Legrand Quteo series.
To make a connection using a screwless clamp , a regular or spring-loaded terminal is required. This connection is preferable for copper wires, which are not subject to deformation when exposed to high temperatures. Sockets with screwless terminals are presented in the Legrand Galea Life series. Sockets with both screw and screwless terminals are available in such series as Legrand Valena, Legrand Celiane, Legrand Cariva, Legrand Mosaic, Legrand Plexo.
Legrand socket mechanisms with screwless terminals (from left to right): Etika art. 672220, Valena Life art. 753425
Types of terminals for sockets
There are sockets with screwless and screw terminals. Let's consider each mounting option in more detail.
Screw terminals
Using a special screw, you can clamp the wire by placing it between the plates. When there is a load, the wire heats up, and when there is no load, it cools down. This process contributes to the “swinging” of the terminal; after some time, the contact between it and the wire becomes worse, carbon deposits appear, which later can lead to the socket breaking. In this type of fastening it is better to use aluminum wires. After some time after use, the wires become deformed and the contact overheats. To avoid this kind of problem, you just need to tighten the screw in time.
Automatic (screwless) terminals
This type of terminal has a special tooth bent inward. A wire is attached to it using a spring. Installing a socket with this clamp is very simple. You need to place a wire stripped to the required length in the terminal; it is clamped automatically. By pressing the button, you can remove the wire back. Copper wires are suitable for this type of fastening. Screwless terminals cost a little more than screw terminals, but they are easy to maintain and will also save you from having to tighten the wiring every six months.
Catalog Legrand
The range of the presented catalog offers pass-through and terminal devices with a number of connectors - from one to three, of different types and purposes.
The manufacturer offers end, single, single-pass models in each line, with the exception of surface-mounted Quteo, where a single type is offered.
Dual power sockets
- Valena Classic are products for all installation modes labeled TV+R.
- Mosaic and others - a similar type of installation, marking - TV+SAT.
- Valena In'Matic - single TV + RJ 45.
The Ethics series also offers a TV-SAT model, which allows you to connect satellite and analogue television together.
Electrical sockets marked TV-R(RD)-SAT and TV-FM-SAT are a universal type, equipped with one cable input for transmitting several types of signals, branching at the output:
- Radio or FM signal - R, RD;
- TV signal with the designation - TV analog type;
- Signal from a satellite dish marked SAT.
The presented three-connector models are available in most series.
You can buy television electrical sockets, electrical and electrical installation equipment from a French company, as well as find out prices by going to our online store and contacting our sales specialists using the contact phone number listed on the main page. In addition, you can always use the site's shopping cart.