Pass-through switch - the very name of this type of electrical device already shows their true purpose. The devices belong to the family of standard household switches, familiar to all residential property owners.
The design of the devices externally resembles the traditional design. The only difference is how to connect the pass-through switch, the contact group diagram of which is slightly different.
Let's figure out together what rules should be followed when connecting a pass-through switch, and what actions should be abandoned.
What is a pass-through switch and how does it work?
It would be more correct to call this device a switch - it is a switch for users rather out of habit, since it is used to turn lighting on and off. If you call it correctly, then it is much easier to understand how it differs from standard switches - this name most fully reflects the essence of its effect on a working electrical circuit.
Additional names are changeover, duplicate or cross switch.
Like a standard switch, a walk-through switch has only two positions, but the fundamental difference is that in a conventional device it is strictly defined, for example, up is on, and down is off, but with a walk-through, these sides are constantly changing.
The operating principle of the pass-through switch becomes clearest when comparing the electrical circuits between it and the standard device, which is shown in the figure:
If a regular one in an open state simply breaks the circuit, then in the case of a pass-through one it all depends on the position of two switches at once:
From the diagram it is clear that each of the switches must have three terminals - one for the phase that comes from the power source and two for the “control” wires. When either of the two switches changes position, the circuit either closes or opens, depending on what state it was in before.
Additionally, we can formulate one more difference between a switch and a switch - the latter can always be connected as a simple switch, but doing the opposite will not work. When repairing such a circuit, it must be taken into account that one of the wires between the switches is always live.
Lezard sockets and switches: connection instructions and reviews
The amount of electricity consumed by various types of household appliances, among other things, depends, of course, on the quality of sockets and switches installed in the house. Specialized stores today sell similar products of various brands. For example, Lezard sockets and switches are quite popular among consumers.
Manufacturer
Switches and sockets of the Lezard brand are produced by the Turkish company Dernek GROUP. This company was founded in 1970. Initially it specialized in the production of a wide variety of consumer goods. The products of this company began arriving on the Russian market in 1995. In 2003, the management of Dernek GROUP decided to completely refocus on the production of electrical devices. In 2007, goods produced by Dernek GROUP factories began to be supplied to the market directly under the Lezard brand.
The Dernek GROUP company produces similar products of various designs. If you wish, today you can purchase, for example:
- double sockets 710-0800-127;
- regular sockets 710-0800-122.
Lezard switches are available on the market as single-, three-, or two-button. Some of them are ordinary, others are passable. Lezard switches, among other things, can be supplemented with backlighting, red or green. Also, if desired, today you can purchase extension cords of this brand in specialized stores.
Switch series
There are several lines of Lezard brand sockets and switches on the market. The most popular among consumers are the Nata series devices in a case stylized as wood, stone or metal. Mira switches with a durable polycarbonate coating also earned very good reviews from consumers. In addition, there are products on the market today from this manufacturer of the Deriy series, which are characterized by increased safety.
Pass-through switches
The Turkish company Dernek GROUP, as already mentioned, supplies products of this type to the Russian market. Pass-through switches are used to control not one device, as usual, but two at once. Such Lezard devices are very popular mainly among owners of large cottages. These products are essentially switches that switch one contact to another.
Instructions for connecting a pass-through model
Almost all devices of the Dernek GROUP company sold on the domestic market have a simple design. It is not difficult to connect the products supplied by this company to a household network. The installation technology for conventional switches of this brand is absolutely the same as for similar products from any other manufacturer. The wires from the socket are connected to the device outputs according to the diagram provided by the factory. Using the usual method, the “Lezard” switch with backlight is also installed. Installation is carried out without performing any additional actions, since the indicator is included in its circuit in a special way.
With pass-through devices of this brand, which have a more complex design, some home craftsmen may encounter certain difficulties in terms of installation. Therefore, next we will consider in more detail what instructions exist for installing just such models. Mount the Lezard pass-through switch as follows:
- The circuit of both lamps is closed using an incandescent light bulb.
- The three wires of the first socket box are twisted together. In the second socket, a phase or zero is then found.
- Unwind the wires in the first box and short them together in the second socket. Also find phase or zero.
After the phase and zero (located in different boxes) have been found, strip the ends of the wires and flatten them. Next, proceed to the installation of switches. Perform this procedure as follows:
- They turn over the two-key Lezard switch and study the diagram drawn on the back panel.
- In most cases, a zero is connected to the third output of one of the switches, and a phase is connected to the second.
- The other two wires in both devices are connected to outputs with the same serial number. In this case, you should be guided by the color of the insulator.
How to connect sockets: features
This is how the Lezard, a double switch, is mounted. How to connect an outlet from this manufacturer?
Like switches, these Lezard devices have a diagram on the bottom of the body. When installing, you just need to focus on it. But there is one feature in the installation procedure for Lezard sockets. Models that come in red packaging are mounted in the usual way. Devices sold in orange include the apartment network, taking into account the fact that terminals 2 and 3 are reversed. Based on the diagram presented by the manufacturer, this should be kept in mind. The last one on the panel is a standard one, designed for the normal position of the outputs.
Of course, when connecting both sockets and switches of this brand, all necessary safety measures should be observed. You only need to work with rubber gloves. Before twisting or connecting wires, be sure to turn off the power to the network.
Assembling the extension
Connecting the Lezard switch (as well as the socket) is a fairly simple procedure. The same can be said about assembling extension cords of this brand and connecting the power wire to the blocks, which is done in just a couple of steps. Special screw fastenings are provided at the extension cord outputs.
Connecting the wire thus takes the consumer no more than a few minutes. However, on sale today, unfortunately, there are pads from this manufacturer with minor defects. There are no screw fasteners on these Lezard extension cords. Therefore, to connect the wire, those consumers who are unlucky with their purchase have to use a soldering iron. Many customers who do not want to tinker with such a tool even have to throw away the block and purchase a new one from a different manufacturer in the store.
Lezard switches: consumer opinion
Reviews about devices from this manufacturer, as already mentioned, are relatively good online. The advantages of products supplied to the market by Dernek GROUP include, first of all, its wide range. The advantages of the Lezard brand sockets and switches themselves are:
- stylish appearance;
- reliability and long service life.
In terms of build quality, most home craftsmen compare the products of this company to similar products made in China.
The disadvantages of devices from this manufacturer include, first of all, the fact that rather thin plastic is often used to assemble their cases. Equipment of this brand must be handled carefully during installation and operation.
Another disadvantage of Lezard sockets is that the contacts in them are secured with screws. The wire in such structures can, unfortunately, be pinched literally to the point of breaking off. Some batches of products supplied by Dernek GROUP may sometimes contain non-working defects.
Cost of sockets and switches
Consumers also consider the advantages of the products of the Turkish company Dernek GROUP to be their relatively low cost. The price for Lezard switches is usually about 100-150 rubles. Walk-through models cost about 200-250 rubles. Sockets of this brand are sold in specialized stores for 100-150 rubles, depending on the design and type of case.
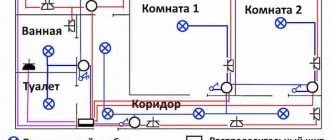
Application area
- Stairs - switches are installed on the first and second floors. On one floor they turned on the lights, went up the stairs and turned them off. If your house is three or four storeys, then you can use the diagram shown in Figures 2 and 3.
- Bedrooms - one switch is installed at the entrance to the room, and the second and third on both sides of the bed. We entered the room - turned on the light, went to bed - turned it off. To turn on lighting from 3 places, a circuit with a cross switch is used (see Fig. 2).
- Corridors - at the beginning of the corridor they turned on the light, walked along the corridor and turned it off at the other end.
- In summer cottages - for lighting paths.
Of course, the list is far from exhaustive and many other options can be thought of.
Connection diagrams for pass-through switches:
Here are the correct pass-through switch circuits for controlling lighting from two, three or more places.
Two control points:
The control circuit for pass-through switches from two points is extremely simple. To implement it, you will need two two-way switches (two single-key pass-through switches).
Three control points:
For three-point control, you will need two bidirectional switches and one crossover switch. Cross switches are a type of pass-through switches that were specially designed to turn on/off the same luminaire (group of luminaires) from three or more points. It has four contacts and its connection to the circuit is very simple.
A crossover switch can be purchased in stores or made from a two-key pass-through switch. To do this, you need to install a couple of jumpers, then carefully glue the keys with glue or replace them with one large key from a single-key switch.
The connection diagram for pass-through and cross switches for 3 control points looks like this:
Four control points or more:
The principle of operation of this circuit is no different from the previous one, just another intermediate cross-switch is added to the circuit. Thus, the number of pass-through switches can increase even to infinity.
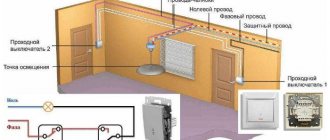
Installation features
When installing such switches, not two, but three wires should be connected, because one wire goes directly from the network to the lamp, and the other two connect pass-through switches. This is clearly visible in the diagram.
To avoid getting tangled in wires, try to use the same colors. For example, a cable typically uses three wires: brown, blue and blue-green
Brown - connect the phase wire to the input of the first switch and the output of the second Blue - connect directly to the lighting fixture - this is the “neutral” wire Yellow-green - usually used for grounding, but because The lighting does not require grounding; it can be safely used at the junction of two Lezard pass-through switches.
Use this diagram for all the switches in the house and you will never get confused.
In addition to the described option, two-key pass-through switches are also produced under the Lezard brand.
The principle of their use is the same. It’s just that instead of one light source, you can connect two to this switch.
On the “other side” there can be either a single-key or a two-key “receiver”.
Using a two-key pass-through switch can significantly save not only money on the purchase of another separate device, but also the time and cost of its installation, because the necessary electrical circuit is already placed in one compact housing.
Below is a drawing that demonstrates how to connect Lezard two-key pass-through switches.
Two-key switch. Connection diagram
Selection, design and differences of pass-through switches
Before assembling such a control scheme, here is what you should pay special attention to:
1To connect a pass-through light switch, a three-core cable is required - VVGng-Ls 3*1.5 or NYM 3*1.5mm2
2Do not try to assemble a similar circuit using ordinary switches.
The main difference between regular and pass-through ones is the number of contacts. Simple single-key ones have two terminals for connecting wires (input and output), while pass-through ones have three!
In simple terms, the lighting circuit can be either closed or open, there is no third option.
It is more correct to call a pass-through not a switch, but a switch.
Since it switches the circuit from one working contact to another.
In appearance, from the front they can be absolutely identical. Only the pass key can have an icon of vertical triangles. However, do not confuse them with reversible or crossover ones (more about them below). These triangles point in a horizontal direction.
It will be interesting➡ Galvanometer - what it measures and how it works. The principle of operation of a galvanometer
But from the reverse side you can immediately see the difference:
- the pass-through has 1 terminal on top and 2 on the bottom
- a regular one has 1 on top and 1 on the bottom
Due to this parameter, many people confuse them with two-key ones. However, two-key ones are also not suitable here, although they also have three terminals.
The significant difference is in the operation of the contacts. When one contact is closed, pass-through switches automatically close the other, but two-key switches do not have such a function.
Moreover, there is no intermediate position when both circuits are open at the gateway.
Switch types
There are two ways to connect wires to a light switch: screw terminals and self-clamping terminals. In the first case, the cables are placed in a special block and secured with a screw. The only drawback of this connection is that over time the screws become loose and need tightening. Those. A mini-circuit can occur at any moment.
Large manufacturers use the second option to create their products. It is considered more expensive, but also more effective. In addition, recently modular technology has become increasingly used.
Connecting a pass-through switch
First of all, you need to correctly connect the switch itself in the socket box. Remove the key and the overhead frames.
When disassembled, you can easily see the three contact terminals.
The most important thing is to find the common one. On high-quality products, a diagram should be drawn on the reverse side. If you understand them, you can easily navigate through it.
If you have a budget model, or any electrical circuits are a bit of a mystery to you, then an ordinary Chinese tester in circuit continuity mode, or an indicator screwdriver with a battery, will come to the rescue.
Using the tester's probes, alternately touch all the contacts and look for the one on which the tester will “squeak” or show “0” at any position of the ON or OFF key. It's even easier to do this with an indicator screwdriver.
After you have found the common terminal, you need to connect the phase from the power cable to it. Connect the remaining two wires to the remaining terminals.
Moreover, which one goes where does not make a significant difference. The switch is assembled and secured in the socket box.
Do the same operation with the second switch:
- look for the common terminal
- connect the phase conductor to it, which will go to the light bulb
- connect two other wires to the remaining ones
Advantages of installing a pass-through switch
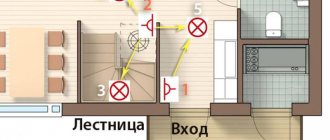
Pass-through switches allow you to control room lighting from two or more places, which is an undeniable convenience. This is especially valuable for multi-story houses with flights of stairs. Here you can install the first switch on the first floor and the next on the second, which will turn on the light downstairs and turn off the upstairs.
The use of walk-through switches to control the lighting of staircases is especially important. A good solution is to install one switch at the entrance to the bedroom, and a second near the head of the bed, which will allow you to enter, turn on the light, get ready for bed, lie down and turn off the light. It is also advisable to install switches at the entrance to a house or apartment and at the end of the corridor.
Helpful advice! Using special motion sensors or a timer built into the switch, you can automatically turn off the lighting when leaving a certain place.
Walk-through switches have significant advantages compared to conventional devices:
- high reliability and safety of operation;
- instant shutdown of the power supply to the premises, if necessary, from any point;
- optimal energy consumption;
- low cost;
- simple installation that does not require the involvement of specialists;
- no complicated settings.
The presence of walk-through switches allows you to turn on the lamps below with one switch, and when going up the stairs, turn them off with another
Lezard Mira switch, pass-through, with insert, metallic gray
We deliver goods directly from partners from all over Russia. These products are not presented in stores and are only available for ordering on the website.
Art. 12269349 In the shopping list In the shopping list In comparison In comparison
Description
The Mira pass-through switch from TM Lezard is designed for cross-connecting lamps, which allows you to control their operation from two different points. Such fittings are used on stairs, in long corridors and other spacious rooms. Switches are installed at different ends of the room. You turn on the light when you enter, and turn it off when leaving the room, on the opposite side. Here we offer to buy a switch in a metallic gray housing.
- stylish case design;
- additional convenience for the user;
- acceptable price.
You will find the most favorable conditions for purchasing household goods in the Leroy Merlin retail chain. We offer a huge assortment, convenient catalog search, and decent service.
Characteristics
Prices and availability may vary. Please check the exact cost and availability of goods in stores.
Reviews
Lezard Mira switch, pass-through, with insert, metallic gray in Moscow
Lezard Mira switch, pass-through, with insert, gray metallic and other products in this category are available in the catalog of the Leroy Merlin online store in Moscow at low prices. Read the detailed characteristics and description, as well as reviews of this product, to make the right choice and order the product online.
Buy products such as Lezard Mira switch, pass-through, with insert, metallic gray, in the Leroy Merlin online store, having first checked their availability. You can receive the goods in Moscow in a way convenient for you; to do this, read the information about delivery and pickup.
You can always place an order and pay for it online on the official website of Leroy Merlin in Russia. For residents of the Moscow region, we not only have low prices for such products as “Lezard Mira switch, walk-through, with insert, gray metallic,” but also fast delivery to cities such as Moscow, Balashikha, Podolsk, Khimki, Korolev, Mytishchi, Lyubertsy, Krasnogorsk, Elektrostal, Kolomna, Odintsovo, Domodedovo, Serpukhov, Shchelkovo, Orekhovo-Zuevo, Ramenskoye, Dolgoprudny, Pushkino, Reutov, Sergiev Posad, Voskresensk, Lobnya, Ivanteevka, Dubna, Yegoryevsk, Chekhov, Dmitrov, Vidnoye, Stupino, Pavlovsky Posad, Naro-Fominsk, Fryazino, Lytkarino, Dzerzhinsky, Solnechnogorsk, Istra and Zhukovsky.
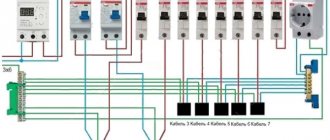
Connection diagram for the pass-through switch wires in the distribution box
Circuit without grounding conductor.
Now the most important thing is to correctly assemble the circuit in the junction box. Four 3-core cables should go into it:
- power cable from lighting circuit breaker
- cable to switch No. 1
- cable to switch No. 2
- cable for lamp or chandelier
When connecting wires, it is most convenient to orient them by color. If you use a three-core VVG cable, then it has two most common color markings:
- white (gray) – phase
- blue – zero
- yellow green – earth
or second option:
- White gray)
- brown
- black
To choose a more correct phasing in the second case, follow the tips from the article “Color marking of wires. GOSTs and rules.”
- The assembly begins with neutral conductors. Connect the neutral conductor from the cable of the input machine and the neutral going to the lamp at one point using the terminals of the car.
- Next, you need to connect all the grounding conductors, if you have a grounding conductor. Similar to the neutral wires, you combine the “ground” from the input cable with the “ground” of the outgoing cable for lighting.
This wire is connected to the lamp body. - All that remains is to connect the phase conductors correctly and without errors. The phase from the input cable must be connected to the phase of the outgoing wire to the common terminal of the pass-through switch No. 1.
And connect the common wire from pass-through switch No. 2 with a separate wago clamp to the phase conductor of the lighting cable.
Having completed all these connections, all that remains is to connect the secondary (outgoing) conductors from switch No. 1 and No. 2 to each other. And it doesn’t matter at all how you connect them.
You can even mix up the colors. But it’s better to stick to the colors so as not to get confused in the future. At this point, you can consider the circuit fully assembled, apply voltage and check the lighting.
The basic connection rules in this diagram that you need to remember:
- the phase from the machine must go to the common conductor of the first switch
- and the same phase should go from the common conductor of the second switch to the light bulb
It will be interesting➡ What is an autotransformer?
- the remaining two auxiliary conductors are connected to each other in the junction box
- zero and ground are supplied directly to the light bulbs without switches
Switch installation
The main difficulty is not connecting the wires to two independent lamps. And in installing a switch in a junction box. Imported switches (simon, wessen, lezard, schneider electric, anam, legrand-legrand, valena).
You need to use a screwdriver to secure the switch directly in the installation hole and tighten it with screws or bolts (which are most often included in the kit). Then we install the box with the keys on it, press it and secure it (if necessary), with bolts on top.
A very interesting practice is to install a switch with an indication of hidden installation. This type of electrical appliance is popular in a “smart” home and apartment, where design and style play a big role. Its installation is carried out in a recess in the wall, from the junction box to the wiring cables, everything is completely similar to conventional installation, but at the final stage you need to attach a special closing cover (sometimes sensors with a flip flap are used).
Let's consider the installation process if there are two electricity networks. We combine one network into one group, the second into another. Now we connect the cables accordingly. One wire should close when the other opens, so check the connections carefully.
What to buy to implement the scheme
Understanding how a pass-through switch works, you can independently install a convenient lighting control circuit. Products from several companies are popular on the electrical goods market, for example legrand pass-through switches. They are functional, have an attractive design, some with LED backlighting.
The legrand valena pass-through switch, if it is without a pair, can work as a simple one. But usually they are bought in pairs.
Buyers often ask how a pass-through switch looks different from a regular one. There are few differences: enterprises use a single housing design for different devices. There is no marking on the pass-throughs indicating switching on (sometimes there is one, due to the use of standard components, but they do not pay attention to it). Differences in the connection of electrical contacts can be easily determined by a person familiar with electrical engineering.
The figure shows the connection of a pair of legrand pass-through switches operating for one group of lamps.
Pass-through switches, like regular ones, are available with one or two keys. Two-key controls control two groups of lamps. You can, for example, adjust the brightness of the lighting by turning on and off groups of light bulbs in a chandelier. No worse than products from other companies: lezard, lexman, abb, schneider electric. Lezard pass-through switches are connected in the same way as those made by legrand and other companies.
It is very simple to assemble a circuit from devices from any manufacturer, but sometimes difficulties arise because circuits with errors are found on commercial sites on the Internet. Sometimes cheap Chinese devices are accompanied by paper instructions with errors in the circuits. Use the simplest diagram on which everything is clear and which you understand.
Required materials and tools
Regardless of which of the two types of pass-through switches (single-key or two-key) you will connect, you will need the following tools and materials:
- Cable - in this case it is better to use a three-core cable, and use the wire that is intended for grounding to connect two Lezard pass-through switches
- Terminal blocks - it is better to use end ones, because they significantly save time spent on wiring
- The pass-through switches themselves
- Wire stripper
- Socket boxes for placing switch housings
- Pliers or round nose pliers to give the wires the required shape for connection
- Screwdriver for fixing in the socket of the switch housing
Of course, this is an incomplete list. It all depends on what stage the electrical work is currently at.
If you are going to carry out hidden wiring with existing plaster, then you will also need a wall chaser, putty, and cable fastenings.
Don’t even try to assemble a circuit of pass-through switches inside the socket box - you shouldn’t do that. This is inconvenient both from the point of view of installation and from the point of view of subsequent possible repairs.
All work on connecting pass-through switches must be carried out exclusively in the distribution box.
Helpful advice: in order not to confuse the wires, use special stickers on them. In the future, these stickers will help you easily determine which wire goes where.
You should also not try to use twisted wire connections - this is a sign of bad taste. Firstly, the contact is completely unreliable, secondly, there is a high probability of a short circuit due to the use of poor quality or insufficient quantity of electrical tape, thirdly, the twisting takes up a lot of space even in the junction box.
Two-key pass-through switch: connection diagram
To control the lighting of two lamps (or groups of lamps) from one switch from several places, there are two-key pass-through switches. They have six contacts. If necessary, find the common wires using the same principle as in a conventional device of this type, only you will have to connect a larger number of wires.
The connection diagram for a 2-key pass-through switch differs only in that there will be more wires: the phase must be supplied to both inputs of the first switch, just as from the two inputs of the second it must go to two lamps (or two groups of lamps, if we are talking about a multi-arm chandelier ).
The principle of connecting two-key pass-through switches
If you need to organize control of two light sources from three or more points, you will have to install two cross switches at each point: there are simply no two-key switches. In this case, one pair of contacts is placed on one crossbar, the second on the other. And then, if necessary, they are connected to each other. The outputs of both crossbars are connected to the last two-key transition switch in the chain.
How to organize control of two lamps from four places
If you think about it, everything is not so complicated, and the connection diagram for a pass-through switch from 2 points is generally simple. Just a lot of wires...
3 point circuit
To be able to turn the light on/off from three places, you need to buy a cross (cross) switch for two switches. It differs from those described earlier by the presence of two inputs and two outputs. It switches a couple of contacts at once. See the figure for how everything should be organized. If you understand the above, this one is easy to understand.
Electrical circuit for controlling a lamp from three points
How to assemble such a circuit? Here's the procedure:
- Zero (and ground, if any) is connected directly to the lamp.
- The phase is connected to the input of one of the pass-through switches (with three inputs).
- The input of the second is fed to the free wire of the lamp.
- The two outputs of one three-pin device are connected to the input of a crossover switch (with four inputs).
- The two outputs of the second three-pin device are connected to the second pair of switch contacts with four inputs.
The same diagram, but from a different perspective - where to connect the wires on the housings.
Where to connect the wires
And this is approximately how to distribute it around the room.
Wiring when controlling the lamp from three places
If you need a circuit with four, five or more points, then it differs only in the number of cross switches (for four inputs/outputs). There are always two switches (with three inputs/outputs) in any circuit - at the very beginning and at the very end of the circuit. All other elements are cross devices.
Connection diagram for pass-through switches for 5 points
Remove one “crossbar” and you get a four-point control scheme. Add more and there will be a scheme for 6 control places.
To finally get it all in your head, watch this video.
Basic recommendations for installing two-key pass-through switches
When installing both standard and two-key pass-through switches, it is recommended:
- The placement height from the floor level should be 90 cm.
- The distance from the door or window opening to the pass-through switch must be at least 15 cm.
- Distribution boxes with switching must be located in a visible place and at the same time they must be placed at a distance of 15–30 cm from the ceiling level.
- For installation of pass-through switches, it is recommended to use a 3-core flexible cable with a cross-section of 1.5 mm² (VVGng, PVSng, ShVVP, and so on).
- Cable and wire products must be laid in corrugation, in grooves or cable channels.
- All metal surfaces of lamps must be grounded.
Manufacturer
Switches and sockets of the Lezard brand are produced by the Turkish company Dernek GROUP. This company was founded in 1970. Initially it specialized in the production of a wide variety of consumer goods. The products of this company began arriving on the Russian market in 1995. In 2003, the management of Dernek GROUP decided to completely refocus on the production of electrical devices. In 2007, goods produced by Dernek GROUP factories began to be supplied to the market directly under the Lezard brand.
Is it possible to turn a simple switch into a pass-through switch?
Now let's consider the opposite situation, when you need to make a transition switch out of a regular switch. To do this, you will need a pair of simple switches with one or two keys.
It is desirable that they be produced by the same manufacturer and have identical dimensions.
The task is to add an additional contact to a simple switch.
But let us immediately note that it is better not to waste time on such a modification, but to immediately buy a duplicate switch.
But if you still decide, then the algorithm of actions is as follows:
- First check that the design features of the device allow you to swap the terminals.
- Remove the key with clips.
- Remove the electrical part.
- Remove one of the contacts from the socket and rotate it 180 degrees.
- Cut off one of the areas of the general group.
- Reassemble the device and make sure it works correctly.
- Close the device with one cover or leave two buttons, but glue them together.
It will be interesting➡ Making conductive glue from scrap materials
How to connect a switch
Below we have presented a diagram of the operation of the switch and its installation. A two-key Euro switch is two single devices, but in one housing. Their phases are combined, and at the moment when one bridges its contacts (and it begins to supply power to its group of devices), the second breaks the circuit and stops receiving signals from the phase cable from the outlet or wiring in the apartment. This happens because the ground wire and phase neutral are connected directly to the lamp, and the phase passes through the switch.
Connection diagram for a two-key switch to a chandelier
To work you will need:
- Pliers;
- Screwdrivers (indicator, flat and Phillips);
- Stationery knife;
- Level.
First we turn off the electricity. Next, you need to prepare the wires in the installation box; to do this, we clean them with pliers. It is necessary to leave approximately 10 centimeters of wire; cut off the excess with a stationery knife. Now you can connect the wiring and switch wires. If the wiring is three-phase, then this process will not be particularly difficult.6 We simply connect the cables corresponding in color to 3 phases and zero.
Double switch
If the wiring is two-phase, then you need to fasten the wires of the switch with a terminal, and eventually getting two jokes instead of three, connect them to the power supply of the electrical network.
Install the protection plates and turn on the power. Ideally, both switches should be in the up or down position when the light is off. If necessary, remove the second electrical switch, rotate it 180 degrees in the box, then set it as two toggle positions.
Video: How to connect a two-key switch
Connecting a chandelier is also no more difficult. Certain lamps are combined into groups, and if there can be only two groups, then there can be any number of lamps: with two arms, five or even six.
Disadvantages of pass-through switches
One of the disadvantages of walk-through switches is the need to drill walls under them. Organizing a power line with a pass-through switch has several disadvantages:
- time and effort spent on wall slitting for hidden wiring;
- the need to connect the remote control via a regular key for models with motion sensors;
- unprofitability for an apartment due to cable grooves and installation of a DIN rail;
- difficulties with identifying terminals;
- lack of clarity of the “ON” and “OFF” positions.
Experts note that the devices are more suitable for country cottages, dachas, and the private sector than for an apartment.
A pass-through switch is convenient to use in rooms with several groups of lighting fixtures. The device provides comfortable light control and safe movement of people. Currently, the pass-through light switch circuit, controlled from three places, is not tied to the layout of a residential property.
Comments:
I use this circuit on my stairs to turn off the lights when you walk along them. Very comfortably. Thank you for the article.
As for me, pass-through switches have outlived their usefulness. A motion sensor is very inexpensive, and its installation is much simpler, so the technology is outdated
Vyacheslav, just imagine, you installed a pass-through switch in the bedroom to turn off the overhead light after you went to bed. What will you replace it with? Motion sensor? So that at night, when you turn around, you have illumination throughout your bedroom?
Necessary equipment and materials
- Switches
- Mounting box
- Electrical insulating tape
- Terminals
- Phillips and regular screwdrivers
- Installation knife
- Side cutters
- Pliers
- Wrenches
- Electric cable
If the room has already been wired and you need to install redundant switches, then you need to make grooves or open installation of cables. In order to make grooves you will need a hammer drill and a wall chaser. You also need alabaster. He will secure the corrugated pipe. In case of open installation, a distribution box is required; it is attached to the wall using a corrugated pipe.
Switch series
There are several lines of Lezard brand sockets and switches on the market. The most popular among consumers are the Nata series devices in a case stylized as wood, stone or metal. Mira switches with a durable polycarbonate coating also earned very good reviews from consumers. In addition, there are products on the market today from this manufacturer of the Deriy series, which are characterized by increased safety.
Which cable is better to use?
According to current rules, when connecting a backup switch, it is recommended to use a 3-core copper cable with a cross-section of 1.5 square meters. mm.
The most popular options:
- VVGnG-3x1.5.
- ShVVP-3x1.5.
- PVSng-3x1.5.
The main difference between the above conductors is the type of insulating coating and the characteristics of the cores. When choosing a cable, make sure that it is marked according to GOST.
This guarantees that when purchasing a wire with a cross-section of 1.5 sq. mm you get exactly this parameter, and not 1.0 or, for example, 1.2 sq. mm. Remember that a mismatch in cross-section can lead to overload and accident.
How to connect sockets: features
This is how the Lezard, a double switch, is mounted. How to connect an outlet from this manufacturer?
Like switches, these Lezard devices have a diagram on the bottom of the body. When installing, you just need to focus on it. But there is one feature in the installation procedure for Lezard sockets. Models that come in red packaging are mounted in the usual way. Devices sold in orange include the apartment network, taking into account the fact that terminals 2 and 3 are reversed. Based on the diagram presented by the manufacturer, this should be kept in mind. The last one on the panel is a standard one, designed for the normal position of the outputs.
Of course, when connecting both sockets and switches of this brand, all necessary safety measures should be observed. You only need to work with rubber gloves. Before twisting or connecting wires, be sure to turn off the power to the network.
Basic connection errors
Novice electricians often make mistakes when connecting pass-through switches. Most often, they are allowed during the period of identifying the input (common) terminal.
It is necessary to understand that their location may differ for each manufacturer. This means that before installation you must always check the terminals for compliance using a multimeter and compare the data obtained with the existing circuit. Pay attention to where the arrows on the switches are pointing.
If the common wire is identified correctly, but the lighting still does not work correctly, it means the user made a mistake with the purchase. It is possible that two standard switches are installed, rather than walk-through ones.
The second mistake that beginners make is an installation error. Typically, a pair of wires from the first switch is connected to the input, and from the second device to the output. In this case, the circuit does not work, because the contacts must be connected according to the “crosswise” principle. Solar-powered street lamps for cottages and gardens, for country houses, autonomous LED power stations with sensor, photo, video
Lezard switches: consumer opinion
Reviews about devices from this manufacturer, as already mentioned, are relatively good online. The advantages of products supplied to the market by Dernek GROUP include, first of all, its wide range. The advantages of the Lezard brand sockets and switches themselves are:
- stylish appearance;
- reliability and long service life.
In terms of build quality, most home craftsmen compare the products of this company to similar products made in China.
The disadvantages of devices from this manufacturer include, first of all, the fact that rather thin plastic is often used to assemble their cases. Equipment of this brand must be handled carefully during installation and operation.
Another disadvantage of Lezard sockets is that the contacts in them are secured with screws. The wire in such structures can, unfortunately, be pinched literally to the point of breaking off. Some batches of products supplied by Dernek GROUP may sometimes contain non-working defects.
Safety Tips
The power supply is turned off on the panel when operating any lighting devices.
- Use an indicator screwdriver to check the presence of current in the network.
- If the panel is on the landing, post a notice that work is underway and before manipulating the wire, check for the presence of current.
- Wear protective insulated gloves that will protect against electric shock.
- When chipping, protective clothing is used.
Pass-through and cross models are the best solution for organizing lighting in the house. A thoughtful and well-planned layout will ensure maximum comfort in the house. When choosing such devices, you should not save on existing models. Adjusting the light from several independent points means comfort and energy savings. Moreover, such devices will work longer than any motion sensors and cotton switches.
Assembling the extension
Connecting the Lezard switch (as well as the socket) is a fairly simple procedure. The same can be said about assembling extension cords of this brand and connecting the power wire to the blocks, which is done in just a couple of steps. Special screw fastenings are provided at the extension cord outputs.
Connecting the wire thus takes the consumer no more than a few minutes. However, on sale today, unfortunately, there are pads from this manufacturer with minor defects. There are no screw fasteners on these Lezard extension cords. Therefore, to connect the wire, those consumers who are unlucky with their purchase have to use a soldering iron. Many customers who do not want to tinker with such a tool even have to throw away the block and purchase a new one from a different manufacturer in the store.