Requirements
The main requirement for electrical wiring is compliance with safety requirements and compliance with the tasks that will be assigned to it.
The basic rules for installing electrical wiring are contained in the main document for electricians - PUE (Rules for Electrical Installations). In particular, Chapter 2.1 defines the rules, regulations and requirements for indoor and outdoor electrical wiring. Compliance with the requirements of regulatory documents is mandatory, since these standards were derived through verified calculations and confirmed experimentally.
According to the latest requirements, residential electrical wiring must adhere to the TN-CS power supply system standard or, in extreme cases, TT. The systems imply a different approach to grounding and connecting the neutral conductor. This is necessary to prevent electric shock if you unintentionally touch the body of the device, which has a short circuit to the body as a result of a malfunction. In addition to grounding, the level of safety is additionally affected by the installation of protective equipment that automatically interrupts the power supply when leakage currents occur.
The PUE specifies permissible current values for wires of various cross sections, copper or aluminum, as well as methods of laying, fastening, connections and branches.
Distinctive features of modern electrical wiring
At the end of the 20th century there was a breakthrough in modern household technologies. In addition to televisions, other devices began to be used inside homes:
- Wireless connection.
- Powerful household appliances.
- Video surveillance and security systems.
- Computers.
Therefore, work with the installation of electrical networks has become more complicated. The principles of operation and arrangement remain the same. Even the first stage - design - causes difficulties. It is necessary to know the locations of household appliances and the power they absorb. The lighting system for each room is thought out at the same stage.
Now they use not only power, but also low-current systems. These are wires for TVs, telephones, and computers. This also includes acoustic and security equipment. Power and low-current systems are not separated. The power source for the devices is a classic 220 V network.
The number of devices and devices with simultaneous operation is changing upward. Previously, one chandelier was enough, now local or a system of spotlights is added to the overhead light. The total power consumed by the devices also increases.
Installation
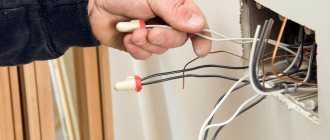
The most difficult thing in organizing hidden wiring is gating the routes, especially in panel houses. This process is labor-intensive and dusty. You can make your task somewhat easier by using special equipment for this purpose, namely a wall chaser.
The wall chaser greatly simplifies the work
In addition, we will need a hammer drill, a special attachment for scoring and a flat chisel attachment, drills and bits for concrete.
It is recommended to start by preparing seats for sockets, switches and junction boxes. It’s easier to follow the following algorithm:
- install a crown of the appropriate diameter on the hammer drill;
- make a sawing with a depth of 5 mm;
- replace the crown with a drill;
- we make holes along the furrow, a little deeper than the cup holder;
- change the drill to a crown and work with it;
- insert the chisel attachment and knock out the concrete.
Having prepared the seats, we proceed to grooves, that is, we make grooves in the wall somewhat wider than the outer diameter of the corrugation or pipe by about 20-25 mm.
We install the cable (do not forget to place it in corrugation or pipes). The easiest way to “grab” the cable in the groove is with a thick gypsum mortar.
At the same stage, the distribution board is installed, if it has not been installed previously.
We recommend labeling the cables, at least in the distribution panel, to avoid confusion.
At this point the second stage is completed, you can begin finishing work.
Necessary materials and tools for work
High-quality electrical wiring must meet the requirements of SNiP and safety standards. To carry out such wiring, you will need consumables and tools:
- electric meter;
- residual current device (RCD) for conducting currents under normal operating conditions or when leakage currents occur;
- power, low-current, lighting cable;
- branch boxes;
- terminal blocks (preferably screwless);
- sockets and switches;
- socket boxes;
- open type electrical wiring box;
- a mixture of alabaster for installing the cable inside the groove;
- glue;
- screws and self-tapping screws;
- baseboards;
- electrical insulating cardboard;
- tin strips for fastening.
Tools you will need: wall chaser, chisel, hammer, scissors for cutting cables. To lay the cable inside walls or boxes, you will need a spatula and an emery float. You will also need pliers, a screwdriver, a measuring tape and a knife.
New wiring: permit, contract, necessary documents
New wiring in an apartment with your own hands should begin with a project. This is a plan of each room in the apartment with marks of the places where the electrical wiring will be located. The lighting plan and outlet layout are two separate electrical wiring lines, so they need to be done separately from each other.
The power supply project is drawn up by a specialist or organization with the right to carry out such work. The designer draws up a plan in accordance with the requirements of the PUE, so there will be no problems when putting electrical wiring into operation. At the same time, he takes into account the customer’s wishes regarding the placement of sockets and switches, taking into account the number of connected household appliances.
Before installing new electrical wiring, you must address the issue of obtaining technical specifications and allocating the required power. This is especially important before building a new home.
To obtain electrification, you need to go through several stages:
- Contact the HOA or management company to obtain a certificate for the allocated power and a certificate showing the apartment’s power supply diagram.
- Contact a company that will draw up a project for the electrical supply of the apartment and conclude an agreement.
- Coordination of the project with the maintenance service of the house, then with Energonadzor.
- Installation of electrical wiring.
- Invitation of a licensed electrical laboratory to conduct tests of the electrical network. Based on the test results, it issues a Technical Report with protocols for testing and measuring equipment.
- Drawing up an application to Energonadzor with attached documents with the results of network testing for acceptance of new wiring. Coordination of the quality of installation and the correctness of its implementation by the Energonadzor inspector. If the work is completed without any violations, he issues a Certificate of Permission to Operate the Electrical Installation.
Having received the certificate of approval, you need to contact the house maintenance service to connect to the electrical network according to a permanent scheme.
Creating a Wiring Diagram
In new apartment buildings, the general building electrical network is connected only to the apartment. The entire layout of the electrical network inside the apartment is already carried out by the owner, depending on the developed plan for the arrangement of furniture and electrical appliances. This is convenient, because owners of apartments with a ready-made network will have to partially or completely dismantle the old one in order to change it.
You can draw up a wiring diagram for your apartment and carry out its installation yourself, or you can entrust this task to specialists. The second option requires a fairly expensive investment, but it is worth remembering that working with electricity is life-threatening.
If you do not have certain skills, then it is better to entrust the installation to specialist electricians, and you can draw up the wiring diagram yourself.
The diagram can be made on a small piece of paper, but be sure to apply all the elements in accordance with generally accepted designations. Any installation begins with the development of a diagram of the future electrical wiring.
Basic documents
The rules for installing electrical wiring are described in SNiP - these are norms and recommendations that help to safely conduct electrical wiring during construction or repair. Since 2010, all building codes have been recognized as a set of rules. More recently, SP 256.1325800.2016 was issued, which describes the requirements for power supply, grounding, and installation of electrical wiring in apartments, private houses and public premises. This is an updated version, but you can use earlier ones by first reading the update points.
In turn, SNiPs must comply with the Electrical Installation Rules (abbreviated PUE) and fire safety rules.
In addition, there are various GOSTs that describe the standards for grounding devices, cables, and other important elements of the electrical network. Thus, GOST 31565-2012 regulates the installation of cable products from the point of view of fire safety. And GOST 50571.15-97 is used for proper cable installation. Chapter 5 is used, which describes the electrical wiring requirements. An experienced electrician knows the basic safety rules and standards, and will always be able to carry out high-quality installation of electrical wiring.
Why do you need a wiring diagram?
It turns out that installing modern electrical wiring in an apartment is a real art, which only a professional electrician can handle.
If you do not want to constantly change the decoration of the walls in order to mask cables that appear here and there, we recommend that before renovating an apartment or building a house, draw up a drawing indicating all significant objects related to electricity: sockets, switches, an electrical panel with an RCD, lighting fixtures.
A sample diagram that a homeowner can sketch. Attention is paid to marking the locations of all electrical points, from the electrical panel to the sockets. Based on the requirements or wishes of the home owner, the electrician draws up a schematic diagram of the electrical wiring in the apartment. His task is to divide the cables into groups in order to properly distribute the load, think through the control and protection system, and ultimately do everything to guarantee safety and comfort.
What must be taken into account when drawing up a diagram, drawing, work plan necessary for proper installation of electrical wiring?
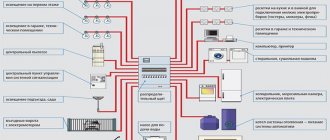
Let's consider the electrical network from the point of view of its component parts:
- Automatic protection devices installed in the electrical panel. The functioning of all home equipment and the safety of users depend on their quality and proper installation.
- Cables and wires with the correct cross-section and good insulation.
- Sockets and switches with high-quality contacts and safe housings.
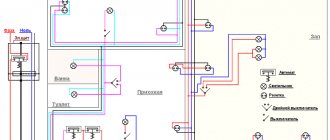
In private houses, a mandatory element is an input circuit breaker and a power cable from it to the switchboard. Using a circuit breaker, the power consumption is regulated and, if necessary, all electricity in the house is turned off.
Approximate wiring diagram in a private house. The main attention should be paid to the distribution of power across circuit breakers and the protection of each dedicated line. The electricity meter is usually installed at the entrance, after the input circuit breaker.
Rules for installing electrical wiring
During renovations in an apartment or house, the question usually arises of how to properly replace electrical wiring. If you want to do this yourself, then you need to know all the intricacies of proper electrical wiring.
As with other types of work, electrical wiring installation begins with planning, which is based on the principles of convenience and safety. Basically, of course, in developing the plan, the emphasis is on safety, because electricity is such a thing where negligence is unacceptable.
The work must be done competently and accurately, which will save you from problems and protect your home. A clear plan must be followed at all stages of work.
Dividing electrical wiring into groups (lines)
It is much easier to manage and control an electrical network if it is divided into several lines. In the event of a malfunction or emergency, you can turn off one group, while the rest will function as usual.
Option for dividing into 4 groups:
- Group 1 – powerful household appliances
- Group 2 – kitchen line
- Group 3 – bathroom and toilet
- Group 4 – lighting system
Below we will talk about each electric group in more detail.
Stationary household appliances
Large household appliances are usually located in the kitchen or bathroom area. Layout of sockets in the kitchen. Rules: it is prohibited to place sockets directly behind the dishwasher and washing machine; It is better to use waterproof models.
A separate connection for the kitchen area is necessary for repairs. If one of the devices breaks down, a replacement will be required. In order not to turn off the electricity in the entire apartment, it is enough to turn off one protection device responsible for stationary equipment. Unfortunately, even expensive household appliances break down from time to time. Repairs sometimes take several hours. A separate electrical group will allow you to maintain a comfortable stay in the kitchen and other rooms.
What prevents you from simply disconnecting a broken device from the network by pulling the plug from the socket? The fact is that built-in equipment has connection points to the electrical network in hard-to-reach places. In addition, the malfunction may occur not in the device itself, but in the wiring disguised in the wall. In this case, it is much easier to move the circuit breaker lever.
Dedicated line for the kitchen
The kitchen line is traditionally the busiest. Approximately 5-6 units are constantly connected to the network, even when not in use. This applies to the refrigerator, oven, hob, dishwasher, hood, microwave, toaster. Many people use a kitchen electric grill, meat grinder, bread maker, multicooker, etc.
Electrical wiring diagram for the kitchen, divided into 4 groups. For powerful household equipment, separate circuit breakers are installed in the distribution board. In this case, a separate powerful electrical cable will simply make it possible to use several devices simultaneously.
If lighting devices or a water heater are also “hanging” on the common wiring, then when the next device is turned on, the network simply cannot withstand it and an automatic shutdown will occur. A detailed analysis of diagrams and options for the location of sockets in the kitchen is given in the article, which we recommend that you read.
One or more lighting groups?
Considering the number of lighting fixtures in each room, you can make one or several lines. If there is one six-arm chandelier in the hall, and in the bedroom there is low-power overhead lighting and two chandeliers, then all the devices can be combined into one line.
However, if the living room resembles a disco hall - with chandeliers, spotlights, ceiling and wall lighting - then a separate group should be organized only for it.
Wiring diagram for 220 V spotlights or halogen lamps for one room, for example, a kitchen, children's room or hallway. If, in addition to lamps, the network of one room includes transformers or power supplies, then it is also recommended to connect it to a separate protection device.
Rooms with high humidity
Increased requirements apply to electrical appliances and cables in the bathroom, since the close proximity of water is a risk. In order for the electrical network to be safe and functional, a number of rules must be taken into account when drawing up the diagram and installing the wiring:
- The distribution box should be installed outside the bathroom - in the corridor, hall or hallway
- For each device that is used in the bathroom (washing machine, mirror lamps, hair dryer or electric razor), it is necessary to allocate a separate socket
- Regardless of the size of the bathroom, the switch is always installed on the outside. The best place is near the front door
- It is recommended to lay the electrical cable at the top of the wall, right under the ceiling, placing the lines parallel to the floor and using an insulating sleeve
The requirements also apply to the choice of fittings that will be used regularly - sockets and switches. Suppose the degree of protection of sockets should be at least IP 44, and it is even better to purchase special devices with a splash-proof cover.
It is recommended to abandon 220 V lamps in favor of 12 V analogues.
A three-core copper wire is quite suitable for installing sockets in a bathroom, but you should pay attention to the cross-section: for connecting ordinary appliances it must be at least 2.5 mm², for powerful electrical equipment - 4 mm². The domestic version is VVGng.
Requirements for electrical wiring in a new building
Electrical wiring in an apartment in a new building should be made of copper cable, which is covered with an insulating layer. It is prohibited to use an aluminum cable: when you turn on several powerful electrical appliances at once, it will not withstand.
The 7th edition of the PUE rules states that electrical wiring in a new building must be made using a three-core copper cable, with one of the cores providing grounding.
There are two types of grounding, the difference is the zero separation point:
- TN-S system (working zero N);
- TN-CS system (protective zero PE).
A three-core cable extends from the panel in the house: phase - L, neutral - N and ground - PE.
Grounding is necessary to protect occupants from electric shock. In addition, if there is a grounding conductor, then the electrical equipment will not burn out. When you do electrical wiring in a new building, do not forget about grounding. If you connect the grounding conductor poorly, it will break. Then, during a phase breakdown, for example, on a refrigerator, all electrical equipment in your home that is connected to the network will be under extreme voltage.
How to eliminate such a situation? Do not twist the wires together. It is recommended to use special terminal blocks that differ in the way the cable is clamped. Or you can solder the connection, placing it in a junction box, socket box, electrical panel, that is, so that if necessary, you can easily reach them.
If the apartment has old type wiring - made of aluminum, you should dismantle it and make it copper. Is it possible to install new wiring? Then use terminal blocks to connect the copper cable to the aluminum cable.
- Where are sockets and switches located?
It is prohibited to place sockets and switches wherever you please. This point is regulated by the requirements of SNiP 23-05-95.
So, the switch should be located no more than 10 cm from the doorway (on the side where the door handle is located). At what height to install is up to you, choose the most convenient option. However, in children's organizations the switch must be located strictly at a height of 180 cm from the floor.
Recommended articles on this topic:
- How to accept an apartment in a new building
- Stages of renovation in an apartment
- Electrical repair in the apartment
According to SNiP requirements, if the room is no more than 6 square meters, then one socket can be installed. However, it is prohibited to connect electrical appliances (that consume a lot of electricity) using portable devices. Therefore, it is better to immediately install so many sockets that there are enough to connect all the electrical equipment. It is recommended to make more sockets in the kitchen area.
We choose special sockets that will be located in rooms with high humidity, with protection from water. They are located at a distance of at least 60 cm from sinks, bathtubs, and toilets. They must be connected via an RCD. Choose the location of the outlets so that it is convenient for you to use them. Distance from the floor, windows and doorways - from 10 cm, from the ceiling - 20 cm.
Branches to sockets and switches must be 50 cm away from the gas pipeline, and 4 cm from other communications.
- What types of electrical wiring are there?
According to SNiP requirements, electrical wiring in an apartment in a new building is carried out horizontally or vertically. You can install the wiring:
- in a hidden way - if it is important for you to protect yourself and preserve the interior. The cable is laid in the floor, in the voids between concrete slabs, and also in the walls. If the wall is wooden, then the cable is laid in a special protective sleeve to reduce the risk of fire;
- in an open way - this way it will be easier to carry out electrical wiring in a new building. Wires can be laid in channels that are mounted on the surface of the walls. The advantage of this method is that you can quickly get to the wire to repair it. However, the interior of the home will be damaged.
You can carry out electrical wiring in an apartment in a new building by combining the two methods described above. For example, the main line will be hidden in the floor or ceiling. In this case, the wire leading to sockets and switches is laid in an open way. The combined method is used infrequently, usually for installing wiring in utility rooms.
Most often, electrical wiring in a new building is carried out in a hidden way. However, it is worth considering how you will replace the cable if a breakdown occurs.
It is best to place the cable in a corrugated sleeve. This way you can easily take it out and replace it with a new one. In this case, the finishing coating of the walls will not be damaged. The corrugated hose is laid in channels that are cut with a grinder or a grinder. Please note that according to SNiP, it is prohibited to deform metal reinforcement when cutting channels on reinforced concrete slabs. In addition, the wire should not be placed at the joints of panel slabs.
- Automatic machines for protection
When carrying out electrical wiring in an apartment in a new building, do not forget about the circuit breakers. They are located in the electrical distribution panel according to the following rules:
- if the machine is 16 A, a lighting line is connected to it;
- 20 A circuit breaker - socket line;
- The 25 A circuit breaker is designed for connecting high-power household appliances. It is necessary to draw a separate line to the electrical panel.
In addition to automatic machines, RCDs should be installed on all electrical equipment. It will work if a current leak of 100 mA occurs. We connect all lines separately to an RCD, which is designed for leakage from 10 to 30 mA.
Electrical wiring methods
There are two ways to lay the wire. This is in an open way and in a hidden way. The open method is on top of the plaster, and the hidden method is inside the plaster.
The entire electrical wiring route must run vertically and horizontally. It is prohibited to lay the route diagonally.
Hidden way of laying electrical wiring
This method is more relevant and is mostly used only, that is, we are talking about hidden wiring to sockets, switches, wall lamps (if provided), apartment panels and distribution boxes. For hidden wiring, there are different types of installation: on the floor, on the wall and on the ceiling.
A wire is laid along the floor in a special corrugation for pouring the floor screed. If there is already a filling of the solution, then grooves are made for the corrugation with the wire, with access to the wall to the distribution boxes, then to the sockets and switches.
If you decide to lay electrical wiring along the wall, then the grooves for the wires are made at the top, 15 - 20 cm away from the ceiling. With this choice of installation, the wires can be laid both in corrugation and without it. The wires for the chandeliers are laid inside the floor slabs by making holes in them at the required points of entry and exit of the wire. (The floor slabs have special holes along their entire length). This installation method exists if you do not plan to install a false ceiling.
Grilling on the ceiling can be done if it is structurally provided for. In other cases, gating the ceiling is strictly prohibited due to the destruction of the interfloor ceiling.
It is better not to use this method of laying. “But I saw that the electrical wiring is carried out along the ceiling,” you say. Yes, they do, but in an open way and in a corrugated manner. Shroba is not needed in this case.
In this case, wire runs to sockets, switches and distribution boxes are made under the plaster.
To ensure that distribution boxes can be accessed at any time, it is better to mount them on the wall rather than on the ceiling. After all, the ceiling with such installation of electrical wiring is usually covered with a suspended or suspended false ceiling.
Open laying method
If we compare the hidden and open installation methods, then the open method has a number of advantages over the hidden one, but there are also disadvantages.
Advantages:
- Quick and easy installation;
- Lack of additional equipment for installation;
- Minimum damage during installation.
Flaws:
- Not an attractive look;
- Compliance with fire and electrical safety standards during installation.
In apartments, if you suddenly cannot do without open wiring, wires are laid in corrugation (corrugated electrical pipe made of self-extinguishing PVC) or special plastic PVC trays.
Corrugations are available for sale in different outer diameters (16, 20, 25, 32, 40 and 50 mm). Sold in coils of 100 m.
As for the trays, they also come in different sizes. Fastened using a dowel-nail with a diameter of 6.8 mm.
List of further works
After the wiring diagram has been sketched out, we begin to calculate the network parameters and install it.
Selecting a cable and calculating its cross-section
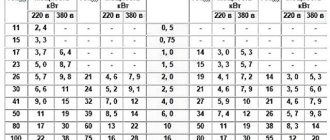
To accurately calculate the cable cross-section based on the power of consumers, use the following relationship: I=P/U, where P is the total power of all consumers in the circuit for which the cross-sectional area of the conductor cores is selected, and U is the voltage of the apartment network. Most often, the wiring circuits are arranged in such a way that the electric current load in them does not exceed 25 A. In this case, the following sections are used:
- wire VVG-3*2.5 – two-core power cable with a cross-section of one conductor of 2.5 mm2. This is the most used wire for organizing the electrical network in the apartment. They connect the distribution board with the distribution boxes of the premises;
- wire VVG-3*1.5 - two-core power cable with a cross-section of one conductor of 1.5 mm2. Such conductors are used for installation from distribution boxes to sockets, automatic switches in the panel;
- wire VVG-3*4 – three-core power cable with a conductor cross-section of 4 mm2. Such conductors are separated into separate circuits for connecting powerful apartment consumers (furnace, heating tank, etc.).
Marking sockets and switches
The placement of sockets and switches in the apartment should ensure ease of use and cover the needs of residents in connecting equipment. A typical example of the layout of electrical equipment (connection points) is presented in Figure 6.
An example of placing connection points in an apartment
When marking the locations of sockets and switches, the following requirements of modern standards must be observed:
- sockets and switches are located to the left of the doors;
- switches are mounted at a height of 0.9 m from the floor;
- in living rooms, sockets are located at a height of 0.4 m from the floor, in the kitchen - 0.95 -1.15 m, in the bathroom the use of sockets is prohibited.
Wall chipping
After marking the locations of distribution boxes, sockets, switches, and installation points for lamps, they begin to arrange grooves (grooves) along the walls and on the ceiling for laying out the wiring. It is worth remembering that gating should be done in horizontal and vertical planes along straight lines. This will make it possible to more accurately determine the location of the wire in the future. The grooves are made using a grinder or a hammer drill. The depth of the groove must be at least 20 mm, and the width must be sufficient for laying all cables planned for laying in this location.
Cabling
The principles of laying cables for hidden and open wiring are the same. Installation starts from the connection points and leads to the distribution panel. Next, the line is inserted into the shield and moved to another circuit. If necessary, identification tags are hung on the end sections of the wiring for quick reference. After installation is completed, the cables are covered with boxes or putty in the wall.
Installation of socket boxes and junction boxes
The laid wiring is brought to the mounted junction boxes and electrical outlets, inserted into them, and the ends are driven out with a small margin. All wiring branches are arranged in boxes. The connection of the conductors of aluminum or copper wiring must be reliable. For connection, it is advisable to use special devices, as shown in Figure 7.
Connecting conductors in a junction box
Immediately before connecting the wires, they ring and make sure that the installation work is carried out correctly at this stage.
Installation and assembly of electrical panel
When all the cables of all electrical circuits are laid to the installation site of the electrical panel, they begin to organize the apartment's distribution panel. This part of the electrical network is characterized by a large number of conductors and protective devices, so it is very important to make all connections correctly. For the shield, you always choose mounting boxes with a certain supply of seats. This will allow you to upgrade the system or eliminate its malfunction in the future.
An example of an electrical panel diagram for a standard apartment is shown in Figure 8.
Figure 8. Example of electrical panel diagram
In the figure, the positions indicate: 1 - introductory machine; 2 - electric meter; 3 - zero bus; 4 — protective grounding bus; 5–9 — automatic machines; 10 - separate automatic switch for lighting
Installation of sockets and switches
Sockets and light switches are installed in pre-installed boxes with wire ends removed. The process is not difficult and will require a minimum set of tools: pliers, wire cutters, and a screwdriver. This is the final stage of installation work on the apartment’s electrical network.
Checking the quality of work
The quality of the work performed is checked by turning on the wiring circuits and checking the presence of voltage and the correct phase distribution in the network. This procedure is carried out using voltage indicators. Incorrect installation can also immediately show a disconnected circuit breaker against short circuits.
Tips for properly connecting electrical points
To create effective wiring in an apartment, it is necessary to distribute different directions and combine groups of electrical points in these directions.
So, for laying electrical wiring from the electrical panel, it is worth highlighting the following lines:
- lighting for living rooms, kitchen and corridor;
- electricity supply to living rooms;
- separate power supply to the kitchen;
- lighting and power supply for the bathroom and toilet;
- a separate power line for electric stoves and appliances that consume high power.
For each group it will be necessary to install a special protective shutdown device, which will promptly turn off a specific line, which will protect the wiring and the equipment powered by it from damage.
When connecting electrical points, you should definitely use distribution boxes, since they are, first of all, one of the ways to isolate connections.
It is worth noting that the connection of the electrical panel to the power lines in the apartment should be entrusted to the electricians of the management companies, since this work must be performed exclusively by specialists in accordance with the requirements of legislative documents.