Until recently, the load on the electrical network in residential premises was insignificant. Calculations and installation of networks were not given due attention. Electrical supply projects were carried out according to standard schemes. The emergence of modern high-power equipment causes the redevelopment of the entire residential electrical wiring network, recalculation of its power and replacement of electricians. To carry out design and installation work in a new formation, you need to know the modern principles of arranging a residential electrical network.
Home electrical planning
So that during the operation of electronic equipment and connecting it from various electrical points does not lead to constant reinstallation of network elements, so that you do not have to constantly ditch the walls of the apartment, experts recommend starting work on arranging the electrical network with drawing up a power supply diagram. An example of a wiring diagram and connection of electrical equipment can be seen in Figure 1.
Rice. 1. Example of an apartment power supply diagram
Such a drawing or diagram is formed in the “reverse order”: initially, all the lighting equipment and power equipment used are applied to the apartment plan; then, based on power calculations, the wiring diagram, wire cross-section, and protective devices are selected.
Power section
The power part of the electrical network includes powerful equipment used in the apartment: ovens, stoves, heating tanks, air conditioners. To connect them, separate powerful lines are allocated, protected by separate circuit breakers (RCDs). This design method will allow for safer operation of equipment in an apartment and more efficient repair work on electrical wiring networks.
Lighting part
The next block of the apartment's electrical circuit is the lighting part. There are two design options here:
- one group;
- several groups of lighting equipment.
The first type of scheme is used in small rooms equipped with a relatively small number of lighting devices. The second lighting chain method is more common. An example of such a connection is shown in Figure 2.
Rice. 2. Design diagram for several lighting groups in an apartment
If in a room, in addition to lighting elements, there is a need to use power supplies and transformers, it is also recommended to turn them on in a separate electrical circuit with a separate RCD.
Large home appliances
In any apartment, the place where a large number of household appliances are concentrated is the kitchen. Most of them continue to work when a person is not directly using them. This is a refrigerator, electric stove, bread maker, etc. To ensure correct operation of equipment and constant protection of the network from overloads and short circuits, when developing an apartment’s electrical network, experts recommend separating a separate line. Such connections are made by laying electrical wiring with a larger cross-section and installing a high-load RCD.
Layout features
Disadvantages of the layout of a 1-room apartment:
- Small living area.
- Very often there is a low ceiling.
- Small toilet, bathroom and kitchen.
- Small corridor or hallway.
- There are no mezzanines.
- Often there is no balcony or loggia.
Using partitions during redevelopment The main advantage of an apartment located not on the corner of the house, but inside, is its much better heat retention. In addition, there are several immutable rules that apply when planning:
- An old design trick - you need to visually show as much free space in the room as possible.
- Abundant artificial lighting even when there is sufficient natural light.
- Using color combinations. For example, the ceiling should always be lighter than other surfaces, but it does not have to be white - it can be any color. A lighter ceiling will visually rise and make the room more spacious.
- Mirrors and glossy reflective surfaces in the interior will also visually enlarge the room.
- In a one-room apartment, it is preferable to use a minimalist design style - it will make the room more spacious and preserve its functional features.
- Built-in or mobile furniture.
- Instead of a stationary internal partition between rooms, it is recommended to install furniture - a closet, a shelving unit. It will perform not only the role of a partition, but also its direct functions.
An example of redevelopment of a corner apartment with one room of 50 m2
Drawing up a wiring diagram
Electrical wiring in an apartment begins with drawing up a network wiring plan. Installing electrical wiring according to an existing design drawing is much simpler and more expedient for a number of advantages:
- the electrical network diagram will allow you to plan in advance the necessary equipment and facilities;
- the presence of a circuit will allow you to accurately determine the power of the input input;
- the drawing gives installation personnel an understanding of potentially fire-hazardous wiring components in order to take measures to redesign them or take additional safety measures;
- The diagram will allow installation to be carried out as planned, with verification of completion of the full cycle.
Examples of schemes for a one-room apartment
Electrical engineers believe that if the total load on the apartment’s electrical network does not exceed 25 A, then it is possible and even cost-effective to plan the network with one circuit per machine. This method is a typical standard scheme of the past, when lighting elements with power sockets were included in the circuit. Today, these techniques have been abandoned and installation is carried out along independent separate circuits. An example of wiring a one-room apartment is shown in Figure 3.
Rice. 3. Electrical supply diagram for a one-room apartment
The drawing shows the competent distribution of the network load of a one-room apartment into several separate circuits with their own RCDs. Such a system will ensure trouble-free operation of the wires and correct operation of the equipment without voltage drop.
For a two-room apartment
The difference between the drawing for the installation of supplies for a two-room apartment and a one-room apartment is in the larger number of circuits in terms of wiring. Some arrangements are possible here. Figure 4 shows an example of such a circuit.
Rice. 4. Electrical supply diagram for a two-room apartment
The example clearly shows several lighting circuits, as well as separately dedicated protected circuits for the kitchen, rooms and other powerful equipment.
For a three-room apartment
Figure 5 shows an example of a drawing, which is often used for apartments with three or more rooms, where a fairly large number of conductors will come out of one distribution board.
Figure 5. Example of a power supply diagram for a three-room apartment
The peculiarity of this option is that there are separate circuits enclosed in separate blocks with their own protection. In this example, there are 2 blocks (25 A and 40 A, respectively). This method allows you to separate zones of cable products, making the system more convenient and practical.
If there is no money for the device and no circuit
In some cases, searching for wiring is a fundamental task: for example, you urgently need to make a through hole in the wall, hammer in a dowel or nail. In such cases, you can use the means at hand to understand where the wiring is located in the panel house:
It is also worth remembering the basic principles of cable management that were followed in all Soviet houses:
But one should not rule out the appearance of cables under the baseboards or floors - such passages were not uncommon in panel houses. Particular attention should be paid to the gaps between the slabs: the ban on placing wires in them was often ignored by electricians for lack of other options.
Electrical wiring diagram in an apartment: step-by-step examples of wiring, installation and connection
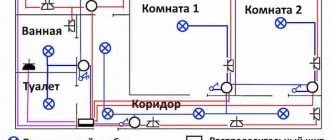
The placement of sockets and switches in the apartment should ensure ease of use and cover the needs of residents in connecting equipment. A typical example of the layout of electrical equipment (connection points) is presented in Figure 6.
Expert opinion
It-Technology, Electrical power and electronics specialist
Ask questions to the “Specialist for modernization of energy generation systems”
Electrical wiring diagram for a two-room apartment - Everything about electrics in the house The example clearly shows several lighting circuits, as well as separately dedicated protected circuits for the kitchen, rooms and other powerful equipment. Ask, I'm in touch!
Choice of installation method: open or hidden
After determining the layout of cable lines, the method of laying cables should be adopted. There are two ways to lay lines - hidden, open.
The first method is common when the finishing of premises is carried out with suspended structures and false panels (plasterboard, MDF). There is no need to make grooves (grooves) in the walls followed by putty. Hidden electrical wiring installed in an apartment has a number of significant advantages:
- maintaining the general appearance and integrity of the interior;
- less stringent requirements for cable installation conditions;
- increased tolerances to permitted currents.
It is not uncommon to see the option of open wiring. Wires are often placed in special plastic boxes attached to the decorative surfaces of the room. The open method of laying cables has the following advantages:
- possibility of installation after or during finishing work;
- faster installation;
- the ability to modernize the network by installing additional cables or dismantling them.
Currently, if the arrangement of the electrical network is an integral part of the general renovation of the premises, specialists often use a hidden method of laying conductors.
Tool you will need for the job
Electrical installation and repair is a complex, labor-intensive process performed by professional electricians. You can’t do this without a set of special equipment. In the work (for installation, replacement of old electrical wiring), the installation team uses the following set of professional tools and devices:
- angle grinder machine with cutting wheels for stone;
- bit;
- perforator;
- screwdrivers with handles made of insulating material;
- phase indicator (indicator);
- wire cutters;
- pliers;
- extension;
- knife;
- level;
- putty knife;
- portable lamp.
List of further works
After the wiring diagram has been sketched out, we begin to calculate the network parameters and install it.
Selecting a cable and calculating its cross-section
To accurately calculate the cable cross-section based on the power of consumers, use the following relationship: I=P/U, where P is the total power of all consumers in the circuit for which the cross-sectional area of the conductor cores is selected, and U is the voltage of the apartment network. Most often, the wiring circuits are arranged in such a way that the electric current load in them does not exceed 25 A. In this case, the following sections are used:
- wire VVG-3*2.5 – two-core power cable with a cross-section of one conductor of 2.5 mm2. This is the most used wire for organizing the electrical network in the apartment. They connect the distribution board with the distribution boxes of the premises;
- wire VVG-3*1.5 - two-core power cable with a cross-section of one conductor of 1.5 mm2. Such conductors are used for installation from distribution boxes to sockets, automatic switches in the panel;
- wire VVG-3*4 – three-core power cable with a conductor cross-section of 4 mm2. Such conductors are separated into separate circuits for connecting powerful apartment consumers (furnace, heating tank, etc.).
Marking sockets and switches
The placement of sockets and switches in the apartment should ensure ease of use and cover the needs of residents in connecting equipment. A typical example of the layout of electrical equipment (connection points) is presented in Figure 6.
An example of placing connection points in an apartment
When marking the locations of sockets and switches, the following requirements of modern standards must be observed:
- sockets and switches are located to the left of the doors;
- switches are mounted at a height of 0.9 m from the floor;
- in living rooms, sockets are located at a height of 0.4 m from the floor, in the kitchen - 0.95 -1.15 m, in the bathroom the use of sockets is prohibited.
Wall chipping
After marking the locations of distribution boxes, sockets, switches, and installation points for lamps, they begin to arrange grooves (grooves) along the walls and on the ceiling for laying out the wiring. It is worth remembering that gating should be done in horizontal and vertical planes along straight lines. This will make it possible to more accurately determine the location of the wire in the future. The grooves are made using a grinder or a hammer drill. The depth of the groove must be at least 20 mm, and the width must be sufficient for laying all cables planned for laying in this location.
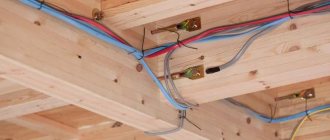
Cabling
The principles of laying cables for hidden and open wiring are the same. Installation starts from the connection points and leads to the distribution panel. Next, the line is inserted into the shield and moved to another circuit. If necessary, identification tags are hung on the end sections of the wiring for quick reference. After installation is completed, the cables are covered with boxes or putty in the wall.
Installation of socket boxes and junction boxes
The laid wiring is brought to the mounted junction boxes and electrical outlets, inserted into them, and the ends are driven out with a small margin. All wiring branches are arranged in boxes. The connection of the conductors of aluminum or copper wiring must be reliable. For connection, it is advisable to use special devices, as shown in Figure 7.
Connecting conductors in a junction box
Immediately before connecting the wires, they ring and make sure that the installation work is carried out correctly at this stage.
Installation and assembly of electrical panel
When all the cables of all electrical circuits are laid to the installation site of the electrical panel, they begin to organize the apartment's distribution panel. This part of the electrical network is characterized by a large number of conductors and protective devices, so it is very important to make all connections correctly. For the shield, you always choose mounting boxes with a certain supply of seats. This will allow you to upgrade the system or eliminate its malfunction in the future.
An example of an electrical panel diagram for a standard apartment is shown in Figure 8.
Figure 8. Example of electrical panel diagram
In the figure, the positions indicate: 1 - introductory machine; 2 - electric meter; 3 - zero bus; 4 — protective grounding bus; 5–9 — automatic machines; 10 - separate automatic switch for lighting
Installation of sockets and switches
Sockets and light switches are installed in pre-installed boxes with wire ends removed. The process is not difficult and will require a minimum set of tools: pliers, wire cutters, and a screwdriver. This is the final stage of installation work on the apartment’s electrical network.
Checking the quality of work
The quality of the work performed is checked by turning on the wiring circuits and checking the presence of voltage and the correct phase distribution in the network. This procedure is carried out using voltage indicators. Incorrect installation can also immediately show a disconnected circuit breaker against short circuits.
Location of junction boxes in a panel house. How to find a junction box in a wall?
Repair is necessary, but problematic. Many owners of houses or apartments, when starting renovation work, are often faced with the problem of finding a junction box.
Finding it under a layer of plaster, wallpaper, or even drywall is not an easy task. It’s good when the owner of the house or apartment himself installed the electrical wiring or was at least present at this moment.
What should those people do who moved into an apartment where the wiring was done before them? In fact, there are several effective ways to find a junction box, let's look at them in more detail.
Distribution boxes in old-style apartments
- Khrushchevka. In the 60s of the last century, distribution boxes in Khrushchev buildings were made of metal and they were closed with a very bulky lid, which was difficult to disguise under finishing materials. You can find such a metal box visually and with the naked eye. As a rule, in Khrushchev-era buildings they were mounted at a distance of 15 cm from the ceiling level. Iron also tends to rust; oxidation will certainly manifest itself on the surface of the finishing material;
- Brezhnevka. In multi-storey buildings of this type, the technology and method of installing distribution boxes is different. The installation was carried out at the junction between the wall and the ceiling and was covered with a galvanized sheet of metal, forming a void. It would seem that finding such a design would not be a problem, but the whole dilemma is that such a sheet is covered with plaster, which creates a search problem. For successful detection, you can use special detectors-alarms or drive an indicator screwdriver from the socket, guided by the light of the indicator lamp;
- Stalinka. In such houses, the search for a junction box will be based on tapping the wall at a height of 2.5-2.9 meters, since if detection is successful, a characteristic dull sound will be heard.
Search for distribution boxes in modern apartments
Homes built in the 2000s and modern buildings use plastic junction boxes. They are no longer masked with a thick layer of plaster, but are simply carefully covered with wallpaper or other finishing materials.
The most difficult situation is finding the box under the drywall. The problem is that the sheets of drywall are mounted on a metal profile, and using a magnet to find the wiring will not work. The only way out is to use a detector-signaler.
If you need to find a power outlet box, then connect a surge protector to it, to which you should also connect several powerful household appliances. We turn on the surge protector, then the devices and, using a regular indicator screwdriver, move upward from the socket, and as the intensity of the indicator glows, we get the exact location of the box.
There is another way to determine the junction box, but it does not provide a 100% guarantee. In this case, we hope that its installation was carried out based on the requirements for electrical installation work, according to which the box is installed 15 cm below the ceiling level (see figure below).
Typical frequently asked questions from readers
What kind of circuit breaker should be installed in the apartment if the electrical switchboard is rated at 25 A?
If a 25A circuit breaker is already installed in the entrance (in the electrical switchboard), then it makes no sense to install more than this rated current in the apartment.
It is more advisable to install circuit breakers with a lower rated current - 16 or 20A. If you connect a large number of powerful electrical appliances in your apartment that can simultaneously be included in the electrical circuit, and their load significantly exceeds or approaches the rated current of 16 - 20 A, you can use the same 25 A, but with greater sensitivity than set in entrance. For example, if there is C25 in the entrance, you can put B25 in the apartment.