Installing electrical wiring in an apartment is quite a large-scale undertaking that requires an appropriate approach, so if you are not confident in your abilities, it is better not to attempt to do this work yourself. For those who have decided to take such a serious step, we will try to make the task much easier by describing in detail all the stages. Unfortunately, within the framework of one article it is problematic to present everything necessary without compromising perception, but the missing information can be found in other publications on our website.
Main stages
This type of installation work is usually carried out in three stages:
- Preparatory stage. It includes:
- selection of wiring type;
- drawing up a work plan;
- marking.
- calculations for selecting equipment and cables;
- purchasing everything you need.
- Installation. This is the most labor-intensive stage of work, taking up most of the time. It includes:
- preparation of routes (wall slitting or box installation);
- creation of seats for electrical points;
- installation of distribution boxes and cable laying;
- installation of a shield (if it has not been done previously).
- The final stage, which includes:
- installation and connection of electrical points (sockets, switches, lighting fixtures, etc.);
- assembling a distribution board and connecting internal lines to it;
- connection to input;
- checking all internal lines one by one.
Now in detail for each section.
Color temperature and color rendering of light
An important factor in choosing lamps for lighting rooms is color temperature. This indicator illustrates the quality of light and the shade of the glow. The unit of measurement is degrees Kelvin (K).
Color temperature information can be found on the packaging of the light bulbs you purchase. To make it easier to understand, consider three types of glow:
- Warm - 2700 K. Soft light with an unobtrusive yellowish tint.
- Neutral - 4000-4200 K. Light as close to natural as possible.
- Cold - 6000-6400 K. Glow with a slight bluish tint.
Important! There are lamps with parameters much higher than 6400 K, but they are not suitable for residential premises.
The shade of the glow directly affects the psycho-emotional state. Warm light is perceived best - it gives comfort and tranquility. This shade is suitable for general lighting. Neutral is more often used to highlight local zones. Cold light is often found in offices, home libraries, hallways, and hallways.
Many people confuse color temperature with color rendering index. However, the second indicator does not symbolize the tone of the lamp's glow, but the ability of light rays to distort the shades of surrounding objects. To evaluate the index, a numerical scale with numbers from -60 to 100 is used. The higher the lamp index, the more correctly the real colors of objects will be recognized when the light is on.
Full scale of light color temperature
Preparatory stage
The most important part of this stage is planning. First of all, you should decide on the type of wiring. That is, choose what it will be, internal or external. The first option is more labor-intensive and practically cannot be reconfigured without major repairs (carried out before finishing work), but it looks more aesthetically pleasing. With the second option, everything is much simpler; it can be done without major repairs. Wiring can be reconfigured within certain limits, such as installing an additional line or relocating (adding) outlets.
Example of external wiring in a box
As practice shows, external wiring in apartments is not popular, for several reasons: firstly, the living space begins to resemble an office, and secondly, the box is an excellent dust collector. In addition, such wiring indirectly indicates permanent repairs, which reduces the cost of the apartment when selling. Be that as it may, this option has a right to exist and in some cases there is no alternative, but since the hidden type of wiring is mainly used, we will focus on it. https://www.youtube.com/watch?v=UGBLLe7oBy8
Wiring and requirements for it
The first and very important point that you should know about before starting electrical installation work is that in panel houses (Khrushchev-era buildings) you most often cannot trench walls in accordance with Moscow Government Decree No. 73-PP dated February 8, 2005 “On the procedure for renovating premises in residential buildings on territory of the city of Moscow." Also, according to Government Decree No. 508 (Clause 11.3 and 11.11 of Appendix No. 1), it is prohibited to tap load-bearing walls.
In this case, it would be rational to conduct wiring through existing channels, the floor or under the ceiling (if a suspended or suspended ceiling is planned). The first and last options are more preferable. If the electrical wiring in the apartment is changing and you plan to cover the walls with plasterboard, an excellent solution would be to lay the wiring behind the plasterboard.
Important!
It is strictly prohibited to scratch the ceiling in the apartment! The only option in which you can make grooves on the ceiling is to first apply an additional layer of plaster to the ceiling, in which the cable will be hidden. This layer can already be carefully grooved without touching the monolith.
Those. The simplest option is to draw lines from the panel to the sockets and switches along the ceiling, ducts or floor, and then make vertical grooves and so-called wells for installing socket boxes.
Another important point that you should pay attention to if you decide to do the wiring in the apartment yourself is noisy work
allowed from 9 am to 7 pm (except Sundays), while from 1 pm to 3 pm there must be an hour of silence! Shredding is a noisy job and can not only cause the anger of neighbors, but also cause a fine (from 1 to 5 thousand rubles for individuals).
Let's return directly to the installation of apartment electrical wiring. As we said earlier, the length of the conductors must be purchased with a reserve. This reserve will be used to connect them to each other (on each side the outer sheath of the cable is removed by 5-10 cm) and to connect sockets, switches, lamps (the length reserve is from 10 to 15 cm).
The video shows how to correctly install electrical wiring in an apartment without breaking the rules:
Making a plan
Having made a choice, we move on to drawing up a diagram. This must be done for the following reasons:
- the diagram will allow you to determine the amount of necessary equipment and calculate the approximate cable footage, taking into account the cost of the latter; for example, purchasing an extra 50 meters of copper wire will not only be expensive, but also offensive;
- the installation process will take a lot of time, and you can simply forget or not take into account some points, and after finishing work it will be impossible to make adjustments
- The planning process allows you to choose the most optimal option for cable routes and electrical points locations.
You need to start by drawing up an accurate plan with all the rooms; if you don’t want to practice with a tape measure, you can take the drawing from the technical passport of the apartment as a basis. Next, we make a photocopy of the drawing, or alternatively, scan or redraw it. Since we are making the scheme for ourselves, we don’t have to adhere to GOST requirements. Locations for electrical points are indicated approximately.
“Clean” apartment plan
We choose the optimal location for lighting fixtures and determine their quantity. Having decided, we indicate these places on the diagram. We do the same with switches. Next, we draw the lighting lines and distribution boxes on the diagram.
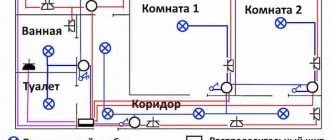
Plan with applied lighting diagram
It is undesirable to make one line for all lighting, since in case of an emergency you can be left in the dark. It is also not advisable to get too carried away with zoning, leading a separate route to each room. This increases cable consumption, requires more circuit breakers, that is, leads to an increase in the cost of the project.
In the plan presented above, two zones were made, one included two rooms and a corridor, the second a toilet, bathroom and kitchen. Ideally, lighting should be planned in such a way that if any of the lines fails, the electrical panel will always remain illuminated.
Now let's move on to the power part. We select places for electrical points (in this case, these are sockets) and draw routes, if necessary, add distribution boxes. All this should be done taking into account the future layout, so that there are no “frozen” (unclaimed) outlets, for example, covered by furniture. The opposite option, in which there will be a shortage of electrical outlets, is also undesirable (extension cords are not the best decoration for the room).
Plan with lighting and main power section
A few clarifications need to be made here. In the diagram presented in Figure 4, four separate lines are used for sockets. This was done so that when the protection on one of the lines is triggered, only one room remains de-energized. The actual number of zones can be halved by combining rooms and a corridor into one circuit. As for the kitchen, it is recommended to make a separate line for it.
Now all that remains is to draw on the plan individual routes for the stove and boiler.
The final version of the wiring diagram in the apartment
Useful tips
- As for the wiring diagram, the best option is to break it down into rooms. That is, each room is a separate section with its own load, and, therefore, with its own cable cross-section. This refers to the cable from the first distribution box above the entrance door to the apartment, to the distribution box above the door to the room. Inside the room, wires with a smaller cross-section are scattered among the lamps and sockets, suitable for certain loads that you have planned in advance, based on the number and total power of consumer devices.
- The wiring diagram, as well as installation work, must begin from the farthest room. The last room is the hallway.
- It is necessary to bypass the diagram of concrete structures such as floors above windows and doors. Firstly, this is a monolithic product, which is very difficult to groove. Secondly, God forbid, when installing curtain rods, you stumble upon a cable with a drill. All the work will go down the drain.
- Correctly counting the number of distribution boxes will make it possible to save the length of the cable used.
- The best option is to lay the cable in a corrugated hose, and then put it in grooves.
Marking, calculations and purchasing
Having finished with the plan diagram, we arm ourselves with a pencil, a ruler with a level and a mounting (breaker) cord, and proceed to marking. We start by indicating the exact locations of the electrical points.
Location of electrical points
Here it is necessary to make a digression and talk about the basic norms and rules:
- It is recommended to install sockets in residential premises at a distance of 30 cm from the floor. The exception is the bathroom and kitchen. In the first case, a place is selected approximately 50 cm above the level of the washbasin and bathtub (while being as far away from them as possible). In the second, the level of sockets is selected depending on the features of the kitchen unit and the location of the equipment.
- It is rational to place switches at a distance of 90 cm from the floor, next to the entrance to the room.
- The wiring route, as well as electrical points, should not be located close to heat sources (batteries, electric stove, etc.), the minimum distance to them is 50 cm.
- Routes in walls should be laid parallel or perpendicular to the floor.
- It is necessary to make an indent of at least 10 cm from the windows, and 15 cm from the ceiling.
If you plan to install a suspended ceiling, then the main wiring can be done above it; this greatly simplifies the task, but creates a problem with access to the distribution boxes.
Example of ceiling layout
You can also lay the wiring on the floor, but in this case you will need to increase the thickness of the screed. In apartment buildings, this option is practically not used.
Floor layout
Mistakes when choosing lighting for an apartment
It is difficult to create a high-quality lighting project without even a minimal understanding of the system. By throwing yourself into bold design experiments, you can make mistakes that are very costly to correct. Top 7 main shortcomings:
- Lack of a clear lighting plan. If you don’t have a ready-made project on hand, it’s simply impossible to organize a competent system. You risk missing important details.
- Different color temperatures of lamps. Dissonance is inevitable if some of the lamps shine with a warm shade, and others with a cold shade. Such disagreement will visually destroy even the most original interior.
- Incorrect placement of lighting sources. You cannot rely on luck and believe that randomly placed lamps will provide uniform flows of light. It is necessary to analyze possible options and think through placement points.
- Failure to comply with lighting standards. Even if it seems to you that two lamps per room are enough, it is better to double-check your beliefs through calculations.
- Purchasing budget lamps with flicker. When choosing light sources, you should be guided not by price, but by the quality of the products. Lamps with a high percentage of flicker have a bad effect on vision and health.
- Use of diverse lamps. It is necessary that light sources be combined in style. For example, a classic crystal chandelier will look strange against the backdrop of trendy pendant lamps with metal shades. Trends are great, but the compatibility of elements is still more important.
- Ignoring the features of the room. There are proven ways to brighten a dark room. With the help of light you can transform even the darkest and cramped room.
In this article we will touch on all of the above aspects. Design tips will help you avoid mistakes and create a stunning atmosphere in your rooms.
Advice! Do not blindly repeat the lighting design that you saw in a picture on the Internet or from friends. You need to first check whether it will fit into the interior of your home.
Calculations, equipment selection and purchase
Having finished with the markings, we make calculations to select the cable cross-section and characteristics of the protective equipment (circuit breakers, RCDs or automatic circuit breakers). All the necessary information to solve this problem can be found on our website. Recommendations for equipment are also indicated there.
Since the rules for installing hidden wiring require ensuring its replacement, the cable in the grooves must be laid in pipes or corrugation made of non-combustible material, so do not forget to add them to the estimate.
Next, we make an estimate for equipment and cables. We calculate the footage of the latter along the routes; we calculate the number of sockets, switches and distribution boxes according to the drawn up diagram. The number of circuit breakers corresponds to the number of lines; we must install an RCD on individual routes (boiler, kitchen electric stove). In addition to this, we take into account the introductory circuit breaker and the fire protection RCD; if required, we add an electric meter.
Everything is simple with the purchase, we take it wherever it is cheaper, and do not forget to inquire about the availability of the necessary certificates for the equipment.
How to install wiring in an apartment - step-by-step diagram
Step 1: Grooving and installing socket boxes
The grooves for laying cables, as we have already said, must be either vertical or horizontal. Crooked grooves lead to accidents and injuries. To carry out the work, it is advisable to use a stepladder with a stop, which will protect you from falling and injury. We first mark the boundaries of the groove with a grinder, and then knock out the groove with a chisel, and also do not forget to knock out the places for installing the socket boxes. It is worth noting that this stage is characterized by too much noise, so it is better to talk to your neighbors in advance so that they do not complain about you. It is also worth remembering that any such work is carried out only on weekdays during working hours.
Installation
The most difficult thing in organizing hidden wiring is gating the routes, especially in panel houses. This process is labor-intensive and dusty. You can make your task somewhat easier by using special equipment for this purpose, namely a wall chaser.
The wall chaser greatly simplifies the work
In addition, we will need a hammer drill, a special attachment for scoring and a flat chisel attachment, drills and bits for concrete.
It is recommended to start by preparing seats for sockets, switches and junction boxes. It’s easier to follow the following algorithm:
- install a crown of the appropriate diameter on the hammer drill;
- make a sawing with a depth of 5 mm;
- replace the crown with a drill;
- we make holes along the furrow, a little deeper than the cup holder;
- change the drill to a crown and work with it;
- insert the chisel attachment and knock out the concrete.
Having prepared the seats, we proceed to grooves, that is, we make grooves in the wall somewhat wider than the outer diameter of the corrugation or pipe by about 20-25 mm.
We install the cable (do not forget to place it in corrugation or pipes). The easiest way to “grab” the cable in the groove is with a thick gypsum mortar.
At the same stage, the distribution board is installed, if it has not been installed previously.
We recommend labeling the cables, at least in the distribution panel, to avoid confusion.
At this point the second stage is completed, you can begin finishing work.
Installing wiring in an apartment - what do you need to remember?
Before connecting the electrical wiring in the apartment, you need to take several important preparatory steps. So, we have already talked about designing and drawing a circuit - a very important step on which the quality of installation depends. The next step is to make markings in the wiring diagram, along which the wires will be laid and a temporary shield will be installed.
It is advisable to start work by laying the main bundle of cables, their branches and indicating their turns. Do not forget that the cables must be arranged vertically or horizontally. After finishing, draw a diagram that you will need when carrying out the main work. After this, we need to purchase tools and other construction equipment (we select them based on the material of the walls and other surfaces):
- grinder for working with concrete and brick surfaces;
- assembly chisel – suitable for working with foam blocks and plaster.
This tool will be needed to create recesses in walls and other surfaces when laying wires. Next we proceed to preparing the electrical wiring - cutting the cables. When cutting them to the required length, do not forget to leave about 15 cm of cable in reserve for connecting the cables to each other. Next, you need to prepare a sealing mixture, which in its characteristics will be similar to that applied to the walls for finishing. It is needed to secure the wires in the groove and level the surface. Having prepared the solution, apply it to the walls and wait until the mixture dries a little, after which we smooth out the unevenness using a foam float.
Final stage
This is the simplest part of the work, we install sockets, switches, lighting fixtures and connect them to the wiring. Next, we assemble the distribution board and connect internal lines to it. All information on these processes is on our website.
The input connections are made; this procedure is performed by employees of the electrical company with which an agreement on electricity supply services has been concluded.
After connecting the shield, we turn on the machines one by one and perform a test.
Connecting sockets and switches
This stage is quite simple; you need to connect all the sockets and switches in the apartment. For this purpose, socket boxes and special boxes are installed in the grooves. We recommend that you “plant” these elements on alabaster, because it quickly and reliably sticks to the wall.
There is no point in writing the same thing several times, so we offer a list of articles that you need to read:
- How to install a junction box in a wall
- How to connect a European socket
- How to install a light switch
- How to connect a switch to the network
Wall work
When the markings on the wall are ready, you can begin another stage of work, which is also no less important. However, before you start drilling or gouging out the wall, you need to decide how the wires will be installed on the wall, open or closed.
So, for the closed method it is typical to trench the walls, i.e. make special grooves in the walls where the wires will be laid, after which these channels are sealed with plaster.
But for the open method, such actions will not have to be performed; the wires will be hidden in special boxes for electrical wiring.
Note!
Insulate the foundation with your own hands - a step-by-step description of the use of the best materials and technologies (90 photos)
- Do-it-yourself pergola on a summer cottage: step-by-step instructions with photos and descriptions
Laying laminate flooring with your own hands: a detailed description of how to lay laminate flooring. Laminate calculation, step-by-step description and installation secrets (105 photos and videos)
It should be noted that these special cable ducts are made of fire-resistant and self-extinguishing plastics. As a rule, this wiring option is most relevant for a private house made of wood.
Distribution boxes
For faster and easier wiring indoors, it is necessary to use special distribution boxes that are designed to connect wires on all sides.
Of course, you can install the electrical wiring yourself, but you will have to put in a lot of effort and patience, but there’s nothing very complicated there either.
Using the same principle, you can do the installation of electrical wiring in the garage with your own hands. It is important to follow all the rules during the work process and the result will definitely please you.
However, not everyone will be able to do everything at once and quickly; there is a high probability that at some stage certain difficulties or problems may arise.
And you don’t want to stop halfway, then as a solution to the problem, you can watch a video of installing electrical wiring with your own hands, maybe this will help solve your problem.
Apartment lighting plan
Lighting design is the next step after planning the purpose of rooms and arranging furniture. Many people mistakenly believe that one chandelier in a room is enough. However, in this case, local areas of the room will remain darkened. To prevent this from happening, three types of lighting should be included in the project:
- General: ceiling lights, lamps, chandeliers for uniform lighting of the space.
- Local (local, working): lamps for lighting the functional areas of the room.
- Decorative: light sources for decorating interior items and creating a creative atmosphere in the room.
When planning lighting, you should be guided not only by personal preferences. It is necessary to correctly calculate the number of lamps per room area and think about the location of lighting fixtures.
Scenario for proper room lighting
How to make lighting in a room: night and decorative lighting
You shouldn’t give up on effective lighting, even if your plan didn’t include additional lighting. Let's consider two scenarios: decorative and night lighting.
Decorative lighting
Beautiful designer interiors often feature creative lamps, bright neon signs, original lamps, LED strips, and garlands. With the help of these elements you can create an amazing ambience in the room and transform the atmosphere.
It is necessary to think about how to organize decorative lighting in a house or apartment. The main thing is to correctly build the layout and connection of the lamps to the electrical network. Devices must exist independently from the main lighting sources so that they can be turned on separately.
Example of decorative bathroom lighting
Night lighting
It is not safe to move around the rooms at night: in the dark it is easy to trip over furniture or trip. To make moving around comfortable, it is worth providing special lighting. For example:
- LED lighting of the floor, stair steps and flights.
- LED ceiling lighting.
- Wall lamps, floor lamps.
- Night lights and table lamps.
Ideally, you don’t have to reach for the switch to turn on the night lighting. You can set up a smart light system and control devices using voice commands or a remote control. Another convenient solution is to automatically turn the lights on and off. To implement the idea, motion sensors should be integrated into the room. They will react to human movements and start the process of turning on the light.
Many people confuse night and decorative lighting. This is not entirely correct. Yes, both scenarios are considered minor. However, the task of the night one is to ensure safety, and the decorative one is to create a spectacular environment.
Night lighting in the hall
Plan for placing lamps in rooms
There are basic rules for placing light fixtures, but you can get creative. For inspiration, we offer several ideas and interesting models of lighting devices for different rooms.
Living room
The layout of lighting fixtures depends on the presence or absence of a chandelier. If there is one, it is better to place it in the center and surround it with built-in lamps.
Examples of luxurious chandeliers for a unique interior: Terzani Volver and Luce Tavere .
buybuy
Terzani Volver chandelier in silver
buybuy
Luce Tavere chandelier with several lamps
If there is no chandelier, the task of main lighting falls on pendant and spotlights. They can be arranged in rows, in a semicircle, crosswise, or in a checkerboard pattern. The choice of scheme will depend on the number and type of devices.
You can place sconces or decorative LED lamps on the walls. Don't forget to highlight the space near the sofa or armchair where you most often relax with light.
Example of a living room lighting scenario
Children's
Do not oversaturate the nursery with bright light. One chandelier, 3-4 lamps and an original night light are enough. Table lamps with shaped lampshades will look great on the bedside table.
Example of a living room lighting scenario
Idea! Using a projector, you can “strew” the ceiling with stars. This decorative lighting option will definitely impress children.
Bathroom
If you don't know how to position the lights in the bathroom, feel free to plan a three-level lighting system. We decipher: the upper level is ceiling lamps, the middle level is sconces, the lower level is LED strip or miniature spots for floor lighting.
Increasingly, designers are decorating bathrooms with original pendant lamps. Such products look especially interesting near mirrors or wall cabinets. The most advantageous composition is two symmetrically located lamps.
Examples of lamps: the laconic Paulmann and the ultra-fashionable Artichoke Red .
buybuy
Paulmann pendant lamp
buybuy
Pendant lamp Artichoke Red
Example of a bathroom light scenario
Bedroom
For a small bedroom, a chandelier, several sconces and a table lamp are enough. It is better to place wall lamps on both sides of the bed, above the nightstands, near pictures and mirrors. Interesting options for the bedroom: red Turbolamp Laenburg model .
buybuy
Pendant lamp Turbolamp
buybuy
Pendant lamp Laenburg
Example of a bedroom lighting scenario
Kitchen
In the kitchen, built-in lamps can be located on the ceiling and furniture facades. The chandelier will be replaced by stylish pendant lamps in unusual shades. They are best placed above a bar counter or table.
The kitchen apron can be decorated with LED strip. The result will be decorative and at the same time functional lighting in the work area of the room.
Example of a kitchen lighting scenario