Electrical installation in a new building
Today, before moving into a new building, in most cases additional expenses are required, since apartments in new buildings are rented out without renovation. It is necessary to connect electrical systems for electric stoves (high-rise buildings are not connected to the gas supply) and the use of household appliances. Therefore, the speed of settlement, as well as the comfort and safety of life, depends on how correctly and quickly the installation of electrical wiring is planned and carried out.
Electrical installation of a one-room apartment in a new building
Electrical installation of a two-room apartment-new building
Electrical installation of a three-room apartment-new building
Today, before moving into a new building, in most cases additional expenses are required, since apartments in new buildings are rented out without renovation. It is necessary to connect electrical systems for electric stoves (high-rise buildings are not connected to the gas supply) and the use of household appliances. Therefore, the speed of settlement, as well as the comfort and safety of life, depends on how correctly and quickly the installation of electrical wiring is planned and carried out. life activity. life activity.
Our prices
| Prices for electrical installation in a new building: | ||
| ECONOMY | ||
| One-room apartment (up to 35 sq.m; 16 electrical outlets; box up to 12 mod.) | from 35,000 rub. | up to 45,000 rub. |
| Two-room apartment (up to 45 sq.m; 18 electrical outlets; boxing up to 36 mod.) | from 45,000 rub. | up to 55,000 rub. |
| Three-room apartment (up to 60 sq.m; 28 electrical outlets; boxing up to 48 mod.) | from 60,000 rub. | up to 75,000 rub. |
| area over 60 sq.m. | 1200 rub. per sq.m. | |
| AVERAGE | ||
| One-room apartment (up to 35 sq.m.; 16 electrical outlets; box up to 36 mod.) | from 45,000 rub. | up to 60,000 rub. |
| Two-room apartment (up to 45 sq.m; 18 electrical outlets; box up to 48 mod.) | from 70,000 rub. | up to 75,000 rub. |
| Three-room apartment (up to 60 sq.m.; 28 electrical outlets; box up to 54 mod.) | from 80,000 rub. | up to 90,000 rub. |
| area over 60 sq.m. | 1500 rub. per sq.m. | |
| MAXIMUM | ||
| One-room apartment (up to 35 sq.m; 16 electrical outlets; box up to 48 mod.) | from 60,000 rub. | up to 70,000 rub. |
| Two-room apartment (up to 45 sq.m; 18 electrical outlets; boxing up to 54 mod.) | from 80,000 rub. | up to 90,000 rub. |
| Three-room apartment (up to 60 sq.m.; 28 electrical points; boxing up to 27 mod.) | from 90,000 rub. | up to 120,000 rub. |
| area over 60 sq.m. | 2000 rub. Per sq.m. | |
View full price list
| № | Name | Unit | Price |
| 1 | Installation of internal electrical panel (box) up to 12 modules | PC. | from 3200 rub. |
| 2 | up to 24 modules | PC. | from 4600 rub. |
| 3 | up to 36 modules | PC. | from 5100 rub. |
| 4 | up to 54 modules | PC. | from 6200 rub. |
| 5 | Cable laying (1.5 sq. mm - 4 sq. mm) in a corrugation (corrugation fastening) | linear meters | 85 rub. |
| 6 | Laying the power cable (6 sq.mm - 35 sq.mm) | linear meters | negotiable |
| 7 | Installation of electrical box | linear meters | 100 rub. |
| 8 | Installation of cable in a groove with subsequent insertion | linear meters | 70 rub. |
| 9 | Installation and wiring of a single-pole ABB circuit breaker (in the switchboard) | PC. | 170 rub. |
| 10 | Installation and disconnection of the ABB, Legrand difavtomat | PC. | 310 rub. |
| 11 | Installation of introductory automatic machine ABB, Legrand | PC. | 500 rub. |
| 12 | Installation and connection of an electric meter | PC. | 800 rub. |
| 13 | Installation of socket, switch (internal) | PC. | 250 rub. |
| 14 | Installation of socket, switch (external) | PC. | 250 rub. |
| 15 | Installation of external electrical box 10 -25 mm | linear meters | 80 rub. |
| 16 | Installation and wiring of an "Amstrong" type lamp | PC. | 280 rub. |
| 17 | Installation and disconnection of a spotlight (plasterboard) | PC. | 290 rub. |
| 18 | Installation and connection of a 12V step-down transformer | PC. | 200 rub. |
| 19 | Chandelier installation | PC. | from 400 rub. |
| 20 | Installation of sconces | PC. | 250 rub. |
| 21 | Setting the bell (with button) | PC. | 700 rub. |
| 22 | Installation and disconnection of instantaneous (storage) water heater | PC. | from 1500 rub. |
| 23 | Connecting a washing machine | PC. | from 1500 rub. |
| 24 | Dishwasher connection | PC. | from 1500 rub. |
| 25 | Electric floor heating devices | sq.m | 650 rub. |
| 26 | Installation and disconnection of the heated floor controller | PC. | 400 rub. |
| 27 | Fan installation | PC. | 300 rub. |
| 28 | Installation of video intercom (with call panel) | PC. | 6000 rub. |
| 29 | Installation of the ground loop (turnkey) | PC. | from 15,000 rub. |
| 30 | Digging a trench 400 x 700 mm (with installation of an armored cable in a HDPE pipe, backfilling with 150 mm sand, laying warning tape, backfilling) | linear meters | 1100 rub. |
Show in full
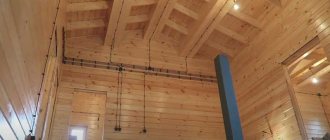
Wiring installation
Well, we have completed all the preparatory work, and it’s time to proceed directly to the installation. It can also be divided into several stages, which we will now consider.
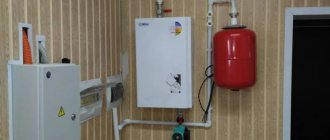
Installation of distribution board
The electrical network of the apartment begins with the distribution board. It is also often called apartment. There are two options here: the meter is installed inside the apartment or on the site. We will talk about arranging a more complex option, with a meter inside the apartment. Although this complexity is very conditional.
Switchboard
- First of all, we should choose a place to install the distribution board. This should be a comfortable place, not prone to flooding, and inaccessible to children. The installation height of distribution boards is usually 1.5 meters.
Wall-mounted switchboard
- The next point we must decide on the type of distribution board. This can be a mounted or built-in shield. A mounted one, of course, is easier to install, but it takes up space and does not look very aesthetically pleasing. Therefore, it is better to choose a built-in one, although you will have to dig a niche in the wall for it.
Built-in distribution board
- If a meter is installed in the switchboard, it must have a separate niche for this device. Moreover, in this niche there should be a window for reading the meter readings without opening the doors.
The photo shows a distribution board with a window for the meter
- Switchboard doors must be locked with a key. And the installation location must ensure full opening of the panel doors.
- Another issue that is worth a couple of lines is the material from which the switchboard should be made. If installation will be carried out in a concrete wall or other fireproof structure, then you can choose a plastic product. If installation is carried out in a wooden wall, then the choice should be made of an iron product.
Plastic distribution board
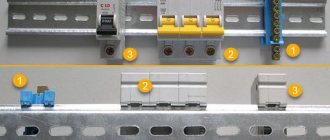
- Now we move directly to the process of installing electrical devices inside the switchboard. All devices are mounted on a so-called DIN rail. It may already be in the shield, but often it is installed independently. The dimensions and location of these rails are selected individually, based on the number of devices and the ease of their installation.
DIN rail
- The very first device in our network is a meter. Any devices that allow you to remove voltage from it in accordance with clause 7.1.64 of the PUE must be located outside the apartment.
- From the meter, the wire is laid directly to the group circuit breakers. Some install an input machine between the counter and group machines. But according to clause 7.1.65 of the PUE, this is not required.
- Let's dwell a little on the cross-section of the wire from the meter to the group machines. It must correspond to the nominal value of the meter. Usually it is 25 or 32A. For such a current, a wire of 2.5 mm2 or 4 mm2, respectively, is sufficient. It is recommended to use the same wire to make jumpers between the inputs of group circuit breakers. It’s better to purchase and install special tires.
Connection diagram in the distribution cabinet with installation of an RCD on all group circuit breakers
- But only the phase wire goes down to the group circuit breakers. The neutral wire from the meter is immediately connected to a special bus. A protective grounding wire is connected to another similar bus, which comes into the panel bypassing the meter.
Note! Surge limiters and power quality monitoring devices are installed between the meter and the group switches.
Connection diagram in the distribution board for a three-phase meter
- Next, as you can see in the video, the wire from the output of the group machine goes to the junction box. The only exceptions are groups that have an RCD machine. In this case, a phase wire from a group circuit breaker and a zero from the corresponding bus are connected to them. And the phase and neutral wires are connected to the RCD terminals, going directly into the distribution boxes. The protective grounding wire, in any case, is connected without switching devices.
Installation of wiring throughout the apartment
Well, we have installed an apartment panel. Now all that's left to do is install the wiring around the apartment. This is a rather labor-intensive, but not very complicated process.
Niche for socket or switch
- First of all, we need to hollow out or drill special niches for the mortgage boxes. We will then install our sockets and switches in them. In addition, in each room we should prepare niches for distribution boxes.
- In distribution boxes all connections from the group wire to individual electrical points are made. Typically, distribution boxes are mounted above the room entry switch. At a height of 10 - 30 cm from the ceiling. If there are many electrical points in the room, then you can create two or more distribution boxes. But to reduce the amount of work and simplify subsequent maintenance, it is better to try to make all the connections in one.
Types of distribution boxes
- The material of the distribution box is selected based on the same parameters as for the distribution board. The size and shape are selected based on ease of installation.
- After all the electrical points are ready, we connect them with grooves to the junction box. The wires will run along the grooves. Their depth should be sufficient to hide the wire in them, and also provide at least a 10 mm layer of putty above them. The PUE standards require a figure of 1 cm of putty layer from us.
- But the wires still need to be connected to the junction boxes. And they will go from our switchboard. Therefore, we make grooves from the distribution board to the distribution boxes.
Gates to the distribution box
- Some install wiring in plastic corrugation. This is not prohibited for concrete and brick walls, but according to Table. 2.1.2 and 2.1.3 are optional. You can install the wire directly into the wall.
Note! In order not to engage in the labor-intensive process of wall slitting, some install wires in the screed layer, under plasterboard slabs and in other ways. Such options have a right to exist. But before you use them, consider where you will place the distribution boxes and how you will provide mechanical protection for the wire.
Connecting sockets in a distribution box
Connecting switches in a distribution box
- Now all that remains is to lay the wires to the junction boxes. There, make the connection and lay them to each electrical point.
Carry out electrical wiring in a new building on a turnkey basis
Many people decide to save money and do everything themselves, without involving specialists. This solution is quite viable, but only if the homeowner has experience in electrical work, time and technical capabilities. But in most cases it is better to trust the professionals in their field.
Qualified specialists have extensive experience working on a variety of projects, including new multi-storey residential buildings, for which we provide the following services:
- Calculation of power lines taking into account the number of electricity consumers
- Checking cable lines
- Creation of an electrical project (if necessary)
- Replacement of electrical installation products (sockets, switches, etc.)
- Creation of low-current networks (telephony, TV, intercom, Internet, etc.)
- Full/partial replacement of electrical wiring
Connecting machines and RCDs
The last stage of installing electrical wiring in an apartment is assembling the input panel. According to the diagram you have drawn up, you must connect circuit breakers and RCDs. There should be no difficulties in connecting these devices - the input wire is inserted from the top, and the one going out to the junction box from the bottom. We talked about how to connect an RCD. Connecting a circuit breaker is also not difficult, even for electricians. You can clearly see the installation process of these devices in the video below:
After all the protective devices in the apartment are connected, it is necessary to test the electrical wiring with a multimeter to ensure that the work done is correct. The best thing to do for these purposes is to call an electrician so that an experienced specialist can check everything. Inspection services for finished wiring are not that expensive. If no problems are found, feel free to turn on the machine and carry out the first tests of the finished line.
Using this technology, electrical wiring in an apartment can be done with your own hands. We hope that the step-by-step instructions, diagrams and requirements provided helped you complete electrical installation safely, and most importantly, in compliance with all rules and regulations.
Related materials:
- How to replace electrical wiring in an apartment
- Replacement of wiring in Khrushchev
- How to choose an RCD for an apartment
- How to make grounding in an apartment
- Wiring diagram without junction boxes
https://samelectrik.ru/
Electrics in a new building: reliable, high quality and inexpensive
– this is your chance to get the electrical work done quickly, efficiently and in compliance with all the deadlines specified in the contract. By contacting us for help, you get the following benefits:
- Professionalism of specialists - we employ real masters of their craft with experience of 5-10 years and above
- Personal approach and individual price - we calculate the cost of work strictly taking into account the characteristics of your apartment, and do not offer unreasonably high prices to everyone
- Efficiency is our goal, so that you move into the long-awaited apartment as soon as possible, so we will install everything in the shortest possible time!
- Warranty on all work – 5 years
A specialist’s visit to the site for consultation is FREE!
Hidden and open electrical wiring
It doesn’t matter which electrical wiring diagram you choose for an apartment in a new building, the cable is laid either in a hidden or open way.
With the hidden method, the wire is laid in the walls or floor (under plaster) or in the voids of plasterboard structures.
If the wiring method is open, then the wire is attached to the walls or ceiling using brackets.
Advantages of the hidden method:
- The wire is not visible.
- It is impossible to damage the wiring.
- Even if a short circuit occurs, a thick layer of plaster will prevent a fire from occurring; at most, the wires will melt. If the wiring is open, the finishing coating may catch fire.
- Easy to carry out cosmetic finishing.
- If the electrical wiring in a new building is optimally planned and executed with high quality, it will last for many years.
Flaws:
- You will spend a lot of money and effort creating electrical wiring in a new building using a closed method. You will have to sand and finish the surfaces, and this is an additional expense.
- To replace a damaged wire, you will have to spend a lot of money.
- Hidden wiring is poorly cooled. This means that the permissible voltage is lower (compared to open).
Advantages of the open method:
- Ease of installation.
- Budgeting.
- You can quickly change the electrical circuit in a new building.
Flaws:
- The interior will be ruined.
- Increased risk of wiring damage.
- Fire may occur.
Analyze the advantages and disadvantages of both methods before choosing the right one. However, experts recommend doing electrical wiring in a new building using a closed method.
Electrical installation in a new building includes
- Visit of a specialist, diagnostics of the object
- Drawing up a diagram of the location and quantity of electrical appliances, sockets, switches (based on an electrical project, design project)
- Drawing up an estimate for electrical installation work
- Wall chipping, installation of socket boxes (after plastering the walls)
- Installation of all necessary power and low-current cables
- Electrical panel installation
- Checking all power lines (before finishing work)
- Finishing work
- Installation of sockets, switches, lamps, automation
- Commissioning works
Criteria for choosing safe electrical accessories and cables
Cable selection
The old wiring was made of aluminum throughout. Time has proven the impracticality and unreliability of using such a fragile and soft metal in electrical engineering. Therefore, you need to lay copper wires, so buy them. You will find out the length of the cable if you measure all the planned channels for it with a tape measure (mark the lengths on the diagram).
As for the brand of cables, non-flammable cable of the VVG NG brand is suitable for residential premises. If a grounding circuit is connected to the apartment, then for sockets buy a three-core cable with a cross-section of 2.5 square millimeters; for lamps, you can take a 2-core cable of the VVG brand with a cross-section of 1.5 square millimeters. millimeter. For kitchen electrical wiring, a three-core cable with a cross-section of 4 square meters is used. mm.
In general, the selection of copper cable cross-sections for apartment wiring is regulated by the PUE and depends on the current load. The average indicators are such that the nominal residential current load is taken to be 16 Amperes, which corresponds to a cable cross-section of 2.5 square meters. mm. But, with the current level of technological progress, one can only expect an increase in the number of electrical appliances. Therefore, here’s some advice for you: take a copper cable with a cross-section of 4 square meters. mm. It will withstand a current load of 25 Amps, your wiring will not heat up and will last for a very long time.
Attention! If the electrical wiring in an apartment is its circulatory system, then the input cable can safely be called its artery. Choose it responsibly.
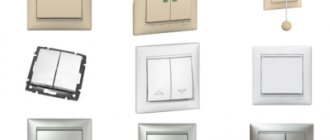
Selection of electrical accessories
When choosing sockets and switches, as a rule, we focus on their functionality and aesthetics. But compliance with electrical safety standards during their installation is the determining parameter of choice. What is meant? The currently widespread internal placement of sockets and switches does not guarantee the safety of their use.
The reliability of electrical accessories is ensured by the design of its fastening elements. If they are made of soft metal, they will become deformed as the screws are tightened. By inserting the plug into such a loose socket, and then pulling it back, you will pull it out along with the socket and exposed contacts.
Switches are a slightly different story. You don't pull anything, just press. Therefore, the basis for the safety of a switch is the degree of protection of its keys, which must be made of high-quality polymer, which is reflected in its price.
Another important element of electrical accessories is the contact group. By purchasing cheap products, you risk getting electrical accessories with poor functionality. When tightening conductors, thin metal fasteners form weak contact, which leads to burning. In addition, in cheap sockets and switches, the threads on the fasteners often “fly off”.
“Plug sockets installed in apartments, living rooms of dormitories, as well as in rooms for children in child care institutions, must have a protective device that automatically closes the sockets of the socket when the plug is removed” (PUE clause 7.1.49).
Choosing a contractor - what to look for
Electrical installation
It is imperative to pay attention to the legitimacy of the contractor’s work. He must have registered his activities as an LLC or an individual entrepreneur, and also have the appropriate certificates for admission to the specified work .
If you have checked this point, then the next important aspect is signing the contract. It states all the obligations and rights of the parties who enter into it. It stipulates various conditions, for example, the period for performing electrical installation work, who will be responsible for this, the work schedule, what financial and material costs the customer will bear, etc.
Be sure to ask the contractor how he will monitor the work. So, for example, someone sends a video or photo of an object to a customer. You should check with the electricians who will work at your facility for permits.
Find out how long the company has been on the market, read reviews about it. This way you will collect a real portrait of the company and will be able to protect yourself from low-quality services if the company does not do quality work.
Conclusions and useful video on the topic
For more complete information regarding the installation of electrical wiring in the apartment area, it is recommended to watch a video describing the processes.
Familiarization with the video will enrich your existing experience, which will only have a positive impact on the quality of work.
Electrical wiring done by hand in a city apartment is a completely acceptable option. However, there are some “buts” in solving the issue in this way.
Firstly, you should not take on this matter if you do not have the slightest experience in electrical installation. Secondly, when planning to carry out work independently, you first need to think about your own safety and only secondarily about your own benefit.
Share with readers your experience of independently installing wiring in your apartment, connecting sockets and switches. Please leave comments, ask questions about the topic of the article and participate in discussions - the feedback form is located below.
Internet cable for low current
At the moment, category 5 - CAT5e - is quite enough for this. This is what everyone recommends.
But the fact is that a low-current cable is a rough engineering project that is laid out for decades, and not for a year or two.
Therefore, when renovating an apartment, as they say, “from scratch,” it is better to initially install a CAT6 or CAT6a cable.
With future modernization of devices (in recent years this has been happening much faster than we think)