After the decision was made at the general meeting of homeowners to install two barriers in the local area, a decision was immediately made to install an online video surveillance system. The installation of a video surveillance system was caused by the need to protect the barriers from vandals, ensure the safety of residents of the house when returning at a late time, and protect cars parked in the yard. It was obvious to everyone that the presence of video cameras installed on the walls of the house and warning signs about video surveillance would scare away almost all potential lawbreakers. Therefore, everyone voted unanimously.
Determining video camera installation points
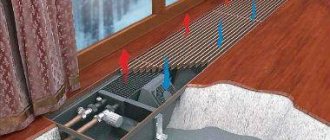
The most important and difficult stage in creating a street video surveillance system is the choice of installation points for video cameras, since it is necessary not only to provide surveillance of the required area of the local area, but also to take into account many additional technical requirements. After all, it is necessary not only to choose a reliable surface for mounting video cameras, but also to minimize the length of the cables through which the supply voltage is supplied and the video signal is transmitted to the active equipment. In addition, it is necessary to prevent direct sunlight from entering the camera lens and falling blocks of snow from the roof of the house. It is also necessary to think about protecting video cameras and active equipment from thieves and vandals.
Designing a video surveillance system for the local area begins with walking around it and studying the surveillance zones. After marking the intended installation point for the video camera, you need to take any camera (even a point-and-shoot camera with Zoom will do) and stand against the wall under the intended installation location of the video camera to see what the area you want to monitor looks like on the camera screen. By changing the focal length of the camera lens using the Zoom system, you can determine with great certainty how well the point for installing the video camera has been chosen. In this simple way, you can determine not only the installation points of video cameras, but also their number. In addition, knowing the range of change in the focal length of the camera lens, it will be possible to estimate what focal length the video camera lens should have.
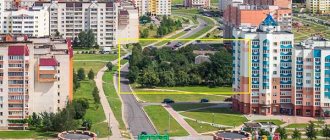
After selecting the installation points for video cameras and plotting them on the plan of the local area, the result was a street video surveillance diagram presented in the drawing.
As can be seen in the diagram, a system of three video cameras will allow overlapping video surveillance of the entire local area, including barriers, entrances to entrances, car parking and monitoring of the installation sites of the cameras themselves. As practice has shown, for detailed monitoring of the entrance to the fifth entrance and the parking lot located next to it, it is necessary to install a fourth video camera (the tenants promised to install it, so there is no camera for this project).
Distance from camera to DVR
Cameras installed in home video surveillance systems are powered from a network with a voltage of 12 Volts (DC current) and a voltage of 14 Volts (DC current). As part of modern video surveillance systems, there are also devices connected to a 220 Volt network (alternating current), but they are more suitable for large protected objects, and they should not be considered as an option for a home video surveillance system.
A significant distance of the video camera from the power source leads to a voltage drop at the input to the consumer. Therefore, in order to make a video surveillance system, you should pay special attention not only to the calculation of a suitable power supply, but also to the correct choice of cable for powering and transmitting the video signal. And for this it would be nice to listen to the important commentary of a specialist:
Denispnt FORUMHOUSE member
I recommend using 12 Volt power if the distance from the cameras to the recorder is no more than 50 meters. In this case, you can lay special combined cables, which will save money and time for laying routes. 220 Volt power supply will have to be used for routes longer than 50 meters. If the combined cable is not suitable (coaxial interference is possible), it would be better to run a separate power line and a separate video line. If the length of the routes is more than a hundred meters, I advise transmitting video over twisted pair, and running the power at 220 volts. Naturally, you need to understand that the power supply must be backup.
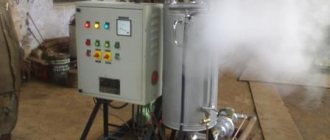
In order to ensure continuous video recording in conditions of an unplanned power outage, it is necessary to select power supplies that can switch to battery power in the absence of voltage in the general network. We are talking about special redundant power supplies used in home video surveillance systems.
Backup power must be provided not only to all video cameras, but also to the DVR. The power of the power supply must correspond to the total power (Watts) of all consumers connected to it.
Considering the unevenness of the voltage drop depending on the distance of the camera, the most reliable power supply will be a device that has the ability to regulate the voltage. Using such a unit in combination with a household voltmeter, you can easily obtain the required value at the input to the consumer.
Block diagram of a street video surveillance system
Thanks to the construction of a video surveillance system based on IP cameras, the structural diagram of the system turned out to be very simple and consists of video cameras with a power supply connected via a twisted pair cable to the ports of the router. The WAN router output is connected to the Internet. Video cameras are installed on the street, and the router and power supply for the video cameras are in a metal box in the entrance of the house.
The use of IP cameras in the video surveillance system eliminated the need to install a DVR in close proximity to them. In addition, anyone with Internet access can record video images using a desktop computer, laptop or DVR. At the same time, even the most low-power computer is suitable for recording, the main thing is that the hard drive is of sufficient capacity.
From personal experience, to record images from three color video cameras throughout the day in Full HD format (1920×1080) at a frequency of 5 frames per second, 30 GB of hard drive space is required. Per week, which is quite enough, the archive will occupy only 210 Gb, which is quite a bit for modern hard drives.
The presented diagram of the video surveillance system allows you to easily increase the number of video cameras. It is enough to replace a four-port router with a router with eight ports.
If video cameras are installed at a considerable distance from each other, then it is advisable to connect them in separate groups. Each additional group is connected to a network switch (switch), and the switch is connected to the router with just one twisted pair cable.
With this scheme for building a video surveillance system via the Internet, regardless of the number of video cameras, you will only need one fixed IP.
If you want to create a local video surveillance system without an Internet connection, then the router is replaced with a switch, to which you can connect any number of computers, a server, a video recorder and other IP devices. The number of connected devices is limited only by the number of ports and the speed of the switch. All ports of the switch are equivalent and therefore there are no rules for connecting devices, unless specified in the documentation for the switch. The organization diagram of the simplest local video surveillance system is shown in the photograph.
Thus, the minimum set of a video surveillance system may consist of just one IP black-and-white or color video camera and a computer. If you are creating a video surveillance system consisting of a large number of video cameras, then you will additionally need a switch or router from any manufacturer.
Preparatory work for selecting the necessary equipment
With the help of video surveillance, you can recognize arriving guests, monitor children and elderly family members. This is a more economical option than concluding an agreement with a security company. Video surveillance systems operate around the clock and consume very little electricity. The equipment operates independently without the involvement of the human factor.
The composition of a video surveillance system is determined by the goals and tasks that it will perform. First, it’s worth understanding the question of how to choose a video surveillance system for a private home. Define tracking zones and other video monitoring functions:
- approaches to the land plot (along the entire perimeter of the fence or only the entrance elements);
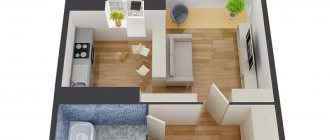
Approximate layout of cameras in a private house Source nadzor.ua
- whether or not to include adjacent parts of the street;
- courtyard (entirely or separate buildings);
- the whole house around the perimeter or just windows and doors;
- the distance from which a person can be identified;
- Do you need video surveillance recording (during the day, night);
- transferring video recordings via the Internet to a smartphone, tablet, TV.
The same area can be viewed by several cameras. They must be selected before installation begins. If you set the task to control the entire territory, you need to take into account that this will be a rather expensive option. Before turning it into reality, such a need should be carefully thought out and justified.
Based on the selected zones and objects, a video surveillance kit is selected for a private cottage. Knowing the number of security cameras, choose their installation locations. To do this, you should use a map of the territory, mark the installation points of the devices on it and mark the areas covered by their control. Most often tracked:
- entrance area to the site;
- front door to the house;
Example of tracking zones in a private home Source trb.in.ua
- Garage Doors;
- entrances to all buildings on the site;
- parking and storage areas for expensive equipment.
To monitor the entire perimeter of the cottage, cameras are installed in the corners of the building. To view the entire area, one camera mounted on a high support is enough.
For tracking along the perimeter of the fence, cameras with a small viewing angle are used. They are placed on fairly high supports, while taking into account and eliminating obstacles blocking the observation zone.
To take pictures in the area of the front door of the house, front cameras with good resolution are installed. As an option, a peephole camera is suitable for the front door, and a video intercom for the entrance gate.
Camera installation locations are chosen taking into account the protection of vandals and natural phenomena: rain, hail, solar radiation, wind.
Selecting video cameras
The main condition of the residents of the house when deciding to install a video surveillance system was to ensure round-the-clock viewing of video images from cameras online on any mobile or desktop computer without installing additional software. Based on this requirement, and taking into account modern trends in the development of street video surveillance systems, the choice of video cameras was made.
Depending on the type of video signal coming out of the video camera, two types of video cameras are used for video surveillance - analog and digital. To transmit a video signal from an analog video camera to the Internet, it must be converted using a DVR or other device into a digital signal. Unlike analog video cameras, digital IP video cameras have a built-in WEB server and connect directly to any network - local, WAN or Internet. Therefore, the DVR in video surveillance systems made using IP cameras can be installed either directly next to the IP video cameras or in any other place. In this case, any computer connected to the Internet can be used as a DVR. This possibility, together with other advantages, determined the choice of IP video cameras for a street video surveillance system, since installing a DVR in the entrance of a house provided the possibility of its being damaged or stolen by intruders to destroy evidence of a crime.
Although IP video cameras are much more expensive than analog cameras, they have, in addition to the above, a number of additional advantages: they retain the original image quality regardless of the length of the cables, have higher picture detail, allow remote configuration of parameters and manage access rights, have a built-in motion sensor, compatible with network equipment from any manufacturer.
Selecting an IP camera based on technical characteristics
IP video cameras had to work outdoors in difficult climatic conditions. Therefore, operating temperature and humidity came first. Since the cameras had to work around the clock (during the day in bright sun and at night in almost complete darkness), the second requirement was the ability of the video cameras to produce high-quality images in a wide range of illumination. To be able to see the license plates of passing cars and the faces of passers-by, the cameras had to have high resolution. Video cameras had to fully satisfy these requirements.
Additional requirements were the ability to manually change the focal length of the lens, support all modern video information streams, and the ability to supply power voltage and digital signal through one cable according to the PoE standard (IEEE 802.3at-2009).
Of the color IP video cameras on the market, the outdoor color IP camera Space Technology St-182 IP fully met the requirements, but it was very expensive. Further search allowed us to find a cheaper non-branded analogue - the ROKA R-2020 color IP video camera. As time has shown, the choice turned out to be correct. The table shows the main technical characteristics of the ROKA R-2020 color IP video camera. The appearance of the video camera is shown in the photo above.
| Technical characteristics of the ROKA R-2020 video camera | |||
| Parameter | Unit | Meaning | Comments |
| Operating temperature | °C | -40…+50 | Ambient temperature at which the camera will remain operational |
| Protection class | — | IP66 | The video camera can operate in dusty conditions and strong water jets |
| Lens focal length | mm | 2,8-12,0 | The ability to change the focal length of the lens allows you to change the viewing angle of the camera (zoom in or out of the picture) |
| Infrared illumination | m | up to 40 | The distance at which the camera will see in complete darkness |
| Camera resolution | dot | 1920×1080 | Number of pixels in the image by width and height (Full HD) |
| Matrix resolution | MP | 2,0 | Number of millions of pixels on one square inch of the matrix |
| Matrix size | inch | ⅓ | Diagonal matrix size (8 mm) |
| Minimum lighting | OK | 1,0 | The camera's ability to see a low-light object, the lower the value, the better |
| Electronic shutter | seconds | 1-0,00001 | The ability of the camera to automatically change sensitivity depending on the illumination of the subject |
| Signal to noise ratio | dB | more than 52 | The ability of the camera to work in low-light conditions |
| Gamma correction | dB | 0,2-1,0 | Improved detail recognition in dark areas of the image |
| Broadcast speed | frames/second | 25 | When the image resolution is 1920×1080 |
| Built-in web server | — | — | IE8, Google chrome, Firefox Mozilla |
| Supported protocols | — | — | HTTP, TCP/IP, IPv4/IPv6, ARP, IGMP, ICMP, RTSP, RTP, UDP, SMTP, FTP, DHCP, DNS, DDNS, PPPOE, UPnP, NTP, SNMPv3, IPFilter, QoS, Multicast, ONVIF v2.4 , P2P |
| Mobile platform support | — | — | iOS, Android OS, Windows phone OS, Unified CMS for DVR, IP cameras, NVR, AHD-DVR |
| Supply voltage | IN | 12±10% | Constant stabilized voltage with PoE support |
| Consumption current | A | no more than 1.0 | Maximum power consumption when IK illumination is turned on does not exceed 12 W |
| Geometric dimensions | mm | 220×80×80 | |
| Mounting method | 2D | Allows you to move the camera's viewing angle in horizontal and vertical directions | |
The right column of the table contains my comments, allowing you to understand the influence of a particular parameter on the functionality of the video camera.
CCD matrix
The photosensitive matrix of the video camera acts as a photodetector, and is one of the main components of the video surveillance camera circuit, thanks to which the output image is formed.
The matrix is a rectangular semiconductor wafer that converts the light flux received from the lens into an electrical charge, which is transferred to the processor for processing, amplification, and generation of the video signal. The light-sensitive CCD matrix has an aspect ratio of 4:3 and is formed from a huge number of light-sensitive elements - pixels. The greater the number of pixels the matrix contains, the less noticeable the discreteness of the generated image, i.e. better picture quality. The number of pixels of the matrix is indicated in the technical specifications, for example, 2 megapixels means that the matrix is formed from two million pixels.
Matrix format
The CCD matrix format is a rounded value that indicates the diameter of the transmitting tube through which the light flux passes to the matrix. Typically, the matrix format (tube diameter) is equal to the diagonal of the CCD element. The most common formats: 1/4″ (3.6 x 2.7) mm, 1/3″ (4.8 x 3.6) mm, 1/2″ (6.4 x 4.8) mm, 2/3″ (8.8 x 6.6) mm, 1″ (12.8 x 9.6) mm. Most often, video surveillance cameras are built from a CCD matrix of 1/3 or 1/4 format, less often - larger formats due to their high cost, as well as the high cost and complexity of selecting optics, lenses, frames. The larger the format of the CCD matrix, provided the number of constituent pixels is the same, the lower the noise level, and accordingly, the better the image quality. Knowing the sensor size is necessary to choose the right lens.
Setting up a street video surveillance system
Before installing a video surveillance system, it is advisable to configure the video cameras and router in stationary conditions. This will allow you to be confident in the serviceability of the equipment and simplify the launch of the video surveillance system after installation.
What is an IP address
An IP address (Internet Protocol Address), pronounced ah-pee, is a record of four numbers separated by dots, for example, 192.168.1.1. An IP address is analogous to your postal address and differs only in that instead of letters and numbers, only numbers are used that indicate the address of a device on the Internet, such as a website, server or router. IP addresses come in two types: static and dynamic. A static IP is assigned to one device and never changes. A dynamic IP address is temporary and can change each time a device (computer or router) is connected to the Internet. To be able to view images from video cameras via the Internet, a white static IP address is required
. Currently, providers, as a rule, allocate a dynamic IP and, in order to replace it with a static one, require a monthly additional payment to the subscription fee. The most reliable way to find out the type of IP is to call your provider.
Calculation of channel capacity
One digit in a binary number that takes the value 0 or 1 is called a bit and is designated bit (b) or bit (b). Bits are a convenient way to measure the data transfer rate in communication systems. The value used for this is the number of transmitted bits per second (bps or bit/s). If the data transfer rate is high, then the prefix K (kilo) or M (mega) is added to reduce the number.
To account for the amount of transmitted information, the unit of measurement is bytes per second, which is designated (Bps or byte/s). Bit and byte are related quantities, 1 byte = 8 bits. When abbreviating, bits are always written with a lowercase letter, for example KB (kilobits), and kilobytes with a capital letter, for example KB (kilobytes). Having understood the units of measurement, you can now begin to calculate the required transmission channel speed.
First you need to determine what flow of information per second the video camera matrix will produce. To do this, you need to multiply its resolution (1920x1080) by the color depth (modern IP video cameras generally provide a color depth of 8-12 bits) and the number of frames per second (5 frames is enough to monitor the yard). As a result, we get a flow equal to 118 Mbit/sec. Before being sent to the Internet, the video signal is compressed using the H.264 standard, which reduces the stream by more than 70 times. As a result of calculations, it turns out that the flow from one video camera will not exceed 1.7 Mbit/sec. In practice, depending on the detail and dynamics of the picture, the flow will be several times less.
I will provide data obtained from the practice of using video cameras. Based on the amount of memory occupied on the hard drive by video from one camera, the flow is 0.115 megabytes per second. In megabits 0.115×8=0.92 Mbit/sec. From three cameras 0.92 Mbit/sec × 3 cameras = 2.76 Mbit/sec. As you can see, the actual video signal flow is two times lower than the calculated one. Obviously, this is due to the static nature of the observed object and the transition of video cameras at night to black and white operation.
The ZyXEL Keenetic Start model router has the ability to monitor actual traffic at the current time. Observations have shown that real traffic does not exceed 3.5 Mbit/s.
Calculation of the required hard drive space to record a signal from one video camera
Knowing the amount of video signal flow from one video camera, it is not difficult to calculate how much hard drive space is needed for recording. From the previous calculation, the flow value was 1.7 Mbit/sec. Since the capacity of a hard drive is expressed in bytes, it is necessary to convert the stream to megabytes. To do this, divide 1.7 Mbit/sec by 8 and get 0.21 MB/sec. There are 86,400 seconds in a day, therefore, per day, video from one video camera will occupy 18,144 MB = 18.2 Gb on the hard drive.
In practice, the volume of recorded video signal from one video camera per day takes about 10 Gb, so if you plan the volume of your hard drive based on the calculation results, you can’t go wrong.
Setting up video cameras
Setting up a video camera is described using the example of setting up a ROKA R-2020 color IP video camera. The presented configuration method is standard and can be successfully used for configuring other models of IP video cameras.
To configure video cameras, you need to connect each of them in turn to a desktop computer or laptop using a LAN cable. Next, you need to supply power to the video camera by connecting its power supply to the electrical network.
Setting up Network connections in the Windows operating system when connecting a video camera is standard and is therefore not included in this article.
The next step is to gain access to the camera’s web interface for further configuration. To do this, you need to launch the Internet Explorer browser and enter the IP address of the video camera in the address bar, which is usually indicated in the documentation or on its packaging box. By default, most video cameras, like routers, have IP 192.168.0.1 or 192.168.1.1. There are also special programs, for example IPSearch, that allow you to automatically find all devices on the local network and determine the IP video camera, subnet mask, port number, serial number and other data.
If, after opening the camera settings page, you are prompted to download and install additional software, you must agree and follow the instructions. This process should also be described in the camera's instruction manual.
Next, you will be asked for a login and password to enter the camera setup menu. If this does not happen, you can refresh the page in the browser by pressing F5. If the window for entering your login and password does not appear, you need to set the browser security level. To do this, you need to: Select the menu item Internet Options\Security\Local Intranet, then click on the “Other” button, at the bottom of the list, check the boxes against “Allow Active X to be used without prompting”, and “Allow Active X control to run”. Next, click OK. To view the video camera image via the Internet, the same setting must be made for the Internet by selecting the menu item: Internet Options\Security\Internet, then click on the “Other” button and check the boxes as described above. Refresh the page in the browser by pressing F5. Now a window for entering your login and password should appear.
To access the settings of all IP video cameras, the default login is set to admin, and the password is admin, 1234, or the field is left blank. The password and login are usually indicated in the documentation for the video camera. For the ROKA R-2020 IP video camera, the default login is admin, password is admin.
Having gained access to the control panel and settings of the video camera, you first need to change the password. This can be done in different ways for different camcorder models and should be described in its operating manual. For the ROKA-R2020 camera, this is done by clicking on the “User” button. The ROKA R-2020 video camera allows you to set three access levels: administrator, observer and operator. The administrator and operator are given full access to control operating modes and configure the video camera. The observer can only watch the video broadcast.
Next, you need to click on “Network” and enter the network parameters, as in the image shown. After saving the new data, you will need to log in to the control panel of the camcorder again. To do this, you will need to enter the set IP 192.168.1.201 and the new password you created earlier into the address bar of your browser.
The next step is to enter the “Camera Settings” panel and change the data in the windows, as in the photo above. I chose the number of frames 5, which is quite enough for observation, and allows you to minimize network traffic and hard drive space for storing video on your computer.
The default parameters in the “Video Settings” tab are universal for all cases of video camera operation. Since in a street video surveillance system, video cameras have to operate both in almost complete darkness and in high intensity lighting in the yard, parameters were selected experimentally to ensure high image quality under these conditions.
In the “Date and Time” tab, you need to select a time zone, set the current time and select a synchronization source. Settings in other tabs are not necessary.
Configuring the remaining IP video cameras for the street video surveillance system is performed in the same way, with the exception of assigning network parameters. For clarity, I presented the settings of three video cameras of the street video surveillance system in the form of a table.
| Table for setting network parameters of IP video cameras for street video surveillance | ||||||
| Camcorder | IP | Network mask | Gateway, DNS, FTP server | HTTP port | RTSP port | Mobile port |
| №1 | 192.168.1.201 | 255.255.255.0 | 192.168.1.1 | 8201 | 5541 | 1025 |
| №2 | 192.168.1.202 | 8202 | 5542 | |||
| №3 | 192.168.1.203 | 8203 | 5543 | |||
As can be seen from the table, only IP, HTTP port and RTSP port differ in the network settings of video cameras. The difference lies only in the last digit, which indicates the number assigned to the video camera. For video camera number 4, the IP will be 192.168.1.204, HTTP port 8204 and RTSP port 5544, and so on.
Having completed the setup of IP video cameras, you have practically created a local video surveillance network. It is enough to connect the video camera to the computer via a switch (switch) according to the diagram given at the beginning of the article. But in order to be able to view video images from video cameras from any point where there is access to the Internet, you must use a router instead of a switch and obtain a white static IP address from your Internet service provider.
Setting up the router
To work in the video surveillance system, an inexpensive, time-tested router (router) of the ZyXEL Keenetic Start model was chosen. As time has shown, the choice turned out to be successful. The router has been working stably without freezing for more than three years.
I did not provide step-by-step instructions for setting up the ZyXEL Keenetic Start router, since there are many sites on the Internet that provide step-by-step instructions. I will only dwell on the description of the configuration features for the video surveillance system, namely port forwarding, which is published on the website page “How to forward ports on a router.”
Main components
Components of a video surveillance system with one camera
Necessary elements of the system:
- IP cameras - the device captures the image and compresses the signal in the format that is used to transmit data on the Internet - the TCP / IP protocol. The video image in this form can be directly transmitted via an available Internet connection to a computer, digital video recorder, or mobile phone.
- Server – system control unit. It requests an image, transmits data, records and saves. The server can run as an application on standalone hardware or in a virtual environment.
- Cables – system components are connected using twisted pair or Ethernet cables.
- Software – free or commercial software. The software provides tools to perform monitoring and recording. Paid software provides more options: unlimited archive storage, integration with other subsystems, license plate recognition, etc.
A standard web browser allows you to view camera images. However, to manage multiple devices, it is worth installing special software.
Installation of a video surveillance system
The installation of the video surveillance system was carried out by specialists from a contracted company. Thanks to the cable box already installed along the entire internal wall of the house by the builders during a major renovation of the façade of the house, laying wires from the video cameras to the box did not present much difficulty.
The design of the box consists of two wooden bars fixed parallel to the wall, to which profiled strips of galvanized roofing iron are attached using self-tapping screws. If you need to lay a new cable, just unscrew the screws and tuck it into the box.
The video cameras are fixed to the wall using dowels and screws. The connection of the wires coming from the video cameras with the main cables is made in distribution boxes using sealed RJ-45 connectors and a coaxial connector. The main cable, laid outside the box, is hidden in a corrugated plastic tube. The photograph shows the appearance of video camera No. 3 mounted on the wall. The other two video cameras are mounted in a similar way.
From the box, the main cables are led into a metal box mounted on the wall under the ceiling in one of the entrances of the house. The box is inconspicuous and is well camouflaged among other boxes installed on the walls by Internet and cable television providers. When choosing a location for installing the box, it is necessary to take into account the possibility of supplying it with a 220 V AC supply voltage and a twisted pair cable from the Internet provider.
If you open the lid of the box, a picture will appear before your eyes, as in the photograph. At the bottom of the box there is a power supply, above it there is a router, and at the top right there is a double socket for connecting devices to the electrical network.
As you can see, the installation in the box was done carelessly. I especially didn’t like the fact that the connection of the wires of the power supply cable to the video cameras with the wires of the power supply was made using the twisting method. Terminal blocks should have been used here. But, as operating practice has shown, such installation did not affect the performance of the video surveillance system.
Wiring diagram of the video camera for connecting to the network and power source
ROKA R-2020 video cameras provide the ability to connect to the Internet and supply voltage according to the PoE IEEE 802.3af and IEEE 802.3at standard. This means that when connecting a video camera, no additional cable is required to supply power. Power to the camcorder can be supplied over the free pairs of the twisted pair cable directly to the RJ-45 socket installed at the end of the cable coming out of the camera. At the same time, it is possible to supply supply voltage to a separate coaxial connector.
Regardless of the RJ45 compression options, voltage is applied simultaneously to pins 4 and 5 (blue pair) from the positive terminal of the power supply, and to pins 7 and 8 (brown pair) from the negative terminal.
This is especially convenient if the video surveillance system uses a switch, for example, the 9-port PoE switch ROKA R-KM-POE0801, in which each port provides the ability to supply 12 V DC voltage with a power of up to 30 W via RJ-45.
The cable must be at least category 6 with a length of no more than 100 m. The transmitted power must not exceed 30 W.
Installation and connection of cable KVK-P
Now you need to lay the KVK-P cable to each video camera, or rather to the place where you planned to place them. You can lay it indoors either in a plastic channel or simply on top of the walls.
On the street, if desired, it can be protected with corrugation, but not necessarily.
To protect the connection points between the cable from the recorder and the cable from the camera from snow and rain, mount a junction box on the wall and route the wires into it.
Next, remove the top layer of insulation from the cable, about 8-9 cm, and strip the two power cores. Press them with NShV tips.
Insert these wires into the male power connector. There are two connectors “+” and “-“. As we have already agreed before, the red wire will be the positive contact, the black wire will be the negative one.
After this, remove the insulation from the coaxial cable.
Carefully move the outer copper braid back so that not a single hair has accidental contact with the core in the center. Otherwise, the quality of the picture will be poor, or there will be no picture at all.
Expose the central core by 3-4mm and mount the BNC-F connector.
Insulate everything from above with a protective cap.
Next, install the video camera itself on the wall. You run the wires from it into the junction box where you just installed the BNC-F connectors.
Connect the connectors together and close the lid tightly.
To prevent moisture from getting inside, it is necessary to use a box with sealed cable entries on the sides.
All other video cameras on the walls of your house are connected in the same way. To each of them you will have to pull a separate KVK-P cable.
Methods of video surveillance via the Internet on a computer
You can watch broadcasts from IP video cameras on a computer or laptop with the Windows operating system in several ways: using the IE browser (Internet Explorer), the widely used free VLC media player, or the special HeroSpeed CMS program.
Watching videos using the standard Internet Explorer browser
You need to launch the Internet Explorer browser and enter the IP address of the video camera in the address bar, for our case 135.135.135.135:8201. 135.135.135.135 is the IP issued by the provider, 8201 is the HTTP port that we assigned to video camera No. 1 when setting it up. A window pops up asking you to enter your username and password. After entering your login and password and clicking the “Login” button, the video camera panel with the image will load. If you quickly double-click on an image, it will take up the entire monitor screen.
If, after entering the IP, a blue page appears in the browser, then you need to follow the steps described above in the “Setting up video cameras for a video surveillance system” section.
Watch videos using the free VLC media player
If the VLC media player is not installed on your computer, then you need to download its distribution from the Internet and install it. Installation of VLC is automatic and does not present any difficulties. After installation, you need to launch the player, click the “Media” tab and select “Open URL” in the drop-down menu. Enter the following address in the pop-up window: rtsp://135.135.135.135:5541/0. 135.135.135.135 is the IP issued by the provider, 5541 is the number previously assigned by us to the RTSP port of camera No. 1, 0 is mandatory only for reading RTSP from the ROKA R-2020 IP video camera. For other models of video cameras, after the slash you need to enter another parameter, which is assigned by the camera manufacturer.
View and record video using the special HeroSpeed CMS program
HeroSpeed CMS is a specialized client program for working in video surveillance systems and is suitable for working with IP video cameras from many manufacturers. Usually, a camcorder comes with a CD containing a program for this camcorder from the manufacturer. Currently, the manufacturer usually provides a link to a website from which you can download the necessary software.
HeroSpeed CMS allows you to simultaneously display video on the monitor screen and record it to your hard drive from all video cameras of the video surveillance system. The program has many settings and supports many languages. True, the translation into Russian was done rather unprofessionally.
In order for the program to start showing video, you need to enter communication parameters. To do this, click the left icon in the form of a list on the top panel, add all video cameras and enter their addresses. The photo shows the panel completed for video camera #1. Where is 135.135.135.135 IP issued by the provider, RTSP port number 5541 and HTTP port number 8201. The rest of the settings are easy to figure out on your own.
Once the video surveillance system is operational, all that remains is to more accurately frame and focus the video cameras.
As you can see, it is quite possible to develop and install an online video surveillance system for a yard via the Internet based on IP video cameras after reading the presented article.
What is included in the video surveillance scheme for a private home and cottage via smartphone?
To organize constant video monitoring you will need to purchase:
- video cameras in the quantity corresponding to the created security project;
- DVR with hard drive for recording information;
- a switch (switch) that allows you to connect several cameras to one information cable;
- a router with a SIM card that communicates via the Internet;
- connecting wires and cables for transmitting information.
The sale offers a very large assortment of such equipment. It is produced by manufacturers with different capabilities and software. Therefore, when purchasing, you need to pay attention to its compatibility.
Experienced users can assemble a video surveillance kit from individual parts and configure it by installing various programs. But even they try to buy equipment from one manufacturer, which eliminates the need for complex settings.
I recommend that beginning home craftsmen use a ready-made solution. A video surveillance kit fully prepared by the manufacturer allows for quick installation and configuration, eliminating the need for incomprehensible “dances with a tambourine.”
The DVR can be purchased together with a hard drive or separately. It is better to choose its capacity at 2 terabytes. Then you will have to delete recorded information less often.
Analyze the issue of increasing the reliability of data storage by installing two recorders, one of which operates constantly on the outer perimeter of the building, and the second - inside the house, reacting to movement.
In addition to storing captured information on the hard drive, a useful feature is the ability to simultaneously send photographs of frames via email via the Internet. They can be used to reconstruct events even if DVRs are stolen.
You can send these pictures via Yandex mail, which requires fine-tuning the program. There is a more optimal solution: use a dedicated service for sending letters.
Each letter is a separate photograph. They accumulate very quickly. Therefore, using a motion sensor and a video camera timer will be very useful. They will create a gentle mode for sending letters.
But even in this case there will be a lot of pictures. Please note that Yandex may consider sending emails frequently as spam and block your account. Here you need to choose the optimal settings.
Photos uploaded to Yandex mail must be automatically reduced to a size of 640x480. This will reduce the server load and prevent it from being blocked.
LAN (local area network)
The structured cabling system (SCS) to ensure LAN operation is designed in strict accordance with standards. There is less room for creativity here. At the same time, the SCS is the basis of the future system and the most problematic part for modernization. An error in the design of SCS can lead to significant costs during the implementation of the system.
A large number of recommendations, manuals, and books have been written on the design of SCS. In this section we will note the most significant and subtle points that the IP video surveillance designer encounters.
Using an existing LAN
When designing a transport infrastructure for IP video surveillance, the customer is very tempted to use segments of the existing LAN. This is dictated by the desire to save on implementation and the ingrained idea that one of the main advantages of IP video surveillance is the use of existing LANs.
When using existing networks, consider:
- IP video surveillance is characterized by a large constant flow of transmitted data in real time. Delays and interruptions in data transmission lead to the loss of some information
- IP video surveillance can lead to problems in the operation of important office network applications (accounting programs, databases, etc.)
- IP video surveillance is the security of the enterprise and special measures should be taken to protect against hacking, hacker attacks, intentional failure, when working in public networks
- Difficulties in diagnosing malfunctions and troubleshooting problems when implementing an IP video surveillance system
You should use an existing LAN only in the most extreme cases, after performing a full calculation of traffic on the network, monitoring and auditing the existing SCS. Any design decisions must be coordinated with the customer’s IT service.
Ensuring information transfer
When calculating traffic from a video camera, you should take into account and summarize all possible streams that will be requested from the camera. Depending on the capabilities and features of the software and the tactics of use, these can be separate streams for recording, a stream for display, an RTSP stream for broadcast requests, viewing the camera via WEB, etc.
If there are a large number of streams, you should pay attention to the camera’s hardware limitations for transmitting multiple streams, and thus make calculations based on the maximum possible traffic determined by the camera, and not by incoming requests.
For cameras with bitrate restrictions, it is more correct to calculate based on the maximum bitrate value. In any case, when calculating the exact traffic figures from a video camera, you should take into account the nature of the scene being observed, the type of compression, the number of fps, and the degree of compression. Any serious manufacturer has all this data. If the specified information is not available, then you can rely on similar values from another manufacturer. Practice shows that the data will be comparable.
When calculating traffic on network ports of station processing and monitoring equipment, one should take into account the operating features of the software. Network traffic also depends significantly on software algorithms. In particular, the traffic when using Multistream and without will be very different, due to the fact that the camera transmits several streams.
Any accurate traffic calculations in IP video surveillance will always be approximate, so it is recommended to reserve a bandwidth of 30-40%. This reserve will allow you to avoid problems during peak loads and create the possibility of expanding the system.
It is worth noting that in an Ethernet network, the actual throughput in real conditions (i.e., the information transfer rate) is 40-50% of the nominal speed in the data transmission channel. Those. for 100BASE-T the data transfer rate will be 40-50 Mbit/s.
Providing the necessary traffic is a basic task when designing a network for IP video surveillance. But at the same time, traffic calculation data is always approximate. It is recommended that the final diagram indicating the traffic on each data transmission channel be agreed upon with both the camera supplier/manufacturer and the station equipment supplier/manufacturer.
Aspects of network design for video surveillance are discussed in more detail in our articles on SCS and LAN.
Regulatory documentation for the design of SCS
There are two main State standards in Russia:
- GOST R 53245-2008 Information technologies. Structured cabling systems. Installation of the main components of the system. Test methods.
- GOST R 53246-2008 Information technologies. Structured cabling systems. Design of the main components of the system. General requirements.
But these standards are written in dry and rather complex language. In addition, they contain errors and inaccuracies, and you should be careful when using them. In order to become familiar with the basics of building an SCS, the best solution would be to take advantage of the experience and recommendations of experts and study relevant books on this topic.
Those who are interested in the topic of standards in video surveillance can read our article on this issue.
Selecting software for video surveillance
Solutions for processing information from video cameras include the following:
- processing server with specialized software
- NVR (Network Video Recorder)
- recording video data to the built-in video card or network storage directly by the camera itself
NVR and built-in card recording solutions are convenient for small and simple facilities. Most tasks for a modern facility require advanced functionality that can only be provided by specialized software. The choice of software for working with IP cameras ultimately determines the parameters and capabilities of the video surveillance system.
Software, in terms of purpose and application tactics, can be divided into the following classes:
- camera manufacturer software
- free software versions
- software integration platforms
Software from a camera manufacturer usually works only with one “native” brand of camera and has limited functionality. In most cases, such software uses video analytics built into the camera, has a single-server architecture and is distributed free of charge. Camera manufacturers do not rely on consumers using native software with their cameras and approach development and support accordingly. You should not consider software from the manufacturer as the basis of a video surveillance system that solves any complex or important tasks.
Free versions of software from serious renowned manufacturers are, as a rule, versions of paid software products limited in functionality and further development. Manufacturers often test new and promising technologies using free versions. These products are quite functional, but it is difficult to count on prompt technical support without financial and contractual leverage.
Currently, the software market for IP video surveillance systems has a large number of various offers from foreign and Russian companies. Competition in this area is high, which encourages companies to create high-quality products with in-demand features. In this article, we do not have the task of comparing the products of specific companies. Let's consider the main and most significant points that can determine the choice of a software product.
Possibility of using video analytics built into IP cameras
Modern IP cameras contain rich video analytics functionality on board. This can reduce the load on the processing server by removing the video analysis functions from it, and, accordingly, the need for decompression. At the same time, modern image processing algorithms are optimized and do not heavily load the processing server and allow the implementation of more complex algorithms than those on board the camera. It needs to be decided on a case by case basis. You can read more about the work of “camera” analytics in our article.
Working with multiple threads. Multistream support
One of the most relevant features in the software. When working with multiple data streams, it is possible to significantly reduce the load on the server and PC of the operator’s workstation. As a rule, one stream with maximum quality and fps in H.264 is used for recording, and a second stream in MJPEG with a lower resolution is used for display.
It should be taken into account that the additional stream from cameras increases the load on channels and communication equipment with IP devices.
A video on our YouTube channel is dedicated to using the second stream from the camera.
Possibility of system expansion. Technical support. Changing product versions
The IP video surveillance system is extensible and scalable in nature. For this there are initially all the necessary prerequisites. This must be taken into account not only by leaving reserves in the cable infrastructure, active equipment, and server resources, but also by incorporating this capability into the software.
Some software products require the purchase of a support package for a certain period in advance, and only during this period the user will have the opportunity to purchase additional licenses for new cameras, system configuration objects, use new functions, upgrade and switch to new versions. If you do not purchase a support package, then in the future you will not even be able to connect new camera models for prepaid licenses. This feature is often found in foreign products.
Technical support for software products for IP video surveillance is one of the most popular options. It is recommended to obtain technical support for the product from the manufacturer or supplier at the design stage. Particular attention should be paid to this possibility for foreign products, because it may be paid or difficult to access.
State-of-the-art intelligent video processing capabilities
Modern motion detectors with control of the direction, size, speed, color of an object allow you to fine-tune the system’s response to any event in the frame. Other service detectors for light, rotation, abandoned objects, etc. will improve the safety of the facility and provide the operator with relevant information in a timely manner. Counting people in line, visitors, identifying areas of greatest interest and analyzing traffic in the store's sales area increase the efficiency of retail operations. License plate recognition automates the operation of parking lots and frees up the operator for more important tasks. Facial recognition increases the security of a facility by preventing intruders from entering and allows automated verification at checkpoints.
In each specific case, it is necessary to look at the availability and quality of operation of one or another required software function. At the same time, if at the moment there is no need to use part of the software functionality, then in the future such an opportunity may be required. In this regard, software should be selected based on the possible maximum set of various functions and when choosing software, focus on those products and those versions that allow upgrades.
Price
The cost of a software product should be considered as a whole system. Situations often arise when a more expensive product, due to its optimal architecture and capabilities, allows you to save on server hardware, PC monitoring, active equipment, and disk space for storing video recordings from cameras.
When choosing software, you should be extremely wary of all kinds of advertising brochures and promises from manufacturers. It will be useful to contact professionals and analyze real-life experience in using the selected software products. It is important to obtain support from the manufacturer or supplier of the software product in advance.
Our article on this topic will help you understand the nuances when choosing video surveillance software.