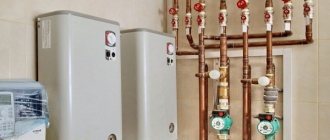
An electrode (another name is ion) boiler is one of the variations of electric heating devices. It is used mainly in country houses and differs in that, instead of the usual heating elements, it is equipped with a set of electrodes, which, in fact, heat the working fluid. This innovation made it possible to get rid of the shortcomings characteristic of electrical equipment - low performance and short service life. Due to the simplicity of the design, you can make an electrode boiler with your own hands. But before you start assembling, you should familiarize yourself with the features of its operation.
DIY electrode boiler
Design features
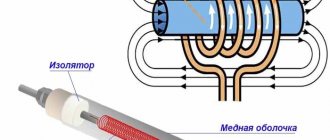
From a structural point of view, such a boiler is a small all-metal pipe coated with polyamide (it acts as an insulator). The coolant input and output, as well as power terminals, are connected to the housing. A set of insulated electrodes is inserted into the pipe on one side, while the other is hermetically sealed.
Electrode boiler
Let's consider the technical parameters of factory models.
- Length – up to 60 cm, diameter – no more than 32 cm.
- The power can vary between 2 and 50 kW, in other words, the boilers are capable of heating a room of up to 1500 m².
- They can also be single- and three-phase. In the first case, we mean low-power appliances used in private homes, in the second - high-performance boilers intended for industrial facilities.
- The optimal value of energy consumption is achieved at a working fluid temperature of 75ᵒC. If the indicator is higher, then energy consumption increases, and if it is lower, then it, accordingly, decreases (at sub-zero temperatures, the thermal conductivity of the liquid worsens).
The operating principle of an electrode boiler. Comparison of electrode and heat boilers
Based on the method of coolant supply, ion devices can be of two types:
- open systems are characterized by the fact that the heated liquid moves naturally, transfers heat and is sent back to the heat generator;
- closed ones have a special pump and expansion tank - they are necessary for the initial stage of warming up the working fluid.
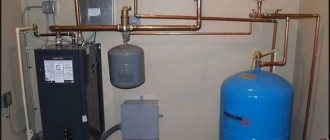
Boiler piping
Video - How the boiler works
Necessary materials
To make an ion boiler we will definitely need:
- firmness and determination;
- welding, ability to use it;
- iron tee;
- a steel pipe that has the dimensions we need;
- coupling;
- terminal and electrode insulators;
- set of electrodes;
- terminals for grounding and zero.
You may also be interested in an article on how to make a steam generator yourself, read about it here
About the advantages
Electrode boiler ROMSTAR 2 smart (set)
- The main advantage of ion boilers is their high efficiency (up to 98%), which is explained by the relative simplicity of the device’s operation.
- Their small size allows them to be used even in small houses.
- Electrode boilers do not have a “dry run”. The liquid is a full-fledged “participant” in the working process, so its absence will not cause overheating of the system - only the circuit will open.
- Voltage drops in this case are not dangerous - if it drops, the device will not turn off, it will simply work with less power.
- Cost-effectiveness is another advantage of electrode boilers.
- Finally, they reach the set temperature quickly and cool down just as quickly, allowing for more efficient use of automatic control. Operating principle
Drawing of an ion electric boiler
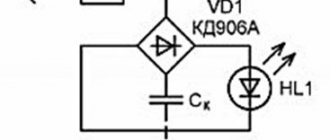
Operating principle of an electrode boiler
As can be seen in the figure, when the polarity of the current changes, the direction of movement of salt ions in water also changes. In this case, the electrode and the device body are used as contacts.
The operating principle of such a device is based on the electrolysis process, that is, the role of the heating element is played by water itself . However, there is one condition: for water to begin to conduct current through itself, the presence of salts is necessary. The more impurities in a liquid, the better it will conduct current. Charged particles of impurities or ions under the influence of electricity begin to move from contact to contact (electrodes). Since the current in a conventional electrical network is variable and its frequency is 50 Hz, the ions change their direction from electrode to electrode 50 times per second.
The home network has a constant voltage of 220 V, hence, based on Ohm's law, as the resistance decreases, the current increases. But water is still not a good conductor, unlike metals such as aluminum or copper, so as the current increases, it begins to heat up. Thanks to this, the efficiency of electrode boilers is close to 100%.
IMPORTANT! The power of the water heater directly depends on the amount of impurities in the water. The more salts, the more powerful the boiler.
This simple diagram clearly shows the simplicity of the electrode boiler design.
As a rule, a standard boiler is cylindrical in shape. An electrode, also cylindrical in shape, is installed inside the latter. In this case, the first contact in the device is the electrode, and the second is the housing itself. Based on this, there is a need to ground the water heater, since current can flow through its body .
If you decide to buy an electrode heating boiler, the problem of grounding disappears. Most factory models have a body coated with polyamide. The latter plays the role of an insulator. Also pay attention to the size of the water heater. Usually this is a small cylinder with a height of up to 600 mm and a diameter of up to 300-400 mm. Such boilers can develop a power of up to 6 kW, which is quite enough to power the average house or apartment.
Manufacturing technology. Instructions
After becoming familiar with the structure of the boiler, you can try to make a similar device at home. This process is not as difficult as it may seem, but it requires utmost care and attention. Otherwise, the finished product may be unsafe.
Stage 1. Preparing everything you need
To work you will need the following equipment:
- welding machine;
- electrodes;
- iron tee;
- electrode insulation (polyamide);
- neutral wire;
- coupling;
- ground terminals;
- steel pipe of appropriate dimensions;
- insulation for terminals.
Note! At the preparatory stage, you should study the operating diagram of such equipment.
Stage 2. Assembling the ion boiler
Assembling the boiler
First, let's clarify several important aspects. So, the ion boiler needs grounding, as mentioned above, and the neutral cable must be supplied exclusively to the outer pipe. It is also worth remembering that the phase should only be supplied to the electrodes.
Assembling the boiler
With proper preparation, the assembly procedure should not cause any difficulties.
Assembling the boiler
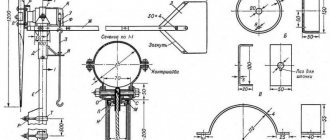
Step 1. First, take a pre-prepared pipe (optimal dimensions - length 25 cm, diameter 8-10 cm). On one side, a set of electrodes is placed in the pipe, and on the other, a coupling is installed for connection to the heating main.
Ion boiler drawing
Note! To install the electrodes, a tee is required, through which the coolant will enter/exit.
Step 2. An insulator is installed near the electrode, which, in addition to its direct function, will also serve for additional tightness of the boiler.
Step 3. High quality heat-resistant plastic is used to make the insulator. But not only tightness is important for the device, but also the possibility of threaded connection of the electrode with a tee. That is why it is recommended to entrust the manufacture of the insulator to an experienced specialist who will make the part in accordance with the required dimensions.
Parts for boiler assembly
Step 4. A large bolt is welded to the body. Next, the neutral cable and grounding terminals are attached to the bolt.
Note! For greater reliability, you can attach a second bolt similar to the first.
Step 5. After connecting to the heating system (this is done using a coupling), all that remains is to hide the finished boiler with a decorative coating. Such a coating is necessary not so much for aesthetic purposes, but for safety and protection from electric shock. This should not be neglected, since it is necessary to limit access to the heat generator as much as possible.
Stage 3. Installation work
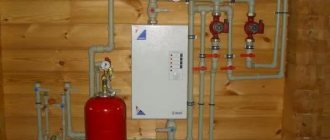
Boiler connection diagram
Boiler connection diagram
At this stage, installation of the following system elements is required:
- air vents;
- pressure gauge;
- fuse.
In this case, the shut-off valves are installed after the expansion tank. The above diagram will help you get acquainted with the connection features in more detail.
Installation of an electrode boiler
Installation of an electrode boiler
Connection diagram
Heating system assembly
Heating system assembly
Heating system assembly
Polyphosphate filter Setting up an electrode boiler
Video - DIY ion boiler
Other important installation points.
- The boiler is installed exclusively vertically, which can only be explained by its operating features. Fasteners must be separate.
- Before installing the device, the entire heating system is thoroughly washed. To do this, take clean water diluted with an appropriate product (such as Rothenberger). If a contaminated coolant is used or the line has not been properly flushed, the performance of the ion boiler will decrease significantly.
Flushing the system
Flushing agent - For grounding, you can only use a copper cable ø4 mm (or larger) with a resistance of no more than four ohms. The cable is connected to the zero terminal, which, accordingly, is located in the lower part of the unit body.
- Heating devices (batteries) are selected in accordance with the volume of the system. The best option is that a kilowatt of device power corresponds to 8 liters of total volume. If this figure is exceeded, the boiler will operate longer than required, resulting in increased energy costs.
- In addition, when arranging a heating system, preference should be given to bimetallic alloys or aluminum. The use of other alloys is unacceptable, since they contain many different impurities that affect the electrical conductivity of the working fluid.
- If an open system is installed, then the batteries used must in any case have a polymer coating on the inner surface, which will prevent air from entering and, as a result, prevent corrosion. Closed systems do not have this disadvantage.
- Cast iron products should be abandoned altogether, because the impurities they contain in large quantities will reduce the performance of the ion boiler. Also, such batteries are too large, which will increase energy consumption.
Installed boiler
Video - Connecting the Galagan boiler
Advantages and disadvantages of electrode heating boilers
We will compare electrode models only with other electric water heaters. Gas boilers will not be taken into account, which, of course, are much cheaper to operate, but require obtaining permits for their use, the availability of a project, gas and other special conditions.
So, ion boilers can stand out among their analogues in the following ways:
Electrode boilers are the smallest heating elements. Which does not affect their performance at all.
- they are compact, have a simple design, so they are well suited for use in dachas or private homes;
- the devices are not afraid of voltage surges, since the latter only affects the power of the boiler, but not its operation;
- ion water heaters quickly heat up and cool down, so it is convenient to use any automated room temperature control systems with them;
- they are safe, since even in the absence of water the device will not deteriorate, will not cause a fire or short circuit , it simply will not work (there will be no closed circuit);
- they have excellent efficiency, reaching 98%.
Disadvantages of electrode water heaters:
- knowledge in electrical engineering is needed not only to build a boiler, but also to calculate the parameters of the liquid, its electrical conductivity and the amount of impurities;
- Ordinary water, for example, from any heating system, is not suitable for operating the device, since such a liquid contains many free ions;
- air should not be allowed to enter the boiler, as this will accelerate the process of metal corrosion, thereby reducing the service life of the water heater;
- you need to monitor the temperature of the water in the boiler, since if it exceeds 75 degrees, this will significantly increase energy costs;
- when installing the device, it must be grounded, especially for homemade devices;
- The power of the water heater directly depends on the coolant ; high-quality and correctly made liquid can increase the power of the device and vice versa;
- they operate on AC power only.
You can use your electrode boiler as an instantaneous water heater by simply connecting it to the water supply system.
In addition, it is worth mentioning several features of the ion water heater:
- it can be used as a regular instantaneous water heater, and not just as a boiler;
- ease of assembly and installation, ease of repair have a positive effect on its popularity;
- very cheap, even if you buy a factory version rather than making it yourself;
- silent, has no impact on the environment or humans, does not emit toxins or harmful substances, so it can be installed anywhere.
No matter how good an ion boiler is, it is still not a worthy replacement for gas analogues. If it is possible to install gas equipment, of course, choose the latter.
About the coolant used
Electrode boilers do not require a specially prepared coolant; ordinary water can be used for this (provided that its resistivity does not exceed 1.3 kOhm/cm). In this regard, the water still needs some preparation. So, if you simply fill it with distilled water, it will not bring any success, because it does not conduct electricity.
The preparation process consists of conducting experiments, as a result of which the resistance increases (baking soda is used for this, for aluminum appliances - ASO-1) or decreases (melt or rainwater is added).
Prices for the range of electric boilers
Electric boiler
How to calculate power
The feasibility of installing a heating boiler of one type or another is determined by its operating conditions and the area of the room. Based on these data, the minimum power and operating cost for the heating season or the whole year are calculated.
Power formula: W=We*S (kW);
- W is the optimal power of the heating installation;
- We is the specific power per unit area, depends on the region (southern regions are about 0.05–0.07, northern and central – up to 0.2);
- S – total area (m2);
Additional correction factors can be introduced for different types of buildings and roofs:
- roof without thermal insulation – 0.25;
- no external wall insulation – 0.35;
- drafts or powerful ventilation – 0.15.
These and other amendments are contained in reference literature, as well as relevant GOSTs.
It is important! Having received the required boiler power value, compare it with the maximum possible load on the electrical network in the house. Garage and garden cooperatives have weak networks and are not able to power powerful heating devices.
Connection diagram to the heating network
For normal operation, you will need to install a circulation pump, an expansion tank, a special filter and an automation unit. Most often, 3 standard schemes for connecting an electric boiler to a heating circuit are used.
Standard or sequential
The most common concept is in which the coolant is supplied from top to bottom using a pump. Allows you to connect a large number of heating radiators.
The boiler connection diagram is the most common
Parallel circuit
Well suited for small rooms with 1–2 battery sections. Liquid circulation in such a circuit is possible by gravity due to convection. A second boiler or central heating can also be connected.
1 – boiler, 2 – heating system radiators, 3 – expansion tank; 4 – valve for filling/feeding the system from the water supply
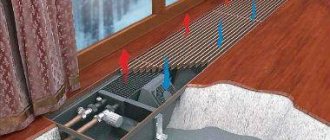
Connecting a heated floor
In houses with central or gas heating, low-power electrode boilers are used to heat the floor. This floor retains heat longer and makes the indoor microclimate softer than when using infrared heaters.
You can connect the heated floor to the boiler yourself
Heating water in a hot water supply system involves the use of special 2-circuit boilers, which can also be connected to a general heating system.
Before starting work, the drawing must indicate the number of circuits, locations of heating radiators and the total number of pipes, installation locations of pumps and filters. Provide taps for draining water and filling fluid into the circuit.
Consequences of electrolysis, direct action of current
During the operation of the hydrolysis solution, water breaks down into hydrogen and oxygen, leading to the formation of air pockets. Does not allow fluid to circulate normally within the system.
Some users have found traces of corrosion on aluminum radiators - a consequence of electrochemical exposure.
If you install cast iron radiators in the heating system, the quality of the coolant will change for the worse. Distilled water washes out impurities from the pores of cast iron. An electrode boiler requires the installation of bimetallic structures.
The liquid in the system is under constant influence of current; grounding is required. The process is complex and not possible on all types of heating systems.
You can install a clamp on a steel pipe if the system consists of cast iron radiators and plastic pipes - a process that is practically impossible to solve.
Pros and cons of homemade heating equipment
When making an electric boiler yourself, you can highlight the main advantages of the finished equipment:
- Minimum cash costs.
- Easy assembly and operation.
- You can choose individual characteristics that are optimal for a specific room.
However, this installation is not without its drawbacks:
- High level of fire hazard.
- Low level of energy efficiency.
- Electrician and turner skills are required to produce high-quality heating equipment.
To summarize, it should be noted that independent production of electric boilers is advisable in the case when you are in dire need of a means to heat the room, but you do not have enough money to purchase modern equipment. The best option may be to purchase a domestic boiler, which has good quality and is not a high price.
This is the electrical device we built! There is nothing complicated about it! All spare parts can be bought both on the market and in a plumbing store! The power can be increased or decreased! It all depends on the square of the deliverances! Just change the heating elements!
Oleg Chertov
A good idea, but is it possible to describe in more detail the details - what is the heating element from? What pipe diameter is needed? It turns out there is no thermostat - the heat is measured over time and then the on/off timer works.
koo7ya
I want to assemble such a boiler for temporary heating, tell me what heating elements you used and what diameter is the pipe in the boiler!
Components of the device
The electrode boiler has a simple design. To create it, you need several metal parts that are welded together. This allows you to quickly obtain a finished design.
To install the boiler, metal parts are required, which are connected to each other by welding
Required materials:
- welding machine;
- steel pipe;
- steel rod;
- tee;
- coupling;
- insulators for terminals and electrodes;
- terminals;
- Bulgarian.
Beginners are recommended to use a welding inverter, despite its high cost. This is an ideal device for those who want to continue welding in order to pay for the device. If you have the skills, you can work with conventional transformer welding. The main thing is to make high quality seams.
A steel pipe will become the body of a homemade electrode boiler with your own hands. You can choose the dimensions yourself. Experts recommend choosing a material with a diameter of 10 cm and a length of 30 cm. You will also need a tee and coupling. The first one is screwed onto the tube. A coupling connects the housing to the heating main.
Installation of EOU
To install an energy-saving water heating device, fittings and connecting elements are used, which are traditionally used during plumbing work (pipes, hoses, couplings, adapters, etc.). Installation of an energy-saving electrical installation in a heating system is no different from installation of other types of boilers:
- output temperature is about 95 °C;
- operating voltage range 220–380 V;
- single-phase installation length 300 mm, diameter 43 mm, weight 2 kg;
- inlet connection size G1″, outlet G1¼″;
- three-phase installation length 400 mm, diameter 106 mm, weight 7 kg;
- inlet connection size G1¼″, outlet G1¼″.
Possible installation options
The input of the unit is connected to the return line, while the output is mounted to the flow line of the heating system. If one or more boilers are already operating in the system, the installation of an energy-saving option is carried out in parallel with the existing devices. There are several options for installing the system:
- two-wire circuit with top wiring (natural water circulation);
- single-wire circuit with bottom wiring (forced water circulation);
- parallel circuit, when the EOU is connected to a heating system installed previously;
- parallel circuit, when two or more EOUs are connected to the system.
Mandatory requirements
When installing an energy-saving water heating boiler, it is necessary to provide for the installation of an electricity meter, in relation to a current strength of 1A. The cross-section of the electrical cable must be the same as indicated in the instructions. Mandatory requirements also include the installation of a grounding loop.
Contents of delivery
The delivery set of the electrode boiler from the manufacturer includes:
- electrode block with power from 3-50 kW
- power unit including circuit breaker, modular contactor and digital water thermostat
- digital thermostat for air climate control unit.
Attachments (expansion tank and pump) are not included in the delivery package, so their parameters are pre-calculated and the equipment is purchased separately.
Putting the heater into operating mode
The last stage is connecting the power and grounding wires, filling the system with water and setting up the electrode boiler. It will need to be brought to operating power by adjusting the coolant composition. Tap water is usually used, but it contains a number of harmful inclusions that form scale on the surfaces of the electrodes. The ideal option is to fill the system with distilled water at the very beginning; if it is not available, use rain or tap water.
To set up, you need to have the following devices and materials:
- current clamps or ammeter;
- soda;
- syringe;
- container for stirring.
Since electrode boilers made by hand according to the given drawing will have an approximate power of 4 kW, then according to calculations the current in the circuit should be 4000 W / 220 V = 18 A. The ammeter is connected to the power wires, after which the device is connected to the network for heating water in the system. At this time, a soda solution is made in the container, the approximate proportion is 1/10. It is better to add it to the system through an open expansion tank or other place with a syringe.
After switching on, the first ammeter readings will be less than 18 A. In small portions, slowly, a soda solution is added to the coolant for electrode boilers. In this case, the system must be completely warmed up. If distilled water was poured in, the process will take a long time, you need to be patient. Topping up should be stopped when the device shows 16-17 A, otherwise the concentration may be exceeded. This can lead to boiling and the release of steam or rupture of plastic pipes.
Blitz tips
- By organizing space heating using an electrode unit, you can save three times: firstly, on the operation of the device itself due to its efficiency; secondly, on its installation, by doing it yourself, following simple instructions and, thirdly, by constructing it from your own parts. The second and third options allow you to save up to half the cost of constructing a heating system, but do not provide guarantees for the performance and efficiency of the equipment.
- To heat large buildings with several floors, it is recommended to use not 1 heavy-duty expensive heat generator, but 2 or 3 devices connected to each other into 1 heating system.