For the winter holidays, everyone wants to transform their home. A DIY garland of 220 Volt LEDs or a battery operated one will be an excellent home decoration for the New Year holidays.
Everyone wants to feel the festive atmosphere, especially in their home. However, many types of home decorations cost a fair amount of money. The only option left is to make your own jewelry. Let's look at the main ways to make a garland of LEDs at low financial costs.
Idea N5. Retro garland
Retro garlands are popular when decorating photo zones, terraces, gazebos, shop windows and other objects. And it is not at all necessary to purchase a finished product, since anyone can assemble it. To do this, you will need: a connecting wire (it’s a good idea to get wires in fabric insulation), sockets (the most convenient models with clamps for wires), the incandescent light bulbs themselves (you can also take LED ones), a plug and a switch. In this example, we will consider a series connection of light bulbs; we will use some sockets with a built-in switch.
- Cut the wires into pieces of the required length - they will determine the distance between the glow points.
Rice. 13: cut the wires into pieces - Strip the insulation of the wires at the ends; in these places they will be connected to the cartridge, so the length of the core must be appropriate.
Rice. 14: Strip the ends of the wires - If you are using a wire with fabric insulation, then its edge must be fixed with electrical tape so that the fabric does not fray further.
Rice. 15. Secure the insulation with electrical tape - Disassemble the cartridge itself and thread the wires into the cartridge cover.
Rice. 16: insert the wires into the socket cover - Connect the ends of the wires to the contacts of the socket
Fig. 17: Connect the wires to the socket - Assemble the cartridge body; the excess length of wires from under the cover should be carefully pulled out, avoiding excessive force, so as not to loosen the contact.
Rice. 18: Assemble the chuck body - Repeat the same procedure with the remaining sockets, after which you can fix the light bulbs in them.
- Cut the wire from the last light bulb; you will need one core from it, which you need to connect to the switch gap.
Rice. 19: Connect the switch - Connect the edges of the wire to the plug; to do this, they must be inserted into the groove of each contact and clamped with a screwdriver.
Arrange the rest of the wire so that it does not protrude; the plug body should close normally. Rice. 20: connect the edges of the wire to the plug
The retro garland is ready for use - plug in and enjoy. If you wish, you can complement the garland’s surroundings with a darkened wire or socket - they can be painted in the appropriate color. For greater gloss, the wires are painted with gold or bronze paint.
Ready-made retro-style garland of light bulbs
Garland assembly:
- We divide (or cut) the wire into 9 parts of 50 cm, the remaining end will be 1.5 m.
- If you cut it, we clean the ends with a knife or wire cutters. It is best if you have a special tool for stripping wire insulation.
- If you left the wire intact, then remove the insulation from a small area between the marked zones.
- We prepare the cartridges, remove the upper part from them, insert the stripped ends or “ears” into the base.
- Connect a plug to the long end. Instead of a plug, you can attach a dimer using a special adapter.
That's it, your DIY incandescent lamp garland is ready! It looks stylish and beautiful and will decorate any friendly gatherings both at home and in the yard.>
Garlands of forest cones
It is very popular to use pine cones in New Year's decor, because they are not only a beautiful material, but also cheap, because they can be collected in any park or forest.
Traditionally, they are used to make Christmas tree decorations, and are also used in the design of Christmas wreaths and topiary. But you rarely see a garland of pine cones, although this decoration looks very elegant and unusual. Making such a decoration is very simple.
We will need:
- several pine cones;
- twine or twine, preferably colored;
- transparent, fast-acting adhesive;
- tassels;
- glitter;
- white acrylic paint;
- a can of silver spray paint;
- gold leaf;
- artificial snow;
- pliers;
- a set of small eyelets and screws.
Operating procedure:
- Preparing the cones. It is better to use open specimens to create decorations, as they look more elegant in a garland. But if some of the cones are closed, they can be forcibly “dissolved”. To do this, use an egg tray. We put a cone in each cell and wait for several days. Sometimes the process takes 1-2 weeks.
- We decorate the opened cones. Elements decorated in various ways look interesting. We cover some cones with “gold”. To do this, wrap it in a sheet of foil and press it well against the scales with your fingers. This way the color will remain on the surface of the pine cone.
- We cover the other part of the cones with white acrylic paint, imitating snow. For this we use a sponge brush, which we press well onto the scales of the cone.
- Apply glue to several cones and sprinkle them generously with glitter. This is to diversify the overall composition, especially if you use different colors.
- In addition, some specimens are coated with silver spray paint or a thick layer of artificial snow.
- We screw a screw loop into the upper part of each cone in the place where it was attached to the branch. It is convenient if you have a drill with a thin drill bit on hand. In this case, you can make a small hole, drop a little glue into it and screw in a loop. But even without a drill you can make a good fastening if you use simple pliers. We do this with every lump.
- We take twine or string and cut a piece of the required length, sufficient for the future garland. We pass a rope through the loops on the cones and make one knot so that the decorative elements do not tend to bunch up. We place the cones in this way at a distance of 6-8 cm from each other.
Interesting: 30 inexpensive, but original and pleasant gifts for the New Year from AliExpress
What are New Year's garlands?
Previously, only one type of garland for the Christmas tree was produced - a wire with small multi-colored light bulbs. It worked from the network and did not provide many opportunities for decorating the space. Today the choice is much larger and more varied. And you need to imagine exactly what options manufacturers offer in order to understand which garland to choose for a Christmas tree, decorating a house, or for decorating a facade.
What are garlands used for:
- decorating a holiday tree;
- elegant lighting of houses, commercial buildings, adjacent areas, public spaces;
- festive decoration not only for the New Year, but also for any other occasion - for a birthday, for a warm family dinner or a fun party with friends;
- as a decor for photo shoots.
The garland adds a feeling of celebration, fun, and comfort. It changes the mood and is liked by everyone without exception, no matter where it is used.
Garland of cups
Such a garland will definitely attract the attention of guests and will delight the owners with its original design. The obvious advantages of the product are minimal financial costs and ease of implementation.
At the same time, the garland looks simply enchanting - multi-colored flickering lights look great not in doorways, a corridor or a nursery.
To work you will need:
- 20 disposable cups made of white paper or plastic;
- scissors and a simple pencil;
- cardboard and colored paper;
- glitter paper, old patterned wallpaper or scraps of brocade;
- glue that does not leave marks after drying;
- stationery knife, rhinestones and sequins;
- electric New Year's garland.
Operating procedure:
- We make the design of the cups, for which we place the glass on the back side of the cardboard and trace the product with a pencil from one side of the sheet to the other;
- For each of the twenty cups you need to make a separate “suit”. We smear pieces of brocade or wallpaper with glue and press them tightly to the glasses. We smooth out the “dressed” cups and set them aside for several hours until completely dry. When the cups are dry, glue on sequins, rhinestones or beads;
- Using a breadboard knife, make a cutout in the shape of a cross at the bottom of each cup. We put a light bulb from a garland into the resulting hole, and bend the edges of the cardboard petals inward;
- To keep the garland intact until next year, the light bulbs will need to be removed from the cups, the mini-lampshades should be stacked one inside the other and placed in a box.
Garland of cocktail tubes
With these incredibly colorful cocktail tube balls, your ordinary electric garland will take on a stylish, eye-catching look. You can also make a New Year's garland 2022 from only the bright balls made in this master class.
Prepare:
- multi-colored cocktail tubes;
- wire or other material for screeding;
- pliers;
- LED garland;
- scissors.
Manufacturing:
- Cut off the tops with the grooved part from all cocktail tubes.
- We tie a bunch of cocktail tubes in the middle with wire and tighten them thoroughly using pliers.
- We bend the tubes upward, giving the shape of a ball.
- We string balls from tubes onto a rope or attach them to an LED garland and decorate our home for the New Year.
Video:
Style and design
The style of the garland can be any. Most often, simple colored jewelry is used, in which the elements contrast with each other or smoothly “flow” from one tone to another like an ombre. If desired, you can always complement the design with images of the birthday boy’s favorite heroes. For example, children hold “Fixies” in high esteem, the heroes of “Frozen”, “Smeshariki”, “Luntik” and funny dogs from “Paw Patrol”. Girls quite often prefer cute little ponies or funny students from the Monster High school. Boys will like the Tyrannosaurus, the heroes of "Cars", "Walley" and "Star Wars". But for older people, garlands with crowns are more suitable.
Quite often photographs are attached to the garland. If we are talking about a child’s birthday, then on each flag you can depict a child on each of his birthdays - at one, two, three, ten. And if the decoration is intended for an older birthday boy, then the photographs reflect the main milestones of his history - graduation from school, wedding, birth of a child and other events. Depending on the type of connection of elements into a garland, its design and style changes significantly. The easiest way is to stretch the tape or braid through the holes made along the edges of the blanks. But if you add a small bow with a spirally twisted ribbon to the fastening point, the look will be completely different, more festive and solemn. In principle, you don’t even need to connect the garlands, but immediately fix them on the wall using stationery pins so that there is one nail for each flag.
Typical frequently asked questions from readers
On the Chinese garland, two of the four channels stopped working. The lights rang, everything is normal. As I understand it, the fault is in the control board itself. Is there a way to repair it yourself or do you need to buy a new garland?
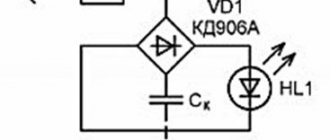
Everything the Chinese have done can, theoretically, be repaired. Most likely, the diagram of your garland control board is similar to the one shown in the figure.
Since two of the four lines are working, there is a high probability that two control thyristors (VS1-VS4) have failed. All you need to do is check the thyristors and replace the burned out ones. You can read about how thyristors are diagnosed in the article:
Selection of necessary materials and components
To make your own LED garland, you will need the following tools, materials and components:
- soldering iron with rosin and solder;
- insulating tape;
- heat-shrinkable casings that increase insulating properties;
- LEDs;
- resistors.
LEDs can be obtained by disassembling non-working computer accessories - keyboards and mice. The correct functionality of a homemade garland depends on the quality of the selected components and connections and the reliability of the operating scheme.
When diodes are connected in series, they will work, but the voltage will increase significantly, which will increase the amount of heat generated, and ultimately lead to failure of the device. This is the main reason for the use of resistors, which reduce the voltage and change other input current characteristics, due to which the color changes when the sources glow.
LED selection
The main elements of the garland are LEDs. The main technical and operational parameters are considered to be operating voltage and current flowing in the forward direction. Both characteristics will be needed to calculate the electrical circuit and electricity consumption.
On average, an LED operates at a current of 20 mA. To reduce the amount of electricity consumed, resistors are used, and the resistance value of this element depends on the parameters of a particular LED diode. You can find many calculators on the Internet that allow you to perform a simple and quick calculation of the resistor for the selected LED.
The supply voltage of the element indicates the moment when the voltage drops at the pn junction, which occurs due to the internal resistance of the product. In other words, if we are talking about a 12 V power supply and 3 V LEDs, then no more than four of these devices can be connected in series, since each of them reduces the supply voltage (12 V) by the value of its own (3 V). If you add a fifth element to the circuit, it will practically not glow.
The voltage depends on the specific manufacturer and LED colors. For example, diodes with blue, white and green crystals have an operating voltage of 3 V, yellow and red - 1.5-2.5 V. The power consumption of diodes is calculated according to one of Ohm’s laws: P = U * I, where P is power , U and I are voltage and current, respectively.
If we consider the values given above, then when we substitute them into the formula we get the following value: 3 (V) * 0.02 (A) = 0.06 W. When 4 LEDs are connected in series, this characteristic will increase to 0.06 * 4 = 0.24 W. When a limiting resistor is connected in series, the voltage will increase by another 0.06 W, so the total power consumption will be 0.30 W. If you use several groups of 3 LEDs that are connected in parallel, then this value must be multiplied by their number.
The luminous intensity of a red 1.8 V LED diode is 0.2-2.0 cd, white - 10-20 cd. However, these characteristics do not make any adjustments to the calculation scheme and are selected solely based on the purposes of further operation of the device.
Resistor selection
When choosing resistors, you need to focus on power and resistance. The second parameter depends on the number of LEDs connected in series to the circuit and their operating voltage, the power depends on the current value. Using a 0.125 W resistor will almost always be sufficient.
When operating 3 V LEDs, it is customary to use resistors with the following resistance depending on the number of elements:
- 1 LED – 470 Ohm;
- 2 – 300 Ohm;
- 3 – 150 Ohm;
- 4 – 1 Ohm.
If you plan to operate diodes with a voltage of 2.1 V, then the relationship will be as follows:
- 1 LED – 510 Ohm;
- 2 – 390 Ohm;
- 3 – 300 Ohm;
- 4 – 180 Ohm;
- 5 – 75 Ohm.
Selecting a power supply
In the case of an LED garland, a 12 or 24 V power supply with a reserve of output power (approximately 25% on top of the total power consumed by the circuit) must be used. The choice of a specific block depends on the number of LEDs - for a circuit with 7 or more elements, it is advisable to use a 24 V product.
The 24 W unit allows you to switch 11 series-connected 2.1 V diodes or 6 3 W diodes. It will almost always be enough to use a small power supply with a voltage of 24 V and a current of 0.5 A with an output power of 12 V.
Advantages and disadvantages
Before you start choosing garlands powered by solar panels, you need to carefully study their pros and cons. This will save the buyer from making a rash decision and allow him to settle on the best option for a particular case.
As for the advantages, first of all it is efficiency. The statement is true for any solar-powered device. In the case of garlands, you only need to invest money at the time of purchase - in the future they do not require additional costs. Electricity bills will not increase, and the lamps themselves will last a long time - there is no need to replace them. It must be borne in mind that with a low level of quality, the price may differ significantly; it is significantly influenced by the manufacturer.
Autonomy is another important point. Such garlands can be used outdoors or in areas that are not equipped with power. In addition, there is no need to turn the device on and off: it does these manipulations independently, without requiring attention.
However, with such a significant number of positive aspects, we must not forget about the disadvantages. In this case, there is only one – a small charge. This is true when the daylight hours are shorter than the dark hours. In a short time, the battery may not have time to charge. This is also facilitated, for example, by cloudy and rainy weather.
In the next video you will find an unboxing and review of solar-powered LED garlands for illuminating trees and landscapes.
Paper garland with fringe and tassels
At first glance, paper garlands are unremarkable. But if you use a little imagination and put in very little effort, you can end up with a real art accessory for the New Year 2022. For example, a garland with fringe and tassels will decorate any interior in the house.
To work you will need:
- multi-colored paper, foil, decoupage sheets or wrapping paper;
- glue gun;
- stapler and scissors;
- twine, ribbons, rope;
- a simple pencil and a ruler.
Operating procedure:
- take colored paper or foil and fold it in half;
- cut along the edge two-thirds of the way;
- Lubricate the middle with glue, put twine, rope or ribbon in the center;
- press hard.
Garlands “Hearts”
For Valentine's Day, a man is preparing a gift for his other half. The heart is a symbol of love and strong relationships.
Let's look at how to make a garland of paper hearts on your own. For this you will need:
- a pack of double-sided colored paper;
- needle and strong thread;
- scissors;
- simple pencil.
The work is as follows:
- A sketch of a heart is drawn on a piece of paper.
- This sketch is cut out using scissors.
- The finished product is applied to other sheets, outlined and cut out. In this way, the required number of hearts is made.
- Using a needle and thread, the prepared hearts are strung into a garland.
- The product is ready. It can be made to any length using different colors.
Stars
On the eve of the new year, 2022, I really want to make crafts with my own hands! Creating paper garlands is the most interesting and exciting activity. Why not make stars, because they look incredible? The work will require a minimum of time, and the result will please you. It’s best to involve the whole family in the master class; the kids will happily start cutting and gluing.
What you will need:
- needle;
- double-sided colored paper;
- scissors;
- a thread.
How to do the job:
Take colored paper and cut out squares.
We bend the parts in half and cut them.
From each edge we bend one corner to the strip, we get a triangle.
We bend the resulting part in half inward.
We unfold the workpiece, you should get a line for the height of the figure. Step-by-step photos will help the needlewoman understand the main nuances.
Bend sharp corners towards the center.
We denote the resulting triangle with creases. We also bend it in half and fix the height.
We straighten the ends of the large triangle and bend it to the height of the smaller figure.
We make 5 blanks in the same way. We insert the elements one into the other with the bent side up.
We press down the finished structure, loosen it slightly, and connect the ends.
We thread the needle and collect the stars.
The result is a spectacular, bright garland. It is unlikely that you will be able to purchase a similar one in a store. Therefore, don’t be lazy, it’s time to get to work. After all, there is less and less time left before the holiday, and there is still a lot to do.
The easiest ways to make paper garlands
Wall hanger in the hallway: DIY crafts and unusual ideas
It doesn't take much time or effort to decorate your apartment with intricate and whimsical paper decorations. Paper garlands are lightweight, durable, beautiful and affordable. We will tell you about the simplest ways to make garlands that will decorate your life and lift your spirits.
- Templates. To make your work easier, you can use blanks: simply print them and cut them out from a simple landscape sheet of paper. These can be cute ghosts and other Halloween figures.
These are the New Year's templates you can print and make your own garland.
And this is the now popular Halloween theme - cute ghosts and a “smiling” pumpkin.
2. Drawings. If you have basic artistic skills, you can fold a piece of paper several times and then draw the picture you want on it.
For example, you can make autumn garlands with your own hands as follows.
You need to draw leaves of various shapes and sizes on multi-colored sheets of paper, draw another outline inside, and then cut them out, outside and inside.
3. Garlands of snowflakes. Delicate lace decorations made from plain paper are easy! Use templates or make your own design.
Use templates to make snowflakes or just use your imagination.
Idea #4 – Let's use an old keyboard!
By analogy with the previous method, you can make a diode garland with your own hands, using an unnecessary keyboard. As you know, some keys are backlit with 5 Volt diodes (for example, Caps Lock). If you have a non-working keyboard, disassemble it and carefully remove the light bulbs, from which you can assemble a simple electric garland. Next, select suitable resistors and a USB cable with which the connection will be made. The diode garland circuit is as follows:
The diode legs (anode and cathode) must be soldered to the black and red wires of the electrical cord, in accordance with the color marking. When everything is ready, insulate the exposed contacts and proceed to testing the homemade garland. Such a garland can be powered with a voltage from 5 to 12 volts, while selecting the required resistor for each of the LEDs. In our case, the homemade product will be powered from a 220 Volt network through a charger, which will provide 5 V output
Please note that the number of parallel-connected LEDs with resistors can be increased or decreased, as in the case of a garland on incandescent lamps
In the video you can also see an example of how to make an LED garland at home:
How to assemble a flashing electric garland with musical accompaniment?
LED garland diagram
The AC mains voltage is supplied to the power controller through resistors and a diode bridge, already rectified and smoothed through a capacitor.
In this case, this voltage is supplied through the button, which is open in the normal state. When you close it, the controller modes switch.
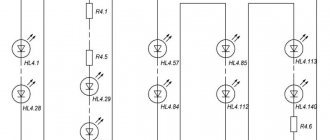
The controller in turn controls the thyristors. Their number depends on the number of backlight channels. And after the thyristors, the output power goes directly to the LEDs in the garland.
The more such outputs, the more varied the colors the product can have. If there are only two of them, this means that only two parts (or halves) of the garland will work in different modes - some bulbs will go out, others will light up, etc.
In fact, these two lines of diodes will be connected on two channels in series. They will connect to each other at the end point - the last LED.
If for some reason you are annoyed by the blinking of the garland and you want it to glow evenly with only one color, it is enough to short-circuit the cathode and anode of the thyristor on the back side of the board using soldering.
The more expensive the garland you have, the more outgoing channels and wiring will leave the control board.
At the same time, if you follow the traces of the board, one of the mains voltage outputs is always supplied directly to the final LED of the garland, bypassing all elements of the circuit.
How to decorate a window with garlands (ideas)
Finally, I want to show you a bunch of other ideas that you can also take note of. Wonder, please, it’s so great when windows and walls and even doors are decorated in a winter theme, you immediately feel the holiday, and your mood lifts.
Here they are droplets of cheerful mood from beads.
Use music CDs or regular cardboard rings wrapped in thread.
Make naughty bunnies or tops.
A product made from fir branches and twinkling lights looks very beautiful.
Here is another children's delight, a garland of pine cones in the shape of owls.
In the West you can often find shoes or mittens.
Garlands for school and kindergarten for a competition from scrap materials
Making crafts can be an interesting and useful way to spend time with your children. Decor is often needed for a kindergarten or school. Since there is no time to purchase a large amount of materials, improvised means are used.
The easiest option is to make snowflakes. They can be strung on ribbons or threads and used as home decorations. If the child is of senior school age, then snowflakes are crocheted from threads with him.
Another option is to make banners with different festive elements. It is used to decorate a building or room.
In order to make a craft, you will need the following materials and tools:
- scissors;
- buttons;
- clothespins;
- threads of red and green or light green;
- cardboard;
- glue.
At the initial stage, you need to cut out Christmas trees from cardboard, and use glue to attach buttons of different colors to them. Next, pompoms are made; the most suitable thread colors for this are light green and red. The products are attached using clothespins to a thread. The decoration is ready.
Using a similar pattern, you can make mittens or snowmen, as well as Santa Clauses and Snow Maidens.
Portable garland
The garland does not blink, it is constantly on. The assembly of the garland is good, the wires are soft, you can wrap small objects for decoration. There are 50 LEDs on the garland. Glows in green, blue and red light. As I already said without blinking. But there is a garland with the same appearance, which has a controller and you can change the colors to 8 different modes. But the price is naturally twice as much as this option. Choose any one using the link at the bottom of the article.
Garlands have two types of moisture protection. IP 20 and IP 44, I have an option with IP 20 protection, intended for indoor use only, that is, moisture is not allowed. And the version with IP 44 protection can be used both indoors and outdoors. Read the instructions for use carefully, they are clear in Russian.
Let's go through the instructions a little:
- The length of the garland is 3 meters,
- Distance between LEDs 5 cm,
- The glow mode is constant,
- Temperature operation from -20 to +40 degrees,
- Service life 50,000 hours of operation.
The battery case has a power button and a 5 ohm limiting resistor. The housing cover can be easily removed by lightly pressing the edge of the cover, where there is an inscription OPEN.
To summarize, the garland is simple and good, worth the money. It is small in size and versatile. Since it can be hung on a Christmas tree or decorated with objects indoors, as well as taken outside for parties and holidays. Just keep away from moisture. The wires are soft and bend well. You can hang a garland on almost any object. On a tree, a Christmas tree, even on yourself and you will stand out in the company on a holiday. And this is not a joke, because it is electrically safe. Wrap around a vase, floor lamp, etc.
DIY New Year's garlands for a school competition
A selection of the most unusual and original handmade jewelry. For the first one, pine cones will be used. Tint the pine cones with white gouache. Tie to a thread. Decorate a veranda, a fence near a kindergarten, or a Christmas tree growing near a school.
The frost-resistant garland is made from ice. Pour some water into the cake pan. Add viburnum and Christmas tree branches. Freeze. And then pull it with thread. Make the ice decor colorful. To do this, pour tinted gouache water into an ice tray. Pull the thread through. When the pieces freeze, it will turn out to be a great craft.
Do you have a lot of old newspapers at home? Make them into New Year's room decorations!
Let's walk through the kitchen. Pasta bows or tubes will make an unusual decoration. Just tint the pasta in color, tie it to the thread.
What about popcorn? Would you like to involve popcorn in your decor?
Natural home fragrance – citrus peel. Cut stars from tangerine peel. Dry in the oven. Hang it on a thread.
Falling snow is made from cotton wool. Roll into small pieces in your palms. You need a lot of cotton balls. String it on a thread and hang it in any room. Make similar decorations from cotton pads.
Are you a needlewoman? Do you like to crochet? An idea for you - a knitted garland. Knit many small snowflakes using small napkin patterns. Starch the workpieces. Iron. Hang threads of knitted snowflakes from the fireplace or Christmas tree.
Printable template.
What else do you need to know?
There are several important points that are also worth considering:
- To make a garland with running lights, you need to purchase a three-phase multivibrator. It only works with LED equipment.
- For outdoor use, use only diode products; it is best to additionally protect the connections with heat-shrink tubing, and place the socket and control unit indoors. An outdoor garland should be an order of magnitude stronger than a home one.
- If there is an old garland that is not working, it can be repaired. To do this, first remove the power supply, measure the diameter of the used diodes to find out their characteristics via the Internet. The power of the resistor is calculated, it is soldered in place of the block, after which you can turn on the lights.
Types of solar-powered garlands
A garden garland as a lighting product can be made in several types, differing in their configuration and technical characteristics: the number of LEDs and electrical power, the length of connecting wires and battery capacity, the number of operating modes.
The industry produces the following types of outdoor solar-powered garlands:
- linear - is a regular garland made of several light sources connected in one line;
- curtain - made in the form of a main horizontal wire, from which several threads of the same length descend;
- fringe - differs from the “curtain” type only in that the length of the descending threads is different;
- mesh - structurally similar to a “curtain”, but has not one horizontal wire, but several connecting the descending threads;
- duralight - a transparent (colored) cord made of polymer materials, it contains LED light sources;
- melting icicles;
- sculptural form.
Options for using a solar-powered garland when decorating various objects
When choosing a solar-powered garland for the garden, the selection criteria will be the following:
- The appearance and geometric dimensions must correspond to the intended location.
- Technical characteristics - number of LEDs, battery capacity, degree of protection and temperature conditions of use.
- Availability of additional automation devices – controller and motion sensor.
Rainbow garland
This rainbow fan garland is so easy that you only need ribbon and paper to make it. So if you are planning a colorful party, be sure to include this beautiful and easy rainbow fan garland. This is an inexpensive craft and looks amazing! Simple instructions can be read on the website, the link is below.
Photo source: icecreamoffpaperplates.com/2017/03/17/rainbow-fan-garland-diy-party-decoration/
Fan garlands are really very beautiful. Check out another small selection of what beauty can be made from plain paper.
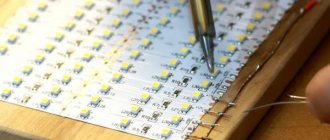
Making a garland of LEDs
With LEDs connected in series, you can create a flickering garland. Its creation will take a minimum of time, and almost anyone with basic electrical knowledge can cope with the task. The most important thing in this case is to strictly follow the instructions.
To assemble an LED garland yourself, you need to follow the steps in the following order:
- Decide on the desired distance between adjacent sources (diodes).
- After unwinding the wire, use a marker of any color to make the appropriate marks on the places where the LEDs will presumably be installed. Ideally, the distance between them should be 200-250 mm.
- At those points where marks were left, remove the insulation from the wire, creating “bare islands” 20-30 mm long. You need to act carefully so as not to damage the cable itself. This will simplify the process of future diode mounting.
- To such areas you need to apply rosin and solder.
- Attach the LEDs to the resulting nodules by connecting their legs to the wire with a soldering iron. Please note that this fastening option will be less reliable, so you will have to use reinforcing clamps, which will also cover the exposed parts of the garland.
- Cut the narrow tape into different pieces 30-40 mm long, then use it as insulation for diodes. As a result of these steps, each LED should be located in a “pocket” that holds it firmly to the cable. You need to wrap all the light sources on the wire.
- Then you need to ensure the top of the “pocket” is sealed. For this purpose, silicone sealant is suitable, which not only increases the strength of the structure, but also improves the glow.
- All that remains is to connect the resistor and power supply to the circuit, and then test the operation of the homemade equipment.
Preparing to create a battery-powered LED garland
An LED garland connected to batteries looks no less beautiful. In addition, such a product will be as safe as possible for children. This type of illumination is used as an external light source. When moving in the air, a bright multi-colored trail will remain, which designers often use to create various patterns in space. The product must be protected from wind, precipitation and low temperature.
To produce a battery-powered garland you will need:
- LEDs with a diameter of 10 mm of different colors with a scattering effect;
- magnets with a diameter of 1.3 and a thickness of no more than 30 mm;
- electrical tape or narrow tape;
- lithium battery (for example, CR2032 3V);
- epoxy adhesive.
The process of making a garland using lithium batteries
To create a bright shimmering garland you will need to perform high-quality soldering. There is no need to rush while completing the work. Be patient, be careful and attentive, follow the steps:
- Test the LEDs to see their light levels. Connect the components to the lithium battery one by one (connect one longer leg to the “plus”, the other short leg to the “minus”).
- Fix the position of the diodes, then wrap each element along with the battery with adhesive tape or electrical tape in 2 layers.
- Align the magnet with the positive contact of the battery, fixing it.
- Each part of the structure must be installed on a thin wire. Check the functionality of the product!
Using resistors in pairs
In this case, you can reduce the cost of the product by making it more economical, but remember: it is much better from the point of view of electrical safety and equipment durability to connect each LED with its own resistor. Plus, the latest components are cheap.
What types of luminous Christmas tree decorations are there?
New Year's designs sparkling with lights for decorating a thorny tree are sold in a wide variety.
This decor is not limited to the standard modification in the form of wires to which tiny incandescent lamps are connected. Moreover, such illuminations are becoming a thing of the past, and they have been replaced by LED garland.
The peculiarity of modern lighting is the use of special lighting devices - these are tiny LEDs, which are distinguished by a number of positive qualities:
- low power consumption;
- long service;
- low heating temperature;
- resistance to mechanical damage and temperature changes.
But if ordinary LED illumination is no longer a curiosity, then battery-powered street lighting structures are not yet so common. By the way, this is a very convenient and practical solution.
It will be especially appreciated by residents of private houses who, for one reason or another, cannot count on connecting to the power grid. They will hang the wires along the branches of the forest beauty with their own hands, and then simply turn on the button on the block where the batteries are inserted. The Christmas tree will blink with cheerful lights, even if there is no light in the house.
Also, a Christmas tree LED garland is convenient if there are frequent power outages. It looks impressive, especially since there are no extension cords or wires attached to it: only tiny flickering lights are visible to the eye, and nothing superfluous.
It is also rightly called mobile: you can place a New Year’s tree in any corner of the yard and even move it from place to place, without worrying about connecting to the network.
DIY New Year's garland made from paper with templates
Make your own Christmas decorations. The simplest option is made of paper. Even a child can handle the job.
Take a circle template with a diameter of 3 cm. Cut out similar circles from colored paper. It will take quite a lot. Do you want to quickly cut out a lot of circles? Combine 4-5 sheets of A4 colored paper.
Draw circles on the top sheet of paper. Cover the entire sheet with drawings. Staple from the sides. Start cutting. You will immediately notice that after each cut out template 4-5 circles appear.
Next, fold them in half and glue them onto a thread. It turns out to be a quick DIY paper garland. A colored homemade jewelry chain will be an excellent craft for kindergarten or school. But before you decorate the room, let the crafts dry thoroughly.
Make other shapes in a similar way. For example, droplets or stars. It comes out original and very festive.
A garland of stars is even easier to prepare. A thin thread is glued to the paper templates. The creation process is complete! Cut out many templates as indicated above - in the version with circles. Find templates here.
It is convenient to cut out a template of a deer or an openwork Christmas tree with a stationery knife. Cut it out and glue it onto a string.
Springy Christmas trees will decorate the wall of the room. Cut out the blanks according to the template. Fold the triangle bases in half. Make cuts along the horizontal lines. Expand. Gently pull down.