The popularity of using LED lighting is due to energy savings, brightness, stylish design and long service life. LED devices of various modifications are available for sale, but their price is quite high, so you can make an LED lamp with your own hands.
For self-assembly you will need basic knowledge in the field of electrical engineering, skills in working with a soldering iron and a great desire. Even a novice radio amateur can assemble a simple model.
LED lamp device
Before starting work, you need to know what this lamp is and what should be obtained as a result of self-production.
Main components:
- Housing (light diffuser).
- Board with LEDs.
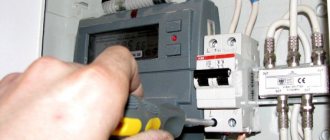
- The power source (driver) is used to convert 220 V to direct (12 V) alternating current. The standard device is equipped with capacitors adapted for long-term operation at high temperatures, and it has automatic short circuit protection. The operating mode of the device is at voltages from 85 to 265 V.
- Base.
Work safety requirements
Experienced electricians note:
- You cannot begin assembly without basic electrical knowledge. Incorrect manufacturing sequence may cause the product to explode or cause a short circuit.
- Devices with voltages greater than 12 V cannot be connected to a standard power supply.
- If the structure is not insulated, electric shock may occur if you touch it with your hands.
- A finished light bulb does not work without high-quality soldering of the nodes.
Self-assembly of an LED light source will not be difficult if you have the knowledge and skills. If in doubt, you do not understand circuits, it is better to purchase a ready-made LED device.
LED strip lamp
Necessary materials:
- 2 burnt out fluorescent lamps 50 cm long;
- LED strip with NK6 light emitters with a current of about 100-120 mA, voltage of 3-3.3 V;
- rectifier diodes 1N4007;
- fuse (can be taken from a faulty lamp);
- capacitor;
- plastic frame for attaching the tape;
- superglue or liquid nails.
Assembly instructions:
- Without damaging the wires, remove the lamps. Extreme care is required: if a fluorescent lamp breaks, the toxic substances it contains can cause severe poisoning.
- The LED elements in the strip are connected in parallel, 3 pieces each. In this case, this scheme is not suitable. You need to cut the tape into pieces with three diodes in each and remove the converters. Solder the wires in it so that you get 22 parallel-connected groups of three LED elements with a voltage of 12 V in each of them.
- To convert AC to DC, a DC rectifier is needed. To do this, you need to remove the capacitor from the fluorescent illuminator.
- Attach the diode strip to the plastic frame with liquid nails (do not rely on the self-adhesive layer of tape) and assemble the structure.
The resulting homemade LED lamps can be used for directional lighting of the workplace, in utility rooms, and in the corridor. The light flow from them is 1.5 times brighter than that of their luminescent counterparts, but the energy consumption is significantly less.
Resistor circuits
This scheme is quite capable even for novice masters. To assemble a device based on it, you need to buy 2 12k resistors, as well as a pair of circuits with the same number of chips soldered in series, taking into account polarity. One strip of diodes on the side (R2) is connected as the anode, and the other (R1) as the cathode. Devices that are assembled according to this scheme are distinguished by a soft light, since at the moment of switching on the LEDs light up one after the other.
Fig. 5 – resistor for an LED lamp.
Thanks to this effect, the naked eye practically does not see the pulsation. This bulb is best suited for a table lamp. To get optimal lighting, it is recommended to purchase strips with 20-40 diodes. If there are fewer of them, it will give an insignificant luminous flux. But the more elements, the more difficult the work is technically.
The simplest LED light bulb to assemble
You will need:
- faulty energy-saving light bulb;
- HK6 LEDs;
- cardboard;
- tools: pliers, soldering iron.
Step-by-step instruction
Carefully separate the base part from the energy-saving diffuser housing. Usually it is assembled using special latches, which must be found and carefully hooked. If the plinth is attached using pinholes on it, you need to carefully drill them or cut them off with a hacksaw.
- Clean the base and degrease it with alcohol/acetone. Carefully remove excess solder from soldering areas.
- There are six holes on the base cover that were used to attach the gas outlet pipes. They will be the installation site for the ICE elements, to fix which you will need another piece of cardboard of the appropriate diameter with holes cut in it.
- HK6 LEDs consist of six crystals connected in parallel. Their power is small, but the stream of light is quite bright. Having inserted the light emitters into the base cell, connect them into two branches of three pieces in a parallel circuit. Next, both circuits must be connected in series to the output wires of the driver.
- Place the driver in the base. Install another circle of cardboard between it and the diode board (to prevent a short circuit between the diode contacts and the driver elements).
Distribute the incoming driver wires as follows: one is led out through the center of the base and soldered, the other will be fixed to the base thread during assembly. Secure the driver with hot glue.
- Connect the diode contacts to the second pair of driver wires. Solder all connections.
- Having installed the plate, glue it with hot glue and assemble the base.
- Solder the wire brought out to the thread.
- The bottom of a plastic bottle of a suitable size can be used as a diffuser.
This simplest manufacturing method costs practically nothing, with the exception of the purchase of six light emitters.
Choosing a lamp housing
You should decide on the case before choosing a circuit. In this case, you can use several options:
- incandescent lamp base;
- self-made device;
- using a housing from a halogen or energy-saving lamp.
Masters prefer the last option, since it is the simplest.
Energy saving lamp housing
It is recommended to make a housing for a DIY LED lamp only if the craftsman has enough experience. In most cases, part of the structure is taken from an energy-saving lamp or incandescent lamp. The burnt-out light bulb should be disassembled and the converter board removed. The scheme is installed in one of the following ways:
- Hide it in the basement. A plastic bottle cap will do.
- Place the diodes in the holes made under the bulb in the lid.
- Place the circuits inside the base. This option has improved heat transfer characteristics. Here the chips are connected through existing holes.
To place the chips, just cut a circle out of thick cardboard or plastic. If the work is done carefully, the device will have an aesthetic appearance.
Base with incandescent lamp
Some craftsmen choose the base of an incandescent lamp to install the circuit, as it has an important advantage: after assembly, the master will not have any difficulties screwing the light bulb into the socket, which will ensure heat exchange.
Fig. 9 – incandescent lamp base.
The base of an incandescent lamp also has its disadvantages. The finished structure will not have a beautiful appearance, and it will also not be possible to make high-quality insulation.
We recommend watching the video: How to assemble an LED lamp with your own hands.
Upgrading a halogen light bulb
Necessary materials:
- LED elements. The quantity is at your discretion, but preferably no more than 22 pieces, since it is difficult to work with a large quantity.
- Burnt out halogen light bulb.
- Super glue.
- Copper wire.
- Resistors.
- A piece of aluminum sheet, a regular beer can will do.
- Tools: hammer, soldering iron, hole punch.
Step-by-step instruction
- Remove the top halogen bulb. Use a screwdriver to remove the putty around the pin base.
- Using precise blows of a hammer, knock out the pins from their sockets so that the old light bulb falls out.
- Based on the number of diodes, make a plan of their location and print it out.
- Attach the paper stencil to an aluminum sheet and use a hole punch to knock out holes on it.
- Download on the Internet a diagram for connecting diodes depending on their number.
- Place the aluminum circle on the stand and insert light emitters into the holes. To facilitate the soldering process, you can immediately bend the cathode legs of the diodes to the anode legs of the others according to the diagram.
- Secure the light emitters in their seats with superglue, avoiding getting it on the legs of the LEDs.
- After the glue has dried, solder the legs according to the diagram. In this case, leave one negative and one positive leg for connection to the power supply. In order not to make a mistake in their polarity in the future, you can cut off the negative one a little.
- Solder resistors to the negative contacts. The result should be six positive and negative terminals (with resistors).
- Solder the resistors according to the diagram.
- Solder a piece of copper wire to the two contacts left for connecting to the power supply, which will become a pin base. One of them, the negative one, can also be made a little shorter so as not to confuse the polarity. The space between them must be glued so that a short circuit does not occur in the future.
- Install the structure on the reflector and glue it.
- Mark the positive and negative contacts with a marker. It is also advisable to note the voltage level: 12 V.
- Check the functionality of the product by connecting it to a car battery or 220/12 V power supply.
Types of LED devices
The type of specific lamp is determined depending on the location of the LEDs:
- COB . The LED is soldered into the board. This will increase the intensity of the glow and protect against overheating;
- DIP . Here the crystal is connected to two conductors, and an enlarger is installed above them. The modification is used in the production of garlands and advertising banners;
- SMD . To improve heat dissipation, diodes are mounted on top. Due to this, it is possible to reduce the size of the light bulb;
- "Piranha". We are talking about ultra-bright light-emitting diodes with increased vibration protection. In most cases, they are installed in cars, as they are characterized by reliability.
A variant of the DIP LED called Straw Hat or “straw hat”.
The most significant disadvantage is the COB design. If at least one chip fails, it will not be possible to replace it; you will have to change the mechanism completely or buy a new lamp.
Model based on an energy-saving light bulb
You will need:
- faulty energy-saving light bulb;
- a piece of fiberglass;
- resistors;
- capacitor;
- LEDs;
- auxiliary materials: table salt, nail polish, copper sulfate;
- tools: soldering iron, drill.
Step-by-step instruction
- Cut the fiberglass board in the shape of a circle d=3 cm.
- Using nail polish, apply the circuit diagram to the board.
- Dissolve 1 tbsp in warm water. l. copper sulfate and 2 tbsp. l. salt.
- After the varnish has hardened, place the board in the resulting solution for one day. As a result of the reaction, the copper coating of the board will disappear, with the exception of the drawing protected by varnish.
- Remove the varnish from the board with acetone and tin the tracks.
- Drill holes using a drill according to the drawing.
- Solder all driver elements.
- Disassemble the old energy saving box, leaving only the wiring coming from the base.
- Install the board in the base part, solder the wires, and secure the board with glue.
How to choose LEDs?
It all depends on where you will use these homemade lamps. If you need bright light in the living room, then you need super-bright fixtures in large quantities. And if for a corridor, toilet, bathroom or hallway, a few pieces are enough.
It's quite simple - more LEDs, more light. Sometimes you just need indicator lamps to show the device is working or that voltage is applied. This is sometimes necessary in enterprises and on factory equipment. In this case, one regular red or green LED is sufficient. You can even use Soviet AL307, widely used in old tape recorders and other equipment.
LED strip light bulb
If you lack the skills to work with a soldering iron and create a circuit on a board, you can assemble the product using an LED strip. Instead of a driver, it is possible to install a power supply to convert current from 220 to 12 V. Due to the large dimensions of the unit, this method is only suitable for lighting with spotlights that will be connected to one unit hidden in the ceiling.
Materials:
- a piece of plastic pipe (future homemade frame);
- LED strip;
- copper wire;
- tool: soldering iron.
Assembly instructions
- Prepare the frame.
- Cover the pipe with pieces of tape. You should know that you can cut the tape only in the places specified by the manufacturer.
- Using soldering, connect the diodes in parallel. Attach a piece of copper wire to the negative and positive groups of wires, which will later be connected to the power supply. When installing a homemade structure in the base of an old energy-saving device, the output contacts of the tape must be soldered to its wiring.
Connection security
Do not install polar capacitors in the diode circuit.
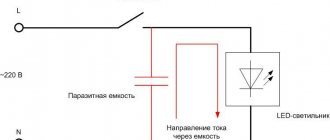
When working with a circuit for connecting diodes to a 220 Volt network, the main danger is the limiting capacitor connected in series with them. Under the influence of mains voltage, it is charged to a dangerous potential for humans. To avoid trouble in this situation, it is recommended:
- provide in the circuit a special bit resistor chain controlled by a separate button;
- if this is not possible, before starting the tuning, after disconnecting from the mains, you should discharge the capacitor using the tip of a screwdriver;
- Do not install polar capacitors in the diode power supply circuit, the reverse current of which reaches values that can “burn out” the circuit.
//www.youtube.com/embed/7JFY9Qte6rk
30.10.2020
Marina Tkacheva / article author
Higher education, journalist, worked until recently as a department editor at a newspaper.
Articles written
4
Safety Tips
- Despite the fact that making an LED light bulb yourself is a fairly simple task, you should not even try to assemble it without having the necessary knowledge and skills in electrical work. Otherwise, homemade products can cause a short circuit that can damage the entire home network. It is typical for LED technology that if the connection diagram is incorrect, an explosion is also possible.
- The home network uses alternating current with a voltage of 220 volts. You should always remember this and not connect lamps and other devices designed for 12 volts to your home network.
- It is recommended to connect the contacts using soldering. If you use an adhesive instead, the reliability of the connection will be low and the product will quickly fail.
The assembly methods presented above do not require significant financial outlays, except for the purchase of LEDs and a small amount of consumables. The main elements used are used parts from burnt-out appliances. The cost of homemade products is several times lower than those purchased in a store. Having acquired installation skills, you can make lamps of varying brightness as you wish.
Design of a modern factory LED lamp
The LED here is initially assembled from many crystals. Therefore, in order to assemble such a lamp, you do not need to solder numerous contacts, you only need to connect one pair.
An LED lamp consists of a base, a driver, a heatsink, the LED itself and a diffuser
Types of LEDs
LED is a semiconductor multilayer crystal with an electron-hole junction. By passing direct current through it, we receive light radiation. An LED also differs from a conventional diode in that if it is connected incorrectly, it immediately burns out, since it has a low breakdown voltage (several volts). If an LED burns out, it must be completely replaced; repair is impossible.
There are four main types of LEDs:
- the most common in lighting decorations and displays is DIP (The Direct In-line Package - a crystal with a lens and two conductors);
- bright automobile “Piranha” (similar design, but there are four terminals, which is more reliable in installation and better for heat dissipation);
- Surface mounted diode SMD (Surface Mount Devices - smaller dimensions, better heat dissipation and more application options);
- COB (Chip-on-Board, soldered into the board - the contact oxidizes less and does not overheat, the glow intensity is much higher).
LEDs manufactured using COB technology are a ready-made assembly of several open-frame elements connected into a single light source
A homemade and properly assembled LED lamp will serve for many years, and it can be repaired.
Before you begin self-assembly, you need to choose a power supply method for our future lamp. There are many options: from a battery to a 220-volt AC network - through a transformer or directly.
The easiest way is to assemble a 12-volt LED from a burnt-out halogen. But it will require a fairly massive external power supply. A lamp with a regular base, designed for a voltage of 220 volts, fits any socket in the house.
Therefore, in our guide we will not consider creating a 12-volt LED light source, but will show a couple of options for designing a 220-volt lamp.
Since we do not know the level of your electrical technical training, we cannot guarantee that you will end up with a properly functioning device. In addition, you will be working with life-threatening voltages and if things are not done accurately and incorrectly, damage and loss may occur, for which we will not be held responsible. Therefore, be careful and attentive. And you will succeed.
Drivers for LED lamps
The brightness of LEDs directly depends on the strength of the current passing through them. For stable operation, they need a constant voltage source and a stabilized current that does not exceed the maximum permissible value for them.
Resistors - current limiters - can only be used for low-power LEDs. You can simplify the simple calculation of the number and characteristics of resistors by finding an LED calculator on the Internet, which not only displays data, but also creates a ready-made electrical diagram of the design.
To power the lamp from the mains, you must use a special driver that converts the input alternating voltage into a working voltage for the LEDs. The simplest drivers consist of a minimum number of parts: an input capacitor, several resistors and a diode bridge.
In the simplest driver circuit, the supply voltage is supplied through a limiting capacitor to the rectifier bridge, and then to the lamp
Powerful LEDs are connected through electronic drivers that control and stabilize the current and have a high efficiency (90-95%). They provide stable current even with sudden changes in the supply voltage in the network. Resistors cannot do this.
Let's look at the simplest and most commonly used drivers for LED lamps:
- the linear driver is quite simple and is used for low (up to 100 mA) operating currents or in cases where the source voltage is equal to the voltage drop across the LED;
- The switching buck driver is more complex. It allows powerful LEDs to be powered by a source of much higher voltage than is necessary for their operation. Disadvantages: large size and electromagnetic interference generated by the inductor;
- A switching boost driver is used when the operating voltage of the LED is greater than the voltage received from the power supply. The disadvantages are the same as the previous driver.
An electronic driver is always built into any 220-volt LED lamp to ensure optimal operation.
Most often, several faulty LED lamps are disassembled, the burnt-out LEDs and radio components of the driver are removed, and one new structure is installed from the intact ones.
But you can make an LED lamp from a regular CFL. This is quite an attractive idea. We are sure that many zealous owners keep faulty “energy savers” in their drawers with parts and spare parts. It’s a shame to throw it away, there’s nowhere to use it. Now we will tell you how to create an LED lamp from an energy-saving lamp (E27 base, 220 V) in just a couple of hours.
A faulty CFL always gives us a high-quality base and housing for LEDs. In addition, it is usually the gas-discharge tube that fails, but not the electronic device for “igniting” it. We again put the working electronics into storage: they can be disassembled, and in capable hands these parts will still serve something good.
Types of modern lamp bases
The base is a threaded system for quickly connecting and fixing the light source and socket, supplying power to the source from the mains and ensuring the tightness of the vacuum flask. The marking of the socles is deciphered as follows:
- The first letter of the marking indicates the type of base:
- B - with pin;
- E - with thread (developed back in 1909 by Edison);
- F - with one pin;
- G - with two pins;
- H - for xenon;
- K and R - with cable and recessed contact, respectively;
- P - focusing base (for spotlights and lanterns);
- S - soffit;
- T - telephone;
- W - with contact inputs in the glass of the bulb.
- The second letter U, A or V shows which lamps use the base: energy-saving, automotive or with a conical end.
- The numbers following the letters indicate the diameter of the base in millimeters.
The most common base since Soviet times is considered to be E27 - a threaded base with a diameter of 27 mm for a voltage of 220 V.
Main conclusions
You can make a lamp yourself using improvised means and inexpensive radio products. Also, this will require direct LED elements - lamps or strips. They can be both low-power and strong. When choosing a material for the body, you need to proceed from the parameters of their heat transfer. To connect such a device to a network without a power supply, you will need to make a driver with a quenching capacitor, having previously calculated it using the formula.
Using the proposed technology, it is possible to produce lamps of any shape and parameters for installation as the main or decorative source of lighting. You can mount them with your own hands on the ceiling and walls in lampshades, chandeliers and table lamps, as well as in any other specially made artistic design.
Previous LEDs Formula and example of calculating the limiting resistor for an LED Next LEDsDetails about the characteristics of LED lamps
Preparatory work
After drawing up the diagram, you need to prepare all the necessary materials and tools. As a base, you can take a halogen lamp and remove the glass from it. The main elements include LEDs. Their number should be the most optimal, in accordance with the drawn up scheme. Resistors are selected using the same scheme.
For assembly you will need copper wire, a soldering iron and solder, as well as a thin piece of aluminum, a hole punch and quick-drying glue. The halogen lamp must be carefully disassembled so that one empty reflector remains. For the LEDs themselves, the reflector is an aluminum piece, marked and cut according to a template. Holes for installing lamps are punched with a hole punch.
Causes of failure
After we have understood the basic principles of LED lamps, we can move on to the reasons why they fail. These include:
- large power surges;
- inaccuracy during the installation of the light bulb;
- incorrect selection of lamp;
- influence of external factors.
Voltage drops
Despite the stability of 220-volt LED lamps, sudden voltage changes have a destructive effect, disabling the lighting element.
The reason for the differences may be:
- Poor quality wiring installed in the premises independently or by unqualified workers.
- Problems at the power plant.
- Weather.
It is worth noting that other lighting elements also suffer from voltage drops, burning out even faster than their LED counterparts.
Wrong selection of lamp
The reason for the failure of an LED light bulb can be the lamp itself, if you buy it in a hurry, without considering all the nuances of the interior. For example, due to an unsuccessfully selected lampshade, the light bulb will not cool well, constantly overheating. In this case, its service life will be significantly reduced, and the owners will spend a lot of money on replacing light bulbs and troubleshooting. Try to take a responsible approach to purchasing a lamp for your room, and most problems can be avoided.
Installation error
Many owners who buy a chandelier or lampshade for their home install it themselves without following the necessary rules. All this affects the operation of devices, including light bulbs. If you do not have the proper experience, try to install lighting under the supervision of a knowledgeable person who can spot erroneous actions and point them out in time.
Otherwise, you will still have to call specialists who will correct your mistakes.
External factor
External factors are no less destructive for LEDs, and they are worth paying attention to. External factors include:
- impacts on the lamp body;
- vibrations;
- weather.
Remember that a light bulb is a fragile item and must be handled with care. The same vibrations will not affect the LED itself, but will quickly destroy the light bulb driver
Disassembling an LED light bulb with sealant
Not all products are easy and simple to disassemble without damaging the components. Try turning the top of the body. If all else fails, you will have to use a solvent. Draw a certain amount of solvent into the syringe and squeeze it through the needle along the seam. Wait about 5 - 10 minutes, then repeat the operation.
Do this at least three times, then begin to rotate your upper body in different directions to swing it. Once the flask is removed, clean the interior walls by removing sealant and degreasing surfaces. If the device will be used in a room with a low level of humidity, no sealant is applied.
Universal electrical appliances operating in the voltage range 110 – 220 volts
Take any laptop, smartphone or trimmer, look at the information that is present on the charger or power supply. You will find there a range of permissible mains voltages for safe operation. Look for the "INPUT" line. Usually this is 110 - 220 volts, or 100 - 240 volts.
Here is a standard Samsung smartphone charger. In the column of the permissible input voltage - “INPUT”, the range from 100 to 240 volts is indicated. This means that you can use it anywhere in the world without any problems.
The Apple iPad tablet charger looks similar, the same voltage range: 100 - 240 volts.
Or any electric razor, be it Philips, Braun or Panasonic, still the same 100 - 240 volts.
You don’t have to bother searching for data on the operating voltages of wireless speakers, laptops, winders (a device for winding mechanical watches), video and cameras. Everywhere you will find a universal operating voltage range.
You can also ignore the second parameter, namely the current frequency, indicated in hertz; it is universal throughout the world and amounts to 50-60 hertz.
Conclusion? You can purchase small electrical appliances without hesitation. You can immediately plug them into a power outlet if you have a special adapter for the power plug.
This is interesting: Replacing a conventional switch with a wireless one (from Wi-Fi)
Conclusions and useful video on the topic
In the video below you can see a detailed description of a specialist about self-assembly of an LED lamp:
LED lamps, made independently, have high technical characteristics. They are almost as good as factory models in terms of qualities such as strength, reliability, and durability.
The assembly of such devices is accessible to almost everyone: to successfully complete it, you just need to strictly follow the diagrams and carefully carry out all the prescribed manipulations.
Perhaps you have already assembled an LED lamp with your own hands and can you give valuable advice to visitors to our site? Or did you have any questions after reading the article? Please leave your comments in the block below.
We use an energy-saving lamp driver
The circuit is more reliable when a driver made from an energy-saving lamp is used with minimal modifications. As an example, the figure shows the conversion of a 20W energy-saving lamp to power a powerful LED with a current consumption of 0.9A.
Converting an LED lamp to power LEDs
The modification of the electronic ballast for LED lamps in this example is minimal. Most of the elements in the circuit are left over from the old lamp driver. The L3 inductor has been modified and a rectifier bridge has been added. In the old circuit, a fluorescent lamp was connected between the right terminal of capacitor C10 and the cathode of diode D5.
Now the capacitor and diode are connected directly, and the inductor is used as a transformer.
Remaking the inductor consists of winding a secondary winding, from which the voltage will be removed to power the LED.
Without disassembling the inductor, you need to wind 20 turns of enameled wire with a diameter of 0.4 mm around it. When turned on, the open circuit voltage of the newly completed winding should be about 9.5–9.7V. After connecting the bridge and the LED, the ammeter connected to the power supply of the LED element should show about 830–850 mA. A larger or smaller value requires correction of the number of turns of the transformer.
Diodes 1N4007 or similar can be used from another faulty lamp. Diodes in housekeepers are used with a large current and voltage reserve, so they rarely fail.
Making your own lamp
Making an LED-based illuminator with your own hands, as they say, “from scratch” is a troublesome task and not suitable for everyone. It’s easier to do this by using an old lamp of a similar type that has already spent its life.
In this case, a homemade LED lamp will be assembled from new elements, soldered onto a board removed from the old device or repaired. If there are working diodes left on it, you will need to replace the burnt elements with new ones (preferably of the same type and design).
Note! When manufacturing branded lamps, for reasons of profitability of sales, the operating current of individual LEDs is selected with an extremely high value. When remaking such a device, it is advisable to solder a limiting resistance of about 1 Kom in series with each element.
If necessary, to make a lamp with your own hands, you can use an old board with a driver circuit, replacing all the faulty parts in it.
In the absence of the necessary boards and parts, the driver can be manufactured based on the above-mentioned circuit of the power supply combined with the converter (see the figure above). When modifying, another resistor should be added to it (let’s denote it as R3), used to discharge capacitor C2. The result will be the diagram below.
Homemade driver circuit
In addition to the resistor, two standard zener diodes (VD2, VD3) are added to it, providing its bypass when the load circuit is broken.
This driver device circuit is designed to connect 20 colorless LEDs of a certain type. If their class or total number is different, the value of capacitor C1 should be changed so that the load current in the diode circuit is at least 20 mA. Its specified value guarantees sufficient brightness of the glow of these devices.
As a rule, a unit that does not include a bulky transformer element is used as a circuit supplying the driver (this connection is called “direct”). The absence of a transformer significantly simplifies the assembly of the module and reduces its size.
Important! But in this case, there is a real threat of high voltage reaching the output of the circuit (in the event of a breakdown of a number of series-connected elements, for example). The only consolation is that this happens extremely rarely
In the final part of the review, we note that the circuit diagrams of most of the LED products on sale are almost no different from one another. Certain differences are observed only in the type of components used in them, as well as in the method of generating the output voltage carried out by the driver.
Let's add to this that LED lamps equipped with special drivers are reliably protected from voltage fluctuations in the network, and the radiator included in their composition protects the product from overheating. The use of independently manufactured modules due to their additional modification can significantly extend the service life of lighting devices assembled on their basis.
Measures to combat LED flickering
A DIY energy-saving LED lamp has a huge advantage, but you need to work hard so that when using your homemade product, users are not bothered by excessive LED flickering:
Drive LED products using an LED power supply that is designed for their rated load.- Make sure that all LED products used are compatible with the control circuits and power supply.
- Check for wiring or other faults in the fixture and ensure that the dimmers are not overloaded.
- Consider using a constant current LED driver.
- When installing your system, experiment to see if there is a minimum level of dimming that bothers you.
To avoid the influence of LED flickering, you should always keep the above points in mind.
Advantages and disadvantages of a homemade lamp
Specialized stores offer a large selection of LED devices. However, sometimes it is impossible to find a device in the assortment that meets the necessary parameters. In addition, LED devices are traditionally high in cost.
Disadvantages of the products include the lack of a warranty from the manufacturer. In addition, if assembled carelessly, such devices may have an unattractive appearance.
Meanwhile, it is quite possible to save money and get the perfect lamp by assembling it yourself. This is not difficult to do and basic technical knowledge and practical skills will be enough.
A DIY LED device has a number of significant advantages over a store-bought analogue. They are economical: with careful assembly and the use of high-quality parts, the service life reaches 100 thousand hours.
Such devices show a high degree of energy efficiency, which is determined by the ratio of power consumption and the brightness of the light produced. Finally, their cost is an order of magnitude lower than their factory counterparts.
How does a dimmer work and on what principle does it work?
Devices such as a dimmer or variator operate on the principle of a rheostat, that is, when the value of the circuit resistance changes, the voltage or current increases or decreases.
Simple and tasteful
The simplest variator is equipped with a rotary adjustment knob and two contact terminals and is designed to adjust the glow intensity of halogen and conventional incandescent lamps. Previously, rheostats were used as dimmers for lighting devices, and later they began to use semiconductor devices, such as dinistor and triac (symmetrical thyristor).
CVTs that use triacs operate on the principle of using a pulse-width modulation (PWM) system. This system is widely used in LED luminous flux intensity control circuits by changing the pulse width and voltage value. This function is performed by a PWM generator.
Important element: LED driver
For the correct operation of a DIY LED device, you need to resolve the issue with the driver. The layout of this unit is quite simple. The operating algorithm consists of passing an alternating current of 220V to the diode bridge through capacitor C1.
The rectified current goes to series-connected LEDs HL1-HL27, the number of which can reach 80 pieces.
The driver for a homemade LED device is assembled according to the diagram below. You can also use ready-made elements bp 3122, bp 2832a or bp 2831a
To avoid flickering and achieve a consistently even color, it is advisable to use capacitor C2, which should have as large a capacity as possible.