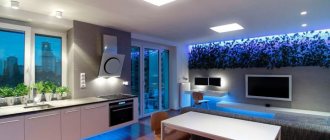
LED strips are often used to decorate the original ceiling space. They allow you to make the ceiling harmonious, stylish, and unique. Choosing the right lighting from the huge assortment in the store is not easy. To do this, you should first familiarize yourself with the variety of such products, their characteristics, main advantages and disadvantages. To properly install and then connect the LED strip yourself, you should carefully study the intricacies of its installation.
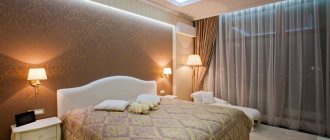
LED strips allow you to create coziness in a room and bring to life any design solutions Source remoo.ru
What is LED strip
The strip with LEDs located on it looks like a flexible strip 5 - 50 millimeters wide. On one of its sides there are LED resistors connected to each other by electrical conductors, resulting in a single circuit. On the other side of the diode tape for the ceiling, as a rule, you can see double-sided tape designed for fixing it on different surfaces.
These flexible strips may contain different numbers of LEDs, and of different sizes. In order to obtain more saturated and bright lighting, one or two rows of diodes are additionally soldered.
Contour and directional lighting
When installing these types of lighting in a plasterboard structure, follow several recommendations:
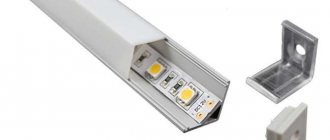
- LED strips are usually attached with double-sided tape. It must be mounted on a special corner or other profile structure fixed to the ceiling. The tape will stick to the profile much better than to drywall;
- You should not make one section of tape longer than 3 m. This can lead to overload on the contact pads. Therefore, the tape should be divided into sections that are connected to the controller separately;
- Be careful when installing wires, do not reverse the polarity;
- use low-melting solder to solder the strips to each other and to the wires so as not to damage the tracks and LEDs;
- Tapes can only be cut in specially marked areas.
Benefits of use
Illuminating the ceiling with LED strip is an inexpensive, but at the same time beautiful design technique. This detail makes the interior brighter and more unique. It should be noted that LED strips, which are economical, are used not only for decorating apartments and residential buildings.
These elements are considered universal, as they are found on different real estate properties. For example, LED strips are used to decorate shop windows and advertising signs, since then they attract increased attention. Shopping centers use durable tapes with increased moisture resistance.
Moisture and dampness do not pose a danger to LED ceiling lighting, which is why it is often installed in the bathroom. IP68 class products can be placed under water. Due to the presence of this advantage, these lighting elements are found in swimming pools, in the design of landscape compositions and on the facades of buildings for various purposes.
The popularity of LED lighting is explained by the presence of numerous positive qualities that distinguish it:
- Consumers prefer this method of interior design, such as LED ceiling lighting, because it has an affordable price and lower energy consumption.
- This lighting is distinguished by a rich and bright glow, especially when there are many light bulbs on the strips. If you want to create a more subdued light, then you can choose an option with fewer of these elements.
- Installing diodes on the ceiling is simple and quick.
- Ribbons come in a variety of colors, so choosing the right option for any interior is not difficult.
- LED devices are completely safe because they are not subject to overheating. They do not damage the base. This advantage becomes especially relevant when you create LED lighting for a stretch ceiling with your own hands.
- Such tapes, as a rule, belong to customizable devices. For example, residents can independently change the intensity of the glow, adjusting it to their own preferences using built-in sensors and regulators.
- LED lamps have a long service life of more than 10 years. They are not afraid of power surges in the network. Conventional light bulbs often burst in such cases, leaving small fragments.
- Strips with LEDs weigh little, and therefore do not create a load on the finishing of the ceiling surface.
- These lighting fixtures are flexible and can be easily bent, so they can be used to frame structures of various configurations.
- The tapes are environmentally friendly because the lamps in them do not emit harmful components.
- The stripes come in a variety of lengths, which you can adjust yourself.
- LED backlight does not affect TV signals and does not cause interference.
Advantages of LED strips
LED strips hardly heat up, so they can be installed together with stretch ceilings and other polymer materials. These light sources are very diverse in color, so you can create spectacular light compositions with them. And the most important thing is that they:
- durable (about 50,000 hours of operation);
- safe;
- easy to install;
- use energy economically;
- adjustable in brightness level and color;
- resistant to damage.
When chosen wisely, such lighting decorates the room. You get soft and pleasant lighting, and the costs will quickly pay off, since due to low energy consumption, electricity bills will be very modest.
Tricolor lamps
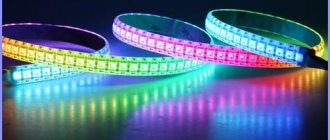
Strip lighting devices differ in the type of lamps used. In RGB strips, each diode is an assembly of three LEDs, having red, blue and green colors.
Such diode strips have 4 outputs. One of them is general, and the other three are intended for each color. By combining them, it is possible to obtain a rich range of shades. In a similar way, a variety of colors can be achieved on a television screen.
If three-color diode strips are used to install ceiling lighting, they must be controlled, which requires a device - a controller. Thanks to its use, you can adjust the speed of color change or fix one color. In an RGB strip, it is not at all necessary to run a multi-color option - you can only use white.
Today, high-tech types of diode strips are available for sale, equipped with built-in Wi-fi. They can be conveniently controlled from a smartphone if the appropriate application is installed on it.
When choosing a power supply, you need to take into account that strips with RGB bulbs are designed for voltages of 12 and 24V.
Tips for choosing LED strip for different rooms of a house or apartment
Different light sources are selected for different rooms. The following can be mentioned:
- For a corridor, options are often purchased whose brightness is lower than SDM 5050. This is due to the lack of need for intense lighting in such a room.
- Often LED lights are installed in the bedroom. In most cases, preference is given to the RGB option.
- In the living room, such ceilings are most often found. For installation, diode strips with different brightness levels are selected. It is recommended to create a multi-level ceiling with lighting, the degree of radiation of which can be adjusted.
On the Internet you can find a large number of different photographs of modern interiors, which are created using diode lighting.
Strips with sealed diodes
Such strips with LEDs are very popular today because they are wear-resistant and durable. They are also commonly called waterproof or moisture-proof. An example of such a device is the 3528 120LED-24V IP65 device. This marking means that the light strip is made using SMD3528 lamps, and the presence of LEDs per meter is 120.
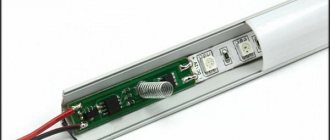
Tightness is ensured by silicone shells that reliably protect parts from all sides. This LED strip lighting option can operate outdoors and in water without any problems. Sealed devices are used to create lighting for swimming pools and aquariums. When choosing such LED strips, you need to look at their markings.
Power supply for LED backlight
If you are installing a backlit baseboard with your own hands, then when choosing a power source, you should choose the right power. The greater the power, the higher the cost; if the power is not enough, the device will overheat. Make sure how many watts 12 or 24 the diode strip is designed for and only after that, purchase the required one. Buy a source to power the system a little larger, about 20% more powerful, this will help avoid both overvoltage and undervoltage.
The power of the power source is calculated using the formula:
Multiply the length of the backlight by the power of 1 meter of LED strip (it is indicated by the manufacturer on the packaging) and multiply the total by the utilization factor, which is equal to 1.3 for frequent use and 1.5 for rare use.
Power and density
The most important parameter of LED strips is power. An important indicator is the placement density. Popular devices have 60 to 120 diodes per meter. But strips of 30, 72, 90 and in some cases 240 bulbs are available for sale. They can be arranged either linearly or in several even rows.
The power of a strip meter depends on the type of LEDs, for example:
- SMD 3528 (60, 120 or 240 lamps) – 4.8 W, 9.6 W and 19.2 W, respectively;
- SMD 5050 (30, 60 or 120 elements) – 7.2 W, 15 W and 25 W, respectively.
Today there are flexible strips with a power of 220 V. In this case, when installing the diode strip on the ceiling, conventional 12V power supplies will not be required. You will only need a small rectifier to connect to the outlet.
Preparing LED strips for installation of ceiling lighting
When installing backlighting, the LED strip is usually cut into separate sections, which are soldered together with special single-core copper wires. This method is often without alternative, because the tape bends poorly - the minimum radius of its curvature must be at least 2 cm, and there is not always enough space on the working plane.
However, in the case of ceiling lighting with LED strips, there is more than enough space. Therefore, cutting the tape in order to then solder its individual sections, and then worrying about covering the exposed parts with silicone, is simply not particularly necessary. Simply purchase a standard length of tape and install it completely over the intended area, connecting it to a power supply of appropriate power.
This is what the curved ceiling lighting with LED strips looks like in the photo.
Protection class
LED strips differ in their protection class. This parameter relates to the moisture resistance of the light bulbs, as well as resistance to the influence of dust and other external factors. Typically, the protection class of a particular device can be read on the product packaging; it is indicated by two letters IP.
For example:
- IP20 - means that diode lamps are intended for indoor installation, they do not have additional sealing;
- IP65 – this type of LED strip is used to illuminate areas that have regular contact with water, this could be a sink or an aquarium, they are used both indoors and outdoors;
- IP 68 - these lighting devices are placed even under water, since they are completely insulated.
Criterias of choice
There are various strip lights on sale. Therefore, attention should be paid to the main selection criteria. Do-it-yourself LED ceiling lighting can be made from scrap materials, however, such a task is difficult, and in most cases only specialists can do it.
If the product will be used as the main light source, then other lamps are removed from the ceiling. Often, designers focus lighting on contours, thereby creating an attractive appearance.
When purchasing, pay attention to the fact that the substrate should not be noticeable. It matches the background of the ceiling. There are options on sale with a gray, brown and transparent base.
Shade of glow
The wall is illuminated with LED strip to create an unusual effect. The products used are divided into plain and colored. Among the features we note the following:
- Most diodes can only emit one color.
- Available in versions with infrared and ultraviolet radiation.
- You can purchase a strip with light bulbs that shine in different colors.
The ability to adjust significantly increases the cost of the product. Installation of LED backlighting involves placing the regulator in a convenient location.
Power and density
The main selection criteria include power and diode placement density. An LED system is suitable for decorative lighting, with 30-60 pieces per 1 m. diodes. The main source should have about 240 diodes per 1 m.
A wide strip is placed around the perimeter of the ceiling of a large room. This is due to the fact that a tape that is too narrow will be almost invisible. The version with diodes arranged in 2 rows is very popular.
Studying the board
Tape lighting under the baseboard and other similar lighting systems should be created exclusively taking into account the markings applied to the surface of the plate. Among the features of the notation used, we note the following:
- The abbreviation SMD indicates that the device is designed to be mounted on a surface.
- Next to the abbreviation there are 4 numbers that indicate the main dimensions of the product.
- Each type of tape has its own power. It depends on the size of the crystals and the density of their placement.
Some manufacturers indicate the technical characteristics of diodes in the description.
Footage
A variety of elements can be illuminated in the interior of an apartment. The footage of the tape used largely depends on the perimeter of the surface to be pasted. Features of choosing this parameter include the following:
- The 11 W strip power replaces a 100 W incandescent lamp.
- You can select a product based on the lighting level by measuring the footage of the illuminated area, after which the result can be multiplied by the power of one meter.
The resulting indicator is also used to determine what kind of controller is required. The most common products are 5 m long; if necessary, they can be divided into several parts.
Protection class
The ceiling plinth used for the LED strip protects the product from environmental influences. The tape itself can be manufactured taking into account the following protection classes:
- IP 20 is a mark that allows you to use the product in a dry room: office, living rooms, children's rooms.
- IP 60 is a designation indicating the possibility of using the board in direct contact with water. Used in areas where there is a risk of water leakage.
- IP 68 is the highest insulation category.
When choosing a product, you should keep in mind that the version with a silicone layer is not suitable for decorating the ceiling. This is due to the low permeability of this material.
Selection of LED strips
Today, many consumers prefer LED lighting.
Before choosing an LED strip for ceiling lighting, experts recommend studying a number of criteria:
- Diode color
. The required shade depends on where the device will be used. Thanks to the use of lighting, you can advantageously emphasize a certain decorative element on the ceiling or decorate the ceiling surface along its perimeter in an original way. - Brightness level
. This parameter depends on the number of semiconductors in the tape and their size. The more LEDs there are on the device, the brighter the glow it produces. - Degree of protection
. When deciding which LED strip is best for ceiling lighting, be sure to take into account the degree of its protection from moisture and dust. In this case, the class of the device is indicated on the product packaging. - Controller
. It is necessary to purchase high-quality and at the same time easy-to-use tapes with these devices. The presence of a controller allows you to independently change the brightness of the lighting and its shades.
Does ceiling covering matter?
LED lighting is often installed along with suspended ceilings. This solution allows you to hide the shortcomings of the main mounting location and realize any design idea.
At the same time, you do not have to think separately about which LED strip is suitable for a stretch ceiling. This is a universal light source that is equally selected for any finishing option. Light structures can also be installed, for example, for suspended and plasterboard ceilings.
By the way, LED strips can create the effect of a complete absence of shadows. This feature has long been appreciated by photographers, since with such lighting you can get great photos without expensive lighting equipment.
Options for creating backlight
To make ceilings with LED strip beautiful, you can use one of the following methods:
- Spot
. When using this option for creating lighting, the devices are placed in a special way so that they emit light directly downwards. The most popular and frequently encountered example of spot lighting is the “starry sky” design. - Directed
. In this case, the tape must be installed in a special way on slopes. As a result of using this method of placing devices, they emit light along the ceiling surface. - Absent-minded
. This option is also called contour. To implement this, LEDs must form a continuous light strip on the ceiling. - Figured
. In this case, the devices are placed in special lampshades that are small in size. This solution allows you to create different lighting configurations.
Installation in niches
Installation of LEDs in plasterboard niches is carried out by simply applying a self-adhesive base to the surface. This is the simplest of all possible installation methods, however, here you must follow certain rules:
- First of all, remove any dirt or fat deposits from the surface.
- Remove the protective packaging from the self-adhesive base.
- Carefully apply the tape to a dry and clean surface.
- We level the LED strip along its entire length.
- If the result of the previous operation is satisfactory, we press the material firmly against the surface so that the tape sticks well.
Advice! In the future, the tape may come off, and to avoid this, the base of the adhesive material can be lubricated with glue. However, it must be borne in mind that if necessary, it will not be possible to remove the tape without damaging the material.
Recommendations for arranging LED lighting
Before making LED ceiling lighting, you should decide how the tape will be positioned. You also need to think in advance about creating protrusions in the plasterboard box if you plan to use it.
Most LED strips have a sticky layer on the back side. Thanks to its presence, you can create LED ceiling lighting with your own hands on almost any surface.
Before you start attaching the tape, you must carefully prepare the base for its installation. It is cleaned of dirt, layers of dust and other contaminants. Thanks to these measures, stronger and better adhesion between the adhesive side of the device and the ceiling surface will be ensured.
To glue a flexible strip, remove the protective film from it, and then apply the tape to the base and press it, and this should not be done too hard. These devices must be fastened carefully. It is also possible to use double-sided tape to install lighting on the ceiling.
Usually, niches are prepared in advance for LED lighting, for the arrangement of which sheets of plasterboard are used. The composition looks interesting when a strip with diodes is attached to curtains or to protruding parts of decorative elements.
In this case, the installation of lighting devices is carried out so that the luminous flux is directed to a certain part of the ceiling surface or to the wall.
There is a way to hide an LED strip on the ceiling. To do this, it can be placed under a decorative product such as a ceiling plinth. As a result, it will not be too conspicuous and the light from the diodes will make the interior of the room more interesting.
But at the same time, you must definitely pay attention to the condition of the surface under the baseboard, since the wall should not crumble in this place. When the plaster is not strong enough, it is treated with a deep penetration primer, which is usually used for concrete bases.
Design
Decorating the ceiling space with LED strip is done differently in each case. Much depends on the design of the ceiling, the presence of projections, the type of lamps purchased, as well as personal wishes. Such lighting can be placed around the perimeter, made into a decorative element of multi-level systems, and used to accentuate the design.
An LED strip hidden in a niche in the suspended ceiling favorably emphasizes the required area. Therefore, it is permissible to use it for the purpose of zoning a room. For example, in a similar way it is easy to highlight the dining area in the hall if it is combined with the dining room.
An LED strip hidden inside the ceiling structure allows you to create accents in the room Source roomester.ru
The LED illumination of curly lines on the ceiling looks attractive. In this way, plain coatings and stretch ceiling structures with patterns are decorated. The use of a diode strip along the edges of the image gives it volume. Successful lighting of prints improves their appearance and adds the necessary mood to the interior. LED lighting makes the ceiling visually wider and a little lighter.
When installing lighting strips with diodes, it is important to take into account the texture of the ceiling fabric. As a rule, the light emanating from LED strips is reflected in gloss, making the room visually more spacious. This is important for rooms with small windows or when they face north. When the LEDs are directed upwards, a soft light is created; in the case of side-mounted strips, a directed light flux is observed.
The use of LED strip improves the appearance of a plain ceiling and helps create comfort indoors Source roomester.ru
Useful tips
Before you start installing the LED strip on the ceiling on your own, it is recommended that you familiarize yourself with the valuable recommendations of specialists:
- It is very important to draw up a plan in advance, which takes into account the slightest nuances of the upcoming work.
- It is worth purchasing a PVC corner in advance for fixing in a niche. It is often used because the adhesive strip tends to peel off after a while.
- After removing the protective layer, the tape must be glued quickly: it must adhere well to the plane.
- The LED strip can only be cut along the lines specified by the manufacturer.
- Fastening more than three meters of tape together is unacceptable. Then the conductive path may be damaged (due to high voltage). If the strip is excessively long, then it must be connected to the controller with wiring.
- When connecting the power supply, polarity must be strictly observed. When connecting a connector to the circuit, recommendations for its connection should be found on the packaging material.
- Soldering should be done carefully so as not to damage the PVC base. High temperatures are not desirable for LEDs.
- It is better to hide the heads of the screws in the cornices: paint the heads with acrylic paint or putty.
- If one strip is mounted, then the connection is made directly, otherwise - in parallel. In the latter case, if a separate section breaks down, the rest will continue to function.
- Difficulties with gluing can be easily solved using double-sided tape.
- The distance between different levels of the ceiling structure should be the same. This will ensure the most even illumination.
With colored lighting it is difficult to do without a controller: it allows you to adjust the tone of the backlight Source remoo.ru
Connecting LED lighting
After the installation of the flexible tape with diodes is completed, they begin to connect it, and the owners can do this work on their own.
LED backlighting involves the use of the following elements:
- power unit;
- controller and sensor;
- Remote Control;
- semiconductor lighting system of a certain length.
The process of connecting an LED strip consists of several stages:
- First of all, connect a network cable with a plug to the power supply.
- Next, 2 contacts of the controller are connected to the block - this action is performed if the RGB system is used for lighting.
- Then contact cables are connected to the controller.
It happens that a controller is already installed in the room, designed for an LED strip of a certain length, but it needs to be reconfigured for a larger number of LEDs. In this case, you will need to install an additional amplifier.
How then to make the wiring? In this case, the power supply is connected to the amplifier and the other end of the LED device, and on the opposite side, in order to reduce the load, another section of the light strip is attached.
When creating colored ceiling lighting, polarity must be observed when making connections. You also need to monitor the compliance of the voltage on the controller and power supply with the lighting device.
The tapes are not allowed to be connected in series, as this often leads to overheating of the bus and melting of the plastic base.
Typically, LED strips are sold in 5-meter-long reels. If a shorter strip is needed, then the excess section is cut off using scissors. An incision is made in the designated location. When you need to solder the tape, then you should use a low-power soldering iron.
To increase the length of decorative lighting, you can use special small devices - connectors, which are designed to close an electrical circuit by snapping into place.
The next stage of work is the correct choice of baseboard for lighting
Ceiling plinth with smooth profile NMC T4
Ceiling plinth with lighting is an original design for the room. Almost no one uses it for basic lighting.
The main purpose of illuminated ceiling plinths can be called decoration, or use as a night light. Installation is simple, so you can install it yourself.
When choosing a ceiling plinth, please note that the product must be made of non-combustible material. It could be:
- Polystyrene foam or polystyrene foam. They are easy to use and attach.
- The ideal option for a backlit baseboard is a polyurethane baseboard. This material is dense and safe to use.
- Ceiling skirting boards with a hole for an LED strip or a neon tube.
- The polyurethane plinth for the ceiling has the shape of a metal profile, which will allow you to place not only an LED strip inside it, but also ordinary lamps.
- Skirting board with corner profile made of polyurethane.
To install the ceiling plinth and LED strip with your own hands, you need the following materials and tools:
- LED Strip Light;
- power unit;
- amplifier;
- Remote Control;
- controller;
- ceiling plinth for LED strip.
Devices for installing LED backlight:
- tweezers;
- surgical clamp;
- wire cutters or pliers;
- devices for removing insulation from wires;
- soldering iron, power no more than 25 W.
Tools for working with the installation:
- solder;
- rosin;
- soldering acid;
- heat-shrinkable tube;
- insulated tape;
- double-sided tape;
- synthetic glue;
- solvent;
- scissors or stationery knife.
Subtleties of lighting design
If you decide to supplement the ceiling space of the room with an LED strip, expert advice on how to illuminate the ceiling will not be superfluous. Correctly selected light sources and well-placed lighting accents in a room can change its space beyond recognition and ultimately save up to 50% of its cost on lighting.
Any light bulb or lighting device has its own color. Therefore, before you finally choose an LED strip for the ceiling, you need to know what kind of light it can provide and whether it will be optimal, taking into account the purpose of the room and the personal preferences of the person who will be in it.
Nuances that you should ask the seller about:
- Color rendering index
. The value of this indicator determines how pleasant the color of interior items will look under artificial lighting conditions. On lamp packages you can find the letter symbols Ra or CRI. For normal lighting, the Ra index should be 80-90, and its ideal value is 90-100. - Colorful temperature
. It is responsible for the shade of light and is measured in Kelvin (letter designation K). There are three shades: warm is ≈2700-3000 K; white or neutral ≈4100 K and cold ≈6500 K. For rooms where family members eat or relax after a hard day, designers recommend choosing neutral or warm light. They help create an atmosphere of ease and comfort. Cool color is ideal for various institutions where it is necessary to put people in a businesslike mood.
When purchasing strips with LEDs, you need to remember that as the voltage increases, the energy consumption also increases. To use them as the main lighting device, you need to purchase bright options equipped with a remote control.
Ceiling lighting options
When creating high-quality lighting on ceiling structures, it is necessary to be guided not only by regulatory documents, but also by interesting design solutions. With the help of correctly placed lamps on the ceiling, you can create a unique play of light in the room.
Suspended
When installing suspended structures, you should take a good margin from the concrete ceiling to the canvas. The resulting “dead” distance can be used as a technical zone for wiring lighting elements.
Exquisite suspended ceiling lighting
To get interesting and at the same time effective lighting for a suspended ceiling, you need to pay attention to a number of the following lighting devices:
- Spotlights . As the most affordable, durable and high-quality light sources. The variety of such products on the electrical engineering market is so great that everyone can choose the most interesting option for themselves.
- Flat chandeliers . One flat chandelier can replace 3-4 spotlights in its lighting effect. It all depends on the preferences of the owners and the design of the room.
- Fiber optic luminaires . Fiber optic threads are a unique opportunity to “play” with the ceiling canvas and design real paintings on it. For example, the starry sky in the nursery.
When installing suspended plasterboard ceilings, the owners of an apartment or house are provided with a wide field for improvisation.
tension
There are also a lot of unique lighting designs for suspended ceilings. For example, recessed LED lamps capable of high light output with minimal power consumption. Several LEDs located in the center of the room will illuminate the entire room. You can also choose the quality of the light flux from bright white to calmer.
Several lamps on a suspended ceiling
For tension structures, fluorescent lamps are also used, which, unfortunately, are becoming less popular. Of these light sources, it is much more relevant to install decorative lighting, for example, in the kitchen or around the perimeter of the bed.
Concrete or wood
When installing light sources directly to a concrete floor, it is necessary to accurately select not only the type, but also the location of the lamps. Since the wiring in such ceilings is laid using grooves.
Simple chandeliers are most relevant for concrete ceilings; for a large number of spotlights, it will be necessary to carry out too much work using a hammer drill or a special crown. The basic rule for installing luminaires on a concrete floor is reliable fixation using hooks or anchor bolts.
Chandelier mounted in a concrete ceiling
When choosing lighting fixtures for wooden ceilings, it is better to choose recessed spotlights. This will hide the main part of the light source and will not complicate the installation too much, since working with wooden floors is much easier than with concrete ones.
Several lamps on a wooden ceiling
Examples of effective room lighting
The LED strip on the ceiling surface looks great. It is easy to choose for the interior in any color scheme, and the ceiling structure itself can have a different number of tiers with different shapes.
For example, flexible tape looks beautiful in a two-level system when the lower tier is made of stretched film fabric. The lines of a box of another level made of plasterboard can be made in a wavy and graceful shape. In this case, it would be appropriate to install spotlights that are built into the plasterboard base.
A beautiful decoration of the room will be LED lighting in the suspended ceiling, consisting of parts of the correct geometric shape.
Tapes attached to their bases will give them additional volume. When using this design solution, you can hang a chandelier made of chrome or shiny metal in the center of the ceiling surface. LED strips can be installed in rooms of any purpose. For example, if there is dark furniture in a light bedroom, blue lighting will look impressive against the background of a white two-level ceiling structure. A ceiling with a similar design will be in harmony with walls made in soft and pastel colors and richly colored furnishings.
Installation in cornice
When installing an LED strip in a plasterboard cornice, it is recommended to follow the following instructions:
- We install the cornice, while leaving part of the structure open.
- After marking (we mark places 15 centimeters below the level of the base ceiling surface), we attach a metal profile to the wall. We install another profile 10 centimeters below the cornice. After this, we place profile sections every 40 centimeters, based on the width of the cornice.
- Along the perimeter of the entire profile we cut slots for the sides. After that we connect these elements.
- At the corners of the bent sides we attach a shelf on which we will mount the LED strip using self-tapping screws.
- When the profile is fixed, we begin to install the electrical wiring. We fix the wires in previously prepared (marked) places. Next, we cover the entire cornice with plasterboard sheets.
- The LED strip is glued to the ceiling with the adhesive side facing the hidden shelf.
- We connect the power supply and test the system for functionality.
LED panels
In addition to LED strips, there are LED panels. The panels can be of different colors and are usually 13 to 15 centimeters thick. Such panels have become very popular among modern designers. With the help of such panels, designers solve the problem of low ceilings. In addition, these lighting elements will fit very well into almost any interior of rooms, offices or even warehouses. They will look great in a bar or restaurant.
Lighting panels can be made in the form of separate elements, or they can have a built-in format, for example, for suspended ceilings.
Such panels are absolutely safe for vision. They have the property of adjusting the light saturation, so it is very easy to choose a comfortable level for yourself or your guests.