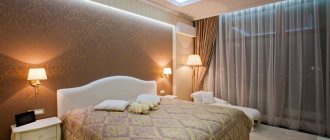
Often in department stores or cafes you can see display cases that are illuminated using LED strips. It’s easy to create such lighting at home. It adds a special charm to the interior when lighting niches, ceilings, and kitchen work areas. The corner profile for the LED strip makes it possible to attach the backlight to the surface. We have already written about other types of LED profiles and how to choose one.
Purpose and application
The main task of the corner LED profile is the installation of directional lighting. As a rule, it is used as:
- lighting niches, window and doorways;
- floor and ceiling plinths;
- lighting of stair steps indoors;
- design of cabinets, cabinets, display cases.
The design of a corner profile and LED strip is relevant for the original design of the room. It allows you to create lighting where it is not possible to install standard lamps.
In addition, the corner profile performs a heat-dissipating function, which increases the service life of the LED backlight.
Installing an LED strip on the steps of a staircase or in the kitchen can significantly save on energy consumption. If desired, you can arrange the lighting so that it turns on only while driving. This is especially appropriate on a flight of stairs.
Installation by gluing
Thin products with low weight are held perfectly on double-sided tape. Manufacturers often complete profiles with them, attaching adhesive tape to the back wall of the product. It is not difficult to glue such a structure. All that remains is to remove the protective layer and press the profile to the prepared base.
It is recommended to fasten products with glue only on durable surfaces - concrete, tiles, MDF or chipboard. A lime-plastered wall should be cleaned of the whitewash layer before installation. After this, you need to prime it with a primer. Only after the soil has completely dried is it permissible to apply glue and install the profile.
Advantages of aluminum corner profile
Aluminum LED corner profiles are lightweight and corrosion resistant. Their use when attaching LED backlights has a number of advantages:
The material is not susceptible to moisture and weather conditions, which makes it possible to mount the LED strip even outdoors.
Cutting aluminum does not require the use of special tools. It is easy to adjust to the parameters of any area.
The material does not create problems during installation, so you can fix the lighting without professional help.
General recommendations
Let's look at some useful tips for fixing the products in question.
- The aluminum frame must be fastened as firmly as possible. The reliability of the installed part will depend on the quality of fastening.
- Choose profiles that will fit harmoniously into the interior. If necessary, they can be repainted in black, white, blue, silver and any other harmonious color.
- Don't forget to install the end caps. Please check before purchasing if they are included with the box.
- Linear lamps will be an excellent solution for interior design in a modern style. If you don’t know what kind of lighting to choose for such situations, you should take a closer look at beautifully designed LED strips.
Diffusers
As a rule, two types of diffusers (screens) are included with the corner aluminum LED profile:
- Transparent.
- Matte.
Both types of screen are made of plastic. When choosing a diffuser, it is worth considering the fact: a transparent diffuser transmits 95% of the backlight brightness, a matte one – only 70%. In the first case, the task of the screen is to protect the LED strip from damage and external influences. In the second, a diffuser is used to not only protect the backlight from moisture and dust, but also to muffle the light emission.
In most models of corner LED profiles, the screens are mounted on the structure from the front - they are snapped on top, unlike other types of fastening systems, where the diffusers are pushed in from the end.
Main types
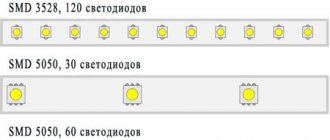
The main characteristic is its ability to dissipate heat, and is expressed in Watts per 1 meter. The characteristic depends on the dimensions and surface area, usually from 10 to 150 W/m. Stores, of course, rarely indicate it, but you can ask the seller. Powerful is available on SMD 5630 and SMD 5730 LEDs, power ranges from 15W to 30W. A wide box for LED strip can be glued in several rows, so when selecting, keep in mind that the power per meter should be higher than that of LEDs.
It is made of aluminum and plastic. Based on installation location, it is divided into categories:
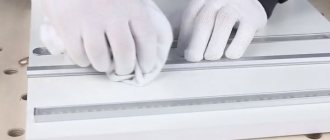
How to cut LED profile at corners?
In order to trim, you will need a miter box - a triangular box, the two vertical edges of which have through slots at an angle of 450 and 900.
Follow the following algorithm:
- Place the plinth in the miter box and press it firmly against the bottom and wall of the tool.
- Holding the fasteners tightly in the installed position, use a hacksaw to cut the corner through the slot at an angle of 450.
- With the second part, which will form a joint with the first, you need to do all the steps described above. The fastener should be cut from the opposite side of the miter box so that your angle meets during installation.
The diffuser is cut in the same way. Then the edges of the profile and screens are lightly sanded with sandpaper to smooth out material errors that were formed under the influence of a hacksaw.
Mounting the LED profile depending on the type of product
Profiles are presented in overhead, corner and mortise models. Depending on the type of product, different installation methods are used.
- The invoice is a profile with a rectangular cross-section, most often installed on the base using glue or self-tapping screws.
- Corner - a trapezoidal or triangular cross-section makes the product optimal for installation at the junction of the wall and the ceiling - instead of a plinth, for embedding in corners, niches, furniture, and the space under stair steps. Installed in the same way as the invoice.
- Mortise - immersed in special grooves in the structures of walls, ceilings, furniture, after which the front part remains flush with the base. It has decorative protrusions along the edges that mask chips and uneven edges of the groove.
Installation
The parameters of corner aluminum profiles have a wide selection and are selected according to the width of the LED strip. But often consumers for their home prefer fastening systems with dimensional characteristics - 16X16, 2 m long.
The process of installing the corner profile itself does not create any difficulties. You can secure it with double-sided tape. This method is especially relevant when installing lighting on tiles and some wooden surfaces that are undesirable to be subject to mechanical damage.
If it is necessary to create a more reliable fastening of the LED strip, the corner profile is mounted with self-tapping screws or self-tapping screws. In the case of lighting a concrete or brick surface, it is advisable to use dowels.
Installation with fasteners
You can also attach it with screws. There are no ready-made holes for them in the profile. They are drilled with a drill with a diameter of 3–3.5 mm at a distance of 20–30 mm from the ends of the product.
In the installation area, for example, in a concrete ceiling or wall, the first hole for the dowel is drilled with a hammer drill. Having inserted the dowel, screw one end of the product with a self-tapping screw. Place it in the desired position and use a marker to place marks on the ceiling through the drilled holes. Remove, drill holes according to the marks, insert dowels and secure with self-tapping screws. Having degreased the area under the LED product, glue it with tape.
It is possible to mount the aluminum profile for LED strip on separate holders. They are installed on the surface with screws and dowels. The design snaps into 2 - 3 holders along its full length.
These methods are used to install overhead and built-in structures. The base can be a ceiling, wall, furniture, equipment, etc.
When deciding to install LED strip lighting, take care of the necessary materials. Buy them on our website.
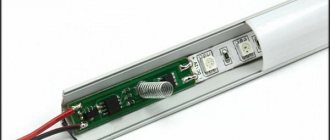
DIY aluminum structure for LED strips
Circuits made of aluminum are at the peak of popularity today, because they have managed to combine all modern popular technologies. The creators managed to place in one product not only a high-quality, strong anodized reliable alloy, but also to integrate LED devices, which are becoming more and more popular every day.
As a result, it was possible to increase the functionality of LED lamps and make the structure for mounting light sources stronger and more reliable. The aluminum contour can be used for DIY installation of tape into the wall surface. In addition, there is a similar option that can be used for arranging lighting in the ceiling or floor covering.
The aluminum profile for the LED strip looks great in various types of structures, without compromising their integrity. But aluminum decors can be completely non-standard, for example, a corner contour used for lighting cabinets and display cases. Most modern models can be decorated with various accessories. For example, you can find clamps, plugs, and special holders that look quite modern, stylish and at the same time discreet. An aluminum profile is an excellent option if you want to decorate the interior of a room in the style of a strict but modern classic.
General connection rules
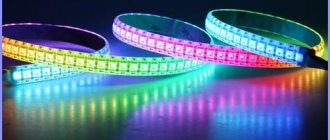
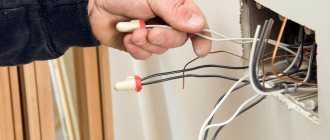
- Duralight cannot be connected directly to a voltage of 220V; first you need to lower it to 12V or 24V. This can be done using a special power supply.
- The ends of the tape must be fixed using connectors and connectors.
- It is necessary to completely eliminate any strong mechanical influence.
- Pay attention to the characteristics. For example, the IP characteristic shows the degree of protection from water. IP 65 can be installed in bathrooms.
- If you have chosen to install the profile using adhesive tape, you should take into account that it can only be applied once. Therefore, before gluing, clean the surface and make markings to avoid mistakes.
- The connection sequence must be observed.
- When choosing a power supply, pay attention to its power. It should be 30% larger than the entire connected LED strip.
- If there is a need to cut the tape, check that it is working properly using the power supply.
Remember that safety precautions must be followed. If you do not have basic electrical skills, call a specialist for help.
DIY LED strip installation: some recommendations
In order to carry out independent installation of the structure, you must follow some rules while working:
- All elements you work with should be inspected very carefully. If any damage or oxidized parts are detected, they should be replaced immediately, as this will negatively affect the operation of the belt.
- When installing modern LED lamps, you should not write off polarity and be sure to adhere to this rule - only then will the circuit work correctly, without unpleasant surprises.
- The tapes should be connected in parallel, which can prevent high voltage loading during operation.
You can install the LED profile yourself, without the help of specialists.