LED strip is often used to illuminate various surfaces. Thanks to it, it is possible to create a special atmosphere in the room and an optimal level of illumination. To effectively and comfortably control such systems, a touch switch for the LED strip is used, which has wide functionality. Unlike push-button models, such devices are more convenient to operate. However, before making a choice in their favor, it is worth familiarizing yourself with their distinctive features.
Design features
Any model consists of:
- Front panel. For ease of use, it is often equipped with backlighting. May have different shapes and designs. When choosing a suitable model, many people pay attention to it without delving into the operating principle and functionality of the device as a whole;
- A touch sensor that sends control signals to the device when an external influence occurs;
- A switching circuit, with the help of which an external signal is converted into the electric current necessary to ensure the operation of the tape;
- A body that combines all of the above elements into a single whole. The design of the housing may vary. It can be built-in or overhead. Its type has a direct impact on the order of installation work.
Attention! The service life of a particular device directly depends on the quality of its components.
Independent creation of backlight from S.L.: taking into account 4 schemes
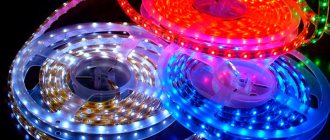
LED strips are popular for the following reasons:
- Huge range of colors and brightness.
- The tape can be cut to the desired length.
- Prices are more modest than those of ready-made devices.
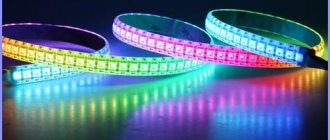
Look at the picture for an example of a tape:
Tape example
To assemble a working light device from a strip, you need the following materials:
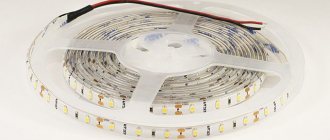
- Ribbon of the required length.
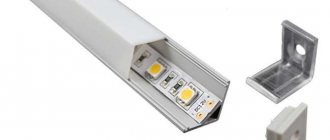
- Aluminum guide (profile). Look at the picture:
Aluminum guide (profile).
The backlight will have a very neat appearance if installed in a profile like this. And this will make it easier during the final installation.
- 12 W adapter.
- Switch.
5. Electrical cable and plug. Instead, you can use a terminal block. The type of connection matters here. The most suitable cable: made of copper, with a large number of cores, in double braid. Its minimum cross-section: 2 x 0.75 sq. mm.
- Thermal shrink tube. It seals all connections.
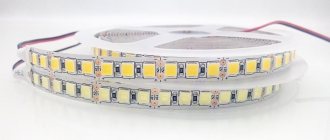
Example:
LED Strip Light
The tape in any room with high humidity needs protection from evaporation. The lowest degree of protection is IP44 (copes with droplets). A more respectable level is IP65 (copes with a stream). The safest setting is 12 W.
The workspace should be illuminated as much as possible. Therefore, it is better to use a tape with 3-crystal SMD 50x50 diodes. 30 diodes are formed. The formula works: 1 m – 12 lumens. If you need brighter lighting, it is better to use the 60 diode version. The color temperature is in the range 3300 – 500 K.
Auxiliary lighting can do without high brightness. SMD 35x28 parameters are enough. 1 m - 5 lumens. Color is not particularly important here. It is more determined by the design concept.
Below is a table of parameters of suitable tapes:
For stable operation of the backlight, you need an adapter with an approximate power reserve of 25%. The power of the tape is affected by the type of model. The technical aspects can be advised by a consultant in the store so that connecting 1 touch switch to the LED strip is successful.
For example, the SMD 50x50 version consumes 7.2 W per meter. Then, with a length of 4 m, the total power reaches 28.8 W. You will need a 36 W adapter.
Suitable switches:
- Regular with button format.
- Sensory.
- Infrared.
- Dimmer. Mechanical or sensory.
- A control unit that causes the light to blink or have an elegant color shift. This works if an RGB strip is used.
If several SLs become the basis for illumination, then the assembly of the device proceeds according to the following plan (parallel):
Device assembly
It is important to follow the assembly rules:
- The tape is cut only in specific places. They are specially marked.
- You can use several tapes.
- The cable coming from the block is soldered to the tape. The contact area is sealed - crimped with a thermal shrink tube.
The soldering algorithm is presented schematically below:
Soldering algorithm
A regular switch should be placed before the adapter, based on this diagram:
Scheme
The dimmer and RGB block are installed only after the adapter. Scheme:
Dimmer and RGB block
The lighting is mounted under the cabinets. An adhesive tape that is sticky on both sides helps with this. First, it is conditionally attached in several areas. After making sure that it is placed in the desired area and evenly, press it along its entire length.
DIY LED lighting for the kitchen work area
Where are they in demand?
The need to connect an LED lamp or strip may arise in various situations. Most often, these lighting devices are used if necessary:
- Ensure sufficient lighting of the work area in the kitchen;
- Connect several lighting fixtures at once;
- Organize lighting of staircases and landings;
- Connect the smart home system.
The location of the LED strip in the kitchen is chosen taking into account the goals being pursued. If you need to organize LED lighting for the work area, choose a powerful light source, which is located directly under the cabinets. This option is the most popular, as it helps prevent negative effects on the eyes due to insufficient light levels and makes it easier to care for the countertop.
Integrated lighting is selected for the space around the hood or for furniture. The LED strip is mounted above the upper cabinets or placed under the lower ones. Sometimes they are fixed under the tabletop.
Installation locations for LED cabinet lighting
There are a lot of options for placing furniture lighting. The LED strip can be located on the inside of the ceiling or walls of the cabinet, under the bottom, on the outer, outer and end surfaces of the shelves.
Installation of the LED strip on the surface of the cabinet is carried out with the back side, which contains a special adhesive layer. To fix it, you need to remove the protective coating from the adhesive side and press the tape to the selected location.
Installation of the LED strip in a cabinet can be done using a plastic or aluminum profile. The LED profile ensures reliable fastening of the strip with diodes.
Advantages
The touch light switch has a lot of advantages.
- Easy to turn on and off the device by pressing the sensitive surface;
- Possibility of adjusting the brightness of lighting in a fairly wide range: 10–100%;
- No sound discomfort. When changing the operating mode or adjustment, the device makes virtually no sounds;
- High degree of protection. The switch is not susceptible to moisture. It can be safely installed not only in the kitchen, but also in the bathroom or toilet;
- Presentability. Modern models can become part of any interior, blending harmoniously into the surrounding space;
- Compactness. The devices are characterized by small sizes. This allows you to install the switch anywhere, including in confined spaces. Most often, the switch is mounted in the profile of the LED strip;
- Availability of light indication, allowing you to find devices in conditions of limited visibility.
Ready-made kit or self-assembly? Let's compare
You can choose a ready-made lighting system based on LED strips equipped with motion sensors. But making such a kit yourself also has its positive properties.
Economical option. It is possible to select high-quality components at a more affordable cost. In the finished “boxed” version, all the parts are assembled branded, at an increased price.
A good solution for creating a system that fits perfectly into the room. The device is assembled precisely in terms of brightness, dimensions, power, and the number of sensors. All subtleties, parameters and layout of premises, personal preferences are taken into account.
Ready-made kits also have advantages. This is a manufacturer's warranty for the entire lighting system and service. In addition, everything is supplied ready-made, meaning you only need to select and order the kit once.
Ready-made option or self-assembly?
A ready-made option is faster and easier for me
0%
Self-assembly - this option is more profitable
0%
Voted: 0
Types of switches
Switches offered by manufacturers are divided into various groups depending on:
- Control method. They can be mechanical, electronic or remotely operated;
- Installation method. Some models are mounted directly into the aluminum profile of the lighting fixture, others are model or overhead;
- Connection type. There are pass-through and non-pass-through devices. The main advantage of the first type is the ability to turn on/off the lighting system from different places. The second type can be controlled from one specific location.
All products differ in shape, color and texture of the front panel. This allows you to choose the best option, taking into account the overall stylistic design of the room.
A modern touch switch has a number of additional functions. Such devices may have:
- Remote control with IR sensor. It becomes possible to control the controller and RGB strip. The user chooses the backlight color that he likes best;
- Timer. Functional models that allow you to optimize energy costs. With this function, the user has the ability to configure time intervals when the lighting system operates;
- A non-contact system that responds to changes in ambient temperature, a sharp sound, or is triggered when moving objects are within a given radius;
- Dimmer. A functional element that allows you to change the brightness of the LED strip. Brightness control is carried out within a specified range. Light intensity can be changed in the range from 10% to 100%;
- Capacitive response. This element allows you to increase the sensitivity of the panel.
Attention! Touch switches can be activated when you approach the sensor and after direct contact with your fingers. The latter type is most widespread.
Additional sensor functionality: 5 important points
This device has a variety of activations. It may also have additional features. With certain skills, a homemade sensor can be equipped with a good range of functions. Today, similar switches are produced with the following versions of added functions:
- Remote control. It greatly facilitates control over the light spectrum of multi-color tape. In this case, the use of a controller is mandatory. Otherwise the remote control will not work. The remote control is also good at controlling sconces. And when connecting to a tape, the remote control must be selected in tandem with the controller.
- Timer. Thanks to this device, significant energy savings can be achieved. In the timer, you can set the time to turn off the lights when there are no people in the room or in the house.
- Volume response. This product reacts even to light contact. Often this device is made independently and complements the timer.
- View without contact. The reaction of these devices occurs when the situation in the room somehow changes. These may be different movements, temperature and lighting changes.
- Dimmer. Any designated touch strip devices can be equipped with a dimmer. This addition allows you to control the brightness of the light in the room.
Optimal for a residential apartment is 1 netxt LED lamp with a touch switch. But it is not prohibited to work on modern electrics with your own hands. More on this below.
Which to choose
A large selection of touch switches causes certain difficulties in selecting the optimal option. Such products are boards with average dimensions of 40 × 10 × 2 mm, allowing them to fit into an LED profile, external modules placed in a plastic case, or a controller equipped with a remote control.
We advise you to pay attention to the wireless pass-through switch, which is also convenient to use, especially when lighting long corridors. By turning the light on at the beginning, you can turn it off at the end.
To choose the appropriate option, you must first decide on the type of LED switch. After this, it is worth considering the technical specifications. Noteworthy meaning:
- The voltage that is supplied to the input of the device and created at its output;
- The strength of the current flowing through the device in standby mode and generated when the load is connected;
- Power.
If you decide to install a monochrome LED strip, you should decide on the operating principle of the circuit breaker. Manufacturers offer devices:
- Capacitive, inside of which there is a spring that fits tightly to the plate. When your hand touches the switch, it creates a vibration. As a result, the contact closes and the lighting turns on. However, having decided to opt for such a device, it is worth considering that if the thickness of the plexiglass diffuser is more than 1 mm, you may encounter a lack of operation. This will cause serious inconvenience during operation;
- Infrared, triggered every time there is an object at a distance of 10 cm from the surface, from which the signal is reflected and returns to the receiving element. If the gap between the protective screen and the sensitive element exceeds 5 mm, you will have to use a profile with a shallower depth or take care of the presence of a hole in the light-scattering lens.
If the choice is made in favor of a model with a dimmer, you should also decide on the principle of operation. Such touch switches are most often turned on/off by a short touch. To change the brightness, you need to hold your hand longer on the control panel.
Some models have a slightly different operating principle. They can have several pre-programmed operating modes. Similar devices are suitable for RBG tapes. They are equipped with a control panel equipped with a touch ring. To change the shade of the glow, you need to smoothly move your finger along the spectral circle. As a result, diodes of the selected color or a combination of them will be switched on.
Attention! When choosing a switch, pay attention to the frequency of the PWM pulses. It should be more than 300 Hz so as not to have a negative effect on vision and the nervous system.
Selecting a power supply, switches and cooling
LED backlight cannot work directly from a wall outlet. Due to the high power, it will immediately burn out, and the cabinets will lose their presentability. The power from which it will operate is 2 or 24 V. Therefore, the next thing you need to do before installing the backlight is to select a power supply. The power of the power supply must correspond to the power consumption that will be consumed by all connected LED strips.
Power supply options
Let's do a simple calculation. If you connect three strips of 5 meters each with a power of 7.2 V, then you need to multiply these two indicators by each other. As a result, we get 36 V. Please note that you need to purchase a unit with a power 20% more than its rating. Therefore, in this case, for LED backlighting, you will need a power supply with a power of 45 V or more. Calculators will do such calculations for you.
The blocks also differ in design. What are they?
- Sealed . These are small models in a case made of durable and elastic plastic. Such blocks are most often used by manufacturers.
- Sealed with aluminum housing . These are very durable and heat-resistant models. You can safely choose them for the kitchen and place them on the cabinet, but due to their positive characteristics, the cost of such power supplies is too high.
- Open . They have a perforated body and large dimensions. Such models are not protected from moisture, so they require additional protection for their housing. May not be suitable for placement on a cabinet.
- Network . They have a low power of up to 60 V. The advantage of such units is that they do not need to be installed. But if you need to connect several of your tapes, you will have to purchase additional blocks and only then decorate the cabinet.
Units installed in kitchens must be sealed. If you purchased another model, take care to place it in a place where, when using the kitchen, there will be no moisture or provide protection.
Power supplies for LED backlighting: 1 – sealed plastic block, 2 – sealed aluminum block, 3 – block with perforated housing, 3 – network block
For LED strips, blocks are also selected for cooling. They are divided into several types:
- active;
- passive.
Let's look at what characteristics they have. In their block where active cooling they have a cooler similar to the one in computers. Such blocks have high power from 100 V, so they can be used to connect long-length tapes. However, over time, the cooler begins to make a loud noise, which will make the situation uncomfortable.
Passively cooled units are more popular for kitchens. They are silent during operation, however, unlike the previous ones, they are larger in size, which can make them inconvenient. The selected block is not enough.
1 – block with active cooling, 2 – block with passive cooling
Choosing the right switch
Now let's look at which switch can be installed for the backlight. The following options are suitable for the kitchen:
- Invoices . They are displayed on kitchen aprons or walls under ribbons;
- Mortise . Can be placed in furniture above a cabinet.
- Sensory . They operate on belts with a light touch.
- Sensors _ Here the backlight is triggered by movement.
- Dimmers . Allows you to adjust the brightness of the light settings.
All are suitable for LED lighting. The switch that is selected can always be replaced.
Installation Features
Connecting a finished device to an LED strip usually does not cause difficulties. However, it should be remembered that LED strips operate on a voltage of 12–24 V. To ensure the required voltage values, the connection to the network is made through a power supply.
When connecting to a finished lamp with an LED strip, the diffuser and plug are removed. On the tape, 1–2 sections are cut to a special mark. The switch will be installed in the vacant space.
To carry out installation work, you will need special connectors of a suitable size or a low-power soldering iron. The power of the latter should not exceed 40 W. Otherwise, there is a risk of damage to the wires when connecting the elements to each other.
Attention! Installation work is carried out using a cable with a cross-sectional area of 1.5 mm². If you are going to install a tape whose length exceeds 5 m, additional calculations should be performed to find the optimal transverse size of the wires.
Now let’s talk about how to connect the switch to the LED strip correctly.
- The wiring strands are stripped and crimped;
- The prepared wiring is connected to the switch connector, which is located in front of the power supply;
- The wires are connected to the lighting element.
In order not to make a mistake when connecting a touch switch, you should pay attention to the markings that are indicated on the product body:
- VCC, GND. The plus and minus are connected here, through which the devices are powered;
- LED+, LED. These contacts are intended for connecting an LED strip.
Attention! Adhesions should be properly insulated.
As insulation, heat-shrinkable tubing of a suitable size or hot-melt adhesive is most often used. The working parts in the selected device must be located on one side. Otherwise, the switch will not be able to be fixed in the profile. A blue LED indicator is used to indicate the location of the sensor.
To fix the switch and LED strip in the aluminum profile, double-sided tape is used. The protective panel is installed last and is secured with a plug.
Touch switches quickly respond to even the slightest touch. This causes certain inconveniences and difficulties during installation work. Considering that the device instantly responds to even a slight touch, you should act with extreme caution and avoid even minor accidental touches to the sensor.
Switch for LED strip in the kitchen
LED lighting for the kitchen: do-it-yourself selection and installation
Modern kitchen equipment makes the cooking process less cumbersome. Proper room lighting and LED lighting for the kitchen under cabinets creates a comfortable environment for the home chef.
Content
Everyone knows about the advantages of LED lighting compared to both traditional incandescent lamps and energy-saving lamps. This is extremely high efficiency and durability. It is also important that the LEDs light up at full power instantly, without requiring time to warm up, and their service life does not depend on the number of on-off switches. The only drawback is the relatively high cost. But the costs are justified: LED lighting in the kitchen will last for several decades, saving a lot of money due to low energy consumption.
If you already have a different type of kitchen lighting, do not rush to change it to a new one. Manufacturers produce LED lamps for almost any type of base and, most likely, you can only replace the lamp itself without changing anything in the lamp or limiting yourself to minor alterations.
Recommended ergonomic kitchen lighting schemes
Proper lighting in the kitchen should be multi-zone. This includes general lighting, light above the dining table and, of course, LED lighting for the kitchen work area.
A sophisticated consumer, technically savvy and familiar with the latest in interior design, often does not limit himself to functional lighting alone.
Where should and can kitchen lighting be located?
- Work area - lighting under cabinets.
The lighting level in the work area should be as high as possible
- The hood above the stove has built-in lighting.
If the hood light seems insufficient to you, standard lamps can be replaced with brighter and more economical diode lamps
Additional lighting in the following places adds convenience or simply decorates the interior:
- Illuminated glass cabinets. If you don't have collectible dishes, put frosted glass in the door, it's no less beautiful.
The soft light emanating from the glazed cabinets visually lightens the kitchen set
- Above the upper cabinets, if the room has sufficient height. Light directed to the ceiling will make the room visually higher
- Under the lower tier of cabinets. The light source should not be visible, so a thin and inconspicuous LED strip for the kitchen is best.
LED lighting directed at the ceiling and floor in the kitchen above and below the cabinets is not intended for work, so it may not be white, but colored. The upper light can be bright, and the lower light should be dimmed, noticeably softer than in the work area
- An LED strip in the kitchen can be installed under the countertop and directed along the fronts of the lower cabinets, highlighting their contents.
The tape is fixed directly under the tabletop. The tabletop itself should protrude relative to the furniture front at a distance no less than the width of the light element
- You can also illuminate the tabletop itself from the inside; for this it must be transparent. They are made from several layers of glass and transparent polymer.
An LED strip is installed along the contour of the translucent tabletop
Another option is hidden LED lighting for the glass tabletop. The light source is directed from the end. To maximize the effect, the tabletop is made of transparent quartz glass with matte details applied to the surface. They are the ones who will glow
- Bar counter lighting, if available.
LED lighting for the kitchen in the bar area is usually directed downwards
- The luminous skin is the latest in fashion. The light does not fall on it from the outside, but comes from within.
The luminous skin came into the kitchen interior from advertising lighting. This is a flat diode panel with an image printed on milky glass.
Actually, LED lighting in the kitchen can be placed almost anywhere. Only financial considerations can limit your imagination.
Do-it-yourself LED lighting can be made using ready-made lamps, or the lighting system can actually be assembled independently from individual elements. We list the main types of devices used:
- Surface-mounted linear luminaires. They are sold both individually and in sets, where several modules are connected in series into one block using a special adapter.
DIY LED lighting for the kitchen work area from ready-made linear modules
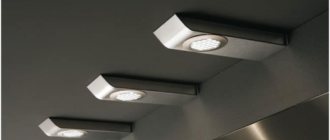
- Surface mounted spotlights.
LED illumination of the work area, made of corner lamps
Lamps, both linear and spot, equipped with touch switches, have appeared on sale. It is enough to touch their body in a certain place to turn the light on or off.
The touch switch is usually indicated by a constantly lit blue LED
- Recessed lamps, linear and spot. Being very thin, they are mounted in the bottom shelf of the cabinet flush with the bottom surface.
The recessed LED lighting for the kitchen is completely hidden in the bottom shelf. This is convenient, but installation of such a lamp requires certain qualifications
- LED strips for kitchen lighting are used no less widely than ready-made lamps. The reason for this popularity is the wide choice of brightness and color and, which is very convenient, the tape can be cut exactly to the required length. It is cheaper than ready-made lamps.
The choice of brightness and color is very diverse
With ready-made lamps, everything is more or less clear, but how to make lighting on a kitchen set with your own hands from an LED strip?
To assemble a working lamp you will need the following materials:
- Diode strip of the required length.
- If necessary, aluminum guide profile.
Kitchen lighting will look neater if placed in a special aluminum profile. This solution makes lighting installation easier
- Power supply 12 W.
- Switch.
- Electrical cable and plug or terminal block, depending on the type of connection. We recommend using a double-braided stranded copper cable with a cross-section of at least 2x0.75 mm2.
- Heat shrink tubing for sealing connections.
LED strip is often sold complete with power supply and control
The LED strip in the kitchen must be protected from water; this is one of the conditions for safe operation. The minimum level of moisture protection is IP44 (withstands individual drops of water), better than IP65 (water jet). Voltage - 12 W, as the safest.
LED lighting for the kitchen work area should be bright, with a spectrum close to natural daylight. We recommend using a strip with three-crystal LEDs of the SMD 50x50 type, consisting of 30 diodes of 12 lumens each per meter of length. If you want to have brighter light, especially when equipping the backlight with a dimmer, it is better to choose a product with 60 diodes. Color temperature ranges from 3300 to 500 K.
Additional lighting for the kitchen, as a rule, should not be bright. Often, the luminous flux of SMD 35x28 from 30 diodes of 5 lumens per meter is enough. Color does not play a significant practical role and depends more on the design idea.
Specifications for Recommended Tapes
To ensure stable LED lighting in the kitchen, we recommend choosing a power supply with a power reserve of about 25%. The power of the tape depends on the model; technical specifications can be obtained from the seller. So, SMD 50x50 from 30 diodes “takes” 7.2 W per meter of length. Thus, if the length is, for example, 4 m, the total power will be 28.8 W. Accordingly, a power supply with a 25% margin is 36 W. Choose a compact model, it will be easier to hide.
As for the switch, the following options are possible:
- Simple push-button.
- Sensory by touch.
- Infrared, responds to hand waves.
- Dimmer that regulates the luminous flux. The control can be mechanical, in the form of a rotating handle, or touch.
- A control unit that makes the light flash or shimmer with multi-colored lights if a multi-color RGB strip is selected. Although, such effects are used infrequently.
LED lighting for the kitchen based on several strips should only be carried out using a parallel connection diagram
LED backlight must be assembled in accordance with the following rules:
- The tape cannot be cut to length arbitrarily, only in certain places. For this purpose, special marks are applied to it.
- If it is necessary to use several tapes, they are connected to the power supply in parallel.
- The electrical cable coming from the power supply should be connected to the tape not by connectors, but by soldering, this is more reliable. The connection should be sealed using heat shrink tubing. You can also use electrical tape, but it is more difficult to do and will not look as neat.
Step-by-step recommendations for soldering the tape-to-cable connection
- A regular key or push-button switch is placed before the power supply.
Connection diagram with a conventional switch
Dimmer or RGB block - after the power supply.
LED strip in the kitchen: photo of the connection diagram with adjustable luminous flux dimmer
- LED kitchen lighting is attached under cabinets using double-sided adhesive tape. First, you should only lightly secure the tape in several places and, making sure that it is in the right place and lies flat, press firmly along its entire length.
If you do not have sufficient knowledge and skills to work with electricity and electronics, entrust the installation of lighting to specialists.
Information for selecting touch switches for LED strips
Every year there are more and more touch panels in our lives. Judging by futurology books, we will even have contact glasses in the near future. But this is still in the future. And today we will talk about such a modern device as a touch switch.
This switch appeared relatively recently on the market, but has already gained popularity. Today it can be found in many apartments, the owners of which are trying to install elements of the “smart home” system in their homes. Moreover, this system often comes in close tandem with an LED strip. Today’s article will tell you what it is and what you should know.
Let's start from the beginning
To understand the use of such a sensory apparatus, it is necessary to understand what it is. Externally, the touch switch designed for the LED strip looks like a crystal panel. The corresponding markings are applied to this panel. Varieties of household models are used to connect to a 220 volt network. The product connection diagram will be given below. The touch switch type may vary in:
Touch switch option
Today, this kind of product is used for the following purposes:
- connecting LED strip. This approach has worked well in the kitchen when using LED strip to illuminate the work surface. And connecting a touch-type switch to it greatly simplifies work indoors in the evening and at night;
Note! Modern technologies that allow you to automate or simplify the switching on of lights belong to the “smart home” system. This also includes the touch switch.
Remote control for LED strip
- connecting sconces;
- control of different levels of lighting for multi-level ceilings. Here again we are talking about LED lighting, organized using a strip (single or multi-color). For the convenience of such control, you can use the remote control;
- control of the main lighting system in a house or apartment. You can also use the touch remote control here.
In whatever situation the switch is used (for an LED strip or other type of lighting), you need to remember that the connection diagram can be different. For the tape, due to a number of circumstances, one scheme is used, and for other light sources another scheme is suitable.
Note! The connection diagram, if you use a remote control to control the level of illumination, will also be slightly different.
You can either buy a touch switch in a specialized store or make it yourself. It is worth noting that you can install it quite easily with your own hands. Installation can be carried out in the kitchen or in any other room. But in the kitchen you will need an aluminum profile for this.
What are the options
Our kind of switch can be activated and turn on the light by different touches. Such products may react to:
- approaching the sensor;
- touching the touchpad with your finger;
Note! The option of activating the device with your finger is the most common and popular.
- other options: temperature change, sound activation, activation at a specified time, as well as the appearance of movement in the sensor operating area.
Option to activate the touch switch with your finger
In addition to different types of activation, a touch-type switch may contain various additional functions. Moreover, with due diligence, this kind of product with advanced capabilities can be made with your own hands. At this point in time, products are produced with the following modifications of additional functions:
- presence of a remote control. This remote control is convenient for controlling the light spectrum of a multicolor LED strip. But here you also need a controller. Without it, the remote control will not work. In addition, the remote control is effective in controlling sconces. When connecting to an LED strip, the remote control must be selected together with the controller;
- with timer. Devices of this kind will allow you to significantly save on electricity consumption, since they can be programmed to turn off the lights when there are no people in the house;
- capacitive response. Such devices react even to a light touch. Many people make this device with their own hands in addition to the timer;
- contactless type. Such products will respond to various options for changing the situation in the room: movement, temperature changes, changes in lighting.
Note! Any type of touch switches used for LED strips can be additionally equipped with a dimmer. It allows you to adjust the brightness of the lighting in the room.
How the device works
To make a touch-type switch with your own hands or install it correctly in an aluminum profile, you need to know its structure and principle of operation.
Note! Whatever type of device is used to connect to the LED strip, the principle of their operation will remain identical.
Any model will contain four elements:
- front part. This is the outer part of the product. Sometimes manufacturers install lighting behind it;
- touch sensor. What it will actually respond to depends on the type of sensor;
- switching circuit. With its help, the signal is converted into electric current, which powers the lighting device connected to it (LED strip or any other light source);
- frame. It can be built-in or overhead. Depending on its type, installation will differ. The housing will either need to be mounted inside the walls or simply overlaid.
The duration of operation of the device depends on the quality of all components of the device. Therefore, try to select models in which price and quality are in an ideal ratio.
The touch-type switch has the form of a module. Due to its small dimensions, it can be installed in a special LED aluminum profile. Using such a profile for installation, you can place the device close to the tape itself (light source).
Note! When installing, remember that the case responds quickly to any type of touch. Therefore, you need to contact him only at one point. The selected installation location should completely exclude accidental contact with the sensor part of the housing.
The device is connected to the LED strip according to the following diagram.
Switch connection diagram
Follow the indicated diagram, and the connection will go without problems.
Self-assembly
If you know how to handle a soldering iron, understand electronics and have all the design details at your disposal, then you can assemble a touch switch with your own hands for connecting to an LED strip, designed to be powered from a 220-volt network. The whole difficulty here is to solder the circuit correctly. Below is the simplest scheme that a beginner can handle. Note! Capacitor C3 may not be used in the circuit.
For assembly you will need the following parts:
Scheme for assembling the product
- two KT315 transistors;
- resistance (at 30 ohms);
- semiconductor D226;
- simple capacitor (0.22 µF);
- power supply or powerful battery with an output voltage of 9 volts;
- electrolytic capacitor (100 µF, 16 V).
All these components should be soldered according to the above diagram, placing it in a suitable housing.
Conclusion
By connecting a similar device to the lighting system of a kitchen or any other room in your home, you will receive significant benefits in terms of light control. Turning on the light with a light touch, minimizing energy consumption and comfort - all this will give you a touch switch connected to the LED strip.
Recommended articles on the topic
Choosing the right autonomous sensors for driving with a siren
Handmade power supplies
Circuits for homemade power supplies for LED strips
How to choose a motion sensor for a toilet How to choose the right radio light switch for your home with a remote control, how to connect Details for calculating the power of the power supply for LEDs
Useful materials Add a comment Cancel reply How to install LED strip in the kitchen
Proper and beautiful lighting in the kitchen is always beautiful and good. In this article, we decided to tell you a completely unusual way of illumination, which can be easily translated into reality. So, DIY LED strip in the kitchen, photo and detailed installation instructions.
How to choose LED strip for the kitchen
Initially, you need to buy an LED strip; it’s worth noting right away that the first one you come across will not be suitable for the kitchen. There is a lot of humidity in the kitchen, plus the stove constantly heats the air. If you take an LED strip that does not withstand such conditions, it will immediately fail, and its cost is far from small. Find out how to make pool lighting.
Now on sale, if tapes can withstand moisture and temperature changes, you only need to look for them. In total, we can distinguish the following types of LED strips for the kitchen:
- One-sided. The upper part has hermetically sealed protection; all diodes are installed in it. Protection is created using a sealant or a special casing made of polymer material. This type is designated IP65.
- Open. It is considered leaky and allows moisture to come into contact with the tape tracks. Designated as IP33, it can be installed together, distant from the stove. The cost is quite reasonable and will pay for itself if all operating conditions are met.
- Double-sided. This type of LED strip for the kitchen is considered the best; it is completely sealed and designated IP67 and 68.
- Controller. It is only needed when using colored ribbons.
- Special connectors allow you to connect LED strips to each other.
- Power unit.
- We prepare the place for installation. Be sure to degrease and clean with sandpaper if necessary.
- Next we glue the tape.
- We connect it to the unit and start using it.
Double-sided is considered the best, but the price of LED strip in this case is quite high. But you guarantee the fact that it will not fail. If you are ready to install the tape in a place where it will not get wet, we recommend choosing a cheaper option.
LED strip light for kitchen
Now we move on to the second stage, and select the optimal LED strip light. It is optimal to use white light; tapes of this type are called SMD-3528. Installing them is a pleasure; you don’t need to think and calculate how the light will fall. Once installed and forgotten about it, at the same time it will create comfortable lighting.
If you want to get unusual lighting, use tapes like SMD-5050. It has different light. Here the choice depends only on you, what kind of light there will be, and with that you can continue to live. We recommend choosing the following LED strip light:
These colors will always look harmonious and complement any interior.
What you need to install LED in the kitchen
Before you begin installation, you must stock up on the following items:
The power supply in this list can be put in first place; without it, not a single tape will work. Approximate calculation: one block per five meters of tape. Usually, five meters is a lot for a kitchen.
In order not to make a mistake here, you need to multiply all meters by the power of the tape run after installation, multiply the resulting value by 1.5. The resulting result will be the total power of the block.
Connecting LED strip in the kitchen
Installation of the LED strip can be done in any place convenient for you, there is nothing complicated here. Choose your own place and follow the simple instructions. You can find examples of ready-made options at the end of this article. Also read: how to install tape in a car.
We couldn’t come up with a simpler diagram, everything is incredibly easy, however, watch the video on how to connect an LED strip, so everything will definitely fall into place. If you use multi-colored ribbons, you must first connect them to the controller, then to the power supply. When connecting, remember the polarity; all cables are marked accordingly.
LED strip in the kitchen: ready-made options
This is how the LED strip in the kitchen looks great in the interior, we decided to make a short review for you so that you understand what can be done with such a simple device.
Interesting article on the topic: How to connect an LED strip, basic methods.
- Do-it-yourself LED strip installation Modern designers are increasingly using LED strips in interior design. It is used to illuminate ceilings…
- Installing an LED strip in the kitchen with your own hands How to connect and install an LED strip in the kitchen Lighting any room and work area is very…
- Installing an LED strip in the kitchen LED strip in the kitchen, photo of the lighting After an unsuccessful installation of lighting for the work area in the kitchen, I decided...
- DIY ceiling lighting with LED strip Among other lighting sources, LED lamps are considered the safest, environmentally friendly and economical. They have…
Installation of RBG controllers
Those who love bright colors and cannot make a choice in favor of a certain glow of the LED strip will be interested in the RBG strip. Such products have 4 contacts, each of which is responsible for a specific color. They are marked in a specific way:
- R, corresponding to the red glow;
- B, responsible for blue color;
- G, allowing you to get green;
- W, available in a limited number of tapes. Responsible for white backlighting;
- V+, indicating overall plus.
To install such a product according to all the rules, wires connect the outputs of the tape and the terminals of the same name on the controller. If the selected model of the lighting element has five outputs, this should be taken into account when selecting a device for control. Manufacturers offer devices with 4–5 terminals, which always allows you to choose the best option for your lighting system.
To supply electrical current to the controller, terminals designated V+ and V- (COM) are used. In this way, several tapes can be parallelized, the total length of which does not exceed 5 meters. If the specified value is exceeded, you will have to use an amplifier.
Connection diagram
Depending on the modification, the LED strip with a motion sensor can be connected either directly to a 220V network or through a 12V step-down transformer. Let's look at both options in more detail.
Connecting directly to 220V
Special LED strips are available for sale, which can be connected directly to a 220V network. This is achieved thanks to the sequence of connecting ice elements, each of which has a given voltage drop. During installation, such a strip needs to be connected only to the motion sensor. The disadvantage of this backlight model may be flickering and breakdown of electric current (which is far from safe for household members). In addition, if one diode burns out, the entire lamp will have to be replaced.
Connection via power supply
A safer, more reliable, stable and common option is to connect via a step-down transformer. In this case, the power of the latter should not be lower than the total similar indicator for the LED strip used. For example, if a 5-meter segment is used for illumination, each meter of which accounts for 12 W, then the final value will be 5x12 = 60 W. The buffer 30% is added to this, it turns out 60X0.3+60=78 W. The power supply should be approximately 80 watts.
In addition, the equipment connection sequence and polarity are important, as shown in the following figure for the monochrome and RGB version:
When the length of the LED strip is over 5 meters, it is necessary to use separate parallel connections for each section, as shown in the figures below:
As you can see from the diagrams, it is better to use your own power supply for each individual section, since small-power transformers will cost less in total than one large one. For RGB versions, it is better to use special amplifiers instead of separate controllers.
The location of the motion sensor in these circuits is at the very beginning, by analogy with a conventional switch - power from a 220V network must pass through it.
DIY assembly
It is not always possible to purchase a touch switch with suitable parameters. In this case, having sufficient knowledge in the field of electrical engineering and having basic soldering and assembly skills, you can try to assemble such a device on your own.
To do this, you must first find a diagram of the device in order to understand what parts will be required for its manufacture. In the most general case, to manufacture a standard switch it is worth preparing:
- Two KT315 transistors;
- Semiconductor D226;
- The capacitor is ordinary with a capacity of 0.22 μF;
- Electrolytic capacitor with a capacity of 100 μF at 16 V;
- Resistance R1. A 30 Ohm element is sufficient;
- 400 ohm resistance relay;
- Power unit. If you plan for the device to operate autonomously and not from a 220 V network, the power supply can be replaced with a 9 V battery.
The prepared elements are arranged according to the chosen scheme and carefully soldered together. When performing work, be sure to follow safety regulations to prevent injury.
In the simplest scheme, an element made of copper or aluminum alloy acts as a receiver. It is soldered to a regular capacitor. Then both KT315 transistors are connected in series. The next element in the circuit is a resistor with a resistance of 30 Ohms, followed by a parallel electrolytic capacitor, semiconductor D226 and a relay with a resistance of 400 Ohms. Some circuits allow parallel installation of another capacitor.
When making a device for RGB tape with a total length of more than 5 meters, two power supplies can be used to amplify the signal. During the assembly process, these elements should be positioned in such a way that there is sufficient clearance between them. This will ensure timely heat removal from power supplies during their operation.
After the product is completely assembled, you will need to check its functionality and perform the installation correctly.
Tools and materials for making backlights
To install a simple automatic lighting system based on an LED strip, you will need the following materials:
- Ice strip.
- Motion Sensor.
- Power unit.
- Controller (when using a three-color RGB version).
- Wires.
- Fastening components.
You will need the following tools:
- Electric drill, screwdriver.
- Measuring device.
- Scissors, screwdriver, knife.
- Soldering iron, solder or connectors.
In addition to the above components, additional equipment and materials may be required depending on the characteristics of a particular backlighting scheme. Let's look at how to choose the main components of the system - LED strip and motion sensor.
How to choose LED strip
There is a large assortment of LED strips, differing in a number of characteristics:
- Color design (monochrome or RGB).
- Shade temperature (warm, cold, natural).
- Dust and moisture protection.
- Power of ice crystals.
- Type of power supply - directly from a 220 V network or through a step-down transformer.
When choosing a tape, you must be guided by the following criteria:
- The most common model of ice strips is equipped with SMD LEDs with a crystal size of 3528. Their lighting parameters are similar to a natural source.
- SMD 5050 LED strips have maximum brightness.
- The stronger and more uniform the backlight is required, the greater the number of diodes should be located per meter.
- Lamps installed near a source of high humidity (in the kitchen, in the bathroom, near the floor surface) must have a high IP protection index - from 67-68.
How to choose a motion sensor
According to the main principle of operation, the motion sensor is similar to a regular switch. Only the closure of the contacts in it occurs automatically - under the influence of the sensor, and not by a human hand. Depending on the type of mechanism, they differ into the following modifications:
- Infrared.
- Ultrasonic.
- Acoustic.
- Optical.
- Microwave.
The choice of a specific model depends on the operating conditions and the tasks assigned to the lighting system. For example, in normal everyday conditions, conventional infrared sensors are used to illuminate stair steps, the operating principle of which is based on determining the thermal radiation of an object.
Among the main operating parameters of the motion sensor are:
- Light level when the sensor starts to respond.
- Glow time after switching on.
- Backlight brightness control.
- Viewing angle.
- Sensitivity, range.
How to connect a sensor strip: step-by-step guide
To connect an LED strip to a motion sensor, you need to prepare materials and tools, mark the circuit and install equipment and wiring.
The procedure consists of the following steps:
- The 220V network is pre-de-energized.
- Conductors are soldered to the LED strip, calculated in length in accordance with the diagram (or connected to connectors). The contacts are sealed depending on the operating conditions.
- The LED strip is installed in place - glued to the wall, furniture, ceiling, steps or decorative elements.
- The wiring is connected to the power supply (controller for the three-color version), and then to the distribution panel.
- From the distribution module, conductors are connected to the motion sensor.
- The sensor is pre-installed in place - on a bracket, in a cavity or in an overhead manner; its controls are set in accordance with the recommendations of the factory instructions.
- All conductors are connected in accordance with the diagram.
- The power is connected and the device is checked.
- If necessary, the motion sensor is configured.
Kitchen lighting
In the kitchen, using light switches is especially inconvenient, since your hands can be smeared with oil and other food ingredients. Light sensors are becoming especially relevant.
To independently implement a lighting scheme, you will need the following components:
- Motion Sensor;
- socket with protection class IP44 (the sensor will supply voltage to it);
- 220 V tee socket;
- adapter for 12 V and 1 – 1.5 thousand mA (plugs into a power outlet and is used to power the tape);
- mother connector (used to connect the adapter to the light source);
- 12 V diode strip of the required length;
- acoustic transparent flat cable (with its help the lighting device is powered);
- power cable (two wires of 0.75 each) for connecting the plug to the sensor and socket.
A typical connection diagram in the kitchen is shown in the figure below.
The essence of the circuit is to connect a sensor to a kitchen outlet. The line switched by the device is directed to the outlet. The adapter that powers the lighting device is connected directly to the outlet.
When soldering the speaker cable to the tape and the mother connector, special attention should be paid to polarity. If the plus and minus are incorrectly determined, the light source will not work
Entrance lighting
A diode light source with a motion detection device is extremely useful in organizing entrance lighting. Often in entrances there are two extremes: the light is always on at night or there is no lighting at all. In the first case, there is a senseless waste of electricity when people are absent, in the second, you have to move by touch, which is uncomfortable and unsafe.
If desired, you can install a special sensor that allows you not only to turn on/off the lights, but also to report information about the presence of people in the room (adjacent area) to the security console or mobile phone. Such information is especially useful when the owner knows that no one should be in the house at this time.