A modern and functional kitchen, regardless of its size and configuration, cannot be imagined without properly organized lighting. Usually, one chandelier or lamp is not always enough, since during cooking or washing dishes, the light flow is blocked. LEDs will help organize additional lighting. Let's look at all the information about the LED strip for the kitchen, find out how it is connected, and what main characteristics they have.
Choosing an LED strip
There are a number of requirements for choosing a tape. Most often, installation on cabinets is carried out using SMD LEDs. They are classified according to the following criteria:
- number of crystals (there can be from 1 to 4);
- monochrome or full-color glow;
- size (range can be from 1.06x0.8 to 5.0x5.0 mm).
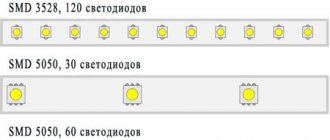
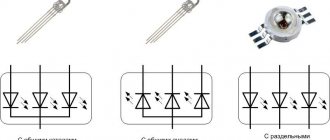
To illuminate the dining area and work area, SMD LEDs with three-crystal diodes are suitable. Their colors can be selected by marking. For example, white is designated as BA512, 515, BB515, 811, blue – BA512, 515, BB515, 811, green – BA585. You can choose a color to match your kitchen interior. To create decorative lighting for the kitchen, you can install a single-crystal strip on the cabinets.
LED SMD with three-crystal diodes
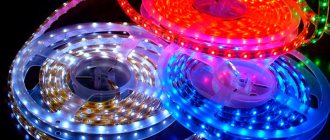
You can opt for the LED strip option. Here the LEDs are located under the cabinet on one plane and are small in size; it will decorate the cabinet well. This lighting also differs in appearance. One meter of strip can accommodate 30, 60, 120 and 240 light bulbs. Brightness and energy consumption will depend on the number of lamps with which the kitchen will be equipped.
LED strip
It is important to pay attention to the moisture resistance of the tape. What degree of protection exists:
- IP20 – cannot withstand high humidity, so you should not choose this LED strip for the kitchen;
- IP65 – can be installed in the kitchen, as it has average resistance;
- IP68 – has the highest protection against moisture, can be used not only in kitchen cabinets, but also in swimming pools.
In order to make LED lighting in the kitchen with your own hands, the second and third types of tape are suitable.
Selecting LED strip
The LED strip must be safe for use, since poor protection from water vapor and high temperatures during cooking can cause a short circuit, and subsequently a fire in the cabinet.
First of all, you need to look at the degree of protection of the shell. It is marked with two letters with a two-digit number - IP (two-digit number). The first number indicates the degree of protection of the backlight from dust, dirt, and resistance to mechanical damage. The second indicates waterproof protection. Both numbers range from 0 to 9.
There are 3 types of protection:
- IP33 - not suitable for installation in the kitchen, as it has poor moisture-resistant protection.
- IP65 - electronic backlight components are protected. Suitable for installation under cabinets.
- IP68 - sealed, moisture-resistant coating. It is used not only in the kitchen, but also in the pool.
It is recommended to use a tape with IP68 protection.
For sufficient lighting, you need to correctly calculate the power density, which depends on the number of diodes located per meter.
To decorate a room, models with 30–60 diodes per meter are used. Such options are not suitable for the kitchen. For the cooking area, it is better to choose models with 120–240 LEDs.
When choosing a backlight, you need to calculate how much power it will consume. The electricity consumption of the tape is 5 times more than that of a conventional incandescent lamp.
| Light-emitting diode | Quantity | Power |
| SMD-3528 | 60 | 4,8 |
| SMD-3528 | 120 | 9,6 |
| SMD-3528 | 240 | 19,2 |
| SMD-5050 | 30 | 7,2 |
| SMD-5050 | 60 | 15 |
| SMD-5050 | 120 | 25 |
Features of use
Before attaching an LED strip to a kitchen unit, it is recommended to study its characteristics. These include positive qualities:
- room owners can independently adjust the intensity and even color of lighting;
- the tape can be used to illuminate useful areas in the kitchen or as decoration;
- the strips differ in the number of LEDs and their colors, brightness and direction of light;
- Ribbons are available in multi-colored or plain colors;
- Some tapes are even equipped with a remote control, which greatly simplifies the process of using them, since you can remotely change the brightness and other parameters.
Anyone can figure out how to attach an LED strip to a kitchen unit, so you don’t have to use the help of professional installers. This allows you to save a large amount.
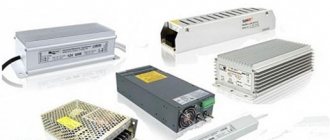
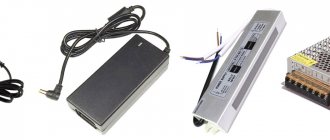
Power supply and cooling
A regular network contains a voltage of 220 V. You cannot turn on the backlight directly into the network, as it will immediately burn out. Diodes are capable of operating at direct current with voltages up to 24 V. This indicator is achieved using a switching power supply. It must generate power equal to the total power of the connected tapes.
Choose a power source with a 20% margin. For example, if the total power is 36 W, then a 45 W unit is suitable.
The power supply unit must be placed in a moisture-proof place, since if water gets into it, a fire may occur. Also, when choosing, pay attention to models with surge protection. This will increase the life of the backlight.
Waterproof and perforated power supply
There are only 4 types of design:
- Sealed plastic power supply.
- Aluminum block body - there is protection against temperature changes.
- Open design with perforated housing. This type has a low price, but the device does not tolerate small amounts of moisture.
- Network source - used to power multiple tapes.
How to choose the color of lighting for the kitchen
When choosing a lamp, it is important to consider the color rendering index. On the packaging it is designated by the abbreviations Ra or CRI . This determines how correctly the color of the products will be displayed. The color is not distorted if Ra corresponds to 80...100 .
Apple color at different color rendering index values
Color temperature is also important for correct color rendering. This indicator is measured in Kelvin (K).
Table 1. Shades and color temperature values.
| Hue | Color temperature, K |
| Warm | 2700-3000 |
| White (neutral) | 4100 |
| Cold | 6500 |
A cool shade will help you concentrate on work. Warm shades relax and create a feeling of comfort. Neutral does not distort colors.
Reference. When choosing a shade, designers advise taking into account not only the influence of the color shade on the psyche, but also the color of the furniture. So, for wooden sets they advise giving preference to the warm zone of the spectrum, for high-tech style - cold ones.
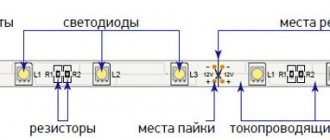
LED backlight connection diagrams
To avoid uneven illumination with high wear and tear, do not arrange LED strips in series. Proper connection will increase the light intensity and also reduce the risk of voltage surges.
Rules for connecting diode strip:
- When connecting several tapes, it is important to maintain polarity.
- Install the power supply at a distance of at least 10 m.
- Do not bend or twist the tape. If it is necessary to carry out installation in a difficult area, it is better to cut the backlight and solder the corner.
- Thick wire sections, as well as a small number of tapes, will help prevent loss of electric current.
- If the backlight has a high output power, it is better to install it in a profile in the form of a box.
- Long tapes (from 5m) are connected only in parallel;
- The power supply should not be placed in a place with high temperatures.
You only need to connect a long strip in parallel.
Usually, manufacturers indicate the places where the cut is made. They also show how best to connect the backlight.
- With direct connection, light sources are connected in parallel to one power supply.
- Dimmers are used to adjust brightness. They are connected in series to the power supply unit assembled with the tape.
- When installing several light sources and dimmers, it is important to use amplifiers, connecting them in series to the backlight.
- When installing RGB strips, controllers with 4 wires are used. The connector will ensure ease of installation - with its help you will not need to solder the controller and tape. It is also connected to a separate power source.
Algorithm for installing lamps
It is necessary to mark the mounting location of the LED strip.
Installation is carried out in the following sequence:
- Drawing up a project.
- Marking.
- Degreasing surfaces.
- Screwing boxes (if provided).
- Gluing tape.
- Connecting wires to the controller.
- Connecting the power supply and dimmer.
- Installation of the switch.
- Connecting the line to the network.
Before starting work, you need to de-energize the room, checking the absence of voltage with an indicator.
Tools and materials for installing LED strips
You can do the installation of lighting under your kitchen unit yourself. To ensure safe use of the backlight and proper connection, please purchase the following materials and tools before installation:
- cutting tools (stationery knife, scissors);
- components for connecting a light source (soldering irons, connectors, dimmers);
- rosin with heat shrink tube;
- fastening elements, such as tape;
- LED strip;
- power supply;
- wires and cables;
- if necessary, a box (aluminum profile) in which the backlight is placed.
For better cooling and longer service life, it is advisable to hide the tape in an aluminum profile.
In addition, you will need a tool with which you can cut holes in wood.
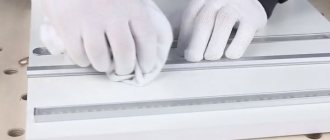
Saw off the profile
Frame: Evgeny Lenkov / YouTube
Measure and cut the required amount of profile. Do not forget to take into account the size of the plugs - if this is not done, the part will stick out behind the cabinet. A hacksaw, angle grinder or miter saw is suitable for cutting.
It is more convenient to cut immediately with the diffuser installed. And to prevent the latter from fidgeting and chipping, wrap two or three turns of masking tape around the cut site.
Selection of cable cross-section
During installation, any cables with a cross-section from 0.5 to 2.5 mm2 are suitable. To accurately select the cross-section, you should use the following formula before installation:
Designations:
I is the current strength in the circuit; calculated by the formula: I = P/U, I = U/R, where P is the source power, U is the voltage, and R is the resistance;
p—resistivity; the value of this value is always constant, taken from reference books for different metals;
l — cable length in meters;
— a value characterizing the permissible voltage difference between the unit and the backlight.
Consider a table of power depending on the characteristics of the wire. The larger the cable, the less power is transferred to the backlight.
| Length, m | Output power, W | |||
| Section area, mm2 | ||||
| 1,5 | 2,5 | 4 | 6 | |
| 50,0 | 50,0 | 50,0 | 50 | |
| 2 | 45,5 | 47,2 | 48,2 | 48,8 |
| 4 | 41,5 | 44,6 | 46,5 | 47,7 |
| 6 | 38,1 | 42,3 | 44,9 | 46,5 |
| 8 | 35,0 | 40,1 | 43,4 | 45,5 |
| 10 | 32,4 | 38,1 | 42,0 | 44,4 |
Installation of LED strip under kitchen cabinets
Before installing the LED strip under the kitchen unit yourself, it is important to plan the location of the structural elements.
The aluminum corner in the photo acts as a reflector, not a cooler.
Typically, manufacturers produce diodes that emit light at an angle of 120 degrees. Wave stripes appear on the wall, which can ruin the entire kitchen design. To avoid this, turn on the lighting before installation and place it under the cabinet. And see where this wave will form. It is desirable to achieve a result in which this strip is projected into the corner between the wall and the working surface of the headset. Light sources must not be installed near the exhaust area.
Narrow light sources are mounted on the edge of the cabinet, since the light will not reach the wall surface. Optimal light distribution can be achieved using aluminum profiles protected with reflective film.
Do-it-yourself under-cabinet installation can be divided into 5 points:
- First, we make a hole in the back of the cabinet to hide the cable routing.
- Dry the bottom surface of the cabinet thoroughly. We install light emitters only on a clean surface.
- If the backlight has an adhesive layer, then simply apply it to the headset and press it tightly. If this layer is missing, use double-sided tape. To hide the tape, you can install a hanging profile painted in the color of the cabinet. Also, the backlight can be immediately placed in a profile housing, but to do this, we first connect it to the power terminals.
- Then comes the installation of the power supply with a switch. It is better to place it in places with low temperatures. We make a wiring arrangement, which we secure with tape or special clips.
- After connecting all the lighting elements, you need to check the wiring for a short circuit. This can be done using a tester. If there are no problems with the circuit, then you can connect it to the network.
The power supply is hidden next to the lighting at the bottom of the module
Where is the best location?
Kitchen cabinet lighting, depending on its location, performs different functions.
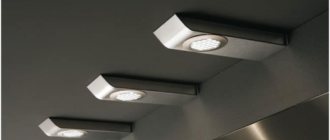
Above the work area
In this case, the lamps are mounted in the center of the cabinets (built-in) or closer to their front side (overhead). Then the light will fall down, creating the right effect and helping to concentrate vision on preparing the products: cutting, cleaning, etc.
Advice! In order not to disturb the appearance, order a special “threshold” along with the cabinets, which will hide the lamp housings.
In the photo there is lighting in the corner under the cabinets
On the apron
Because The main purpose of such lighting is still decorative, so the apron should be suitable. Suitable:
- they threw off with drawings;
- plain tiles;
- textured surfaces.
Of course, part of the flow will fall on the countertop, so you can highlight the apron even if there is a slight lack of light in the kitchen.
Ribbons are usually attached to the top, but can be added to the bottom and sides.