Do overhead lights need to be grounded?
Now I am renovating the room and replacing all the wiring with new ones.
From two-wire to three-wire. With the expectation of reconstructing the riser of the house. Actually I was puzzled by the question. All sockets will be grounded. But do you need to ground the chandelier? Otherwise, modern chandeliers usually have such wiring.
I won’t connect the grounding anywhere until the riser is reconstructed. Neither in the shield, nor in the sockets.
ivant1 wrote: From two-wire to three-wire. With the expectation of reconstructing the riser of the house.
ivant1 wrote: All sockets will be grounded. But do you need to ground the chandelier? Otherwise, modern chandeliers usually have such wiring.
you answered yourself.
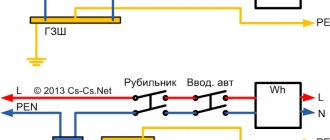
7.1.36. In all buildings, group network lines laid from group, floor and apartment switchboards to general lighting fixtures, plug sockets and stationary electrical receivers must be three-wire (phase - L, zero working - N and zero protective - PE conductors).
7.1.70. In rooms without increased danger, it is allowed to use pendant lamps that are not equipped with clamps for connecting protective conductors, provided that the hook for their suspension is insulated. The requirements of this paragraph do not cancel the requirements of paragraph 7.1.36 and are not the basis for making two-wire electrical wiring.
ivant1 wrote: With the expectation of reconstructing the riser of the house.
For now, at a minimum, install a general 30 mA 63A RCD somewhere after the introductory circuit breaker.
ivant1 wrote: But do you need to ground the chandelier?
In apartment buildings, it is not grounding that is correct, but protective grounding, since TN systems are used. According to current standards, it is imperative to use cables with a protective wire, even if the lamps do not have a special terminal, but they must also be connected in compliance with ALL current standards, that is, for now, with a 4-wire riser before reconstruction, do not connect in socket boxes and near lamps , insulate, be sure to install at least somewhere after the input circuit breaker a general 30 mA RCD.
For chandeliers controlled by a two-key switch, lay four wires accordingly.
ivant1 wrote: I won’t connect the grounding anywhere until the riser is reconstructed. Neither in the shield, nor in the sockets.
In the floor board, the yellow-green protective wire of the PE grounding, if there is necessarily a common RCD somewhere after the input circuit breaker, it is better to connect, always under a separate bolt, to the part of the board to which the PEN 4-wire riser is directly connected. In conjunction with the RCD, it will increase fire safety to some extent, in some cases even if any machine fails!
Where there are adjacent sockets, place only separate socket mechanisms in one frame, and not one monoblock mechanism or a double or triple socket assembly!
Otherwise, in the event of a breakdown in one of the electrical appliances of protection class 1, these are those that have protective terminals on the plugs, dangerous voltage through the protective PE terminals will appear on the housings of all electrical appliances of protection class 1 connected to a monoblock socket mechanism or to a double, triple socket!
Even if there is no breakdown, the capacitive leakage currents of filters and statics of electrical appliances of protection class 1 will be summed up, which, when simultaneously touching such devices and third-party conductive parts of the building, can bite!
For this reason, you must use an extension cord with sockets without protective terminals!
Source
System Features
An outdoor lighting system is a very important component in any locality, as well as on a private plot. Especially if it is rather large in size. Street lighting created using special types of lamps is required to perform the following functions:
- creating the required level of illumination for the visiting part;
- sidewalk lighting;
- ensuring the required level of illumination in the territory, near fences and other barriers (for private houses);
- creation of a unified lighting and signaling system. A motion sensor and other elements of security systems are used here.
Note! A unified lighting and alarm system is very often used for private cottages and summer cottages.
Road lighting
In order for outdoor lamps to work efficiently and for a long period of time, it is necessary to follow the requirements of the PUE. In this case, protective grounding of lamps is of great importance. To make proper grounding, you need to clearly understand this whole process. Therefore, a big role here is given to the protective function of outdoor lighting elements.
Note! For street meetings, any type of lamps and different power sources can be used. However, they must meet certain requirements to work outdoors.
Most often, outdoor lamps are installed on metal or reinforced concrete supports that stretch along roads and mourning roads. Recently, metal poles have been increasingly used to organize outdoor lighting. This is due to the following advantages of these types of supports:
- Possibility of use in different climatic zones;
- such supports can withstand large static loads;
- have a beautiful and aesthetic appearance;
- service life is longer than that of reinforced concrete structures;
Note! Metal outdoor lighting poles can last up to 75 years! Of course, provided that they, like the lamps installed on them, have high-quality grounding, carried out according to the standards established by the PUE.
- versatility. Any street type lamps can be installed on them.
Metal supports on roads
When using lamps on metal supports, you need to know that their improper protective grounding (or, moreover, its absence) can lead to serious electrical injuries to a person who simply touches the support. And since such structures are installed throughout the city, not only adults, but also children can suffer.
Do I need to ground lighting devices: lamps, chandeliers, lanterns?
Some believe that the chandelier does not need to be grounded, others believe that it is a must-have in any apartment. But how should it really be, and what to do if it is impossible to ground yourself? The answer is in our article.
There is an opinion that for low-current groups, in particular lighting in the form of chandeliers and lamps, grounding is not necessary - after all, somehow they lived in Soviet times. What does the regulatory documents say about this, and how to protect yourself if grounding is not possible? The electrician's answer is in our article.
Is grounding necessary for lighting: what is specified in the PUE?
The latest edition of the PUE in paragraph 7.1.36 states the following:
It follows from this that when installing a chandelier or lamp in an apartment, a three-core cable must be connected to it, one core of which will be the ground. Grounding must continuously come from the shield. If we connect a lamp through a plug (for example, a sconce), then it is enough that the socket is grounded.
However, you need to be honest here - almost all old apartments have a two-wire network, and there is no grounding conductor connected to the chandelier. And the chandelier itself does not have a grounding contact (modern devices already have a third contact for connecting the grounding). Replacing a two-wire network with a three-wire one (for single-phase networks) is often not possible (too expensive or you don’t want to spoil the repair). How to protect yourself in this case?
Existing grounding systems
To make grounding, if it is not in the apartment, the resident must study the features of the systems used.
In the practice of electrical installation work the following are used:
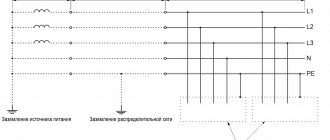
- TN-C is a very popular, but not very reliable system without an additional circuit and protective cable. The functions of the last and working zero are combined in a PEN cable. Input cables are PEN and three phase, output cables are PEN and one phase.
- TN-S differs from the previous one by separating the neutral and protective conductors throughout. Then the number of cables at the input and output is 5 and 3, respectively.
- TN-CS - from the substation to the apartment the conductors are connected, but in the ASU they are separated, and the list of input and output wires is identical to the TN-S system, but implementation will be cheaper.
- TT - voltage passes through zero and three phases, and the grounding wire is separated from the neutral and placed at the input. The scheme is perfect for the private sector.
- IT - electricity flows through three phase cables, and the neutral is separated from the ground, and the reliability of the insulation must be constantly monitored. Suitable for electrical installation.
If in doubt when choosing a system, it is recommended to consult a qualified electrician.
What to do if it is not possible to provide grounding?
If it is not possible to lead a third ground wire to the lighting fixtures, then you can protect yourself by installing an RCD. One RCD with a leakage current of no more than 30 mA per lighting group is sufficient to provide protection against electric shock. From personal experience, we will say that a breakdown on the body of a chandelier or lampshade is a rather rare occurrence, so the likelihood of encountering it is minimal.
There are also chandeliers in which the metal contact of the socket is securely hidden in a dielectric plastic case, so if the insulation breaks down, even if a person touches the chandelier (for example, changing a light bulb), he will not receive an electric shock.
Tips for home electricians:
Source
What is grounding and why is it needed?
According to clause 1.7.28 of the Electrical Installation Rules (PUE)
,
grounding
is an intentional electrical connection of any point in the network, electrical installation or equipment with a grounding device.
Grounding is divided into protective
- performed for electrical safety purposes, and
working
(functional) - performed to ensure the operation of the electrical installation. Most of us rarely encounter working grounding. It is used in power supply networks - at power plants, transformer substations, etc. But we see protective grounding everywhere. This includes the third contact in modern “European” style sockets, and the same third wire when connecting LED lamps. It turns out that phase and zero are sufficient to illuminate the device, but in order to remain safe, a grounding conductor is also needed.
A three-wire cable for connecting a
PUE lamp defines two main classes of systems for organizing electrical installations - with grounded and insulated neutral, divided into 3 main systems: TN, IT and TT. TN, in turn, depending on the implementation, is divided into TN-C, TN-S and TN-CS. Their description is beyond the scope of this article; those interested can look at Wikipedia. What is important for us now is that any of them provides for the presence of protective grounding on the consumer side. It turns out that there is always an opportunity to ground the lamp. Let's figure out when it's needed and when it's not. And this brings us to the concept of classes of protection against electric shock.
.
Is grounding necessary for the chandelier? How to do it?
When designing an apartment's electrical network and installing a chandelier, it is necessary to take into account many important points and resolve several issues. One of them is grounding. This operation is not used so rarely, and for each individual case there is an answer with an explanation to the question of whether it is worth grounding the chandelier.
What is grounding
First of all, it is worth understanding what grounding is. The scientific formulation is limited to the fact that this is a procedure for connecting any electrical appliance to a grounding device. On the plan and in practice, everything looks quite simple: the “ground” (i.e. soil) will attract electric current to itself, reducing the network load.
This way you can achieve a lower voltage - otherwise a person will only be able to touch the chandelier once. The ground electrode itself will be located in the ground, which will act as a conductor for the current. The quality of the established connection is determined by calculating the resistance to current flow. This indicator can be improved by increasing the area on which the grounding electrodes are located or reducing the soil resistance in a separate area.
wood oil for indoor baths
Is it worth grounding a chandelier?
Firstly, not all chandeliers (and, in principle, lighting sources) can be grounded, but only those that have a metal casing. The wiring connected to them is made using modern technologies and should be well protected. It is worth connecting the ground electrode for safety - it does not matter whether the room is dry or wet.
Connecting the “earth” is necessary in a new or reconstructed house, but it will not be superfluous for an old building either. By “closing” the chandelier, you can secure the room - since the voltage in the electrical network will decrease, the room will be completely safe. There is one more nuance - compatibility with automated fire protection systems. If such a system is connected, be sure to ground it.
Preparing to connect the ground to the chandelier
It is important to devote enough time to the preparatory stage - to collect the necessary tools, and also to prepare thoroughly. The tools you will need when grounding a chandelier include:
After this, you should carefully read the diagram that comes with the chandelier. This diagram will show all the branches, the order in which the wires are connected, and the connection to the switch. For example, if three different wires are connected to a chandelier, it is described in detail how the outputs are divided and how the lamps are connected.
The situation is different with grounding: the diagram may not contain information about the corresponding PE type wire (it is yellow-green). The other two - L (phase, brown or white) and N (zero, blue), will be marked and marked, which will make the procedure for installing the chandelier extremely simple.
The procedure for grounding a chandelier
In order to connect the “ground” to a chandelier that is already installed, carry out the following steps as reconnaissance:
When installing, the grounding steps for ceiling lights should be as follows:
Visual instructions for installing the “ground” for a chandelier are shown in the video:
Source
Connecting a floodlight with a motion sensor
The explanatory dictionary interprets the word spotlight as a device for lighting. It consists of lenses and mirrors used to obtain light output at a certain angle.
Floodlight with motion sensor
The floodlight is not used to illuminate the entrances to the house or parking areas, as it is very blinding. In theory, it should turn off even before the high beam headlights reach it.
At the moment, floodlights are also called those lighting devices that illuminate streets at a large angle. The power of such spotlights is completely different - from 10 to 100 watts. They are equipped with motion and light sensors.
In fact, the buyer only needs to connect the cable to the spotlight, and the whole system will work, but the manufacturer reserves the right to set up the user.
Many people do not know how to connect a floodlight with a motion sensor. Below is an installation diagram.
Advice
The spotlight has a housing, inside of which a block with terminals is mounted and connected to the general circuit. There are 4 chains in the diagram.
The diagram for connecting the spotlight to the circuit is shown below:
- The phase wire is connected to the sensor.
- The neutral wire from the block goes to the sensor and spotlight.
- The protection conductor is connected to the housing.
- The wire with phase A is connected to the lamp through the block.
Connecting a motion sensor to a spotlight
To connect the spotlight, you need to apply voltage to it through the phase wire, and also connect the neutral wire and grounding. After connecting the power, zero and phase will go to the power supplies of the motion and light sensor. When the necessary conditions for the sensor to operate arise, the contact will operate and close phase A and thereby turn on the spotlight.
The spotlight automatically turns off when natural light returns to normal. The zero used for protection is needed to eliminate possible current losses at the site of an insulation break inside the spotlight.
It turns out that connecting an LED spotlight is easier than it seems. It is enough to connect three wires - phase, neutral and ground. This lamp is perfect for use in the country.
Installation of floodlights
The LED spotlight is installed using special structures (not plastic), the sensors are directed to the controlled point.
Connecting a motion sensor to a spotlight
Lamps do not always satisfy needs, so more powerful spotlights are used. They are mainly used at protected sites or companies
Such lamps are supplied separately, without sensors. It is extremely important to know how to connect a motion sensor to a floodlight
Connecting an LED spotlight
If you connect a sensor directly to such a spotlight, the connections will burn out, unable to withstand the temperature. To prevent such breakdowns, contactors are used. They remove part of the load from the output contacts of the sensor.
When you include at least one starter in the circuit that copies the operation of the sensor output contact, you can control very powerful lamps.
This connection diagram is universal, as it allows you to turn on several spotlights at once.
Installation of floodlights with photo relays (sensory).
LED floodlight with motion sensor
The flashlight with sensor is extremely convenient to use, as it works fully automatically. The scheme works on a very simple principle. The photo relay is triggered when darkness sets in, voltage is applied to it, and when a person is detected in the observation area, the sensor closes the circuit on itself, causing the lamp to turn on.
Configuring and adjusting motion sensors
Often, motion sensors are adjusted in two parameters - vertical and horizontal. The parameters allow you to adjust the detection range, and most importantly, the detection angle relative to the stationary body. Setting the parameters will allow you to change the area of direct control.
Lamp with adjustable knobs
The possibility of adjustment must be clarified when installing the lamp and try to direct it in the right direction. Adjustment after installation is carried out using two or three knobs.
There will definitely be a DayLight and Time knob. DayLight is designed to adjust the sensor's response time when motion is detected. No other devices are provided. If the knob is turned to the far left position, the sensor will turn on only at night, and if it is turned to the far right position, it will work even on a clear day.
Time – adjusts the time during which the spotlight will remain on after the sensor is triggered. The switching range is different everywhere, but ranges from 5 seconds to 20 minutes.
Grounding of lamps
As a rule, in most cases, lighting (chandeliers, lamps) uses 2 wires (phase and neutral), and this is in the vast majority of cases.
There was information on the forum that it is very useful to also run a grounding wire and that supposedly many lamps are now being produced with the ability to connect grounding to their body.
Or does it only make sense for wet areas. Or in general, there are now only a few of such models of lamps out of hundreds that are not grounded.
Mega549 wrote: it is very useful to also run a ground wire
If the house is new (or reconstructed), then this is a mandatory requirement.
If you have an RCD installed, then! In a fire protection sense, it monitors your wires in relation to the protective conductor (the third wire “ground”). If you connect the lamp body to this wire, then the RCD will also monitor your wires in relation to the lamp body. Whether you need it is up to you to decide. Like this.
lev125 wrote: If you have an RCD installed, then! In a fire protection sense, it controls your wires in relation to the protective conductor (the third wire “ground”). If you connect the lamp body to this wire, then the RCD will also monitor your wires in relation to the lamp body. Whether you need it is up to you to decide. Like this.
no one practically ever does it for themselves and only writes on the forum what is necessary and should be done.
For example, I have a new building, so what? Cables with three wires for lighting are laid in the voids of the concrete slabs along the ceiling. but naturally this was intended to connect a chandelier with two groups of lamps to a 2-key switch, and not one chandelier with grounding.
You got excited about the iron floor and barefoot. This is no longer an RCD, but a machine gun will knock you out. If you have a new building, then three wires are laid not to connect two groups, but to connect a chandelier + PE. These are the requirements of the regulations even if there is no need to ground the lamp. If you want two groups, then pull the cable onto four wires.
Mega549 wrote: for example, I have a new building and what
It's clear. Those. This is exactly what you did to yourself. One large chandelier with 5 lamps, which is all turned on at once with a single-key switch. And all for the sake of having one wire with Pe.
So no one has expressed the situation on the lamp market, how common chandeliers with grounding are.
Mega549 wrote: no one has expressed the situation on the lamp market, how common are chandeliers with grounding.
It would be better not to meet.
HOW IT BANGED.
The green wire turned out to be the body of the chandelier, and there was some kind of voltage on the metal hook in the ceiling. I feel sorry for the chandelier. But then they bought spare parts and fixed it.
Mega549 wrote: One large chandelier with 5 lamps, which is all turned on at once with a single-key switch.
Or for 18 lamps with a control panel.
Once again: the PE conductor is included in the lines not only to ground electrical receivers, but also to increase the level of safety.
“7.1.70. In rooms without increased danger, it is allowed to use pendant lamps that are not equipped with clamps for connecting protective conductors, provided that the hook for their suspension is insulated. The requirements of this paragraph do not cancel the requirements of paragraph 7.1.36 and are not the basis for making two-wire electrical wiring.”
According to current rules.
VTB! wrote: It doesn’t have to be connected if the height is sufficient, the room is dry, the hook is insulated, and there is no Pe clamp on the lamp. It must not be used for other purposes.
Or at your own risk.
in my humble opinion
Gentlemen, well done. Everyone is so cultured. But how to deal with idiocy? You probably think that he will outlive himself. Maybe you are right.
And the idiot is talking about idiocy, and contradicting himself! Wow!
More specifically?
VTB! wrote: Once again: the PE conductor is included in the lines not only for grounding electrical receivers, but also to increase the level of safety.
and there may also be a tiled floor in the kitchen and a metal stepladder
I'm not an electrical expert and I'm having similar problems. I would be very grateful if you could advise me.
Question one: what to do if there is no grounding on the ceiling? The house was built in 1990; there are only two wires on the ceiling in the hallway: phase and neutral. We bought new lamps, they all have the ability to connect three wires, that is, + ground. The instructions, of course, indicate that it is also necessary to connect the ground. What to do in this case? Is it possible to do without land? Will there be any problems with the work?
Source
How to ground a lamp
Results of the previous section:
- Luminaires of protection classes 0 and III do not use grounding;
- Protection class I luminaires must be connected to protective grounding
to prevent electric shock; - Luminaires of protection class II may use (rarely, and also not to ensure their own protection), or may not use (much more often) grounding.
Now that it is clear who to connect and who not, let’s take a closer look at connecting class I lamps to grounding. If the device is connected to the electrical network via a cable, then, as a rule, the wire or terminal for connection already has a grounding conductor or contact and it is enough to simply connect them to the corresponding conductors of the underwater cable.
Hermetic lead-in and grounding terminal on the LED lamp
In some cases, luminaires have additional contacts for connecting grounding on the housing - usually these are special screw terminals marked with the letters PE or grounding symbols. In some cases, when the device consists of several interconnected parts (for example, brackets for some console lamps), all these parts are also connected to each other by conductors to equalize the potential and then all together to grounding.
Please note that the safety of the lamp, even when connected to grounding, is ensured only if it is installed correctly, so follow the manufacturer's instructions in this matter.
Is grounding necessary for the chandelier? How to do it?
When designing an apartment's electrical network and installing a chandelier, it is necessary to take into account many important points and resolve several issues. One of them is grounding. This operation is not used so rarely, and for each individual case there is an answer with an explanation to the question of whether it is worth grounding the chandelier. What is grounding
At what stage is the baby's gender visible?
First of all, it is worth understanding what grounding is. The scientific formulation is limited to the fact that this is a procedure for connecting any electrical appliance to a grounding device. On the plan and in practice, everything looks quite simple: the “ground” (i.e. soil) will attract electric current to itself, reducing the network load.
This way you can achieve a lower voltage - otherwise a person will only be able to touch the chandelier once. The ground electrode itself will be located in the ground, which will act as a conductor for the current. The quality of the established connection is determined by calculating the resistance to current flow. This indicator can be improved by increasing the area on which the grounding electrodes are located or reducing the soil resistance in a separate area.
Is it worth grounding a chandelier?
Firstly, not all chandeliers (and, in principle, lighting sources) can be grounded, but only those that have a metal casing. The wiring connected to them is made using modern technologies and should be well protected. It is worth connecting the ground electrode for safety - it does not matter whether the room is dry or wet.
Connecting the “earth” is necessary in a new or reconstructed house, but it will not be superfluous for an old building either. By “closing” the chandelier, you can secure the room - since the voltage in the electrical network will decrease, the room will be completely safe. There is one more nuance - compatibility with automated fire protection systems. If such a system is connected, be sure to ground it.
Preparing to connect the ground to the chandelier
It is important to devote enough time to the preparatory stage - to collect the necessary tools, and also to prepare thoroughly. The tools you will need when grounding a chandelier include:
After this, you should carefully read the diagram that comes with the chandelier. This diagram will show all the branches, the order in which the wires are connected, and the connection to the switch. For example, if three different wires are connected to a chandelier, it is described in detail how the outputs are divided and how the lamps are connected.
The situation is different with grounding: the diagram may not contain information about the corresponding PE type wire (it is yellow-green). The other two - L (phase, brown or white) and N (zero, blue), will be marked and marked, which will make the procedure for installing the chandelier extremely simple.
The procedure for grounding a chandelier
In order to connect the “ground” to a chandelier that is already installed, carry out the following steps as reconnaissance:
When installing, the grounding steps for ceiling lights should be as follows:
Visual instructions for installing the “ground” for a chandelier are shown in the video:
Helpful information
Grounding lamps, like supports, is one of the stages of installing outdoor lighting. Installation of grounding is the most important and mandatory stage in the installation of an external lighting system. The installation of this system itself has several stages.
Note! In order to properly ground the lamps to the support structure, it is necessary to strictly adhere to the rules and regulations that are prescribed in the PUE. This will avoid breakdown in the insulation of the power cable and prevent electrical injury.
Outdoor lighting installation
According to established instructions developed for the arrangement of grounding networks, all metal supports, without exception, that are elements of an external lighting system are subject to mandatory grounding. The principle of grounding is that if there is a violation of the insulation of the electrical wiring of the lamps, the electric current begins to flow into the ground. As a result, a voltage distribution will occur in the area where the electric current spreads, which will become harmless to humans. The voltage distribution depends on the resistivity of the soil, as well as the placement of ground electrodes on the supports of the street lighting system.
Is it possible to carry out electrical installation by grounding a lighting lamp from the grounding wire of the sockets?
The use of grounding conductors of another group is strictly prohibited, since if there is a sudden break or poor contact of the grounding conductor of the outlet group, the grounding of the lighting line will simultaneously be lost. You will need to carry out electrical wiring in accordance with the PUE and PTEEP.
Regarding the cost of work on a complex of electrical measurements. Count the number of sockets, lamps, panels and protection devices (circuit breakers, RCDs) installed in these panels. Indicate which and how many circuit breakers are installed in the switchboard (three-phase, single-phase). Call us and we will calculate the cost of the work within 3 minutes. If it is not possible to call, then send the above information by email.
PUE-7 1.7.124. Neutral protective conductors of circuits are not allowed to be used as neutral protective conductors of electrical equipment powered by other circuits, and also to use open conductive parts of electrical equipment as neutral protective conductors for other electrical equipment, with the exception of shells and supporting structures of busbars and complete factory-made devices that provide the possibility connecting protective conductors to them in the right place.
7.1.36. In all buildings, group network lines laid from group, floor and apartment switchboards to general lighting fixtures, plug sockets and stationary electrical receivers must be three-wire (phase - L, neutral working - N and neutral protective - PE conductors). Combining zero working and zero protective conductors of different group lines is not allowed. The neutral working and neutral protective conductors are not allowed to be connected on panels under a common contact terminal. Conductor cross-sections must meet the requirements of clause 7.1.45.
Other and useful information
Other and useful information
Grounding check
According to the Rules for the Technical Operation of Consumer Electrical Installations (PTEEP), a thorough inspection of the external parts of the grounding device should be carried out at least once every 6 months. An inspection with selective opening of the soil is carried out at least once every 12 years.
Grounding resistance measurements on external lighting supports are carried out at least once every 6 years.
Reference! The resistance of grounding devices on supports should be no more than 30 Ohms.
External lighting systems, installed, grounded and maintained in accordance with the requirements of PUE and PTEEP, can reliably and safely serve for decades.
The presence of a grounding system on electric poles will protect electrical installation work and protect the power line from overvoltage in the event of a direct lightning strike on the pole.
- How and why to ground metal hoses?
- What is re-grounding and how to do it correctly?
- Is it possible to use screw piles as a grounding device?
- Selection and installation of street lighting supports
- How to properly ground a personal computer
- How to properly make grounding in a garage with your own hands?
Please explain how to properly ground on reinforced concrete supports where there are two lines on top of 10 kV and below by 0.4 kV and the vertical distance between the lines.
Wires on the chandelier
Connecting a chandelier with 2 wires is simple: screw one of them to phase, the other to zero. Which one goes where - it doesn’t matter. If there are two phases on the ceiling, and the switch on the wall is two-key, there are options:
How to connect a chandelier if it only has two wires? To the same wires on the ceiling in random order
On multi-arm chandeliers there are definitely more than two wires. We have decided on the purpose of yellow-green. This is grounding. If the same wire is on the ceiling, connect it to it. The rest also need to be dealt with.
A chandelier with 3 wires is not much more difficult to connect. If one of them is grounding (yellow-green), it can be:
Actually, there are no other options. Three wires are mainly used for lamps with one bulb. With two, this is an outdated design, with three, a more modern design that complies with current recommendations.
Rules for connecting wires
There are no small details when working with electricity. Therefore, we connect the wires in the chandelier according to all the rules. When combined into one group, it is not enough to simply twist them and screw on the protective cap.
You need to connect the wires from the chandelier and the switch in the terminal box
Such twist will sooner or later oxidize and begin to heat up. It is highly advisable to solder such connections. If you know how to handle a soldering iron and tin, definitely do this. This will guarantee normal contact and the connection will not heat up.
Now let's talk about how to connect the wires from the chandelier with the wires from the switch (which are on the ceiling). According to the latest rules, twists are not allowed. Terminal boxes must be used. Most modern chandeliers are equipped with them. If not, buy it at any hardware store or retailer of lighting fixtures.
When using such a terminal box, a problem arises: a twist of a large number of wires simply does not fit into the hole. Output: solder a conductor to the connection (copper, single-core or stranded, with a cross-section of at least 0.5 mm 2 ). This connection is well insulated, and the free end of the soldered conductor is inserted into the terminal box (a long one is not needed - 10 cm is more than enough).
Having inserted all the wires from the chandelier into the terminal block and tightened the screws, the entire structure is raised to the ceiling. There it is pre-fixed, after which the wires are connected to the terminal block in the required order. In this case, it is important to set “zeros” one opposite the other. Phases are connected to phases in random order.
How the wires on the chandelier are separated, how the conductor and the chandelier are connected to the terminal block - all this is in the video.
Grounding methods
For each type of electrical supports, the PUE has developed conditions and methods of grounding. There are 3 types of power line poles:
- wooden;
- reinforced concrete;
- metal.
Clause 6.1.45 of the PUE states that reinforced concrete and metal supports in networks with an insulated neutral must be connected to a grounding conductor, in networks with a grounded neutral - to a PE (PEN) conductor.
Reinforcement on wooden poles is not grounded.
Important! Wooden poles are grounded only if they are installed in a populated area with one-story buildings and their height exceeds the height of the buildings.
Grounding of reinforced concrete supports is carried out in two ways:
- In networks with an isolated neutral and in the presence of special outlets, longitudinal reinforcement of the structure is used as grounding lines (conductors). In its absence, the conductor is a rod with a diameter of at least 10 mm or a stranded wire with a cross-section of at least 35 square meters. mm. One end of the conductor is connected to the grounding electrode, the other to the grounded elements.
- In networks with a grounded neutral, the fittings and support are connected to the neutral wire using a jumper made of bare conductor. When connecting, branch bolt clamps are used. To connect the conductor to the support, use a bolt clamp or eyelet on a pole or crossarm.
Metal supports are installed more often; they have the following advantages over wooden and reinforced concrete ones:
- able to withstand large static loads;
- functional in any climate zones;
- wide choice of shapes and designs;
- long service life, up to 75 years.
Grounding of metal supports is carried out in the same way as reinforced concrete masts. The support body can serve as a grounding conductor. The grounded elements are connected to the support, and the base of the support is connected to the ground electrode.
How to make grounding in an apartment if there is none
In old houses, a TN-C system is installed, which does not have grounding, and a two-wire wire is laid (phase and neutral). To ground the apartment, you will have to install new wiring, install an RCD, or install a circuit.
RCD connection
A residual current device, or, in other words, an RCD, will save a person from electric shock if there is no grounding in the house. Phase and neutral wires pass through the device. At the moment of electricity leakage, it determines the difference between the current strength passing between them and disconnects the contacts, thereby de-energizing a section of the network.
Reference! Electricians advise connecting an RCD regardless of whether there is grounding in the house or not.
There are two options for connecting an RCD:
Vysotsky bright tower with a balcony overlooking the sea
The device has two input and two output terminals (phase and zero). Installation is carried out according to the diagram:
Installation of your own circuit
You can make your own grounding circuit with your own hands both in a private house and in an apartment building. In the second case, the work must be coordinated with the management company and comply with the requirements of the PUE.
Important! It is prohibited to use reinforcement as a grounding conductor. The reason is the outer hardened layer, which enhances the distribution of current, and the rapid rusting process.
Dangerous defense option
It is unacceptable to solve the grounding problem by connecting a PE wire to the water supply or gas supply system. In the event of a leak, the current will flow not through the wires, but through the pipes and battery, which can lead to electric shock not only to those living in the apartment grounded in this way, but also to neighbors.
Do I need to ground lighting poles and how to do it correctly?
External lighting systems are designed to illuminate roadways in populated areas and at highway interchanges, sidewalks and indoor areas, necessary areas at protected sites, and personal plots in private households at night.
For their safe operation, grounding of lighting supports (masts, poles) and external lamps is used. Installation of external lighting systems is carried out in accordance with the requirements of the Electrical Installation Rules (PUE).
Connecting a Chinese chandelier
Most of the relatively inexpensive chandeliers on the market come from China. What's good about them is their large assortment, but there are problems with the quality of the electrical assembly. Therefore, before connecting the chandelier, you need to check its electrical characteristics.
First, check the integrity of the insulation. They can be assembled into one bundle and short-circuited to the housing. The tester should not show anything. If there are any indications, you have two options: look for and replace the damaged wire or take it for an exchange.
The second stage of testing is checking each horn. There are two wires coming from the horn. They are soldered in a cartridge to two contacts. Connect each wire to the corresponding contact. The device must show a short circuit (short circuit or infinity sign, depending on the model).
After checking, start grouping the wires as described above.
Design features of the ground loop
In single-phase and three-phase electrical networks, the ground loop circuits are practically the same. Several electrodes are buried in the ground, after which the entire structure is connected to each other, which becomes a grounding loop. The assembly itself is performed in the form of a triangle or square.
Sometimes the electrodes can be placed in series, forming an open circuit configuration. Each option is selected depending on specific conditions. Connections are made by welding or bolting, and then the finished system is connected to the distribution board through a special cable.
Why is arbitrary location of the contour not allowed? Correct installation requires compliance with certain rules and technical standards. For example, the minimum distance from the building is 1-2 meters, and the maximum is no more than 10 meters.
The depth at which the electrodes should be placed should also be taken into account. First of all, the characteristics of the soil, the presence or absence of groundwater, and their distance from the contour are taken into account. The elements are laid below the freezing level of the ground. This design allows you to create effective grounding of the bathtub in the apartment.
The material for electrodes is most often rods made of ferrous metal. First of all, these are various types of rolled metal - angles, pipes, smooth fittings, I-beams, etc. The complex configuration of the rental does not affect the functionality of the entire scheme; the choice should be made based on the convenience of driving certain structures into the ground. The most commonly used are steel angles.
Instructions
It is possible to ground a water heater without carrying out construction work to install the circuit in newly built apartment buildings (since 1998). In housing built according to old GOSTs, you will have to make changes to the wiring, install residual current devices (RCDs) or differential circuit breakers. In private houses, installation of a grounding loop is provided.
Grounding installation diagram: square and triangle
In addition to the protective effect in the event of an electric shock from an electric heater, the ground loop in a private home performs the function of maintaining the functionality of other electrical appliances in use
Of no less importance is the function of potential equalization (incorrectly in publications they are called “stray currents”), which will protect against injury when a person touches two electrical appliances at the same time or in case of possible “current leaks” of a washing machine or dishwasher
If you do not have enough knowledge of electricity, we strongly recommend that you contact a specialized organization to install grounding.
- They retreat from the foundation of the house by 1.5 - 2 meters, mark and dig a trench in the form of an equilateral triangle with a side of 2 - 2.5 m. The depth of the “ditch” is 50 – 60 cm, the width for the convenience of further work is 40 – 50 cm. From the triangle A trench is prepared against the wall of the house to connect the grounding bus to the electrical panel.
If the soil at the construction site is dry and sandy, then they make not a triangle, but a square with a side length of 1.5 - 2 m. The four pins have a larger area of contact with the ground than in a triangle, which reduces the circuit resistance.
- Two-meter steel reinforcement, the diameter of which is from 12 to 14 mm, is hammered into the corners of the square (triangle). Leave 10 - 15 cm on the surface.
- The free ends of the reinforcement are connected (welded) with a strip of metal. The thickness of the strip is 4 mm, the width is not less than 40 mm. The same strip, welded to the contour, is placed on the walls.
- If several devices need to be grounded, a circuit from the same strip is drawn around the perimeter of the building.
- The trench is filled by compacting the soil. If you have to check the circuit resistance in a few days, the soil can be shed with water for better shrinkage.
Resistance measurements are carried out in dry weather and dry soil - this way the indicators will be more reliable.
- In the right places, 8-10 mm bolts are welded to the circuit - then grounding wires laid from electrical appliances are connected to them.
- The terminal on the device intended for grounding is connected with a copper, necessarily single-core conductor with a cross-section of 4 mm2 or an aluminum conductor with a cross-section of 6 mm2, to a bolt welded to the busbar. Connection type: “bolt”.
Correct connection of a boiler with a storage tank in the bathroom
The bodies of most storage boilers are made of sheet metal. In places where water is used, this poses an additional electrical hazard.
Electric shock from such devices can occur in two cases:
- If the heating element is destroyed. In 95% of storage boilers it is a heating element (tubular electric heater). Poor quality water with a large amount of impurities has an accelerated effect on corrosion, and a collapsed tube promotes contact of water with the wiring phase. Current through the circuit: phase - heating element - water - human body - sewer pipes - earth, causes damage.
- Burning out of the phase wire from the terminal contacts (due to corrosion or burnout) threatens to cause it to fall onto the metal casing, touching which leads to irreparable consequences.
To reduce the danger, they try to install the boiler in a place where accidental contact when taking a shower is excluded (under the ceiling, at a sufficient distance from the bath).
Boilers are powered from separate circuit breakers.
Conventional circuit breakers (popularly called “bag switches”) do not protect a person from electric shock. Such devices are triggered by heating with a strong current, which serves to protect the wiring from fire in the event of a short circuit. Lethal current values are hundreds of times less than the parameters of automatic machines.
three-wire wiring If it is forbidden to connect two-wire wiring, somewhere - in the socket or on the block - the protective and working zero.
Connecting a halogen chandelier (with and without remote control)
Halogen lamps operate not from 220 V, but from 12 V or 24 V. Therefore, step-down transformers are installed in each of them and the entire circuit is assembled and ready for installation. Only two conductors remain free, which need to be connected to the wires sticking out on the ceiling. It is connected in any order, “phase” and “zero” do not matter.
If the chandelier is equipped with a remote control, a control unit is added to the transformers. The connection is similar: there are two conductors that need to be connected to the one on the ceiling. The third conductor coming from the other side (it is thin) is an antenna, with the help of which the remote control and the control unit “communicate”. This conductor remains inside the glass in the form in which it is.
How to connect a chandelier with a remote control, see the following video.
Converting a chandelier designed for a single switch into a double switch
Divide one of the wires into separate strands leading to the chandelier arms. There should be 2 cables coming from each horn. They are all connected to 2 output terminals. If this cannot be done, you should disconnect 1 of the wires from the horns, which you want to connect to the second switch and solder separate cables.
When ready, tape the new ends of the wires together to create 3 pins to connect to the double switch. Mark them with electrical tape or paint. Take a connector with 4 terminals and fasten the neutral to the cable where the ends from all the horns are twisted. Then connect the contact with the 1st phase to 1 of the free ends, and the 2nd phase to the other. You cannot combine them with each other. Using this scheme, you will get what you want: when you press the 1st key, there will be 1 lighting option, when you press the 2nd, there will be another.
Do I need to install a grounding conductor to the light fixture?
2. It is strictly prohibited to use PE conductors of plug sockets or other consumers to connect lamps that are not related to this group line.
3. To connect a lamp from a group lighting line, it is necessary to lay a branch of the protective conductor from the junction box or from the power panel, thereby ensuring the reliability of the connection of the protective conductor of the lamp to the neutral protective conductor of the general group circuit and the independence of its disconnection.
PUE-7 1.7.144. The connection of each open conductive part of the electrical installation to the neutral protective or protective grounding conductor must be made using a separate branch. The series connection of exposed conductive parts into the protective conductor is not permitted. The connection of conductive parts to the main potential equalization system must also be made using separate branches. The connection of conductive parts to an additional potential equalization system can be done using either separate branches or connection to one common permanent conductor.
7.1.36. In all buildings, group network lines laid from group, floor and apartment switchboards to general lighting fixtures, plug sockets and stationary electrical receivers must be three-wire (phase - L, neutral working - N and neutral protective - PE conductors). Combining zero working and zero protective conductors of different group lines is not allowed. The neutral working and neutral protective conductors are not allowed to be connected on panels under a common contact terminal. Conductor cross-sections must meet the requirements of clause 7.1.45.
7.1.68. In all rooms, it is necessary to connect the open conductive parts of general lighting lamps and stationary electrical receivers (electric stoves, boilers, household air conditioners, electric towels, etc.) to the neutral protective conductor.
Other and useful information
Other and useful information
Brand and requirements for conductors
The core of a grounding wire or cable can be single-core or multi-core - it depends only on where it will be used. For example, to ground a door in an electrical panel, you need to ensure its mobility. The rigid core will break due to constant opening of the door and its bending. Therefore, the core must have an appropriate flexibility class that does not interfere with opening, for example 3 and higher.
At the same time, to connect, for example, the casing of an electric motor of a pumping station to a gas pump, there is no need to ensure mobility, since this type of electrical equipment is permanently mounted. Therefore, rigid conductors can be used.
The grounding conductor can be:
- isolated;
- non-insulated;
- is part of the cable;
- be a separate single-core wire;
- aluminum;
- copper.
This begs the question: which wire should I use to connect the ground?
Stores sell cable products with different numbers of cores: 2, 3, 4, 5. This is necessary for assembling certain circuits for connecting devices and connecting electrical equipment to networks with different numbers of phases.
To connect grounding in sockets and other electrical equipment of a single-phase network, it is convenient to use three-core cables, for example VVG 3x2.5. And for connecting three-phase equipment to the network and grounding, four-core cables are intended, for example AVVG 4x32. Moreover, in thick cables the grounding conductor usually has a cross-section smaller than that of the phase conductors. Let's give examples.
- VVG – suitable for internal use. To install it outdoors, it must be placed in corrugated pipes or pipes. It is produced with different numbers of cores; there is a more detailed review of this cable on the website. For use in hot rooms it is better to use VVGng-ls. This cable is rigid and better suited for permanent installation.
- NYM is a foreign brand with characteristics similar to VVG. Hard.
- VBBShv - suitable for outdoor use and burial in a trench, often used to connect a private house to the network. Hard.
- PVA is well suited for connecting power tools and extension cords, because it consists of multi-wire flexible conductors. Produced in two and three-wire versions.
- ShvVP - similar to the previous one, only it is not round, but flat.
- ESUY is a single-core soft copper wire.
To connect the ground wire to plumbing fixtures and other things in the bathtub, you can use single-core wires marked PV. The number after these letters indicates the flexibility class, where PV-1 is a rigid core, and PV-4 or PV-6 is a stranded flexible core.
How to find the ground wire
Looking at the ceiling you can see wires sticking out from there. There may be two, three, or even eight. At least one of them is definitely zero, and new houses may also have a grounded wire. The rest of the wires are phase.
If your chandelier has a ground wire, but there is none in the wiring, it’s okay. According to the standard, it should be yellow-green in color.
You just need to insulate it well and leave it unconnected. But it is imperative to insulate it, otherwise laziness and inattention can lead to a short circuit and fire in the wiring.
Necessary preparation
You need to start by learning the basics of electrical engineering. First, review the electrical safety rules. Then set an achievable goal. This can be connecting a halogen chandelier or a simple one, with 1 horn or several, with or without grounding, to single-phase or two-phase wiring.
Having determined your goals, proceed to study the instructions in the chosen direction. The electrical wiring of modern buildings is very different from that installed in older buildings. The number of cables on the ceiling for installing a chandelier, their purpose and the ability of the master to determine the markings are important for further work.
Ground wire
Modern urban planning regulations require grounding in all new buildings. Therefore, 3 cable ends on the ceiling do not mean that you have a three-phase network. 1 of them can be grounding, its tone is yellow-green.
If your chandelier has a wire of this color, then it is intended for grounding. If there is no such cable on the electrical appliance, the exposed grounding on the ceiling must be carefully insulated. Otherwise, a short circuit may occur.
Phases and zero
Having decided on the grounding, we clarify the purpose of the other wires. There can be 2 or 3 of them. Some 1 of them is necessarily zero, the remaining 1 or 2 are energized. Modern technologies make the work of electricians easier and help to immediately distinguish zero from phase. A contrasting color solves this problem. But it happens that the wiring is all white, then you have to figure it out yourself.
In this case, you should use control equipment - an indicator screwdriver. When it touches a contact with voltage, the indicator lights up as a signal beacon. First check whether the machine is turned on on the electrical panel of the apartment or house.
A reliable way to determine phases is to use a special tester. Turn on the voltmeter on the device and set the value to at least 220V. Then, holding the probes by the handles, alternately touch different pairs of wires. Be careful not to accidentally touch the metal parts of the probe with your hand to avoid electric shock. If the arrow does not move, then both phases are found, and the third wire is neutral. When connecting the probe to it, the device will show 220V. Mark zero with colored tape or marker.