Circuit breakers are machines that are installed to protect electrical networks and connected equipment in the event of emergency situations, such as increased voltage, current overload, or current leakage. Protective devices automatically disconnect the network and equipment by opening the contact groups. According to regulatory documents, all elements of electrical networks must be protected by turning on the appropriate circuit breakers. The principle of their operation is described below.
Is it possible to connect machines after the meter?
The rules for the design of electrical installations stipulate that to ensure the safety of working with electricity meters (verification, replacement), a switching device or fuse must be connected in front of the meter.
What is a circuit breaker
Currently, the functions of fuses are performed by circuit breakers. Also, a packet switch (packet) or a circuit breaker can act as a switching device. The switch in front of the meter is called an input circuit breaker.
The simplest scheme
Note! An electric meter is an electrical energy metering device. To avoid problems with regulatory authorities, the terminals of the meter and the input circuit breaker must be sealed. Otherwise, charges of electricity theft may follow.
All other network and equipment protection devices are installed after the meter.
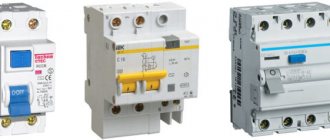
Protective equipment includes:
- automatic switches, which are installed on each line or group of devices and serve to protect against excess current load;
- residual current devices that protect against electric shocks when using faulty equipment or leaks in the wiring;
- differential automata that perform both of the above functions.
Turn off the electricity
De-energize the room using a switch in the electrical panel on the landing or in the apartment. To do this, the handles of the machines need to be moved down - the indicators on them will change from red to green or from one to zero. Circuit breakers are not always labeled, so be sure to check that the power is actually off.
The flags are cocked and the red indicator is visible - the machine is on / ac220.ru
If the apartment has a distribution board with several circuit breakers, turn off only those that protect the outlets. This way you can work under light and comply with safety measures.
Preparation of all necessary materials and tools
In addition to the protection devices themselves, you will need:
- DIN rail for mounting machines;
- wire sections for internal connections;
- side cutters;
- screwdriver;
- pliers;
- knife.
Important! If stranded wire is used, crimp lugs corresponding to its diameter are required. The wires used for internal connections must have a cross-section no smaller than those extending into the line.
You may be interested in: Installation and connection of heated floors
DIN rail
Installation of circuit breakers and other protective devices is carried out on a pre-fixed DIN rail, since the fastening for all devices is standard. Devices can only vary in width depending on the number of switched phases and functionality.
Creating a loop
Connecting sockets and connecting them is a job for a professional. If you do it without sufficient experience, you endanger your home. Due to the dishonesty of some performers, you cannot blindly trust the hired person - you need to at least know in general terms how to properly connect an outlet and how to connect two outlets. This will allow you to monitor the progress of the task.
The simplest connection is to run pieces of wire (jumpers) from one contact of the socket to a similar contact of the next one. This method is not the best. It is used by inexperienced electricians. Due to connecting the socket to the socket in this way, the terminal of the first device suffers - the entire load passes through it. Because of this, the part fades over time.
To properly connect 2 or more devices, you need to connect the wires in each socket as follows:
- They start from the last cell of the block, and connect the main cable to it. Each of the wires (phase, neutral and ground) is inserted into a special PPE cap and into it are two pieces of the same color. One is connected to the contact group, the other is a jumper, which is brought out into the next glass.
- Subsequent cells follow a similar pattern. The wired jumper is the power cable through which current will be transmitted.
Connecting two or more access points in this way guarantees a longer service life of the entire unit, since the main load passes through the cap connecting the wires.
How to properly connect machines after the meter
The installation of machines after the meter must be carried out according to the circuit diagram. The circuit should provide for the division of electrical wiring into several independent lines, each of which is protected by a separate circuit breaker and, if necessary, an RCD.
Note! If the dimensions of the distribution panel are limited, then it is possible to install differential circuit breakers that combine the functions of current protection and residual current devices. The cost of difavtomats is higher than the listed devices, but at the same time the wiring in the panel is simplified.
The machines that will be installed after the meter must have a lower rating than the input one. If you install stronger ones, a fault in the network will cause the input circuit breaker to trip.
It is enough to protect lighting lines by installing a single-phase circuit breaker, and for sockets, two-pole protective devices are advisable, since a single-pole breaks only one wire.
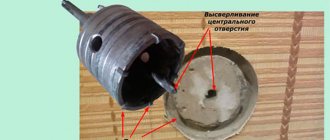
Wall chipping
After making niches for sockets and switches, gating for cable lines begins. You need to do it in exactly this order.
Otherwise, if you first groove and then try to make niches, your center drill will lead into the groove.
The easiest way to cut grooves is with a laser level. Sometimes several lasers are used for this work simultaneously.
For example, if you have two grooves going down to the socket block - one power, the other low-current, then it will be faster to set up two laser levels and, without descending from the stepladder, cut both parallel straight lines from top to bottom at once.
When all the niches and grooves are ready, the premises are cleaned and all the socket boxes are installed.
Next comes the adjustment of the clips for the corrugations on the ceiling. The easiest and fastest way to do this is with a mounting gun.
If it is not there, then use a regular hammer drill to drill holes d-6mm and the clips are placed on the dowel and nails.
Is it possible to lay cable routes without corrugation and how this can all end, read in a separate article.
You only need to use gray PVC corrugation. Unlike other multi-colored species, it does not support combustion. Its flammability class is A1.
In addition to being non-flammable, the corrugation protects the cable from mechanical damage. You can step on it, hit it lightly with a hammer, or catch it with the sharp edge of the profile.
Of course, you will damage the shell itself, but nothing will happen to the cable. Well, among other things, installation in a corrugated sleeve looks more aesthetically pleasing.
The corrugated cable can be laid with equal success both on the wall and on the floor and ceiling. True, in all cases there are a number of significant differences.
How to connect a socket to a machine
Despite their apparent simplicity, sockets are the most complex devices in terms of current protection. The load on them may be absent, or it may jump to the maximum (when you turn on a powerful device) or even exceed it if you connect powerful equipment to several outlets at once.
When choosing a machine, you should take into account what maximum load can be present in the line of sockets for a long time, and what only for a short time. It’s not a fact that a vacuum cleaner, iron or other powerful appliance can be turned on at the same time in living rooms. In the kitchen the situation is different. It is not uncommon here to have an electric oven, stove and dishwasher running at the same time.
Note! All of the above nuances must be taken into account when calculating the ratings of protective devices. After all, if you install too weak machines, the likelihood of false positives will increase. A stronger one installed will not perform its functions.
Two-pole machine
As a rule, the lines to which the sockets are connected are protected by a two-pole circuit breaker that simultaneously breaks the phase and neutral conductors. The wiring diagram for a two-pole circuit breaker is simple. The phase and neutral wires are connected to the upper terminals, marked with the symbols L and N, respectively. The load line is connected to the lower terminals.
You might be interested in Transformer differential protection
Electrical wiring project
To begin with, they draw up an electrical wiring project; it is best if the project is drawn up for you by professionals. But if you have experience and the necessary knowledge, then you can draw it up yourself.
You need to know that Russian standards are very different from foreign standards, which means that foreign wiring diagrams cannot be used in our country. All electrical installations in the house are planned at the initial stage; for this purpose, draw a house plan and indicate on it the places where there will be switches, sockets, chandeliers, etc.
At this stage, it is very important to create a diagram where the locations of the devices will be indicated.
The next step will be to indicate where the wires will be laid in the house.
After all the above manipulations, carry out the wiring.
There are three types of wiring and connections:
To make their work easier, they distribute the load. For example:
This option is a simple ungrouping of electricity consumers and the fewer groups, the more economically the material will be used. In order to simplify the installation of wiring, its installation is carried out in floor slabs. In the diagram, such wiring is marked with dotted lines.
When conducting wiring, it is necessary to take into account the current strength that will have to flow through the network, that is, this is the ratio of the total power of all consumers to the voltage. In houses and apartments, the maximum current consumption does not reach twenty-five Amperes.
All materials must be selected according to this parameter. The cross-section of the wires depends on the current strength.
If you calculate that your current consumption is 16 Amps, then you cannot install fuses with the same operating current value.
It is necessary to take a larger standard value than the calculated one.
Do-it-yourself electrical wiring in the house
To install the wiring yourself, you need to know which cable you need and use it. After all, it is produced with different cross-sections; it is selected based on current parameters.
At this stage, you will need to calculate the amount of materials that may be needed for installing the electrical wiring. Work such as drafting, wiring, and installation can be done quickly, but there is some difficulty in calculating the amount of wire required for wiring. But measurements can be made by taking a tape measure.
Useful tips Connection diagrams Principles of operation of devices Main concepts Meters from Energomer Precautions Incandescent lamps Video instructions for the master Testing with a multimeter
Which side to connect the circuit breaker
According to the requirements of the PUE, power cables must be connected to the fixed contacts of protective and switching devices. For the same purpose, as well as for reasons of unification, most manufacturers of electrical equipment also tend to place the terminals at the top of the devices.
Based on the laws of electrical engineering, it is completely indifferent to which part of the switching device the power is supplied to. It’s another matter when the circuit breaker in the panel is turned off, and any electrician will be sure that there is no voltage at the lower terminals, and you need to be careful with the upper ones.
Machine device
Note! Following this rule significantly reduces the risk of errors and the likelihood of electric shock. Some manufacturers may supply equipment with a different terminal arrangement, but the power cable connection must still be made at the top.
Connection diagrams for the machine after the meter
Line separation is usually carried out using the following method:
- lighting line;
- line of low-current sockets;
- high load line.
High loads mean household appliances that consume high power - boilers, electric stoves, washing machines and dishwashers. These same devices must be protected using an RCD, since they operate in conditions of high humidity, and the slightest internal fault can cause current leakage to the housing.
RCD
Important! Electrical wiring intended for connecting lighting devices is usually the most lightly loaded and operates under normal conditions. It is not always advisable to install an additional RCD here.
Sockets in houses are characterized by the fact that they can connect both devices with low power consumption, for example, the power supply of an antenna amplifier, and high-power devices (a vacuum cleaner or an iron). The parameters of the protection devices are selected based on the maximum power of the connected devices.
Regulations
What kind of lighting do you prefer?
Built-in Chandelier
All building materials and the activities of builders are regulated by rules and requirements, they have a name, and these are GOST and SNiP. The Electrical Installation Rules also apply to electrical installations in houses and other buildings. This document specifies the requirements for electrical equipment.
Electrics in the house should be connected to voltage only after checking for short circuits.
If you decide to do the wiring in your house or apartment yourself, then carefully study the requirements that apply to it.
The main thing to consider is that electrical wiring parts such as distribution boxes, switches, meters and sockets should be within easy access.
Electrical wiring in the house can be installed quickly with your own hands, but you must remember that wiring is very capricious from a safety point of view. With certain knowledge, you can adhere to all norms. So, according to the PUE, switches must be mounted at a level of 0.6 to 1.5 meters from the floor.
The cable that must fit to the switch is placed on top. Sockets are located at a level of 0.5 to 0.8 meters from the floor; this is necessary for safety in case of flooding of the house. Sockets should be at a distance of approximately 0.5 m from gas and electric stoves, pipes and heating radiators.
Wires to sockets always approach from the bottom up, this is how they install electricians in the house with their own hands. There should be 1 socket in a room for every six square meters, with the exception of the kitchen, since it has as many sockets installed as needed.
Installation of sockets in the toilet is not allowed, but installation of sockets in the bathroom is allowed (if there is isolation through a transformer). The transformer is installed outside the bathroom. Before you begin installing electrical wiring, you need to draw up a plan; on the plan, you need to mark the location of the wiring in the walls. It is important to place the wires either horizontally or vertically.
If the wiring wires run parallel to each other, then the distance between them should be at least 3 millimeters. It’s best to mark each wire in a corrugated section or a separate box. This is how you install electrics in a wooden house with your own hands.
A special junction box is used to connect and route wires. The connection points of the wires must be insulated, and do not connect copper wires with aluminum wires.
Expert opinion
It-Technology, Electrical power and electronics specialist
Ask questions to the “Specialist for modernization of energy generation systems”
Connecting a socket for a washing machine. Installation rules. Before proceeding with the installation of the connection point, you should make sure that the wire is not live by touching the ends of the cable stripped from the braid with an indicator screwdriver. Ask, I'm in touch!
Connection errors and how to prevent them
When installing switchgear, beginners, and often experienced electricians, often make mistakes, which can subsequently lead to a fire or at least a power outage. The most common of them:
Stripper
- insulation getting under the terminal. In this case, it turns out that the contact is weakly clamped. At the junction, the contact resistance increases and the contact begins to overheat;
- stripping wires with side cutters or pliers. This is incorrect, because with this method of removing insulation, a small transverse cut is formed on the conductor, and the core may break off at the point of damage. To clean, you need to use a specialized tool - a stripper or at least a knife. Use a knife to remove the insulation as if you were stripping a pencil. With this method, no cuts are formed;
- installation with stranded wire. When the terminal is tightened, the wires move apart. The connection is loose, and since some of the wires do not come into contact, the cross-section of the wire at the attachment point is reduced. The cores of a multi-core wire must be terminated with special lugs, which are produced for each section. The ends are crimped with pliers or a special tool - a crimper;
- maintenance of multi-core wires. There is often an opinion that instead of mounting lugs, you can tin and solder the cores of a stranded wire. Solder is softer than copper and tends to melt under pressure. As a result, after some time the contact deteriorates;
- installation of wires of different sections under one terminal. Since the terminals are rigid, only a wire with a large cross-section can be reliably connected. A thinner one will not pinch. To connect several machines, a special comb bus is used. If there is no such bus, then take a piece of wire of the required cross-section. A jumper of the required shape is formed and only then the insulation is removed at the clamping points.
You might be interested in Magnetic starter
Crimper
Note! Less critical are errors in the order in which protection devices are connected. It is considered correct to connect inputs into automatic machines or RCDs equally throughout the entire structure. The input should be placed at the top. In this case, the safety of servicing the switchboard is significantly increased.
The wrong choice of automation or poor-quality installation of distribution equipment not only reduces safety, but can also cause questions from regulatory organizations. It is better to entrust the work to professional electricians.
Electrical wiring diagram. Old fund.
Using one room as an example, let’s look at the operation and wiring diagram of the electrical wiring.
From the main machine, “phase” and “zero” come to the distribution panel, in which the phase is connected to the input of the first machine, and zero to the “zero block”.
Lighting.
The machine with number 1 is designed for lighting. From the output of the machine, the phase conductor enters the distribution box, where at the point ( 1
) connects to one end of the wire coming from the bottom contact of the switch.
From the top contact of the switch, the phase at point ( 2
) is connected to the other end of the wire coming from the lamp.
From the “zero block” the zero core enters the distribution box, where at the point (3
) connects to the second core of the wire coming from the light bulb. And now if you close the contact of the switch, the light bulb will light up.
Sockets.
Sockets are generally easy. The machine with number 5 is designed to connect sockets. From the output of the fifth machine, the phase conductor enters the box, and at point ( 4
) connects to two other wires coming from the sockets.
From the “zero block” the zero core enters the distribution box, and at point (3
) connects to two other wires coming from the sockets.
Each outlet has its own wire leading to the junction box..
As a result, it turned out that 6 wires went into the junction box, and it turned out 4 twists. Thus, you do the wiring in each room.
Let's finish here, and in the second part we will analyze the installation diagram of electrical wiring with grounding, at what stage the wiring is laid, how to check the operation of the circuit and the equipment used. Good luck!
How to make electrical wiring for a private home with your own hands: Review Video
Now the rotation will be correct for this engine. If different motors are connected to the outlet, you may have to change the phasing for each of them.
Expert opinion
Viktor Pavlovich Strebizh, lighting and electrical expert
Any questions ask me, I will help!
In order to eliminate the possibility of such an asymmetrical connection, manufacturers place the contacts at a special angle, of different sizes and with a special guide. If there is something you don’t understand, write to me!