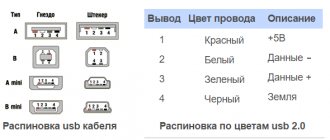
LED strips cannot simply be plugged into an outlet - they need power at a lower and constant voltage. This is precisely the difficulty for most people who dream of LED lighting, but cannot afford to purchase it. Ready-made power supplies for 12 Volt LED strips cost about 500 rubles or more. Moreover, the higher the power consumption, the more expensive these devices are. It turns out that it is much easier to make a power supply yourself - for this you do not need to have a wealth of knowledge in electronics, the circuitry is simple.
DIY making
So, you have decided to assemble your own power supply for the LED strip. The size of the power supply depends on the power of the transformer (if a circuit using it is selected). For a simple device, you will need a transformer with a primary winding designed for 220 V. The output current should be about 1 Ampere, the voltage should be 12 Volts.
You will also need several elements:
- Diode assembly. You can use 4 semiconductor diodes connected in a bridge circuit.
- An electrolytic capacitor with an operating voltage of at least 25 V. You can use elements with an operating voltage of 50 V. The capacitance must be at least 470 μF.
- Zener diode or microassembly KR142EN. This is a voltage stabilizer, but it must be installed on the radiator.
Transformer power supplies
The simplest in design are transformer power supplies. The main element in it is a coil transformer. With its help, the voltage is reduced from 220 V to 12..15 V (or 24, 36 V). The voltage generated on the secondary winding is supplied to the input of a bridge rectifier using semiconductor diodes. Then filtering occurs using a chain, usually consisting of an electrolytic capacitor, resistor, and inductor. Sometimes zener diodes or microassemblies are installed in order to fix the output voltage at the same level.
The advantage of transformer power supplies is that they operate even without connecting a load (the so-called idle mode). In addition, there is galvanic isolation from a 220 V network. But, despite the simplicity of the design, there are a number of disadvantages: very low efficiency, large dimensions, high sensitivity to voltage changes. And the most important inconvenience is the large mass. It is because of these shortcomings that many people use transformerless power supplies for LED strips.
The need to use switches
Even if the LED strip is supposed to be constantly lit, a power switch after the voltage source is necessary. In case of repair or maintenance work (cleaning from dirt, etc.), it is convenient to relieve the voltage with one movement of the switching element.
Circuit breaker and power switch.
There must be a circuit breaker on the 220 V side (regardless of the connection diagram). If the power supply or rectifier is plugged into a household outlet, then it is most likely protected by a circuit breaker. If a permanent connection is used, then it is necessary to provide for the installation of a circuit breaker. It serves as both a switching element and a means of protection in an emergency situation. And it will never be superfluous to install an RCD, especially in the absence of galvanic isolation in the form of a transformer.
Adviсe
- Any unit designed to power LED lamps must comply with lighting standards.
- It is not recommended to disassemble the case and try to make any changes. Re-soldering the adapter circuit is difficult and time-consuming. Even for an electronics engineer.
- Depending on the power of the power supply, several tapes can be connected to it. There is an RGB amplifier for this. It receives a signal from one tape and distributes it to others. At the same time, the synchronicity of color changes and brightness is not lost.
Attention! If you try to connect the tape directly to an outlet, it will start to smoke and, naturally, will not work after that
Fluorescent lamp ballast
Each energy-saving light bulb contains a small circuit that prevents flickering when turned on, and also helps to gradually warm up the device's coils. Its name is electronic ballast. It is with the help of it that gas can emit a glow (frequency 30−100 kHz, and sometimes 105 kHz).
A significant advantage of such devices is the absence of any noise during operation, as well as the absence of an electromagnetic field, which negatively affects the human body.
An electronic choke plays an important role in the ballast circuit of an energy-saving lamp. It is he who determines whether the device will light up immediately with full force or warm up gradually over several minutes. It is worth noting that the manufacturer never indicates the heating time on the packaging. This can only be checked during operation of the device.
Those ballast circuits that perform the function of voltage conversion (and most of them) are assembled on semiconductor transistors. In expensive devices, the circuit is more complex than in cheap light bulbs.
From a burnt-out energy-saving lamp you can make blanks for a future switching power supply. You can also take a working device for this.
The compact fluorescent light bulb (CFL) contains the following elements:
- Bipolar transistors with protective diodes. As a rule, they can withstand voltages of 700 V and currents of up to 4 A.
- Pulse current transformer.
- Electronic throttle.
- Capacitor (10/50 V, as well as 18 V).
- Bidirectional trigger uncontrolled diode (dinistor).
- Very rarely the device contains a unipolar transistor.
When making a power supply from an energy-saving lamp with your own hands using expensive housekeepers, it is enough to supplement the source with some details. You can also use a driver for LEDs, which are often installed in flashlights, as the basis for the future block.
Device Features
The design of such devices is quite simple; they do not contain scarce elements. A standard power supply for 12 Volt LED strips consists of the following elements:
- Step-down transformer - its power should be approximately 25% greater than that of the LED strip. This is done so that there is a small reserve.
- Bridge made of semiconductor diodes. This is a simple design that includes two pairs of semiconductor diodes, which make it possible to obtain a constant voltage from an alternating voltage. But more often, ready-made diode assemblies are used, which have 4 terminals - an alternating current source is connected to two, and the rectified one is removed from the rest.
- A capacitor installed between the positive and negative terminals provides reliable current filtering. More precisely, with its help the entire variable component is cut off. Diodes convert the current, but after this a small proportion of the alternating component remains. An electrolytic capacitor allows you to get rid of it.
All these components are contained in a robust housing. Moreover, if necessary, a cooler (fan) is installed. You can even make it turn on constantly - this will ensure normal operation of the homemade LED strip power supply
When making it yourself, it is recommended to pay attention to the safety of the device - it should not overheat
Switching power supplies
There is no need to think that pulse-type designs do not have a transformer. It exists, but its dimensions and weight are much smaller than those of the structures discussed above. The device operates at high frequencies (several tens of thousands of Hertz versus 50 in a household network). But the disadvantages remain the same - high sensitivity to voltage changes. Moreover, when operating in idle mode, the device may fail. Such power supplies for 12 Volt LED strips can be used, but it is not recommended to turn them on without load.
Purpose and principle of operation
The power supply or adapter is designed to connect equipment to power sources for its normal operation. The power supply for the LED strip serves as a converter of the input voltage to the required output voltage. In this case, we are talking about twelve volts.
The use of such a power supply requires certain competence. If the device is used for its intended purpose, it will not pose a threat to the health of the owner or the equipment.
Pulse adapters level out voltage surges using a special filter. Therefore, an electrical network with unstable voltage critically needs such a device. Voltage surges can not only negatively affect the operation of electrical equipment, but also damage it.
Example of power calculation
For example, you have a tape available:
- There are 40 LEDs per meter.
- Total length – 5 meters.
- The supply voltage is standard – 12 Volts.
With a nominal power value of one meter of 4.8 W, the total value can be calculated. It will be equal to 24 W. It is recommended to add another 6 W to this value (this is 25%). This means that the power supply must have a power of 30 W.
DIY power supply
circuit diagram of a tape with 20 cells, for its assembly you need: a transformer of 1A, 12W; diode bridge with capacitor; chip for radiator (suitable for 7812)
To provide the device with power, it is not necessary to buy a source ready-made in a store; it is quite possible to create it with your own hands if you adhere to the following algorithm of actions:
Choose 4 diodes - absolutely any variety will do, since the voltage supplied to them will be very low.
Select a capacitor; there is only one requirement for it - a voltage of at least 25 V
You should not be afraid of choosing a device with a parameter that is too high, since when leaving the unit, the direct current always has a strictly fixed value.
The diodes are twisted or soldered together in pairs, and it is important that the contact points have different polarities. This is easy to determine: the side with a drawn stripe is positive, and the blank side without a stripe corresponds to a negative value.
Then it is necessary to connect both soldered pairs of diodes together, only now according to the reverse principle: at the point of contact the side with the positive polarity of one element must meet the similar side of the second pair
Accordingly, on the other side, parts of the solders with negative polarity are connected. As a result, you get a small square-shaped element - this is the so-called diode bridge.
We connect 2 terminals from the transformer with a diode bridge, and the points of contact in both cases should be contacts with a combined plus-minus value, and contacts with exclusively negative or positive polarity, created at the last stage of bridge formation, should remain free.
At this stage, the capacitor is connected to the bridge. Here it is necessary to take into account that the polarity in the surge protector has a different designation: o traditionally designates the side with negative polarity, respectively, the side without any designation is positive. The connection to the bridge occurs as follows: the positive contact of the capacitor is connected to the remaining free side with positive polarity, and the negative contact is connected to the side of the corresponding polarity.
At this stage you will need several wires of different colors. Typically, blue is used for negative polarity, and red for positive polarity, but this rule is not unshakable; the wires can be selected at your discretion or based on what is available. If necessary, you can even use the same color for both polarities simply by making a corresponding mark on one of the wires in the form of a knot or cut.
The red wire must be soldered to the terminal of the diode bridge, which has a positive polarity, in the same place where the positive terminal of the network filter is located. The blue wire must also be soldered to the negative terminal of the bridge.
The basic design for the 12V power supply is now considered complete. If desired, you can check the voltage level. Even if any errors occur or the readings are too high, do not worry; with a constant load, instead of idling, the device will begin to produce the voltage it is supposed to. However, those who want to achieve maximum accuracy in voltage-related parameters can equip the resulting unit with an additional stabilizer.
The finished device can be put into the housing, after which it is completely ready for use.
Power supply assembly process
You have an LED strip in stock, the power supply has been calculated and the elements have been selected, now you can begin assembly. Both printed and wall-mounted installations are allowed.
Of course, the whole structure will look much more attractive on a printed circuit board. The manufacturing process looks like this:
- The diodes are connected to each other using a bridge circuit. Be sure to observe polarity; all diodes have an anode (positive terminal) on the strip side of the body.
- Connect the secondary winding of the transformer to the diode bridge.
- An electrolytic capacitor must be connected to the bridge output. When connecting, you must observe polarity! Otherwise the capacitor may explode!
- A choke is connected to the positive terminal gap.
- Next, a zener diode is switched between plus and minus. After it, it is also advisable to install another capacitor.
Finally, the entire device is assembled into one housing, the elements are securely fastened and two outlets are made. The red wire should indicate the positive terminal, black or blue the negative terminal. At this point, the production of the power supply for 12 Volt LED strips is completed, you can use the device.
Purpose and principle of operation
The power supply or adapter is designed to connect equipment to power sources for its normal operation. The power supply for the LED strip serves as a converter of the input voltage to the required output voltage. In this case, we are talking about twelve volts.
The use of such a power supply requires certain competence. If the device is used for its intended purpose, it will not pose a threat to the health of the owner or the equipment.
Pulse adapters level out voltage surges using a special filter. Therefore, an electrical network with unstable voltage critically needs such a device. Voltage surges can not only negatively affect the operation of electrical equipment, but also damage it.
A little theory
Most LEDs require a voltage of about 2-3 V to operate. The design of lighting lamps and LED strips is such that they are powered by more common 12 V voltage sources. In particular, LED strips are made of groups of three series-connected single LEDs with a limiting resistor . Why then the two different types of power supplies?
Note The fact is that the LED requires current, not voltage, to power it. Sounds weird?
Everything is correct. Those 2-3 V that are required for operation are not power, but a voltage drop on a separate LED, and this is already formed as a result of the flow of current through the element. The current must be stabilized, since LEDs are very critical to its value. Firstly, due to the large dependence of the brightness of the radiation, and, secondly, excess current catastrophically reduces the service life.
Under normal operating conditions, it is enough to stabilize the supply voltage, the current will also be stable. It’s not for nothing that it’s said – under normal conditions. The fact is that, like all semiconductor elements, LEDs have a pronounced temperature dependence (which, by the way, is the basis of all electronic temperature meters). When the ambient temperature changes, the current flowing through the device will also change at a constant input voltage. With all the ensuing consequences.
What kind of block is needed for LED strip?
We have already discussed the main parameters of power supplies for LED strips above: supply voltage and power. It remains to consider other features and characteristics that are taken into account when choosing them.
In addition to voltage and power, power supplies for LED strips also differ in the type of design (case), degree of protection from external influences and functionality. Each of these options provides some advantages or limitations for use in different environments.
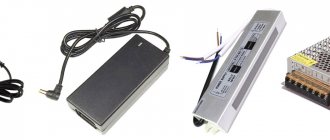
Three main types of power supplies for LED strips:
1. In a plastic case. 2. In a metal case with perforation. 3. Sealed in aluminum housing.
The power supply for LED strips in a plastic case can be similar to the power supply from a laptop or the power supply from various devices, for example, a battery charger for a powerful router and others. As a rule, low-power power supplies have a plastic case and can only be used indoors. They have passive cooling through the body, so they cannot withstand strong overloads.
The power supply for LED strip in a metal case with perforation usually has more than average power and corresponding dimensions. The radio components in them are cooled by air circulating in the case, and in powerful models a fan can be installed for forced airflow, which can be accompanied by a lot of noise. The advantage of such power supplies is the presence of a large number of pins, mainly for fairly powerful models, and a voltage level regulator, i.e. If necessary, they can be slightly adjusted. They are installed mainly in shields, where they will be protected from dust.
Sealed power supplies for LED strips in an aluminum case are well protected from dust and moisture. They are cooled passively through the case; for connection to the 220V network and to the LED strip there are wire sections. They can be installed both indoors and outdoors.
IP rating of LED power supplies
The protection class of a power supply affects the conditions in which it can be used. The most common power supplies for LED strips in a plastic case or in a metal case with perforation have a protection class of IP20 or IP40. This means that they can be used in dry rooms with a moderate amount of dust; it is better to hide perforated ones in switchboards, otherwise over time they will become completely clogged with dust.
Power supplies for LED strips in aluminum sealed cases have a protection class of at least IP65, and they can already be used in bathrooms and on the streets under a canopy. For outdoor use, more protection is required and the housing must be IP67 rated. There are even more protected power supplies with IP68 and even IP69. They can already withstand direct exposure to jets of water and even complete immersion in water up to 1 m.
Types of power supplies for LED strips by functionality
1. The most common ones, performing only the function of powering the LED strip. 2. Power supplies with a built-in dimmer for brightness adjustment. 3. Power supplies for LED strips with remote control. 4. The most expensive combined power supplies with a control panel and a dimmer.
The functionality of the power supply allows you to save space and increase ease of use, so as not to have many different devices in one place. In the most expensive option, instead of three devices, you can install only one power supply for the LED strip, in which everything is already included. At the same time, the simplest power supplies without bells and whistles can boast of their small size.
Main conclusions
The power supply is designed to reduce and rectify current from a household network and power LEDs at 12-48 volts. They can differ in several ways:
- Rated voltage.
- Power.
- Level of moisture protection.
Non-hermetic modules are installed indoors and have good natural cooling. Closed blocks are designed for outdoors and wet areas. When calculating for high power, it is better to select aluminum models with good heat dissipation. Semi-hermetic models are suitable for non-residential and unheated premises.
When calculating the power of the power supply, you need to take into account the total load of all the LEDs in the circuit and add 20 percent to the resulting value. You can connect lighting devices to them with your own hands in a parallel or serial way.
If you want to add useful information about the selection and installation of power supplies for LEDs and LED lamps, be sure to write in the comment form below.
Adding a capacitor
If you increase the supply voltage to the LEDs in order to make the light brighter, the LEDs will begin to heat up, which significantly reduces their durability. In order to avoid this, you need to connect a 10 W recessed or table lamp with an additional capacitor. Simply connect one side of the base to the negative output of the bridge rectifier and the positive side, through an additional capacitor, to the positive output of the rectifier. You can use 40 LEDs instead of the suggested 60, thereby increasing the overall brightness of the lamp.
Video: how to make an LED lamp with your own hands
If desired, a similar lamp can be made using a powerful LED, but then you will need capacitors of a different value.
As you can see, assembling or repairing a conventional DIY LED lamp is not particularly difficult. And it won't take much time and effort. This lamp is also suitable as a summer option, for example for a greenhouse; its light is absolutely harmless to plants.
| JLCPCB is the largest PCB prototype factory in China. For more than 600,000 customers worldwide, we place over 15,000 online orders for prototypes and small batches of printed circuit boards every day! |
Anything in here will be replaced on browsers that support the canvas element
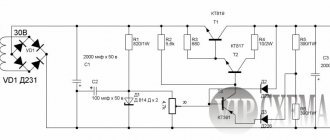
Diagram of a transformer power supply for a screwdriver
Finally, we’ll make our own transformer power supply for a 12, 14 or 18 V screwdriver. Such a source, of course, will be quite bulky, but the beauty of the design lies in its simplicity. Even a novice radio technician with only general knowledge of electrical engineering can cope with repeating the circuit.
For this homemade power supply, you will need a transformer capable of delivering the current we need at a voltage of 12-13 V (for a 12-volt tool), 14-16 V (for a 14-volt tool), or 18-20 V for an 18-volt tool. You will also have to find 4 powerful rectifier diodes and several electrolytic capacitors.
If we have a 12-volt screwdriver that consumes current up to 10 A (most household ones), then we can take a unified anode-heat transformer TAN-138-127/220-50 (TAN-138 220-50), which has 2 windings of 6 each, 3 V at a current of 10 A. It weighs, however, more than 6 kg.
| Winding | Voltage, V | Rated current, A |
| 1–2, 4–5 | 110 | 3,9/2,3 |
| 2–3, 5–6 | 7 | 3,9/2,3 |
| 7–8 | 355 | 0,285 |
| 16–17 | 355 | 0,285 |
| 9–10 | 200 | 0,25 |
| 18–19 | 200 | 0,25 |
| 11–12 | 25 | 0,285 |
| 20–21 | 25 | 0,285 |
| 13–14 (15) | 5 (6,3) | 10 |
| 22–23 (24) | 5 (6,3) | 10 |
Purpose of the winding terminals of the unified transformer TAN-138-127/220-50
Another option is the filament transformer TN-61-127/220-50 (TN-61 220-50). It will be able to provide a current of 8 A at a voltage of 12.6 V (two windings) or 18.9 V (3 windings). Although it weighs less, it still weighs a lot - 3 kg.
| Winding | Voltage, V | Rated current, A |
| 1–1a, 4–4a | 3,2 | 1,66/0,95 |
| 1–1b, 4–4b | 6,3 | 1,66/0,95 |
| 1–2, 4–5 | 110 | 1,66/0.95 |
| 1–3, 4–6 | 127 | 1,66/0,95 |
| 4–8 | 6,3 | 6,1 |
| 9–10 | 6,3 | 8 |
| 11–12 (13) | 5 (6,3) | 8 |
| 14–15 (16) | 5 (6,3) | 8 |
Purpose of the winding terminals of the unified transformer TN-61-127/220-50
If we have the appropriate knowledge and skills, then any dismountable network transformer with a power of 200–250 W can be used to manufacture a power supply. We disassemble, wind up all the secondary windings, leaving only the network winding, and instead wind one secondary winding at the required voltage and current.
If we have a transformer with a toroidal core at our disposal, then it is better to prefer it. Rewinding is more difficult, but firstly, it does not need to be disassembled, which means there will be no problems with humming after assembly. Secondly, the dimensions of such a transformer with the same power are much smaller.
If desired, you can find a ready-made transformer for the required voltage and current in the store.
What diodes are needed? Any rectifier that can withstand a current of 10–20 A and a reverse voltage of at least 30–40 V is suitable. Electrolytic capacitors for a voltage of at least 25 V (for a 12-volt power supply) and one non-polar paper capacitor with a capacity of 1 μF for an operating voltage of at least 400 V. However, you can do without the latter. Now let's take a look at the diagram.
Diagram of a transformer power supply for a screwdriver
The mains voltage is supplied to transformer Tr1, reduced to the required value, rectified by the diode bridge VD1–VD4 and supplied through wires to the tool, to the handle or compartment from which faulty batteries have been removed and capacitors C3–C5 are installed. They are energy storage devices and provide high starting current when the screwdriver is turned on.
Capacitor C1, connected in parallel to the mains winding of the transformer, reduces the reactive component of the inductive load (transformer) and slightly increases the efficiency of the device. As stated above, you can do without it. When assembling the device, do not forget to install diodes on radiators that are not electrically connected to each other. If the radiator is common (for example, a metal case or power supply chassis), then we install diodes on it through mica insulating spacers.
So we figured out how to power a cordless screwdriver from the mains. Now we can choose a power supply suitable for these purposes or make it ourselves.
Kinds
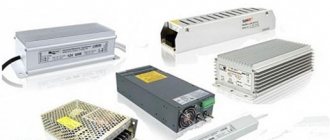
Types of power supplies for LED strip
Designations in the photo:
- Compact and sealed.
- Sealed in aluminum housing.
- Open.
- Compact network.
12-volt units come in two main types:
- Voltage stabilized - 12/24 volts. Twelve volt ones are used mainly for connecting G4 and MR16 LED lamps.
- Current stabilized - direct/alternating.
In addition to these differences, the following types are available:
- Sealed. Protection degree – IP66 and 67. The small case protects the device from dust and water. Has a built-in potentiometer that functions as a current adjustment. Units with low power are produced in plastic housings, while high power units are sealed in aluminum.
- Semi-hermetic. Degree of protection – IP54. Suitable for outdoor use as the adapter body is metal and moisture resistant. Power varies from 10 to 360 watts.
- Leaky. For indoor use only. They are made in a metal or plastic corrugated casing.
Since each model differs from each other in properties, characteristics and purpose, you should carefully approach the choice of device.
The power supply unit for LED strips is selected according to the following principles:
- Power consumed by the tape.
- The voltage required to power the tape.
- Protection against moisture ingress.
Tape supply voltage
The main parameter of LED strips is the supply voltage. Of course, it is different from what we have in our outlets. Based on voltage, tapes are divided into three groups:
- Power supply 12 V.
- Power supply 24 V.
- Power supply 36 V.
Moreover, the current must be constant! If you plug the tape into the network without a power supply, it will fail. The unit voltage must be appropriate - 12, 24, 36 Volts. With its help, the mains voltage is reduced to the operating value. The most popular models of LED strips operate at a voltage of 12 V. Therefore, you need to choose only those LED strip power supply circuits that can generate such voltage.
Options for connecting the LED strip to the power supply
There are only two ways to connect this lighting equipment, like any other - in series and in parallel. But here the installation option plays a very important role. If you choose the wrong switching method, you can burn the contact tracks through which voltage passes from one LED to another.
The choice of installation scheme depends on the length of the strip sections. Each of them has places for cutting. Usually the distance between them is 3 LEDs. And if the tape segments total more than 5 meters, then it can no longer be connected in series. Let's figure out how to properly install and connect.
This is what a correct parallel connection looks like
Serial connection - in what cases is it performed?
Such switching is a connection in which power reaches the second consumer, passing through the first.
If the segments are short enough, then they must be connected to each other in series. This will allow you to increase the length of the strip to the required length. But it is worth understanding that the total final length should not exceed the same parameter of the new LED strip. In other words, if it was sold in a coil of 5 m, then after splicing the final size of the strip should be less than or equal to the original.
If you connect 2 controllers, the color adjustment options increase
If the length is exceeded, there is a danger of burning out the conductive paths between the light diodes due to the passage of high power current through them. In this case, the tracks between the first elements burn out first. When they are removed between the next ones, and so on until the length of the strip is normal for proper operation.
Parallel connection of the strip and how to do it
Parallel connection is called switching, in which power from the source is supplied simultaneously to two or more consumers. However, they are not connected to each other.
If you need to connect a strip, for example, 9 m, then installation in a parallel circuit is necessary. To do this, we take sections of 5 m and 4 m. The wire coming from the power supply is switched in the same order with both strips. It turns out that power from the stabilizing device is supplied simultaneously to both segments. This allows you to avoid overloading the tracks going from one LED to another.
Such tapes are sold in 5m rolls. Important to know! With this installation scheme, do not forget about the operating power of the stabilizer. It consists of the total consumption of two segments. In general, it is necessary to understand that when connected in parallel, the voltage drop remains unchanged, but the current consumption increases - this is quite important to know when installing such lighting equipment
In general, it is necessary to understand that when connected in parallel, the voltage drop remains unchanged, but the current consumption increases - this is quite important to know when installing such lighting equipment
Do you need a powerful power supply for LED strip?
How to calculate the power supply for an LED strip
First of all, it is necessary to determine the power consumed by the tapes. To do this, the power of one meter of tape indicated on it is multiplied by the total length. If LED strips of different types are connected from the same power supply, then this operation is repeated for each type separately, after which the resulting values are added. In addition, it is necessary to take 25-30% of the reserve power for greater reliability and durability of the block for the LED strip.
Let's say you want to install work area table lighting in your kitchen. To do this, you need 2.5 m of SMD5050 tape with a density of 60 diodes per meter. The power of such a tape is 14.4 W meter. Multiply 14.4W by 2.5m. We get the power consumption of the tape 36W. To obtain a power reserve of 30%, 36W is multiplied by 130% or 1.30, depending on the calculator used. We get a minimum power supply of 46.8W. We select the closest value from those available for sale - 60W. If you need to connect tapes of different types, then the task becomes more complicated. Let's assume that in the kitchen not only the work area is illuminated, but also the floor. This means that in addition to 2.5 m of SMD5050 tape with a density of 60 diodes per meter and a power of 36 W, we connect 4 m of SMD3528 tape with a density of 60 diodes. We calculate the power of SMD3528 tape in the same way as SMD5050. We get 19.2W. We add the resulting values 36W and 19.2W. We get 55.2W. Considering the 30% power reserve, a power supply of at least 71.76 W is needed. The nearest higher standard value is 72W. We buy it.
Having determined the required power, you can decide which and how many power supplies are needed. A unit with insufficient power will quickly fail, and a unit that is too powerful will be more expensive than necessary.
A dimmer is used to control brightness. Its power must match the power of the power supply.
Having determined the required power, you can decide which and how many power supplies are needed for LED strips. A diode strip unit with insufficient power will quickly fail, and a unit with excess power will be more expensive than necessary.
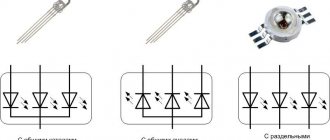
Connecting RGB strip
The RGB strip is connected via an RGB controller. Its power is selected in the same way as for a regular tape. If it is impossible to power all the segments from one controller due to the high power of the tape or the distance between them, then an RGB amplifier is used. Each amplifier is powered through a separate power supply, or, if possible, several amplifiers can be connected to one power supply. This is described in more detail in the article “Connecting an LED strip“.
How to calculate power
When making your own power supply, it is necessary to take into account the power consumption of the LED strip. Exact data can be found in the specification for a specific model. Here are the most common types of data:
- SMD-3528 accommodating 60 LEDs per 1 meter, total power 4.8 W.
- SMD-3528 with 120 LEDs per meter has a power of 7.2 W, respectively.
- SMD-3528 with 240 LEDs per meter has a power of 16 W.
- SMD-5050 with 30 elements – 7.2 W.
- SMD-5050 with 60 elements – 14 W.
- SMD-5050 with 120 elements – 25 W.
If you are selecting a power supply (ready-made) for an LED strip or assembling elements for self-production, you need to take into account all the parameters. The main ones are:
- Power.
- Operating voltage.
In order to calculate the total power of the tape, you need to know how much one linear meter consumes. This value is then multiplied by the length (in meters). Next, you need to add another 25% of the obtained value and select a power supply (or transformer) whose power is closest to the calculated one.
Types and types
Before connecting the LED strip, you should understand their types and markings. This way you won’t make a mistake when choosing a power supply and will accurately calculate the required glow intensity, tape length and other parameters.
The most popular in interior lighting are strips made of single-color—monochrome—crystals. The constant change of colors is too stressful and does not allow you to relax. This is illumination, not lighting
Therefore, universal tapes are used to create advertising, illuminate cars - where it is necessary to attract attention. When decorating interiors, SMD tapes are mainly used
Degree of protection
Since the scope of application is wide, the degree of protection varies. For dry rooms, regular open ones are available - without a protective coating. There are waterproof ones - they can be used in damp areas - in bathrooms, for example. They are filled with a layer of varnish. There is another option - moisture resistant. They are sealed in a sealed housing and can be mounted directly in the water - in an aquarium, pond or pool. They can also be used for outdoor lighting.
Sealed tapes for illuminating aquariums, swimming pools or decorative ponds
For exterior car styling, LED strips placed in a transparent polymer tube are most often used. It protects not only from moisture, but also from mechanical damage, but their cost is also higher.
LED sizes, brightness and density
Let's figure out the sizes. If you take several strips, you can see that they are made of LEDs of different sizes. In addition, they are sometimes located tightly next to each other, in some - at a fairly decent distance, and there are also strips with LEDs in two lines.
Most popular LED sizes
It is not difficult to distinguish the sizes of elements externally, but how can you tell by the markings? Dimensions are displayed in numbers that appear after the letters indicating the type of LED. For example, LED-R-SMD3528 (red) and LED-RGB3528 (universal) are assembled from elements measuring 3.5 * 2.8 mm, LED-G-SMD5050 (green) and LED-RGB5050 (universal) - 5.0 * 5.0 mm.
These are the two most common types, although there are larger ones - 56 * 30 mm, and smaller ones - 20 * 20 mm.
The larger the crystal size, the greater the light intensity they produce. For monochrome crystals the indicators are as follows:
- size 3.2 * 2.8 mm produces a luminous flux from 0.6 to 2.2 lm;
- size 5.0*5.0 mm - from 2 to 8 lm.
Universal LEDs of the same size have lower intensity: three small crystals of different colors are sealed in one housing, and therefore the RGB glow intensity is lower:
- 3.2*2.8 mm produces 0.3 to 1.6 lm;
- size 5.0*5.0 mm - from 0.6 to 2.5 lm.
All values are given for crystals without protective coating. Any of them reduces the intensity of the glow and this must be taken into account when calculating the brightness of the glow.
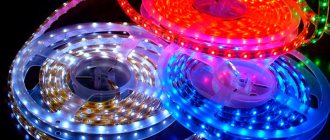
LED strip 220V - what is it and how to connect it
A regular LED strip has a standard length of 5 meters. As a rule, it is divided into 5-centimeter sections. The tape can be cut exclusively along these lines, which in some cases are even made in the form of perforations. Each such 5-centimeter block contains several emitting crystals connected in series - this reduces the voltage for each crystal to the required value.
Depending on what voltage the entire strip is designed for, each 5-centimeter section contains a certain number of LEDs, a multiple of three:
- if the tape is designed for 12 volts, then there are 3 crystals on one cutting section;
- if at 24 volts, then there are already 6 crystals;
- if at 110 volts, then there are already 30 emitters, and the cutting section has a length of not 5, but already 50 cm;
- and if the LED strip is designed for 220V, the connection of which will be discussed in detail below, then there will already be as many as 60 LED crystals on a half-meter cutting section.
In strips designed to connect directly to a 220-volt network, each SMD crystal consumes 3.5 Volts: these are SMD 5630 diodes; 3528; 5050; 2835; 3014. The cutting block contains 60 diodes connected in series, that is, the total voltage consumption in theory should be 210 V.
However, the network provides 220 V, and sometimes even 230 V, and a feature of 220-volt strips with particularly bright SMD 5630 emitters is that the diodes in them operate with a slight overvoltage - a maximum of 3.83 volts per crystal.
For LED strips with 60 crystals per 0.5 meter, the diodes are arranged in 2 rows. Moreover, if you count, it turns out that in a standard 5-centimeter area there are 6 crystals with extremely high luminosity. In addition, such a 220V LED strip without a power supply is used to decorate objects located outside the building envelope - in the open air.
Tapes with SMD 5630 diodes have the following unique power consumption characteristics:
- Power consumption is 10 W/rm. tape length.
- Light-emitting diode crystals have extremely high efficiency - more than 83% of the energy they consume turns into useful light, however, the remaining 17% inevitably turns into heat. As a result, the tape heats up considerably. To prevent melting of such a tape, thick foil is used as a base, coated with a heat-resistant polymer on both sides. The metal not only ensures the strength of the entire tape as a whole, but also effectively dissipates heat along its entire length.
How to connect a 220 Volt LED strip? It would seem that connecting a diode strip to 220 V can be done in a simple way, that is, directly. But diodes are designed in such a way that they allow current to pass in one direction and not in the other. Therefore, if you connect the LED strip to a 220 V network without a rectifier previously inserted into the circuit, then all the crystals on the strip will blink at a frequency of 50 times per second.
This, and even a 2 times higher frequency (that is, 100 Hz), according to SanPIN, is not acceptable, especially in residential premises. For the human eye, such light will be perceived as flickering ripples, which will quickly tire the eyes.
Before connecting the diode strip to 220 V AC, you should insert a rectifier into the circuit. This device contains several capacitors that accumulate a charge when the current flows in one conditional direction and release this charge into the circuit when the direction of the current changes. Thus, the rectifier converts alternating current into direct current without any reduction in voltage.
However, this is not all. The operation of the rectifier is "rough". Its main function is to ensure that electrons flow in the same direction. Therefore, the circuit for connecting an LED strip to 220 V, in addition to the rectifier, must also include a controller. This device is an analogue of a rectifier, only its task is to stabilize and smooth out any, even very weak, fluctuations in the potential difference. Modern rectifiers, as a rule, contain a controller unit inside them, which allows them to produce an even current and even smooth out fluctuations in the network.
If we are talking about a 220V RGB LED strip, which is color, then its installation must be done through the same RGB controller.