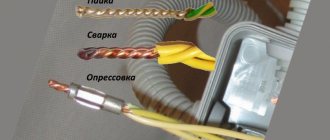
A common method is groove twisting
First, familiarize yourself with the sequence of steps on how to twist wires with your own hands. Bend the ends of the wire into small hooks, hook them together, and wind one wire around the other.
Professionals say that these types of wire twisting can be made more durable by using the following recommendations:
Twisted contacts are additionally connected by soldering or welding, as a result the contact acquires maximum reliability and is almost impossible to break. It is preferable to use soldering when both wires of the connection have a large cross-section.
WAGO terminals greatly facilitate connection, making it more efficient; they are needed when you have to figure out how to twist copper wires with aluminum ones. The whole procedure will take place quite quickly, while the “vags” allow you to connect wires of different cross-sections, the contact will be reliable and durable.
If a home handyman is faced with the task of connecting wires in an electrical outlet or lamp, use WAGO terminal blocks.
Thanks to PPE clamps, the reliability of the connection increases significantly, making it as safe as possible. These products have a low price, so they are available at any electrical store.
Wires twisted together should not be immediately closed using a junction box. It is better to observe how the electrical network works for several hours, after which it is recommended to check the temperature at the mounting location. If the connection gets very hot, you need to do everything again: most likely, the contacts are unreliable.
The twist itself is not waterproof, so it is better to take a box to connect the wires inside the wall; if without it, then the twist wires will need to be insulated using cambrics.
All you have to do is determine for yourself which twisting method is better and consider methods for isolating nodes.
General rules for switching electrical cables in distribution boxes
Of course, all requirements for energy supply are set out in the PUE.
This is an electrician's reference book. Moreover, there are fines for violating the Electrical Installation Rules. However, in practice, all these strictures apply only to institutions and organizations. In private households, responsibility ends with the wire coming out of the meter (electricity meter). The rest is up to the homeowner. To prevent an incorrect connection from leading to a fire or electric shock, you must follow simple rules:
- The connection of wires in the junction box is made during a complete power outage. Even if the electrician is wearing dielectric gloves and is familiar with safety rules, accidental contact of the phase wire with structural elements of the building or grounding is possible.
- The type of connection must be the same for each line within the same box. This will protect your line from loosening under load.
- Physical contact of conductors made of different materials (copper with aluminum) is not allowed. When electric current flows, active electrocorrosion occurs. Metals are coated with an oxide film, which impairs contact. The result is sparking, overheating, and complete burnout of the contact connection. If such a need arises, it is necessary to tin the wires using solder. After twisting, the connection must be soldered for at least 50% of the length. The rest of the strand will not corrode because no current flows through it under load.
- It is necessary to exclude the possibility of exposed conductors leaving the box. Even if the cable is completely laid in the wall.
- When connecting without contact devices, that is, using soldering, twisting or welding, an insulating cap must be placed on the exposed conductor. The insulator must be firmly fixed; non-combustible materials are used in its manufacture.
- The ends of the wires inside the box must have at least a 200% margin along the length of the connecting ends. In the event of a break or burnout, it will be possible to re-install without laying a new wire.
In addition, inexperienced electricians often make mistakes and break off wires when stripping the insulation. If the wire is inserted into the box under tension, reconnection will be impossible.
What is a junction box for?
There aren't many people who don't know what a junction box is.
Nevertheless, it would be useful to remind you that this is a round or rectangular plastic container with a lid and holes on the sides, intended for switching (connecting) electrical wires.
To provide all energy-consuming devices in an apartment or house (light bulbs, lamps, washing machines, televisions, computers, etc.) with electricity, it is necessary to route wires from the distribution panel to the points of consumption - sockets and switches.
This must be done in such a way as to ensure uniform distribution of electricity throughout all rooms.
To do this, the electrical wiring is divided into separate lines. Each room has its own supply wires, to which all energy consumers in the room are connected.
At certain nodal points the wires are connected to each other. At such points, distribution boxes are installed, inside which connections are located.
The main purpose of distribution boxes is to ensure fire safety.
Wire connection points are the most dangerous from a fire point of view.
Insufficiently tight contact creates high resistance in the connection and leads to its heating, sometimes leading to a fire.
The junction box isolates the junction from combustible wall materials, eliminating the risk of fire. In addition to this main goal, there is a secondary one. Twisted wires that are not hidden in a box do not look very aesthetically pleasing.
By type of design, distribution boxes can be internal, designed for embedding into the wall (for connecting hidden wiring), and overhead, installed on the wall (for open wiring).
Is it possible to do without junction boxes at all?
Theoretically, yes. But to do this, you will need to connect the distribution panel and each place of electricity consumption in the apartment with a separate wire.
This will lead to a large consumption of electrical wiring and the need to make wide and deep grooves in order to be able to lay several rows of wire in them.
Ultimately, the disadvantages of this method will many times outweigh the disadvantages of using junction boxes. Savings due to abandoning the latter will be many times depreciated by increased costs for electrical wiring.
One can sometimes hear this as an argument against the use of junction boxes; Although laying a separate line to each point of consumption is economically inferior to the option with junction boxes, it is safer, since it eliminates the connection of wires at nodal points.
There is only one answer to this.
Correct, professionally performed connection of wires in a junction box is absolutely safe.
While everyone has the right to their own point of view, the option of using junction boxes is still more preferable than without them.
Where and how to install distribution boxes?
Distribution boxes are installed at a distance of 10-30 cm from the ceiling - depending on the height of the latter.
When wiring is hidden, the boxes are embedded in the wall, so that the top of their covers is flush with the surface of the wall. With open wiring, the boxes are installed without embedding into the wall on its surface.
PUE (electrical installation rules) require that access to the box cover be provided for inspection if necessary. With the overhead installation method, this requirement is met automatically.
When installing inside the wall, you need to take care of two things. Firstly, it is necessary that the location of the box is known and access to it is provided, and secondly, that the aesthetics of the room do not suffer. The first requirement is more important and must be met in any case.
The second is subjective, depending on the taste of the owner. Aesthetics can be achieved in different ways.
When applying wallpaper, carefully trim it around the lid, leaving it in place.
This will make it possible to see the location of the box and at the same time make it practically no different from neighboring places.
If you use another method of decorating the walls, you need to make sure that the surface of the cover is the same color as the wall, and that you can remove the cover without destroying the wall in this place.
When installing suspended ceilings, to access the boxes (if they are hidden behind the ceiling surface), it is necessary to install small hatches.
How to connect wires in a junction box?
The PES states that the connection of wires should be made by welding, soldering, crimping or using screw and bolt clamps.
Connecting three wires of different sections using screw terminals
Three wires of different thicknesses can be reliably connected to each other using special ZVI screw clamps. The clamps have a very convenient design and allow you to create contact between cables that have different cross-sections. The strength of the connection is achieved by using separate screws for each clamp.
You need to select ZVI clamps taking into account the cross-section of the wires that will be connected, as well as their current load. For reliable contact, it is recommended to connect three wires of adjacent sections. Let us conventionally designate the cross-section of the connected conductors as SPP, and the permissible long-term current as DDT. Below are the parameters of clamps and wires:
- ZVI-3 – SPP 1 – 2.5; DDT – 3;
- ZVI-5 – SPP 1.5 – 4; DDT – 5;
- ZVI-10 – SPP 2.5 – 6; DDT - 10;
- ZVI-15 – SPP 4 – 10; DDT - 15;
- ZVI-20 – SPP 4 – 10; DDT - 20;
- ZVI-30 – SPP 6 – 16; DDT - 30;
- ZVI-60 – SPP 6 – 16; DDT - 60;
- ZVI-80 – SPP 10 – 25; DDT - 80;
- ZVI-100 – SPP 10 – 25; DDT - 100;
- ZVI-150 – SPP 16 – 35; DDT - 150.
With the right choice of screw clamp, you can create a truly reliable connection that will ensure uninterrupted operation of the electrical network.
detailed instructions
First, let's consider the simplest option, when it is necessary to connect two single-core conductors of the same metal (for example, copper).
The technology looks like this:
- We carefully strip both cores of insulation to about 5 cm. You can also use a special tool for removing insulation for this.
- We clean the exposed veins to a metallic shine with a knife or sandpaper.
- We cross the two wires and twist them clockwise together so that they wrap around each other in a spiral (see diagram below).
- We insulate the finished twist using electrical tape. It is also recommended to use heat-shrink tubing, which reliably protects the exposed area from the external environment.
As you can see, there is nothing complicated. The peculiarity is that it is necessary to expose the veins by at least 5 cm and twist them with pliers so that there is continuous and reliable contact.
I would also like to give a couple of tips about a more complex situation when it is necessary to twist single-core and stranded wire. In this case, first repeat points “1” and “2” from the instructions provided above. Next, you need to cross the products and carefully wind the stranded wire around the middle of the single-core wire (at a distance of 2.5 cm from the end). When all the turns are wound, the free end of the single-core conductor must be bent with pliers towards the turns, as shown in the photo below. After this, the connection is insulated and placed in the junction box. By the way, in the same way you can make a good twist of two stranded wires.
You should draw your attention to the fact that it is forbidden to twist aluminum and copper under any circumstances. The first and main reason is that a galvanic couple is formed between aluminum and copper; as a result of chemical reactions, when moisture enters (it will be there in any case), electrolysis begins and the connection is destroyed
The contact resistance increases until it disappears completely, at which time it begins to heat up and burn. With direct current, such a connection will be destroyed especially quickly.
The first and main reason is that a galvanic couple is formed between aluminum and copper; as a result of chemical reactions, when moisture enters (it will be there in any case), electrolysis begins and the connection is destroyed. The contact resistance increases until it disappears completely, at which time it begins to heat up and burn. With direct current, such a connection will be destroyed especially quickly.
The second reason is that copper and aluminum have different coefficients of thermal expansion; under load, when the contact heats up, the conductors will expand “differently,” and after cooling, the twist will weaken and the resistance will increase even more - like a snowball.
The third reason is that an oxide protective film always forms on the surface of aluminum, which also increases the contact resistance, therefore, to connect aluminum wires, they are coated with quartz vaseline paste, and terminal blocks for them are sold already filled with this paste.
These are the diagrams you can use when twisting wires with your own hands:
We also advise you to watch the visual instructions:
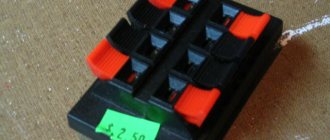
An interesting device will allow you to quickly fasten:
You should know that a fire inspector will never accept an electrical installation if the wires in it are twisted together. Although many will say that nothing more reliable than twisting has yet been invented, the PUE (Electrical Installation Rules) clearly states that it is prohibited to connect wires using the twisting method.
Excerpt from the PUE rules: clause 2.1.21. Connection, branching and terminating of wires and cables must be carried out using crimping, welding, soldering or clamping (screw, bolt, etc.) in accordance with current instructions.
The most common electrical wiring violation is incorrect connection of wires when renovating an apartment. What types of compounds are there, how do they differ from each other, and in what cases is it better to use one type and in what cases another?
Wire connection methods
Twisting is the simplest and most common way of connecting single-core wires made of aluminum or copper, when the conductors are simply twisted together and insulated at the point of contact. The twist is crimped using connecting insulating clamps (PIC); they are simple and easy to install (they are wound clockwise onto the cores twisted together) and ensure reliable grip and retention of the twist throughout its entire service life. They have a body made of flame retardant nylon due to which the conductors do not require subsequent insulation.
Fig.1 Connecting wires using twisting
For small volumes of electrical installation work, the use of strands insulated with PPE seems quite convenient. But when conditions require numerous wire connections and the organization of an extensive electrical network, in this case certain difficulties arise. They are connected with the fact that the described devices are designed only for a certain number of wires of the same cross-section. This greatly limits the possibilities for installing complex electrical networks.
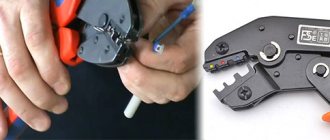
Crimping is the connection of wires using a special copper or aluminum sleeve. The sleeve is twisted and crimped using press pliers. In order to perform crimping, it is necessary to remove the insulation from the ends of the connected wires, twist them and put a sleeve on the twist that is suitable in diameter and material. Next, the sleeve is pressed using press jaws. After the entire procedure has been completed, the resulting connection must be insulated using electrical tape or heat shrink. This method of connecting wires is considered one of the most reliable.
Fig.2 Connecting wires using crimping
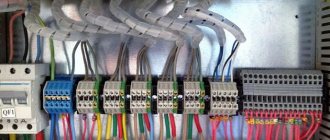
Screw terminal connections are the most suitable option for connecting wires made of different metals. Using this terminal you can connect two wires. For this purpose, a special terminal block is used - a dielectric housing, inside of which there are nodes for attaching wires to the contacts. Screw connection terminal blocks are most often used when connecting wires in switchboards and distribution boxes.
To connect wires with screw terminals, carefully strip the insulation from the ends of the wires and place the ends of the wires in the terminal so that they do not touch each other. Then tighten the terminal screws tightly.
Fig.3 Connecting wires using screw terminals
When using this method of connecting to aluminum wires, it must be taken into account that over time, the contact of the aluminum wire in the terminal block worsens and you will have to squeeze it from time to time.
Self-clamping terminals of the WAGO type are very easy to install and can withstand significant current loads. The wire is stripped of insulation, inserted into the hole in the terminal block and snapped into place. Terminals with special contact paste allow mixed electrical installation (connection of copper and aluminum wires). The only drawback is that they take up quite a lot of space in junction boxes and socket boxes.
Fig.4 Connecting wires using self-clamping terminals
Welding or soldering provides durable and high-quality contact, with a very long period of trouble-free operation of the electrical wiring, but installation time increases significantly and additional difficulties arise if any changes need to be made to the circuit.
Connecting wires by soldering provides reliable and durable contact, which is characterized by excellent conductivity. But at the same time, soldering has a number of disadvantages that do not allow the use of this type of connection in places subject to increased mechanical stress. In addition, the soldering area requires more reliable insulation.
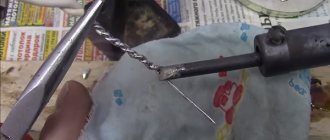
In order to weld the wires, it is necessary to strip the ends of the wires from 4-5 cm of insulation and twist them so that the wires end at the same level. After this, pour flux into the recess of the electrode, press the end of the twist to the electrode and weld the wires. At the end of the procedure, a contact welding “ball” has formed on the twisted wires, which must be cleaned with a wire brush and insulated.
Soldering wires is easier. After stripping the ends of the wires from insulation, it is necessary to sand the ends of the wires to a metallic shine. Next you need to tin the soldering area. When using rosin, heat the twist and press it against a piece of rosin until the twist is completely covered in melted rosin. To avoid melting the insulation during soldering, make sure that the wires do not get too hot.
Fig.5 Connecting wires using welding and soldering
Methods for connecting aluminum and copper wires
The basic principle of connecting aluminum and copper wires is the absence of contact between the conductors. This is achieved by connecting the wires with various terminal blocks, branch clamps or couplings.
There are several ways to make this connection: terminal blocks, branch clamps and bolted connections. The terminals are described above, so we won’t repeat them. Let's consider two types of connections of copper and aluminum wires.
Bolted connections are an equally common type of detachable connection, when the wire is connected to the contact using a thread and a nut. Despite the fact that the connection is highly reliable, it must be checked regularly: copper wires at least once every two years, aluminum wires at least once every six months.
How to make a bolted connection? First, you need to make loops at the ends of the wires to be connected (Fig. 6), the diameter of which should correspond to the diameter of the bolt (loops are conveniently made by screwing the core onto the bolt). Next, alternately put on the bolt: washer, loop, washer, loop, washer, nut. The nut must be firmly secured so that everything holds tightly and does not dangle. Afterwards, the entire electrically conductive part of the structure must be well insulated.
Fig. 6 Example of a correctly executed loop for a bolted connection
Branch clamps come in various shapes, which depend on the wire and the method of fastening in the clamp (Fig. 7). This method of connecting wires is best suited for outdoor use. Branch clamps are used in the same way as terminal blocks. This connection method is more thorough and can even be used to branch a wire from a pole to power a private home and even in a ground loop.
Fig.7 Branch clamps
Related materials:
- Why are wires color coded?
- Cable insulation color
- Cable cross-section selection table
Types of twists and connections of this type
One of the advantages of such a connection as twisting is the possibility of improving it by soldering or welding. When soldering, the connection becomes strong and is able to withstand high currents; when welding, special equipment is used, which makes it possible to give strength to the completed connection. Soldering and welding of both copper and aluminum wires is an excellent way to improve its performance: reduce the thermal load by improving contact at the welding or soldering points.
When carrying out work, twists can be divided into several types depending on the materials, type of wire, type of twist
It is extremely important that the cross-sectional area of each of the conductors matches each other, and is also suitable for the load used
Conductors can be made of the following materials:
- aluminum;
- copper.
Aluminum braiding is less resistant to further unwinding, while copper conductors can be unbraided and rebraided several times, for example, to add a third contact. Aluminum can withstand 1-2 times the load of twisting and unwinding, copper can be twisted and untwisted 3-4 times without any damage.
In this case, conductors can be divided into 2 types:
- with a monolithic core;
- stranded.
When performing the twisting process, it is worth considering the type of conductor, since the options for the plexus may be different. Depending on the type of wire, one or another twisting method should be used.
A cord with a monolithic core is usually used for stationary wiring, when there is no need to move equipment. Stranded conductors are often used for “rough” installation or where there is a need to move devices.
The twisting of both copper wires and aluminum wires is the same and is shown in the tables for each type of cord (stranded/single-core). If it is necessary to weave more than two conductors, for example 3-4, then first the initial twisting is performed for the two ends (shaping the connection) - 1-2 turns, after which the required number of conductors is added and twisted according to one pattern or another.
Hidden wiring type
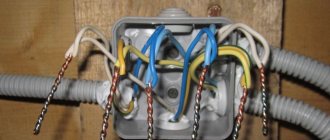
Installation of a branch device for hidden wiring occurs in several stages:
- Route and label all cables (lighting, switches, etc.);
- Make a recess in the wall for the electrical box;
- Punch holes in the right places in the box and pull the wires through them;
- Check how well the device fits into the recess;
- Dilute the gypsum solution and place it in the recess, and pull the box towards you a little;
- Level the device using a level;
- Wait for the solution to dry.
Then twist and insulate the wires in the device and only then close it with a lid and seal it.
Connection diagram
Characteristics
The technical characteristics of the wire make it possible to successfully use VVG and its varieties (AVVG, VVGng, VVGp, etc.) under various installation conditions. GOST 16442 establishes the following characteristics:
- Rated voltage 0.66-1 kV in accordance with the insulation class.
- Operating temperature from -50/+50 degrees. When laying outdoors, provide protection from UV radiation. At -15 degrees. installation requires heating.
- The maximum temperature that the wiring can withstand without loss of functionality is 70 degrees. In short circuit mode (no more than 4 seconds) - 160 degrees.
- The maximum bend is determined by the type of core. For solid ones, it is equal to ten times the diameter; for multi-wire ones, a coefficient of 7.5 is used.
- VVG is supplied in coils. The footage depends on the cross-section of the cores and can be 450 m, 300 m and 200 m.
- The average product life is 30 years, and the warranty period is 5 years.
Pue section 2 (2003)
Chapters 2.4, 2.5 are as revised in the seventh edition (2003)
SCOPE, DEFINITIONS
2.1.1.
This chapter of the Rules applies to electrical wiring of power, lighting and secondary circuits with voltage up to 1 kV alternating and direct current, carried out inside buildings and structures, on their external walls, on the territories of enterprises, institutions, microdistricts, courtyards, personal plots, on construction sites using insulated installation wires of all cross-sections, as well as unarmored power cables with rubber or plastic insulation in a metal, rubber or plastic sheath with a cross-section of phase conductors up to 16 mm2 (for a cross-section of more than 16 mm2 - see Chapter 2.3).
Lines carried out by uninsulated wires indoors must meet the requirements given in Chapter. 2.2, outside buildings - in chap. 2.4.
Branches from overhead lines to inputs (see 2.1.6 and 2.4.
2), performed using insulated or non-insulated wires, must be constructed in compliance with the requirements of Chapter. 2.
4, and branches made using wires (cables) on a supporting cable - in accordance with the requirements of this chapter.
Cable lines laid directly in the ground must meet the requirements given in Chapter. 2.3.
Additional requirements for electrical wiring are given in Chapter. 1.5, 3.4, 5.4, 5.5 and in Sect. 7.
2.1.2. Electrical wiring is a set of wires and cables with their associated fasteners, supporting protective structures and parts installed in accordance with these Rules.
2.1.3. Cable, cord, protected wire, unprotected wire, cable and special wire - definitions according to GOST.
2.1.4. Electrical wiring is divided into the following types:
1. Open electrical wiring - laid along the surface of walls, ceilings, along trusses and other construction elements of buildings and structures, along supports, etc.
When open electrical wiring is used, the following methods of laying wires and cables are used: directly on the surface of walls, ceilings, etc.
, on strings, cables, rollers, insulators, in pipes, boxes, flexible metal sleeves, on trays, in electrical skirting boards and platbands, free suspension, etc.
Open electrical wiring can be stationary, mobile and portable.
2. Hidden electrical wiring - laid inside the structural elements of buildings and structures (in walls, floors, foundations, ceilings), as well as along ceilings in floor preparation, directly under a removable floor, etc.
For hidden electrical wiring, the following methods of laying wires and cables are used: in pipes, flexible metal hoses, ducts, closed channels and voids of building structures, in plastered grooves, under plaster, as well as by embedding them into building structures during their manufacture.
2.1.5. External electrical wiring is electrical wiring laid along the outer walls of buildings and structures, under canopies, etc., as well as between buildings on supports (no more than four spans up to 25 m long each) outside streets, roads, etc.
External electrical wiring can be open or hidden.
2.1.6. The input from an overhead power line is the electrical wiring that connects the branch from the overhead line with the internal electrical wiring, counting from insulators installed on the outer surface (wall, roof) of a building or structure to the terminals of the input device.
2.1.7. A string, as a load-bearing element of electrical wiring, is a steel wire stretched close to the surface of a wall, ceiling, etc., intended for attaching wires, cables or their bundles to it.
2.1.8. A strip, as a load-bearing element of electrical wiring, is a metal strip fixed close to the surface of a wall, ceiling, etc., intended for attaching wires, cables or their bundles to it.
2.1.9. A cable as a load-bearing element of electrical wiring is a steel wire or steel rope, stretched in the air, intended for hanging wires, cables or their bundles from them.
2.1.10. A box is a closed hollow structure of rectangular or other cross-section, intended for laying wires and cables in it. The box should serve as protection against mechanical damage to the wires and cables laid in it.
Boxes can be blind or with openable lids, with solid or perforated walls and lids. Blind boxes should have only solid walls on all sides and no lids.
The boxes can be used indoors and outdoors.
2.1.11. A tray is an open structure designed for laying wires and cables on it.
The tray does not protect against external mechanical damage to the wires and cables laid on it. Trays must be made of fireproof materials. They can be solid, perforated or lattice. The trays can be used in indoor and outdoor installations.
Source: https://www.proftrade.ru/normative/d-19/c-10/doc-1074.html
Secrets of choice
When arranging their home, many people wonder which VVG wire is best to choose. Professionals recommend using a cable with a cross-section of 1.5 sq. mm for standard lighting devices, and 2.5 sq. mm for sockets.
When purchasing, be sure to pay attention to smudges - a high-quality product has an even cut, the shell fits tightly to the cores
It is important to focus on reputable manufacturers - “Energokabel” (Electrougli), LLC “Rybinskkabel” (city
Rybinsk), "MosKabelMet" (Moscow).
Elektrougli), Rybinskkabel LLC (Rybinsk), MosKabelMet (Moscow).
\
Twist
You can make a twist in one of three ways:
- simple twist;
- bandage;
- twisting with a groove.
The first method is most often used in everyday life. The correct choice of tool and the use of PPE caps allows for good contact.
This method is used to connect the ends in the junction box.
Band twisting is used to make connections for large diameter wires. To ensure a strong connection of aluminum cores, groove twisting is used.
If the connection technology in the junction box is carried out accurately, then the contact can serve for a long time and reliably.
All of the listed types of twisting require a certain skill in operation.
Using these methods, it is recommended to connect wires with a cross-section of up to 10 squares. The distribution box of a household circuit uses wires with a cross-section of 1.5 - 2.5 square.
When the wire cross-section is 6 square meters or higher, PPE caps are not used in the junction box.
To strengthen the bandage twist, soldering is used. Technological instructions do not allow simple twisting of aluminum and copper wires.
Such connections can be made after preliminary tinning of the copper.
All of the above methods are used to connect multi-core cables and wires. All operations in the junction box must be done carefully. Especially in the case when there are more than three cores in the cable.
When performing such work, it is recommended to use caps for twisting wires. Before starting, you need to sand the ends of the wire with sandpaper.
If it is necessary to make an additional tap on a certain section of the line, then all actions are performed according to a standard and familiar scheme.
To reliably twist aluminum wires, an electrician requires theoretical training and practical skills.
With enough experience, he can quickly complete any connection. In this case, the place of twisting must be cleaned. Aluminum oxide has insulating properties.
If the contact at the twisting point gets hot, then most likely the stripping of the aluminum wire was not done properly. It's no secret that all operations need to be done correctly.
This law strictly applies in electrical engineering. The fitter must have good tools and an exam on the rules of operating electrical installations - he must pass it within a certain time frame.
Twisting of wires according to the PUE
The rules for electrical installations say that a section of 3-6 cm can be used for twisting. The standards allow the connection of stranded and single-core cables with the ends stripped by 4-8 cm. The stranded conductor must be laid on a single-core conductor and twisted by 4 cm.
PUE establishes the type of wire for the home line. The aluminum cable should have a cross-section of 2.5-4 mm2, copper - 1.5-2 mm2. The VVG and PV power cord is used only with a PVC sheath. Wire type ShVL and ShTB with a cross section of 0.5-0.75 mm2 - with rubber or PVC insulation.
To ensure reliable twisting
To ensure maximum contact between the conductors, you need to ensure that they are in close and strong contact with each other. The spring that is built into the clamp enhances this effect. However, it should be taken into account that the metal spring has its own fatigue threshold, and over time the pressure will weaken and contact will gradually begin to be lost. Also, the bare surfaces of conductors are constantly in contact with air, due to which an oxide film and rust inevitably form on them. These factors will decrease conductivity with increasing intensity. Therefore, for greater reliability and durability of the connection, the use of PPE should be combined with other insulation methods; the reverse is prohibited by the PUE.
Advantages
- easy to install, saves a lot of time;
- do not require additional tools and skills;
- The durable cap simultaneously insulates and protects the connected wires;
- does not require a large amount of additional materials;
- the result is a practical and convenient connection; if necessary, the cap can be twisted and the wires disconnected, or the connection can be remade;
- high-quality PPE can withstand temperatures from –40 to +105 degrees Celsius.
Flaws
- you need to ensure that the size of the clamp matches the cross-section of the cable;
- It is not recommended to use for installing a street line;
- It is allowed to connect only copper electrical wires, caps for aluminum cables must be with anti-oxide paste;
- It is not recommended to use the PPE compound in its pure form.
Connection isolation
An important requirement in the connection procedure is their isolation to avoid accidents. Insulating materials include:
- PVC tubes;
- insulating tape;
- heat shrink tubes;
- special twist insulator caps.
Wire insulation methods
Methods of insulating wires directly depend on the material used. They are divided into methods such as planting, reeling and heating. In the first case, the material is placed on the twisted segment. In the second, simple winding is performed using insulating tape. In the third, insulation with a heat-shrinkable tube involves placing it on the current-carrying part and then heating it.
To the question of beginners, “Is it possible to insulate wires with electrical tape?” should be answered unequivocally in the affirmative. This is one of the most common methods. The main requirement is compliance with the shelf life of the material and the absence of visible damage.
Despite the fact that at first glance the procedure for twisting electrically conductive wires seems simple, a responsible approach to the matter is required.
Wire Twisting Tools
Heat shrink tubes for wires
To properly twist the wires together, you will need:
- stationery or kitchen knife;
- nippers or side cutters;
- stripper;
- hydraulic or manual crimping machine;
- soldering iron - for removing insulation;
- heat shrink tube;
- construction hair dryer;
- screwdriver
Instead of a soldering iron, you can use an electric burner.
One-piece crimping
For twisting stranded wires, special permanent crimp connections are used. This connection method should be used for identical metals, since due to the difference in resistance in each crimp, contact, for example, of copper with aluminum will lead to heating. If the twist is made of copper wires, this should also be the connecting tube, the diameter of which approximately corresponds to the thickness of the connected wires. Pre-twisting of the wires is not necessary.
The cables inserted into the tube are crimped with press pliers on both sides. At least three layers of insulating material are applied to the resulting joint. As an alternative to insulating tape, you can use ready-made crimps with an insulating cap. Such a tube is crimped immediately with a polyethylene cap, which gently deforms and reliably isolates the joint.
Connecting wires by soldering
If the twisted wires are soldered , we get a connection of wires by soldering , which guarantees reliable and high-quality contact, which has a fairly low contact resistance, high conductivity and mechanical strength. But it is important to solder the wire connection correctly; for this you need:
- tin the connected wires with rosin (flux);
- the solder should flow into the twist;
- After the solder has cooled, you can sand it with sandpaper, because sharp edges of the solder can pierce the insulation;
- insulate the wire connection.
But such connection of wires by soldering is very labor-intensive and requires certain skills. The negative aspects of soldering wire connections, I would include:
- need for isolation;
- complexity (not everyone knows how to solder well), and even for those who are good at soldering, doing this, for example, while standing on a stepladder or ladder, to put it mildly, is not very convenient;
- if a mistake was made when connecting the wires, it will not be easy to separate them after soldering, so it is better to leave a larger supply of wires and cables;
- high time consumption.
Where does the wiring start?
A route for its installation is being thought out, which will help carry out repair work if a wire burns out somewhere, without breaking the walls or destroying the decorations of the room.
To do this, you can use pipes or structures for wiring, although in most cases a small area of the wall is knocked out and wiring is laid there - then it is covered with putty or even cement. In principle, this is the simplest method and it is often used.
But what is most important is the wiring diagram, as it will help during the installation process and reliable operation after its completion. Due to it, the correct load on the network will be ensured and the locations of sockets, electrical boxes, and switches will be formed.
If you have knowledge in this area, then this is a simple matter that will not take much time. But in case of their absence, even taking into account an explanation of how this is done, it is advisable to turn to specialists and, based on this information, monitor their work.
Otherwise, unexpected troubles may arise - electric shock, short circuit and burnout of wires, damage to household appliances.
In fact, installing electrical wiring yourself is not an easy task, and as you understand, we do not recommend doing this without the appropriate skills. The fact is that if you don’t know how to do this, it’s better to protect yourself and your loved ones by turning to specialists.
This applies not only to the organization of wiring, but also to simple repairs, if the lights suddenly went out and there was no apparent reason, or you saw a fire or smelled something burning. Any action without knowledge of electricity can cause significant harm.
Types of twists
Types of twists
By twisting the wires correctly, you can get a reliable and dense section. Craftsmen resort to various types of connections - safe and durable:
- Bandage - an additional one is applied to two sections and braided around them. This creates additional reinforcement of the area.
- Groove - with the parallel technique, one core remains motionless, and the second wraps around it. This type involves making 3-4 turns of one cable around the second. Then the first one is laid tightly parallel to the second one and 3-4 turns are made again;
- parallel connection. Two conductors with the insulation removed at the same level are laid side by side. The tips cross tightly and twist in any direction.
Danger of twisting
Connecting the cores to each other using the twisting method
In paragraph 21 of Ch. 2.1. PUE twisting is not prescribed among the methods of connecting wires. The rules allow the use of welding, soldering, and clamps. The danger of twisting electrical wires lies in the following points:
- increasing the contact resistance of the contacts when the cores are loosely tightened;
- weakening of the twisted section, leading to heating;
- increase in current with weak contact;
- melting of the conductor insulation protection;
- risks of short circuits, fire, electric shock to humans.
Despite the regulatory ban, most craftsmen resort to the twisting technique. This option is suitable for testing the operation of the line, running a short-term network, for the period of repair.
Use special terminal blocks to twist the wires.
Types of twists
Reliable and tight twisting protects against unforeseen emergency situations
It is important to do it as correctly as possible. Even the slightest violation of safety regulations can cause a fire.
For this reason, the rules for the design of electrical equipment do not provide for the legal use of this method. Despite the ban, it is relevant both in production and in everyday life. Existing types of wire twists can be used temporarily when, for some reason, a quick connection using safer methods is not possible.
There are simple methods by which the connection can be made safely and firmly. They are not difficult even for a beginner. When performing, it is possible to use both two wires and several. The following known types of twists are usually used:
- bandage;
- groove;
- simple branching method.
Types of wire twists
The above twisted electrical wires are completely reliable electrical connections. But implementation requires certain skills with hand tools. Self-training is available to every person who practices repairing electrical wires.
Bandage is one of the methods of twisting wires, often used in everyday life. It is characterized by the use of an additional segment, which is superimposed on the connected conductors. This is a good method for serial, parallel and branch connections.
Stranded
Beginners sometimes wonder: “how to connect single-core and stranded copper wire?” In fact, the main requirement is a tight and reliable fit of the cross-sectional area of the cores to each other. Knowing how many wires can be twisted into one twist, you can quickly complete the task. The number of electrical conductors depends on their cross-section. The larger it is, the fewer wires are allowed to twist. And vice versa: the smaller the cross-section of the conductive wires, the greater the number of wires that can be twisted.
Connecting stranded wires using the groove method is not difficult. This is an easier way to do the job than the “bandage”. In this connection, it is not necessary to use an additional piece of wiring. In this case, a complete connection of wires by twisting is carried out directly by the wires themselves. They are laid in parallel, in series or in a branch.
Before twisting the three wires together, it is necessary to remove the insulation from the ends of the wires and use a hand tool to twist them. It is permissible to use the “groove” and “bandage” methods, as well as a simple branch. The maximum number of wires in a twist using the latter method depends on the diameter of the conductor. Even with the smallest diameter of the cores, their number should not be more than six. Novice electricians are wondering: “how to make a twist of 4 wires?” It is most optimal to perform this action using the “groove” or “simple branch” method.
Advantages and disadvantages
Using twisting, you can quickly connect wires.
The interweaving of conductors is not designed for connecting powerful appliances - kettles, washing machines, heaters, refrigerators, computers. Despite this, twisting has several advantages:
- fast organization process;
- if performed correctly - durability;
- no need for special tools;
- creation of signal contacts;
- additional reinforcement when using soldering technology;
- minimum costs for consumables;
- possibility of re-execution.
Among the disadvantages are:
- mandatory insulation of the twisted section;
- normal line operation only when connecting low-power consumers;
- inconvenience of implementation;
- risks of wiring fire if the algorithm is violated;
- constant voltage drops and overload of the twisted section.
Plexus is advisable when using low-power equipment - lamps, power adapters.
Nuances
Connecting conductors from different materials
The most basic thing is that twisting is PROHIBITED with conductors made of different materials. It is PROHIBITED to weave copper and aluminum wires. This is due to the fact that when copper and aluminum come into contact, a galvanic couple appears, which destroys the created connection. The higher the current passing through the plexus, the faster its destruction will occur. Such contact of wires threatens with the following consequences:
- heating, sparking and subsequent combustion;
- deterioration in the quality of contact of such a “weave”;
- reducing the contact area;
- strong heating of the wires at the plexus;
- rapid oxidation;
- under temporary and powerful loads, “heating-cooling” cycles occur, which is fraught with severe
- deterioration in connection quality.
The appearance of an oxide film
The film appears as a result of the interaction between the oxygen environment of the air and the conductor. The metal conductors used to make connections are usually made of aluminum or copper and are quite susceptible to oxide film if the connection is not insulated. More expensive materials that are rarely used in electrical circuits, such as gold and platinum, do not have this disadvantage, but their cost is extremely high. An oxide film on wires has the following consequences:
- deterioration in the quality of twist contact;
- intensification of the heating process when current passes.
Dealing with this drawback is quite simple - it is necessary to carry out high-quality insulation of the twist.
The appearance of transient contact resistance
This resistance appears as a result of poor contact between the wires, which causes the temperature to increase greatly at the point where the current passes from one part to another. Transient contact resistance serves as a catalyst for the rapid destruction of the wire tangle, especially in the absence of insulation. To minimize transient contact resistance, the tightest contact between the two conductors should be made.
Recommendations from professionals
Experienced electricians give some tips on how to apply twisting and consider all the risks of such a connection.
PUE allows
Use of soldering
Standards cannot completely prohibit twisting. It can be used in combination with technologies:
- welding: twisted wires are additionally soldered to ensure continuous contact;
- Soldering: Solders cannot impart mechanical strength to a joint. For this reason, the wires are twisted, soldered, insulated and placed in a junction box.
For additional density of twisted cores, use screw terminal blocks.
Connecting conductors from different materials
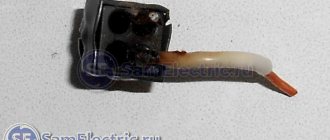
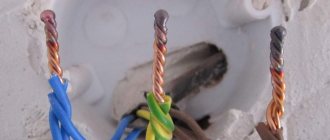
The result of connecting copper with aluminum
It is prohibited to combine copper and aluminum into one twist. A galvanic couple arises between them, which undergoes electrolysis under the influence of moisture and chemical processes. The resistance of damaged contacts increases and then disappears. As a result, the seam heats up and burns.
The difference in the coefficients of thermal expansion of the material will lead to weakening of the seam after cooling. Resistance begins to grow more intense.
The appearance of an oxide film
Aluminum is a material on the surface of which an oxide film always appears. It increases cable protection, but at the same time the contact resistance increases. To eliminate it, the cores are coated with quartz-vasilin paste or special terminal blocks with this filler are purchased.
Twisting, as a type of connection of conductive wires, can only be used as a temporary measure. Under constant operating conditions, the seam can lead to fires in the wiring and fire hazard situations.
Installation
In practice, two methods are used for twisting wires using PPE caps. First method: without preliminary twisting. Second method: with preliminary twisting.
Pre-twisted installation
Often in practice, electricians install PPE on a pre-prepared twist of bare wires. To do this, you need to take the stripped wires and press them tightly against each other. The bundle should be fixed using pliers, stepping back a couple of millimeters from the exposed veins. In this case, you need to start twisting the bare ends of the electrical wires pressed against each other clockwise. For twisting, it is best to use another pliers. A small section can be twisted by hand, but if the wires are thick or there are many of them, then use a tool. Once twisting is complete, bite off the remaining exposed wire at a sharp angle.
Installation without twisting
PPE is installed on electrical wires without twisting (a more popular practice). To do this, you need to place the bare wires parallel so that the ends point in the same direction, insert the ends into the PPE and start screwing the cap manually (clockwise). Manual screwing must be done until the spring clicks. A click from the spring will indicate that the twist within the cap has been completed. Further, if the length of the bare wire does not extend beyond the clamp, then the work is finished.
Some electricians recommend exposing a longer section of cable to make the twist longer and more secure. In this case, it will extend beyond the cap, and after a spring click, you will need to tighten the connection using pliers or a screwdriver until the entire bundle of wires is twisted all the way to the insulating coating. After this, the exposed area must be insulated. The best way to do this is with heat shrink tubing and electrical tape.
It is also important that the conductors transmit current through the connection and not through the clamp spring. Since the spring is not predisposed to such loads, it will very quickly overheat and fail
Do not connect cables made of different metals
You also need to know that you cannot twist a combination of copper and aluminum cables together. Since in such cases, special devices (pads) with built-in metal adapters are used.
Options for twisting stranded wires
In practice, 3 methods of twisting flexible stranded wires are used. The choice of method is made according to the situation and based on the preferences of the master. The methods are:
- serial connection;
- parallel connection;
- thin wire bandage;
Serial twisting
The stripped wires are applied to each other so that they form a crosshair. Then the conductors are twisted together. The connection made is symmetrical relative to the crosshairs. The ends of the wires stick out in opposite directions. After twisting, it is advisable to slightly tighten it so that it tightens.
The method is good due to the compactness of the resulting connection. Its thickness does not exceed 3 diameters of the insulated wire. Care must be taken. If the twist is protected from moisture by a heat-shrinkable tube, then the insulation is put on the core before making the connection.
Parallel
The insulation is removed from the ends of the wires. The cores should be connected so that the stripped sections are parallel. The ends of the wires point in the same direction. The current conductors are then wound onto each other in the shape of a spiral. It is important to make the connection as tight as possible, but not to break the conductors with excessive force.
This twist can be found in the junction box. To protect the contact, electrical tape or heat shrink is used. For temporary and non-essential connections, it is allowed to use a PVC pipe (cambric) for insulation.
Bandage twist
The banded connection of cores is suitable for connecting thick wires that are difficult to bend with your hands or pliers. Current-carrying conductors are laid next to each other. They must first be properly cleaned on all sides using a needle file or file. Then the bare wires are tightly wrapped in a circle with the maximum number of thinner wires. A similar connection is used on power transmission towers.
Important! Do not connect the cable cores in a knot. The contact will be as tensile as possible, but extremely unreliable from the point of view of electrical conductivity.