Every house, apartment or garage has a connection to electrical networks, where there is often a need to repair old wiring or install new wiring. When laying electrical wiring, it is necessary to connect the cables, and do it reliably, this is the key to the correct operation of electrical devices and safety. This is best done using crimps for electrical cable lugs.
When wires are loosely connected, for example by twisting or soldering, the connection area heats up, which most often leads to a fire. Such an unreliable connection does not provide adequate throughput and causes instability in the electrical network, which leads to failure of electrical equipment.
The connection method using crimping (crimping) wire lugs does not have these disadvantages. To do this, use a special tool - crimpers (crimpers), which ensure tight and high-quality contact.
Purpose and areas of application
The main purpose of using cable lugs is to significantly improve the quality of electrical installation work and simplify the procedure for switching wires. Products are made from different metals, including aluminum and copper, which allows you to create transitions between different sources of electrical energy and installations.
These elements are universal, and the range of tips is very diverse. Thanks to this, you can find the most suitable option when performing certain installation operations. Each product is marked, which includes an indication of the conductor cross-section acceptable for switching. Only correctly selected tip sizes guarantee the most reliable and high-quality crimping of the wire (cable).
The nuances of working with NSHVI
If a multi-core cable is used, it is recommended to buy an NShVI tip. This type is not used for terminating wires with one core.
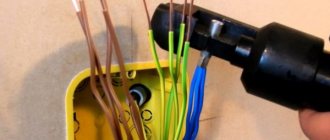
Crimping of a multi-core cable is performed as follows:
- you need to select the wire cross-section and tip brand. The veins should enter freely from the skirt side;
- The type of tip should be selected with some margin. A wire with a cross-section of 1.25 mm is crimped with a tip of 1.5 sq. mm, and the section of the skirt is up to 2.5 square meters. mm.
Option NSHVI
Required Tools
Crimping is carried out with a special tool that allows you to create the necessary force. The following tools are popular:
- Press pliers for crimping PK2 and PK2M lugs are used for terminating cores with a cross-section of up to 10 sq. mm;
- PK1 and PK1M brand tools are a more powerful version of hand pliers;
- hydraulic pliers allow you to crimp wires up to 10 sq. mm;
- In industrial production, a hand press is used. It is suitable for wires up to 240 sq. mm;
- hydraulic press with electric drive is used for cables up to 300 sq. mm.
Types of instruments
Press pliers with hinges increase the pressure of the tool, which makes the manual crimping process easier. Devices with a ratcheting mechanism are especially convenient. They prevent the instrument from unclenching until the procedure is completed.
You can watch how to crimp a wire without tools in this video:
Sleeves for wires for crimping
Not all devices or instruments use cable lugs - there is also a sleeve termination. For cables with copper conductors, sleeves marked GML are used, which means tinned copper sleeve. The GAO brand is suitable for aluminum wires. This is a closed type sleeve made of aluminum. If it is necessary to make a connection with the connection of copper and aluminum elements, then an alloy is used.
Sleeves for crimping
Preparation for crimping
Before putting the tip on the core, it is necessary to perform certain preparations:
- Clean the required length of the wire from the insulation. You can use a special tool for this;
- Twist the wires by hand and place them in the tip from the skirt side.
It is important to choose the correct cross-section of the core to ensure easy entry into the tip sleeve
Stripping wires
How to crimp a wire
After selecting suitable tips and wires, you will need a special tool. Press pliers resemble pliers, at the end of which there is a special matrix where lugs and an uninsulated section of cable are installed
This device allows you to ensure even pressure from the tip on all sides. Particular attention should be paid to the type of cable, which can be stranded or with a monolithic core
Crimping of stranded wires
Single terminal crimp
To make a high-quality crimp, it is recommended to follow the following recommendations:
- to prevent the cores from falling out of the socket, the conductor should be fixed when placed in the tool matrix;
- crimping is carried out using pliers until the snoring mechanism is activated, which allows you to block the tool from opening;
- if fixation is carried out manually, then control is carried out by pulling the hand. If the crimp is of high quality, then the installation will be tight without movement;
- You can use a double-circuit crimping tool. Termination is performed by compressing the insulator and bushing in sockets with different diameters;
- Finally, you need to check the strength of the contact by slightly pulling the elements.
Single wire crimping
Double terminal crimp
The connection of two phase conductors is carried out on one contact. When installing modular machines, they are connected using special jumpers. There are a pair of cables per contact.
In this case, it is recommended to use NShVI for two wires. Here are some installation features:
- two wires are installed inside the cuff at once;
- It is better to perform crimping using press pliers. When crimping a double tip, it is better to use a matrix with a cross section of 6 square meters. mm.
Crimping power cable lugs
To crimp the power cable, it is recommended to use a tinned copper tip, which is protected from oxidation. When cutting the cable, the edge may fluff up and become larger than the rest of the core. In this case, the edge can be removed using a sharpener. The cable should be unfolded so that the circle removes excess along the veins, but does not bend them.
You should not use the soldering method for crimping, since contacts made only with pure tin cannot be used on wires.
Power cable crimping
Marking
The main criteria for classifying cable lugs are designs and materials of manufacture. Regardless of this, Russian-speaking countries have adopted a unified product labeling system, thanks to which a knowledgeable person can easily understand what material the item is made from and where it should be used.
The main letter designations include:
- A – material of manufacture – aluminum;
- L – brass;
- M – copper;
- T – metal with a tubular cross-section;
- U – angular.
You can often see the letter “O” on the elements. Its presence indicates that the product is equipped with a special viewing window, which allows you to visually verify the quality of the connection at any time.
Let's look at more advanced abbreviations:
- TML (O) – tubular tinned copper lug for wires for crimping with an inspection window (or without it, if the letter “O” is missing);
- NSHVI – pin bushing;
- NIK – ring.
Numerical values are added to the letter designations, which indicate the cross-sectional area or diameter of the product.
How to choose the right tip for crimping
The correct choice of this electrical installation element depends on the material of manufacture, flexibility, cable cross-section, as well as the method of connection to the device or equipment:
- Cable cross-section is an important aspect. If it is larger, the cable simply will not fit into the sleeve, and if it is smaller, the crimp will not be tight, and there is no point in such a tip.
- Flexibility of the wire – this can also lead to a loose connection. For example, we use a product with a bolted connection and a flexible electrical cable. When screwed in, the bolts push the wires apart, pressing only a few “hairs” in the middle. There is no talk of any contact anymore.
- The method of connecting to the equipment may also differ. If switching is not possible with a direct connection, it is necessary to use.
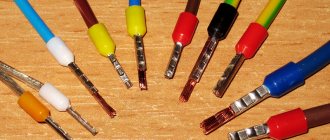
Types and options
Structurally, tips are divided into two main types: single and double. Flaring can be performed at one end of the object, which is a necessary condition when working with multi-core conductors. A polyamide cuff is most often used as insulation.
According to the material of manufacture, electrical lugs are divided into the following types:
- Copper. Suitable for use exclusively with copper cable. In the manufacturing process, seamless tubes are used. A clamping part is installed on one side, and a tubular hole into which the conductor is inserted is installed on the other. These devices can be used during the installation of electrical devices, including input, distribution and grounding types of equipment.
- Aluminum ones are suitable for cores made of the corresponding metal. A contact blade with a special hole is placed on one side, and a tubular hole on the other. To fix the cores, the principle of crimping is used. An additional tool is required. To protect against oxidation, the tip must be coated with a lubricant made from a mixture of quartz and petroleum jelly.
- Aluminum-copper lugs are required in cases where the switchgear uses copper bars and the electrical wiring consists of aluminum conductors. The landing tube is made of aluminum, the blade with contacts is made of copper. The manufacturing process proceeds using the frictional diffusion method (gas dynamic spraying). The durability of the contact is due to the fact that the element is coated directly on top with copper plating.
Separately, it is worth highlighting the presence of bolted tips, the fixation in which is carried out by clamping bolts. In this case, there is no need for crimping, and the bolt is the main component of the product. A wrench is required to tighten the unit.
Main types of crimping pliers for ferrules
The need to use crimping for wires may arise in two situations: in the case of preparing live parts for fastening to the terminals of various electrical appliances and when connecting wires and cables. Depending on the purpose, one or another crimping tool is used. Based on their design features, pliers can be divided into two main types:
- operating on the principle of pliers;
- diaphragm.
The first option is the most common. Pliers are crimped on both sides; they are distinguished from pliers by special recesses on the jaws, which allow the joints to be made as strong as possible.
The convenience of using this type of pliers is that you do not need to choose the position of the tips; you can perform the action from any side. Some problems arise in situations where the sleeve does not fit into the matrix. In this case, you need another pliers.
Crimping the end with diaphragm press pliers is characterized by high density
Diaphragm presses for wire lugs crimp the sleeves on four or six sides, and they themselves adjust to the thickness of the cable. Crimping the end in this way is characterized by high density.
Crimpers are a special type. Although many people call any crimping pliers this way, in this article this concept will be applied to a tool for working with computer and Internet connections. The specifics of this device are discussed further in the article.
Correct selection for crimping
Before any crimping work, a high-quality selection of tips is carried out. Here it is important to take into account both the thickness of the sleeve or the diameter of the input sleeve, and the material of manufacture.
Note! When choosing the diameter of the inlet hole, you should focus on the diameter of the wire that has already been stripped of insulation. It must coincide with the tail of the product.
If an aluminum lug was selected, its cross-section should be identical to the wire. In the case of using copper products, some difficulties may arise, so it is best to do this:
- Look for a suitable solution in the GOST tables, but you will need to understand the flexibility classes of the cores.
- Manually measure the diameter using a special tool - a caliper. Next, the obtained result is compared with the cross-section of the internal hole, which is measured by the same device.
It is important that the materials from which the tips and cores are made are identical, since when copper interacts with aluminum without the use of protective reactions, corrosive processes will occur. This will lead to oxidation and subsequent short circuiting of the wiring, which does not bode well.
Why do you need crimping and crimping wires?
Is it even possible to do without sleeves and crimping? What's wrong with simply attaching wires to machines and other devices?
With a simple clamp, the bundle of wire fluffs up and is crushed to the sides. Some individual conductors may even be damaged. Such conductors, destroyed and separated from the main bundle, no longer take part in contact and the passage of current load through themselves.
All this leads to the fact that the remaining cores are not enough and the connection points heat up. In addition, the bare copper from which the wire strands are made remains accessible to moisture and oxygen. And this leads to its darkening and oxidation. By crimping the conductor once with a tip or sleeve, you will save yourself from all these problems in the future.
Basic rules for crimping
Follow several rules that will simplify the crimping process and improve the quality of the final result when working with cable lugs or sleeves:
- the tip must be selected technically competently, taking into account all the nuances;
- slowly strip the veins, removing all traces of insulation;
- When performing work, use only high-quality tools;
- find a matrix that is suitable for crimping;
- strictly follow the cable crimping sequence.
When using the tool, be sure to set the hole dimensions correctly, otherwise the connecting components may be damaged.
NShVI pin products
Pin sleeve lugs (abbreviated as NSHVI) are made from special electrolytic copper, the back of which is protected by an insulating layer. The material must be treated with galvanic tinning. In the domestic and industrial spheres, NShVI are used for crimping cables with a cross-section of 0.2 square meters. mm and above.
Note! In addition to letter markings, color markings are also used to indicate the diameter of the sleeve.
The nuances of working with NSHVI
NShVI are ideal for crimping multi-core wires, but will be inappropriate when working with a cable consisting of a single core. The crimping process is carried out as follows:
- Select the wire cross-section and cable lug of the desired brand. Make sure that the wires are inserted into the product from the “skirt” side.
- When choosing this component, make a certain reserve. For example, a wire whose cross-section is 1.25 square meters. mm, must be crimped with a tip with a cross-section of 1.5 square meters. mm and above with a “skirt” size of no more than 2.5 square meters. mm.
Required Tools
In the process of terminating a single or multi-core cable, a special tool is used to achieve the required force and ensure the reliability of the result. You should have on hand:
- Press pliers PK2 and PK2M are suitable for crimping wires whose cross-section does not exceed 10 square meters. mm;
- PK1 and PK1M are tools with increased power compared to hand pliers;
- hydraulic pliers, like PK2, can be used for cables with a cross-section of no more than 10 square meters. mm;
- In industrial enterprises, manual presses are used, suitable for cables with a cross-section of up to 250 square meters. mm;
- for conductors whose total cross-section is even larger, a hydraulic press equipped with an electric drive is used.
The presence of a ratcheting mechanism in the press jaws increases the reliability of the work: the tool will not loosen until it is completed.
Sleeves for wires for crimping
It is not always appropriate to use standard cable lugs, so instead of crimping, terminating with sleeves can be performed. For copper cables, GML (tinned copper) sleeves are used, for aluminum cables - GAO (closed aluminum sleeve). When two elements from different materials are connected, a sleeve made from an alloy of aluminum and copper is used.
Preparation for crimping
Before inserting the core into the tip, you need to perform careful preparation:
- Remove the insulation from the end of the wire of the required length (to do this, use a special tool to avoid damaging the wire).
- Twist all the strands by hand and push them inside the tip from the “skirt” side.
Wire lug crimping pliers
How to clean a glass-ceramic stove using specialized and improvised means
Terminal crimping pliers are used to firmly and reliably connect wires to each other or to terminals of various shapes and sizes. In this case, the crimping method is used, which is considered preferable to soldering.
This is especially true when using open-type electrical circuits, which are used in car assembly. Also, when connecting conductors using terminal crimping pliers, you must remember the galvanic couple effect.
The pliers presented in our store differ in the number of supported terminal sizes, the presence of devices for removing insulation, and the use of a conventional crimping or ratcheting mechanism, which allows for a more uniform force over the entire surface.
Wire crimping
- In order to properly crimp a wire, you must follow 3 main rules:
- First, choose the right connector or tip so that its size matches the cross-section of the wire being pressed.
- Secondly, use a professional tool. These are press pliers equipped with a ratcheting mechanism that will allow you to perform a full crimping cycle.
- And thirdly, select the desired matrix. Its geometry and shape must correspond to the crimp part of the tip.
Only stranded wires can be crimped with insulated lugs. Mono-core ones should be used for their type of non-insulated lugs.
When choosing, be sure to pay attention not only to the diameter and cross-section, but also to the shape of the contact blade. Do not use fork lugs on moving or vibration-prone contacts!
The insulation from the core is removed exactly to the length of the compressed tube where the core is inserted. Unlike bushings, it will be extremely inconvenient to bite off the excess with a cable cutter.
When crimping, insert the tip into the press matrix so that the seam of the shank is on top and strictly in the center.
Match the color coding on the dies to the colors of the tips themselves.
When pressing insulated tips with pliers, make sure that each circuit of the matrix is crimping its part of the core and insulation, and also insert the tip into the matrices only from the marked side.
If the dies are not completely closed at the end of clamping the handles, then you have selected the wrong tip size. If the insulating sleeve is damaged, the tip must be replaced.
At home and at work, we are often faced with the need to establish a network connection or troubleshoot problems related to the AC circuit. In this case, we will definitely need a wire crimping tool.
It is designed to mechanically compress connectors or contacts around a cable. This establishes an electrical connection and ensures stability in the network.
Crimpers can be used to work with solid or twisted wires. This crimping tool is also called a crimper. The advantage of crimping is the ability to replace jaws.
The wires are inserted into the sleeve and crimped with a special tool - a crimper. A crimper is a crimping pliers. The great advantage of the sleeves is that such crimping does not create increased resistance at the connection point.
Sleeves in the form of a flat tip with a hole are useful when you need to secure a wire or bundle of wires to a housing with a screw. Simply select a sleeve of the appropriate diameter, crimp it, and attach the tip where needed.
To connect stranded wires, to combine single-core wires with stranded wires, or simply to fix them in terminal blocks, pin sleeve lugs are used.
The stranded wire is conveniently inserted into the lug, the lug together with the wire is crimped, after which the stranded wire can be fixed in any terminal block, even a polyethylene one, without fear that the connection will be broken.
The decisive thing here is the correct choice of the diameter of the tip; it must correspond to the total diameter of the cores being crimped, combined into a bundle, so that the wires do not jump out later.
To crimp the pin terminals, you can use pliers or use a screwdriver and a hammer.
How to crimp a wire
Press pliers resemble ordinary pliers or pliers, with a matrix installed at the end. It is selected depending on the size and shape of the tip. It is into this that both the tip and part of the cable, stripped of insulation, are inserted. After this, just press down the handles using a little force. The tool itself will do the rest for you.
Single terminal crimp
Be guided by the following principles:
- to prevent the conductor from falling out of the tip socket, first install the connecting component in the press jaw matrix, and only then fix the cores;
- When performing crimping with press pliers, press on them until the ratcheting mechanism is activated, with the help of which the tool handles are blocked and the release is prevented;
- if you fix the tip and cores manually, then lightly pull your hand to control the process (high-quality fixation eliminates any movement of the cable inside the tip);
- Double-circuit crimping pliers work on a different principle - compressing an insulator with a bushing in sockets of different sizes;
- Whether you worked by hand or using a press, be sure to check the quality of the connection at the end by lightly pulling on the pieces of wire.
Advice! Before starting work, you can practice using some of the unnecessary wire. As soon as you achieve a high-quality connection, you can begin electrical work.
Double terminal crimp
When connecting two conductors, one contact is used. In a modular circuit breaker, the cores are switched using jumpers: one contact - two cables.
In this case, you should use NShVI for two conductors. Both multi-core cables are placed in the cuff, and crimping pliers must be used for crimping. To crimp a double-type tip, you should install a matrix with a cross-section of at least 6 square meters on the pliers. mm.
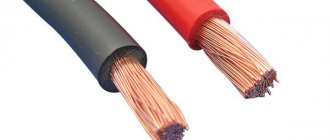
Crimping power cable lugs
When crimping power cables, tinned copper lugs are used, which are well protected from corrosion. If, when cutting the cable, its cores “fluff” significantly and become larger in diameter than the rest, then perform the work on a sharpener. When unrolling the cable, make sure that the circle removes excess knots along the cores and does not bend them.
Soldering is absolutely not suitable for crimping a power cable, since single tin contacts cannot be used on such wires.
Rules for working with insulated tips
- Only stranded wires can be crimped with insulated lugs. Mono-core ones should be used for their type of non-insulated lugs.
Right angle - how to calculate using available tools
When choosing, be sure to pay attention not only to the diameter and cross-section, but also to the shape of the contact blade. Do not use fork lugs on moving or vibration-prone contacts!
- the insulation from the core is removed exactly to the length of the compressed tube into which the core is inserted. Unlike bushings, it will be extremely inconvenient to bite off the excess with a cable cutter.
- When pressing, insert the tip into the press matrix so that the seam of the shank is on top and strictly according to class=”aligncenter” width=”372″ height=”193″
- follow the color markings on the matrices with the colors of the tips themselves
- When pressing insulated tips with pliers, make sure that each circuit of the matrix is crimping its part of the core and insulation, and also insert the tip into the matrix only from the marked side
- If the dies are not completely closed at the end of clamping the handles, then you have not selected the correct tip size. If the insulating sleeve is damaged, the tip must be replaced.
Tips and tricks
A couple of simple tips. In order not to make a mistake when choosing a tip (copper or aluminum), take a piece of cable with you to the store, which will be crimped. Having it on hand will make it much easier to choose the correct sizes.
Each tip is selected individually for a specific cable. In case of discrepancy, crimping will be performed incorrectly. Never use homemade tips, do not cut the sleeve into two parts, trying to save money and use it at several points. Often, short circuits, fires and fires that lead to damage to property arise due to technically incompetent electrical installation work.
What does the tip marking mean: full explanation
Each type and type of product has its own alphanumeric marking, without knowing which it is impossible for a home craftsman to explain in the store what he needs. Let's look at popular markings:
- TML is a tin-plated tip, to work with which you need a special tool - a crimper. Looks like NSP. The only difference is that NShP is copper;
- TA – the same tip, but made of aluminum;
- SIP is a self-supporting tip that has its own insulation along the tube and an annular mounting plate;
- NSHVI - common in household use, sleeve pin;
- NKB - used in industry as geophysical cable;
- RFI-M is already a flag tip;
- IEK – copper fork;
- TMD – double blind connectors;
- NKI - isolated ring.
Aluminum products are regulated by GOST-9581-80, copper - GOST-7368-80.
Products for crimping are made of copper, aluminum or bimetal
The progress of soldering from start to finish
In this chapter, we will describe the entire process in detail, taking into account both significant points and seemingly simple, but no less important, subtleties.
What is needed for work
Electrician tools
The set of tools and materials for work is not very large; all this can be easily purchased in specialized stores. The price for all this is small.
We will need:
- A soldering iron with a stand, and do not choose a powerful model with a thick tip, 15-40 W with a tip with a diameter of about 5 mm is enough;
- For solder, you should also not take thick rods; it is convenient to work with wire 2-3 mm thick;
- Rosin - in addition to it, it is advisable to additionally have both liquid flux and a brush for applying it;
- Tweezers;
- Assembly cutters;
- Pliers;
- Knife;
- File for sharpening and straightening the soldering iron tip;
- Sandpaper, file or needle file with a fine notch to remove oxides and enamels.
Advice! Tubular solder with rosin inside is very convenient.
This is a sufficient set - sometimes you can do without some tools, for example, sandpaper or tweezers, but it is advisable to have everything at hand. Additionally, you may need a tester or probe (if you need to connect a cable of several wires that are not marked with different colors).
There may also be a “third hand” problem when you need to hold two wires or a wire and a connector, but the hand is occupied with a soldering iron. To solve this, you can use a clamp or any suitable clamp.
If you need to connect contaminated wires, then you need to additionally use an alcohol-gasoline mixture, gasoline or some other degreasing agent.
Getting the soldering iron ready
Sharpened soldering iron tip
The soldering iron tip must be sharpened at an angle of 45° and have no defects on the surface. We sharpen it, if necessary, remove excess metal until a smooth surface is obtained.
With a new soldering iron, even after sharpening, the tip becomes tinned. To do this, heat it, dip it in rosin and then touch the solder so that it covers the entire surface of the beveled working area.
Soldering wires
connecting wires by soldering: an example of high-quality work
Soldering wires is carried out in several operations, and they depend on their type and insulation. In addition, we are only talking about copper or brass conductors; if they are aluminum, then a soldering iron will not help us (although this can be done with special fluxes) - they are connected with twists or special clamps (see Terminal blocks for connecting wires).
The thickness does not affect the sequence of operations; soldering a thick wire is no different, except that if the diameter is excessively large, it will not warm up. In this case, you just need to take a more powerful soldering iron.
Attention! According to the current operating rules for electrical installations (PEU) and GOST, soldering of copper wires on power, grounding and neutral lines of electrical equipment is prohibited. In an emergency, they can become very hot and the solder will drain. Special clamps are used for connection.
If we solder single-core wires without insulation, we need:
- Remove oxides from the surface - we do this with sandpaper, a fine file or just a knife. You can also pull the wire between the jaws of the nippers several times, turning to clean the entire surface but without squeezing the handles too hard so as not to bite. We do not clean the entire wire, but only the section that we will connect.
- Cover the surface with flux - heat the wire, pressing it against the rosin, it should be completely covered with it. You can also apply liquid flux with a brush.
- Tin - take a little (no need to be greedy) solder on the tip (it should not be a drop, but a small dome, up to 1 mm high, on the working surface of the tip). Then, we touch the soldering iron to the wire and heat it. The solder should cover the surface itself, there is no need to make rubbing movements, just heat it up. If you need to tin a long length of wire, then touch it in several places.
- We connect the wires together , not end-to-end, but lay them parallel to each other for a length of at least 15-20 diameters (this will ensure the mechanical strength of the connection). Better yet, twist the wires.
- Cover the surface with flux again.
- We solder, just like when tinning, we take a little solder and simply warm up the connected wires. It is important that during the process and for some time after the soldering iron is removed (until the solder cools down), they do not move relative to each other.
In the video you can clearly see how the work is done:
Connection of wire, contact or terminal
All operations are carried out in exactly the same sequence. If the contact cannot be immersed in rosin, we use liquid flux.
Stranded wires
Everything is exactly the same. But if we want to increase reliability, then we do not tin the entire bundle, but fluff it up so that each conductor is tinned separately. Then we intertwine them, twist them and solder them.
Wires in insulation
In order to remove the insulation, they usually use wire cutters or a knife. But it’s more convenient to melt it in a circle with a soldering iron and just pull it off (does not work with heat-resistant insulation). This method eliminates the possibility of accidentally damaging the conductor.
Advice! If the wires are very thin, you can burn the insulation with an open fire (lighter).
Enameled wires
Such wire is usually used for winding transformer coils, etc., but sometimes they can be found under a layer of other insulation. They appear clean in appearance, but are actually covered with a layer of colorless enamel. We remove it in the same way as oxides.
Cables made of several insulated wires
When connecting these wires, you should not solder them all at once, as later it will be difficult to wrap them with electrical tape. We connect all the conductors in turn, after completing the insulation of the previous conductor.
Advice! Instead of electrical tape, it is convenient to use heat-shrinkable tubes (in common parlance, “cambrics”). We cut off a piece and put it on the wire, after soldering, we quickly pull them onto it so that the joint is still warm.
Heat shrink tube insulation
We have discussed soldering technology, but another question often arises - how to connect wires in cables connected to the most common types of connectors. Let's try to reveal it too.
Attention! There are wires in braided shielding. We work with it in the same way as with stranded wire. An awl or pin will help to unravel its section.
NShVI tips
Insulated pin sleeve lugs are often mentioned in the same category as cable lugs. Designed for screw and clamp connections. Similar to those found in ordinary sockets and switches. And if the wire has highly flexible cores consisting of many small wires, without NShVI the product will most likely break into small pieces. In such cases, it is not possible to clamp a bunch of thin, brittle copper threads with a screw.
The NSHVI tip is cylindrical, put on the core with crimping. Afterwards, the cable (wire) can be clamped with a screw or latch without losing the conductive properties of the connection.
Note: a thrifty owner can coat the end of a flexible wire with solder to connect it to a socket or switch.
You can use sleeves. If there is a need to combine copper and aluminum wires, take a bimetallic one. It is necessary in cases where there is a need to avoid electrochemical corrosion. Please note: even in dry rooms, moisture condensation can occur. Naturally, it will cause destruction of aluminum in contact with copper, increasing the contact resistance to electric current. Under certain circumstances will cause a fire.