The nuances of stripping insulation
When choosing a method for removing the insulating coating, it is necessary to take into account its features. Insulation can be single plastic or multilayer. Resins, fabrics, and non-flammable dielectrics are used as the latter.
The procedure involves the use of sharp instruments. They can damage the wire, damage the insulation where it is not needed, and narrow the cross-section. If you use a tool ineptly, you cannot avoid injury.
The weakest point of the wiring is the end of the cable that has been stripped of insulation. If the core becomes less strong or its cross-section decreases, its original characteristics will deteriorate.
To reduce all risks to a minimum, special tools and techniques for working with them have been developed.
Difference between wire and cable
When describing electrical wiring, the term “wire” or “cable” is often used as a conductor of current. To a person uninitiated in the intricacies of electrics, it may seem that this is one product. In fact, they are different.
A wire in the traditional sense is a cord with a small cross-section. Such a conductor can be single or multi-core. It may not have insulation at all, or if it does, it is light in the form of a tube. Removing it is not difficult at all.
The cable consists of a certain number of current carriers. They are connected into one unit, but do not touch each other and are enclosed in a shell made of a special material.
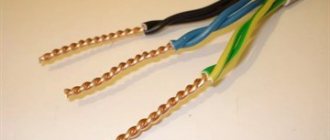
For a single-core wire, the cross-section is determined by one core; for a multi-core wire, the cross-sectional area is determined by the sum of the cross-sections of all cores. To improve the performance properties of the cable, a nylon thread is introduced into the middle.
Any conductor should be handled with care, especially aluminum conductors. Compared to copper, they are more fragile. Bending loads reduce the already small margin of safety of aluminum cores.
Some characteristics for comparison:
- density of aluminum - 2.7, copper - 8.9 t/mᶾ;
- multi-wire design is excluded for aluminum, but possible for copper;
- resistivity of aluminum is 0.0294, copper - 0.0175 Ohm x mm²/m.
Damage during stripping of aluminum cores further reduces their performance.
You can read more about the types of cables and wires in this material.
Features of working with machines for armored cables
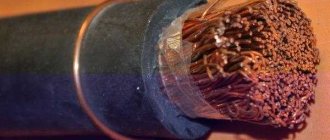
Armored cable is a universal conductor of electric current. Unlike simple insulated wires, the metal braiding of the conductor gives it special strength and creates reliable protection from external negative factors.
The armor is a two-layer spiral shell made of steel tape. The cross-sectional structure of the armored cable is shown in the lower figure.
Cross section of armored cable
Removing metal tape requires a powerful power unit and durable, sharp disc blades. Industrial machines are equipped with cutting units that can clean several armored cables of different diameters at once. This is due to the need to process large quantities of wire products per work shift.
Note! Passing through the cutting block, the knife cleans the cable from the surface polymer or rubber hose, electrically conductive screen (armor) and PVC belt insulation. Only factory-made machines can remove metal insulation
They are large units. After the armor is removed, as a rule, three insulated cores are obtained. They are cut on the same machine, placing them in other openings of the cutting block
Only factory-made machines can remove metal insulation. They are large units. After the armor is removed, as a rule, three insulated cores are obtained. They are cut on the same machine, placing them in other openings of the cutting block.
Stripper for cutting armored cable
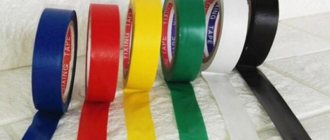
Types of insulating materials
There are single and double insulation.
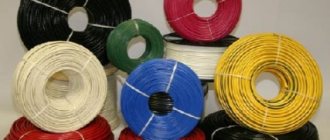
The best option is cables equipped with double insulation. If you plan to place the wire in grooves, it is permissible to use single insulation
For its production, various insulating materials are used:
- Plastics based on organic compounds. These are mainly thermal plastics that soften when heated. When burned, these plastics release various toxins into the environment.
- Thermosetting plastics. They become harder when heated. Insulation made from them is used only in special cases when the requirements for it are increased.
- Natural or artificial rubber of different types. It hardens when heated and supports combustion.
- Fabric based insulation. Withstands a fairly high degree of heating (maximum 400⁰) while maintaining insulating properties.
- Shielding braid. This is not insulation in the literal sense, since the braid does not act as insulation, but it provides protection against mechanical damage.
- Armor braid. Also serves as protection against damage
The choice of tools for removing insulation depends on the material from which it is made.
Effective cleaning methods
There are many proven methods that allow you to clean copper products even at home.
Let's get acquainted with the most effective of them. One of the most accessible home remedies for cleaning objects made of copper is regular tomato ketchup. In order to clean copper with this product, it is simply applied to the surface to be treated and left on it for 1-2 minutes. After this exposure, the ketchup is washed off with a stream of warm water. As a result of this procedure, the copper product will return to its original shine and brightness of color.
You can clean copper items, if they are not very dirty, at home using regular dishwashing gel. To do this, use a soft sponge on which detergent is applied. Wash it off under running warm water.
This cleaning method is used if it is necessary to clean a large copper product that cannot be placed in any container. The surface of such an object is wiped with half a lemon. To enhance the effect of lemon juice on copper, you can clean it with a brush with bristles that have sufficient elasticity.
A product called “vinegar paste” helps give copper its former shine. It is prepared as follows. In a special container, mix wheat flour and vinegar in equal proportions, bringing the resulting mass to a homogeneous state. Then the dough is applied to a copper object and left until completely dry. The crust formed after the mixture has dried is carefully removed, and the copper surface is polished to a shine with a piece of soft cloth.
There is a radical and effective method of cleaning products made of copper, which is used if their surface is heavily soiled and it was not possible to clean them with other means.
- Vinegar is poured into a specially prepared stainless steel container, which is mixed with a small amount of table salt.
- Place the item to be cleaned into the resulting solution and place the container on the fire.
- After the cleaning solution has reached a boil, turn off the heat under the container and leave it on the stove until it cools completely.
- After the solution has cooled, the product to be cleaned is removed, washed under running warm water and its surface wiped dry.
How to strip wires correctly?
There are some nuances in this process, without knowing which you can make mistakes with irreversible consequences.
The stripped area should not protrude beyond the joint. If a bare wire is left exposed, a person may accidentally touch it and suffer an electrical shock.
The insulation from the core must be removed from all sides. Compressing the remaining insulation will reduce the reliability of the fastening.
When an error is made in the wiring of the vehicle, then under the influence of vibration, as a result of loosening of the fastening, the wire will fall out of the connection
Improper stripping will result in short circuits and even fire.
Popular methods of removing insulation
Practical skills play a big role in the process of stripping wire insulation. The main difficulties arise when working with thin wires, when every movement matters. Optimal pressure can only be achieved through practice.
The most commonly used methods for removing insulation are:
- using a knife;
- through side cutters;
- under the influence of high temperature;
- using a stripper.
Each option is preferable in specific circumstances.
Option No. 1 - using a knife to cut insulation
At home, a knife is most often used. When using this simple tool, it is important to choose the correct angle of the blade. The biggest mistake is cutting in a circle while keeping the cutting part perpendicular. In this case, it is difficult to avoid notching the core or breaking the secondary insulation.
If, when removing the braid from a wire with a cross-section of 0.6 to 0.8 mm, the core is damaged, then even with a slight bend it will break at this point
The correct position of the knife is when the tool and the wire axis are in the same plane. First, cut the braid along the conductor. Next, separate the insulation, take it to the side and finally cut it off at the base.
It is better to use a special electrician’s knife with a straight or curved blade to remove hard insulation from wires. The main thing is that there are no jagged or burrs on it. If the knife is folding, it must be equipped with a lock so that it does not fold spontaneously.
A good blade has a double-sided sharpening at a slight angle and an internal rounding of the cutting edge. Some versions of mechanic's knives have a special blade design - it is short and rounded inward, and there is a “heel” at the end. It limits the depth of cut, which is important if it is necessary to remove the top layer of insulation without damaging the sheath of individual cores.
Option No. 2 - side cutters for stripping insulation
Side cutters are a convenient and safe tool, but only if used correctly. What you need to pay attention to is the direction of the cutting edges and the force applied.
The tool is used in two ways:
- The sheath is cut from different sides, and then removed from the conductor. This method is suitable for working with wires with a large cross-section.
- The braid is fixed and cut through with the cutting edges of a side cutter, and then pulled to the side, making axial movements.
In any case, you need to act extremely carefully, otherwise the conductor will be either damaged or bitten off.
When working with a side cutter, you need to take into account that the sharpened side of the tool jaws must be oriented in the direction opposite to the vector of tightening of the braid
They also produce side cutters with notches for conductors of a certain diameter. This simplifies the use of the tool at home.
Following the recommendations will minimize the risk of biting the core. Also, proper use of the tool will free you from the use of large compressive forces.
Option No. 3 - thermochemical removal method
With very thin conductors, with a cross-section of less than 0.2 mm, removing the insulation from an enamel wire or a wire with PVC insulation mechanically is a big risk. The thermochemical method is more suitable here.
In the first case, the technology is as follows:
- The wire is conveniently laid on a flat surface. Vinyl chloride insulation is placed under it.
- Heat up the soldering iron tip and carefully move it along the shell. When heated, it will disappear under the influence of the released chlorine.
There is another option for removing the enamel insulation from the cable. An aspirin tablet is placed on the wire, heated with a soldering iron and distributed along the entire length. Not only will the insulation be removed, but the wire will also be tinned.
PVC insulation is simply heated with a soldering iron or lighter, after which it is easily pulled off, because plastic loses density
Removing the braid by reflowing ensures the integrity of the conductor. The method works well on old wiring, since the winding here is hard and brittle.
Stripping the insulation of a thin enameled conductor can be done using fine sandpaper. Before removing the insulation layer from the wire, the sheet is bent in half so that the sandpaper is inside. Place the wire in the middle, lightly press it with your fingers and pull. Repeat the action until the enamel is completely cleansed.
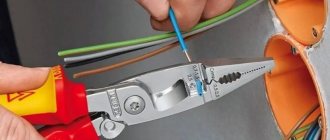
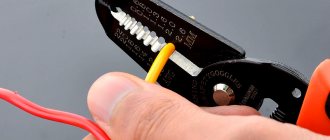
Option No. 4 - stripping with a stripper
If the insulation stripping methods under consideration are manual, then some types of strippers allow this work to be partially mechanized. The tool most often consists of special pliers that work with a certain size of wires and cables.
Conventionally, strippers are divided into categories:
- miniature handheld;
- large rack;
- lever
The first ones look like clothespins. It has one or more holes in its spring-loaded jaws. There are small multifunctional strippers in a case-like form. The drop-down body has holes with knives for different sections of wires.
In addition, the device has a knife that cuts the braid longitudinally, a knife that works in the transverse direction or cuts circularly. They are also equipped with a retractable knife for stripping wires.
The next design is a stripper with levers. Visually, the tool is similar to scissors and includes:
- Knives with a wedge-shaped cut;
- Adjusting screw, with its help you set the desired cross-section.
The cable is secured with clamps, then the levers are pulled together and the insulation is removed instantly. The removal length is set manually. The main disadvantage is the need for adjustment when removing insulation from wires of different sections.
If you mistakenly insert a thick wire when setting the jaws to a smaller cross-section, the conductor will be damaged.
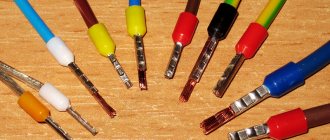
In the category of relatively cheap devices, there are also more advanced strippers. Their blades have holes for conductors
In addition to the main functions, most of these hand tools are used for crimping the ends of stranded wires, cutting wires, and cutting bolts. Sometimes they are used like simple pliers.
A tool with sockets in the blades, like the previous one, is universal. When working with it, you must not relax your attention so as not to place the current conductor in a hole that does not correspond to its cross-section.
These disadvantages are not typical for automatic lever strippers. The wire size is set automatically here. The spring-loaded working element begins to operate when the handles are compressed. You can remove not only the insulation from the core, but also the outer braiding from a round or flat wire.
Many models are equipped with a length limiter that allows you to remove the braid to a set length. The required limit is set once, and further withdrawals occur based on the set limit.
Automatic models, like manual ones, may have additional functionality - crimping tips, cutting, etc.
When choosing a stripper model, you need to proceed from where you plan to use it. For normal work at home, a simple hand tool will do.
There is a special stripper designed to remove insulation from a television cable. Its peculiarity is the presence of two cutting edges located at a certain distance. This ensures convenient installation of the F-connector later
When working with a lot of wires and cables, it is better to arm yourself with a semi-automatic or automatic device. This tool is essential for professional electrical installers.
There is an article on our website where we talked in detail about strippers for stripping insulation from wires. Follow the link to view the material.
A simple device for stripping cable insulation
In this review, the author shows how to make a simple device with which you can easily and quickly remove insulation from electrical wires and cables.
To make this device you will need a piece of metal plate and bolts and nuts.
First of all, cut a piece of thick metal plate of a suitable size. If you have a ready-made piece of metal at hand, that’s even better. You won't have to cut anything.
Main stages of work
At the next stage, the author makes markings according to which it will be necessary to drill holes for the bolts in the plate.
After this, perpendicular to the drilled holes, we drill more holes for wires of different diameters.
We cut threads in the holes for the bolts. Then we select bolts and nuts of suitable diameter.
The bottom of the bolts will need to be sharpened using a grinder or a metal file. The homemade product is ready - now all that remains is to assemble it.
For details on how to make a simple device for stripping cables of insulation, see the video below.
This material was created based on the author’s video from the YouTube channel Mr Novruz. If you like the idea, write about it in the comments.
Hand Operated Scrap Cable Wire Stripper, Manual Copper Wire Stripping And Peeling Machine
New tools for removing insulation
More recently, four new products have been added to the range of insulation removal tools:
- plow knife for removing hard insulation;
- stripper for cutting insulation 2.9 - 6.6 mm² in the longitudinal direction;
- tool for working with wire insulation 0.05 – 2.5 mm²;
- tool for cutting wire insulation 0.25 – 6 mm².
All of them are produced by the US company Jonard Tools.
The new case-type stripper is equipped with five grooves with a diameter of 2.9 - 6.8 mm. There are blades on both the top and bottom. Cuts lengthwise wires, optical modules, protective tubes.
A plow knife is used when it is necessary to remove the cable sheath made of rubber, PVC, PE. A knife with a double-sided blade makes longitudinal and transverse cuts up to 5 mm deep
The stripper for removing the PVC insulating layer from cables with a diameter of 0.05 - 2.5 mm² is automatically adjusted to the required cross-section. When pressure is applied to the handle, the conductor is grabbed, the blades enter the insulation and tighten it.
The latest model is similar to the previous one, but works with wires of other sections.
Criteria for choosing a tool and method
When choosing a device or method for stripping a cable, it is important to take into account not only the amount of work to be done, the experience of the technician and financial capabilities, but also the following features of the conductor sheath materials:
- Coaxial wire. The upper shell is removed thermally, the lower – with a stripper. Other methods may damage the load-sensitive conductors.
- Cable with fluoroplastic insulation. The shell is highly heat resistant. Therefore, mechanical methods are better suited for stripping - with a knife or stripper.
- Wire with enamel protection. When the core cross-section is small - no more than 0.2 mm² - the thermal method is used.
Advice! When choosing a tool for removing the sheath from a conductor, it is important to consider the range of working diameters and the type of handle material. If work with live electrical wiring is expected, the handle must be made of dielectric.
Recommendations for quick removal of insulation
There are non-standard situations from which it is difficult even for a specialist to get out. In this case, you have to make creative decisions and use the tools at hand. Let's look at a couple of examples.
Example No. 1 - damage to the wires leading to the plug
The method is used if, upon visual inspection, it is discovered that the charger has faulty thin wires leading to the plug. The main difficulty of the situation is not only the small cross-section, but also the multi-core cable. Another problematic point is that the wires are enclosed in a continuous braid, so the insulation serves not just as protection, but as a two or three-chamber collector.
To quickly remove the insulation in this case, experts use a thin blade taken from a razor cassette. The cable is secured using a clamp from a table lamp or a vice. The cable is divided into cores, and a blade is used to carefully make an incision in the right place, not too deep. Next, part of the layer is pryed off with a fingernail and carefully removed.
Example No. 2 - removing protection from a cable in a busy area
There is a need to remove cable protection in a loaded area of electrical networks.
The protective layer can be in the form of rigid outer insulation, an internal filler layer, fabric insulation impregnated with resins, or individual insulation for each core
First, using a tool, the outer sheath is removed by cutting it along the cable. Then, using pliers, the cores are removed one by one. The remaining insulating layer is simply cut off.
Tips for Safely Stripping Insulation
Electrical work is not easy. Therefore, even if you have certain knowledge, you must not forget that the damaged core will eventually fail.
For safety reasons, when removing insulation that is slightly longer than required, the excess must be cut off. Exposed veins are too dangerous.
It is not advisable for a home handyman to purchase expensive tools in order to use them several times while removing insulation. In most cases, simple means at hand are quite suitable.
When working with a tool, you need to be extremely careful and attentive. The insulation should be pressed down slowly to avoid damage to the cores.
Microscopic damage to the conductors is invisible, so it is better to do everything slowly, but correctly, so as not to have big problems later.
To ensure reliable and safe contact, you need to use special terminal blocks.
It is not always advisable to remove the insulation if the cable consists of thin wires. It is possible, without removing the insulating layer, to separate the wires and use a special clamp with teeth to create contact
Contact when installing a piercing clamp will ensure the insulation is pierced. Sometimes that's enough.
How to strip insulation with a soldering iron
- To process a cable with a thin coating, you can use fine sandpaper. It needs to be bent in half with the working surface facing inward. After this, wrap the conductor in this bent sheet and, pressing a little, pull it through. This must be done until the enamel is completely removed.
- If you work with a knife, the part of the cable to be stripped must be laid on a solid base. Then start scraping the enamel, turning the guide while doing so, until everything is clean.
By single-core is meant a wire in which the cross-section is formed by one core or wire. As for stranded wires, the cross-section of such a wire is formed by several thin wires, which in some cases are intertwined with each other. To make the stranded wire resilient and elastic, a thread that resembles nylon is added to the structure. Taking into account these features, the technology for removing insulation in each individual case may differ.
How I found my ideal hair growth product
Hello dear! I want to share with you my solution to the sensitive problem of hair loss . The problems are very serious, at least for me. I would never have thought that this misfortune would touch me, especially at the age of 29 (read more...)
Conclusions and useful video on the topic
An overview of stripping tools - from the cheapest to the most expensive:
Whatever method you use to strip the insulation, you must remember that this work is dangerous. A careful and competent attitude to the tool used will help you avoid problems. Each product must be used in accordance with its intended purpose, with the utmost care.
What method do you use to strip insulation from wires? Please share your own experience with people who are faced with this task for the first time. Leave your comments, share your experience, ask questions in the block below the article.
Additional wire stripping methods
Scientific progress does not stand still, so many new devices for stripping insulation have appeared.
Relatively new tools for stripping wires from the insulating layer are:
- Plow knives, which are designed for stripping hard types of insulation.
- Strippers, which are designed for the process of stripping insulation measuring from three to six millimeters square.
- Tools for stripping wires with insulation sizes from five hundredths to three millimeters square.
- Tools designed for stripping insulation measuring from twenty-five hundredths to six millimeters square.
All these devices were developed with the aim of mechanizing the process and more convenient adjustment to various sizes and types of insulation. At the same time, they have the properties of automatic adjustment to different wire cross-section sizes.