Termination technology
Terminating a wire or cable yourself with a special tool will not present any difficulties.
You just need to take a suitable tip, push it onto the core as far as it will go and press it with a press. In this case, the number of crimping points depends on the design of the crimping tool. If crimping is performed using a matrix with point contact, press the tips in 2 or more places distributed along the length. If the part of the tip being crimped is comparable to the width of the indentation after crimping, then one point is enough. The sleeves are crimped with at least two indentations, one on each side to hold each of the conductors. In general, the number of crimping points depends on the width of the “jaws” of the crimping tool matrix. This is necessary for better contact, minimal contact resistance and mechanical strength. In simple words, in this case the conductor will not jump out of the tip or sleeve.
Pay attention to the recommendations given in the instructions or appendix to the crimper (crimp, press tongs) regarding working with tips of different diameters or cross-sections.
The rules and technology for terminating and crimping cores are described in the following documents:
- VSN 139-80
- I1.09-10
In addition, an important requirement should be noted: to crimp an aluminum conductor, you must additionally use quartz-vaseline lubricant, which prevents the formation of an oxide film that impairs contact
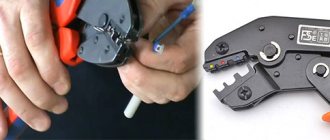
At home, it is not always wise to buy an expensive crimping tool, so there are alternative options. For example, there is a special tool for removing insulation from wires and cables - a stripper, the design of which may include a press, as shown in the photo.
You can also do without the so-called pliers - manually flatten the sleeve with a hammer or pliers, but in this case there is no guarantee of good contact, so it is better to spend at least on a stripper for reliable termination of the cores, or even better, a crimper (special crimp). We talked about how to use the stripper in a separate article.
Please note that if you decide to terminate a single-core conductor using pliers, you must select the correct crimping die. If selected incorrectly, there is a high probability of damaging the sleeve or tip by simply tearing its metal. In addition, there are special tips for soldering
In this case, the termination of wire or power cable cores occurs in two stages:
In addition, there are special tips for soldering. In this case, the termination of wire or power cable cores occurs in two stages:
- The core, stripped to a metallic shine and treated with neutral solder, is inserted into the tip until it stops.
- Solder is poured through a special hole.
Video instructions for using the press
Fiber Optic Cable Cutting Tool
At all stages of work with an optical cable: input control of the fiber optic cable, installation of optical couplings, cross-connects, and so on, an appropriate tool is required for cutting the fiber cable. A set of all necessary tools and materials for cable cutting - NIM-25 (installation tool set) (Fig. 1). The universal kit allows you to mount optical cables with armor made of steel wire, corrugated steel tape, glass rods, including aramid threads and glass fibers, as well as a lightweight universal indoor cable. To cut an optical cable built into a lightning cable (OCGT), it is recommended to complete the kit with a device for cutting a metal module with OM OM SSD.
Rice. 1. NIM-25 Set of tools for cable cutting
Rice. 2. Knife for metal module
Composition of the NIM-25 kit
The first group of tools is fairly standard (Fig. 3) from left to right, top to bottom: wire cutters (cable cutters) for cutting steel wire, including various cables and wires, side cutters, sprayer (spray gun), pliers.
Rice. 3. Tool included in NIM-25
The following group of tools (Fig. 4) from left to right, top to bottom: stripper for removing the buffer, T-type stripper for removing 0.4-1.3 mm (26-16 AWG) sheaths, scissors for cutting reinforcing cable threads, mounting knife.
Rice. 4. Tool included in NIM-25
The third group (Fig. 5), from left to right, from top to bottom: metal tweezers, stripper-clothespin for removing external modules, tape measure, magnifying glass.
Rice. 5. Tool included in NIM-25
A very important and necessary tool when cutting various designs of optical cables is a stripper for removing the outer sheath of the cable (Fig. 6). The depth of the position of its cutting knife is adjusted with a flat screwdriver, depending on the thickness of the shell that we want to cut - first a transverse and then a longitudinal cut is made and then the shell is removed. It is important to remember that during the process of cutting the shell with a stripper, the module with the optical fiber inside must remain undamaged (no cuts, creases, etc.).
Rice. 6. Tool included NIM-25 (stripper for optical fiber)
Auxiliary tools and materials: headlamp, adhesive tape, lint-free wipes, electrical tape, 250 ml alcohol dispenser with pump, D-Gel liquid for removing hydrophobic filler (Fig. 7), set of screwdrivers, hacksaw, container for useful small items ( Fig. 8).
To clean the optical cable from hydrophobic filler, a special liquid D-Gel is used (Fig. 7, right). For ease of work, a rag is moistened with D-Gel and then the mounted cable is wiped with the wet part. After wet wiping, wiping with a dry cloth is necessary. As a result, we get pure OK.
Lint-free wipes are used to wipe optical fibers; in addition, they remove static electricity from the optical fiber.
Rice. 7. Material in the composition of NIM-25
Rice. 8. Tool included in NIM-25
How to terminate a wire without a ferrule
Using lugs is a convenient way to terminate wires. However, they are not always at hand. In this case, the cable is terminated without lugs. The current-carrying conductor, stripped of insulation and dirt, is manually bent into the shape of a ring (ear) under the bolt. To form the joint, use long-nose pliers with a rounded outside. The resulting connection is less reliable than the factory-made tip.
If the wire is copper, then the eye for the bolt can be tinned with solder. It is necessary to bend the ring in the direction of tightening the screw, so that during the tightening process the eyelet twists around the bolt, and not vice versa.
Additional Information. Modern aluminum wire is not flexible. Its strands are more fragile than those of copper cable. This should be remembered when terminating and forming connecting rings. Aluminum wire must be bent a minimum number of times.
Bolted connection
This connection is assembled from a bolt of any diameter, a suitable nut and one, or better yet, three washers. It is assembled quickly and easily, serves quite a long time and reliably.
Bolted wire connection
First, the conductors are stripped of insulation and, if necessary, the top oxidized layer is removed. Next, a loop is formed from the stripped part, the internal diameter of which is equal to the diameter of the bolt. To make it easier, you can wrap the wire around the bolt and tighten it (middle option in the right picture). Afterwards it all comes together in this order:
- A washer is placed on the bolt.
- One of the conductors.
- Second puck.
- Another conductor.
- Third puck.
- Screw.
The connection is tightened first with your hands, then with the help of keys (you can take pliers). That's all, the connection is ready. It is used mainly if it is necessary to make a connection between wires made of copper and aluminum; it can also be used when connecting conductors of different diameters.
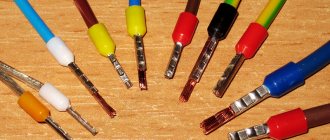
Types of tips by design
Depending on the design of the terminal and the connected electrical appliance, the shape of the tip is selected. It comes in several types.
| Photo | Name |
| Ring | |
| Fork | |
| Power | |
| Tubular or sleeve | |
| With pin | |
| Socket for quick connection of wires |
The lugs can be used to connect one or two wires; for the second case, special parts are produced. Fixation is carried out by crimping or a bolt built into the shank. The first option is most applicable in everyday life and in production; it is intended for flexible wires made of multiple cores. The second is suitable for rigid cables.
Types of tips
You can quickly terminate a cable or wire using special lugs. Their range is varied - there are lugs for aluminum and copper wiring, for single-wire and multi-wire conductors. Each product has its own marking according to GOST, by which you can understand the purpose and characteristics of the electrical device, as well as climatic operating conditions.
Ferrules for copper wires TTM and TML
TML cable lug
Stranded copper strands can be terminated with special lugs made from a copper pipe drilled for a bolt. There are two modifications of such devices - uncoated and tinned. They are also marked as TM (TML), after which the cross-section of the wire under the clamp is set in millimeters and the diameter of the tip hole in mm. Fastening of such clamps is carried out by crimping using special pliers. It is not recommended to use ordinary pliers or a hammer, otherwise you may damage the mechanism. The number of crimps must be two or more for reliable installation.
Such lugs can also be used for single-wire conductors
It is only important to choose the right size, as otherwise the core may break off. Before installation, the ends are cleaned of the insulating layer and oxide to a characteristic metallic sheen.
The scope of application of such products is quite wide. They can be found in connecting cable risers at the distribution input device in the entrance, in grounding metal distribution boxes, connecting electric stoves, and branches. They are also actively used in industry.
Wires and cords with a cross-section from 2.5 sq. mm to 240 sq. mm are suitable for termination.
TML(o)
TML(o)
A less commonly used modification of TML lugs is a device for crimping with a control window that allows the technician to see the process of installing the conductor in place.
Such products are also mounted by soldering. Application area: industry. They are practically not used in everyday life, so many home electricians and housing and communal services specialists have no idea about the existence of such devices.
THERE
TA tip
TAM aluminum and copper cable lugs are used to connect aluminum wiring to copper busbars on input and distribution devices. The product is a tip made of two metals, in which the shank is made of aluminum, and the body itself is made of copper. There is no transition resistance due to frictional diffusion. Installation method: crimping.
TA
Used for aluminum wires. Externally similar to TM brand products, but made of a different material. They have a minimum size of 16 sq. mm.
Connecting and terminating conductors of aluminum wires and cables can only be done using quartz-vaseline lubricant, which prevents the formation of oxide on the surface. Thanks to it, contact with air is reduced.
Other types of tips
PM tip
Copper wires in household appliances are often terminated with copper lugs for soldering. The devices have special “ears” that allow you to securely fix the conductor. Such products include the PM brand, in which the “ears” are combined in a production design. Used for wires with a cross-section of 2.5 sq. mm.
Reducing the dimensions of switching devices and protective equipment has led to a change in the size of the clamps. For this reason, NShP pin wire terminations are increasingly being used.
NB cable bolt and mechanical lugs are actively used in industry. With their help, power cables with a cross-section from 25 sq. mm to 240 sq. mm are terminated. They are made of aluminum alloy and have good corrosion resistance. To create a tight seal, a heat-shrink tube is included.
The range of tips is very diverse; you can always find a device for this type of conductor, but many people use homemade ones
Such products have an important advantage - the ability to create a tip to any size. They can be produced quite simply - you need a tube of the desired material, flattened at one end, and then a hole is drilled in it
Homemade devices are used in grounding devices.
https://youtube.com/watch?v=geLA-dSlunM
Types of lugs for crimping
For every average person, a striking example of incorrect connection of wires is the staircase switchboard; many apartment owners have melted wires in the panel and have twists. Crimping lugs for wires can save citizens from the possibility of heating and fire of electrical wiring as a result of poor-quality contact of wires or lack of cable lugs.
When there is good contact between the connected cable or wire and the connecting device, the transition resistance is minimized, and with an increase in the current load on the contact group, they can heat up in the event of poor contact. Sleeves and tips are intended to remove or minimize contact resistance, in other words, to eliminate poor-quality contact under a bolt or screw.
High-quality contact in the connection, contact resistance:
High-quality contact in the connection, contact resistance
To carry out crimping (crimping for lugs) of wires and cables, special products are used - lugs and sleeves. Tips can be for stranded wires or single-core wires; they are divided according to their purpose and the type of wire for which they are used (copper or aluminum).
For crimping copper cable cores, lugs are used, made from a seamless copper tube, which is flattened on one side and has a hole for a screw connection. This type of tips is:
- with different diameters for the wire and mounting hole, without a protective coating;
- for crimping, electrolytic tinned with different holes for fastenings.
The markings for this type of tips are as follows:
- without coating, TM – X – Y, where X is the wire cross-section, Y is the size of the mounting hole;
- coated, TML – X – U.
Tips
There is also a type of lugs with an inspection window; these are tinned copper products for terminating cable cores and wires. A special feature of this type is the ability of the termination performer to control the correctness of crimping through the control window. This type of product is marked as TML(o); it is noteworthy that they can be installed on the ends of cables using solder and soldering, which almost completely removes the value of the transition resistance.
Quite often in electrical engineering there is a connection between an aluminum wire and a copper cable; in this case, it is recommended to use aluminum-copper lugs for a high-quality connection of the aluminum wire and the copper busbar of the panel.
Aluminum copper tip
With the reduction in overall dimensions of instruments and devices, pin products have become popular tips for terminations. They are used in electrical equipment and circuit breakers in protection devices. With the reduction of clamping fastenings, the pin is the most optimal solution for good contact. This species is labeled as NSP.
NShVI tips
Cable lugs for crimping NSHVI are a pin-sleeved product with insulation. Electrolytic copper is the material from which it is made; insulation is installed on the back side, which is thicker than the metal part. When the terminated wire with this tip is inserted into the socket, only the insulated part of it remains under the clamp on the outside. In industry and in everyday life, this type of lugs is used for cables with a cross-section of up to 35 sq. mm; they are crimped with a special tool.
Crimp terminal for NSHVI wire:
Crimp lug for NSHVI wire
There are several modifications of this tip, which differ in the number of connected wires in one tip. For two cables, the marking looks like NSHVI2, there are no structural differences in this tip, the same metal part and PVC cuff, but the diameter of the sleeve (skirt) is larger, designed for two wires.
Features of working with NSHVI
Cable lugs of this type are intended only for multi-core cables; they cannot be used in the termination of wires with a single core. For rigid (single-core) wires, crimping with bushings (sleeves) without insulation is used. Crimping of a stranded wire is carried out as follows:
- the cross-section of the wire is selected, the brand of the tip is selected, into which the conductors must fit freely and tightly from the side of the skirt;
- in practice, the type of tip is selected with some margin. Example: a PV-3 wire with a cross-section of 1.25 sq. mm can be terminated with a tip of 1.5 sq. mm. The section of the skirt is up to 2.5 sq. mm.
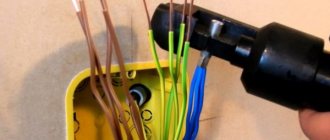
How to properly connect a wire in a junction box
The most controversial and painful problem during electrical installation work is the connection of wires and cables in the junction box. Electricians weld, sleeve (crimp), solder, use various clamps (pads, clamps, terminals, PPE - connecting insulating clamps), twist. How many electricians, so many different opinions.
What do the rules for connecting wires and cables say?
We will use several sources that are relevant today. PUE-7 (Rules for electrical installations), SNiP 3.05.06-85 (Electrical devices), GOST R 50571.5.52-2011. (Low-voltage electrical installations).
Section: Electrical wiring
2.1.21. Connection, branching and termination of wire and cable cores must be carried out using crimping, welding, soldering or clamping (screw, bolt, etc.) in accordance with current instructions approved in the prescribed manner.
2.1.22. At the points of connection, branching and connection of wire or cable cores, a supply of wire (cable) must be provided, ensuring the possibility of re-connection, branching or connection.
SNiP 3.05.06-85
Electrical installation work
Section: Electrical wiring
3.34. All connections and branches of installation wires must be made by welding, crimping in sleeves or using clamps in branch boxes.
Metal branch boxes where wires enter them must have bushings made of insulating materials. It is allowed to use pieces of polyvinyl chloride tube instead of bushings. In dry rooms, it is allowed to place wire branches in sockets and niches of walls and ceilings, as well as in ceiling voids. The walls of the sockets and niches must be smooth, the branches of the wires located in the sockets and niches must be covered with covers made of fireproof material.
GOST R 50571.5.52-2011.
526 Electrical connections
526.2 When choosing means of connection, the following should be considered:
– conductor material and its insulation;
– the number and shape of wires forming the conductor;
– cross-sectional area of the conductor;
– the number of conductors that will be connected together.
Notes:
1 The use of solder connections is recommended to be avoided, except for communication circuits. If such connections are used, they must be made taking into account possible displacements, mechanical forces and temperature increases due to short circuits.
Expanded comment
We have reviewed all regulations governing the connection of wires. Let's look at the advantages and disadvantages.
Crimping (sleeving)
All standards recommend
Very high quality connection, large contact area. There is perhaps only one drawback: the sleeve is large in size and you have to make large distribution boxes, which affects the design of the room.
Sleeve, twist and terminal Vago
Photo and brief description
On the left in the photo is a connection made using a sleeve. The wires are inserted into a tinned sleeve and crimped with a special press. If the sleeve is chosen correctly, the connection turns out to be very good. There is a twist in the center, if done as in the photo it will be no worse than the sleeve, but it is prohibited by the rules, we do not use it in our work. On the right is an attempt to repair the wiring with the help of Vaga, the connection got hot, the terminal melted, and it’s not far from a fire.
Welding
All standards recommend
Good contact, small dimensions. The disadvantage is that it is problematic to weld the connection of a large number of wires without damaging the insulation (very strong heating).
Soldering
It prescribes the use of only PUE, SNiP is silent, and GOST generally recommends avoiding connections using soldering.
It is quite difficult to properly solder even two wires, but if successful, the connection will be of high quality. It is practically impossible to solder five, six or more wires, especially under the ceiling or in a hard-to-reach place where most customers ask to put a junction box so that it is not an eyesore.
Twist
Prohibited
Although no one has come up with a better idea yet. The wires are always twisted first, and then boiled, soldered, or crimped. I will not agitate, we will follow the rules, twisting in its pure form is PROHIBITED!
PPE, Vago terminal and screw clamp
Photo and brief description
On the left in the photo is a connection made using PPE. The wires are first twisted, which in itself is not bad, and the cap is screwed on top in full accordance with the rules. In the center of Vaga (with hoisting flags is considered the best option), it worked under load for about two years, melted plastic and insulation. On the right is a screw clamp, the problem is the same as with Vaga, the connection gets hot, the consequences are unpredictable
Connecting wires and cables using couplings
If the cable to be connected is in the ground, water or rain, then conventional methods of isolating the connection are not suitable. Even if you apply a layer of silicone sealant to the cable and compress it with heat-shrink tubing, this will not guarantee tightness. Therefore, it is necessary to use special couplings.
Couplings are available in plastic and metal casings, poured and heat-shrinkable, high-voltage and low-voltage, regular and small-sized. The choice of coupling depends on the specific operating conditions and the presence or absence of mechanical loads.
Connecting wires and cables is one of the most important points in electrical installation. Therefore, all methods of connecting electrical wires must ensure good contact. Poor contact or poor insulation may result in short circuit and fire.
Which tip to choose
Before you begin crimping, you must select the correct tip. It is worth remembering that tips come in different types - different sleeve thicknesses, different inlet diameters. Moreover, this happens with tips of the same section, but from different manufacturers.
Therefore, it is not always the same matrix; you can crimp 2 different lugs for a wire of the same cross-section. In addition, the number of sleeve crimps may also differ. If you want to achieve a high-quality connection that will reliably serve you for years, use the following recommendations.
Backlash may be acceptable, but it should be minimal.
If the tip material is aluminum, then the choice is simpler. Select a tip of the same cross-section as the cross-section of the wire. You can navigate by the inscriptions on the blade of the contact part.
But if the material of the product is copper, then certain difficulties arise. But there are several solutions here too.
- There are GOST tables that can be used to select the desired type. But this is not entirely convenient, because... you need to clearly know and distinguish between core flexibility classes, and you won’t have these tables at hand.
- measure the diameter of the core with an ordinary caliper. Then compare it with the diameter of the inner part of the tip shank. This can be done with the same caliper, or using the inscriptions on the blade.
The third number in the abbreviation TM-35-8-9 will be exactly the required diameter. That is, if the diameter of the core that you measured turned out to be 8.5 mm, then the most suitable tip would be the one marked TM-35-8-9. Please note that the diameter of the core should be slightly smaller, but not larger than the diameter of the shank.
The material of manufacture of the tip and sleeves must be the same as the material of manufacture of the wire or cable core. Connect aluminum wires using aluminum sleeves and lugs. Copper with copper. Otherwise, corrosion processes cannot be avoided.
If you need to connect an aluminum lug to a copper contact (on a switch or switch), use an aluminum-copper lug or use aluminum-copper washers. There are special aluminum-copper sleeves for joining copper and aluminum cable cores.
Wire preparation and termination process
Before you begin crimping the wires with a lug, you should prepare and strip the wire of insulation. The preparatory steps are quite simple: to do this, you need to clear the required length at the end of the cable manually (with pliers) or using a special stripper, which visually resembles a gun with small holes. After this, the fluffed strands must be smoothed and slightly twisted, this will avoid cutting them during the crimping process.
The next step is to insert the wire into the cable lug from the “skirt” side
It is important that the connector matches the cross-section of the wire (it should not fit too tightly or loosely). After this, you can begin crimping. If the clamp is fixed on the table, then the end plug is installed in the desired slot of the matrix, after which the cores are inserted and crimped
If the clamp is fixed on the table, then the end plug is installed in the desired matrix slot, after which the cores are inserted and crimped.
If termination is carried out for the first time, you should first practice on short sections of cables. In order for the connection to be reliable, strong and of high quality, you must adhere to simple crimping rules:
- The cable inserted into the lug or sleeve must be held in the socket by hand.
- Before crimping, it is recommended to make sure that the matrix is selected correctly.
- It is necessary to squeeze the handle of the press until the characteristic click produced by the ratchet mechanism appears.
- If crimping is unsuccessful, the clamp handle is blocked and the mechanism must be released manually.
- When using a double-circuit alligator clip, it is recommended to ensure that no insulation gets into the metal tip slot.
Modern technology and electrical appliances, a well-equipped panel cannot be imagined without cable lugs. Their uninterrupted operation and high-quality contact directly depend on the correct selection of tools, connectors, and wires with the required cross-section. Careful attention to such details will help avoid overheating, short circuits and fire.
The nuances of working with NSHVI
If a multi-core cable is used, it is recommended to buy an NShVI tip.
This type is not used for terminating wires with one core. Crimping of a multi-core cable is performed as follows:
- you need to select the wire cross-section and tip brand. The veins should enter freely from the skirt side;
- The type of tip should be selected with some margin. A wire with a cross-section of 1.25 mm is crimped with a tip of 1.5 sq. mm, and the section of the skirt is up to 2.5 square meters. mm.
Option NSHVI
Required Tools
Crimping is carried out with a special tool that allows you to create the necessary force. The following tools are popular:
- Press pliers for crimping PK2 and PK2M lugs are used for terminating cores with a cross-section of up to 10 sq. mm;
- PK1 and PK1M brand tools are a more powerful version of hand pliers;
- hydraulic pliers allow you to crimp wires up to 10 sq. mm;
- In industrial production, a hand press is used. It is suitable for wires up to 240 sq. mm;
- hydraulic press with electric drive is used for cables up to 300 sq. mm.
Types of instruments
Press pliers with hinges increase the pressure of the tool, which makes the manual crimping process easier. Devices with a ratcheting mechanism are especially convenient. They prevent the instrument from unclenching until the procedure is completed.
You can watch how to crimp a wire without tools in this video:
Sleeves for wires for crimping
Not all devices or instruments use cable lugs - there is also a sleeve termination. For cables with copper conductors, sleeves marked GML are used, which means tinned copper sleeve. The GAO brand is suitable for aluminum wires. This is a closed type sleeve made of aluminum. If it is necessary to make a connection with the connection of copper and aluminum elements, then an alloy is used.
Sleeves for crimping
Preparation for crimping
Before putting the tip on the core, it is necessary to perform certain preparations:
- Clean the required length of the wire from the insulation. You can use a special tool for this;
- Twist the wires by hand and place them in the tip from the skirt side.
It is important to choose the correct cross-section of the core to ensure easy entry into the tip sleeve
Stripping wires
How to crimp a wire
After selecting suitable tips and wires, you will need a special tool. Press pliers resemble pliers, at the end of which there is a special matrix where lugs and an uninsulated section of cable are installed
This device allows you to ensure even pressure from the tip on all sides. Particular attention should be paid to the type of cable, which can be stranded or with a monolithic core
Crimping of stranded wires
Single terminal crimp
To make a high-quality crimp, it is recommended to follow the following recommendations:
- to prevent the cores from falling out of the socket, the conductor should be fixed when placed in the tool matrix;
- crimping is carried out using pliers until the snoring mechanism is activated, which allows you to block the tool from opening;
- if fixation is carried out manually, then control is carried out by pulling the hand. If the crimp is of high quality, then the installation will be tight without movement;
- You can use a double-circuit crimping tool. Termination is performed by compressing the insulator and bushing in sockets with different diameters;
- Finally, you need to check the strength of the contact by slightly pulling the elements.
Single wire crimping
Double terminal crimp
The connection of two phase conductors is carried out on one contact. When installing modular machines, they are connected using special jumpers. There are a pair of cables per contact.
In this case, it is recommended to use NShVI for two wires. Here are some installation features:
- two wires are installed inside the cuff at once;
- It is better to perform crimping using press pliers. When crimping a double tip, it is better to use a matrix with a cross section of 6 square meters. mm.
Crimping power cable lugs
To crimp the power cable, it is recommended to use a tinned copper tip, which is protected from oxidation. When cutting the cable, the edge may fluff up and become larger than the rest of the core. In this case, the edge can be removed using a sharpener. The cable should be unfolded so that the circle removes excess along the veins, but does not bend them.
You should not use the soldering method for crimping, since contacts made only with pure tin cannot be used on wires.
Power cable crimping
So, how to properly crimp wires with lugs
In addition to selecting the necessary wires and tips, to perform this task you will need a special tool called a “crimper” or press pliers.
Externally, the tool is very similar to pliers, at the ends of which a special matrix is installed, into which the tips and the non-insulated part of the cable are inserted.
This tool is designed to provide uniform ferrule force around the wire, eliminating poor contact when crimping the cable. In addition, there are universal tools that allow you not only to crimp, but also to cut the cable, remove the insulation from it and twist the core.
Particular attention should be paid to the type of cable; in domestic conditions, the power cable can be of two types:
- with a monolithic core;
- stranded
When crimping a wire with a monolithic core, it is enough to remove the insulation layer with a small margin (up to 0.3–0.5 cm), (using a tool or using an insulation stripping knife), then straighten and degrease the area to be worked with, after which you should put it on a thermal insulating tube onto the cord.
Then, we select on the tool (by a jumper in the matrix) a certain section and type of tip. After carrying out the above manipulations, you need to insert the prepared end of the wire into the tip, after making sure that there are no cracks in it.
Install the ratchet lock lever. Failure to comply with this point may result in poor-quality crimping of the tip and, accordingly, poor quality of the connection.
The final part of crimping a wire with a monolithic core with a tool:
- make sure the connection is correct;
- insert the tip all the way into the device so that the numbers with the matrix markings are knocked out on the front or back sides of the tip;
- completely recess the exposed section of the wire into the tip;
- applying force, press the crimper handles;
- as soon as the operation is completed, the handles will automatically begin to return to their original position (to do this, it is necessary to move the ratchet locking lever to the “locked” state);
- The cord has been terminated; the final step is to put the heat-shrinkable braid on the connection point and warm it up with a special hairdryer or lighter.
If the handles do not return to their original position, then this problem may be caused due to the following problems:
- too weak compression of the tool handles;
- malfunction of the ratchet mechanism;
- “weak” spring in the ratchet;
- The ratchet locking lever is not fully installed.
If you have to terminate multi-core wires, then the above method should not be used, as it has many nuances.
Therefore, wires with a large number of cores are crimped according to the following instructions:
- remove part of the insulation from the wire (with a small margin of up to 0.3–0.5 cm); when removing the insulation, it is highly advisable to use a special tool that allows you to remove the braid and not damage the cable cores, but if such a tool is not available, you can use a sharp knife (when removing the insulation, you should make sure that the wire cores were not affected);
- put a small piece of thermal insulating braid on the cord;
- after which the bare area must be degreased with alcohol and a special electrically conductive paste applied (the most common options are compositions such as “KVT” and “EPS”).
After the above manipulations, cable processing can be considered complete.
set the required cross-section and type of tip in the device matrix; install the tip completely into the device so that the numbers with the matrix markings are on the front or back sides of the tip; we insert the straightened cable cores into the lug until it stops (Attention! Twisting the cable cores is prohibited); applying force, press the crimper handles; The crimping of the stranded wire is completed, now we return the heat shrink that was previously placed on the cord to the connection point and warm it up with a hair dryer, soldering iron or turbo lighter; After completing the operation, the handles should return to the standard (unclamped) position; if this does not happen, then the reason for this may be the problems described above.
Crimping tools
The following tools are used for crimping sleeves and tips:
- hydraulic and mechanical presses;
- manual hydraulic press;
- manual mechanical press;
- hydraulic press with electric drive;
- press jaws type PC – 1,2, 1M, 2M, 4.
The quality and reliability of contact of the sleeves depends on the correctly selected replacement matrix and the required contact pressure. The movable element that exerts pressure on the sleeve is called a punch, and the shaped bracket that deforms the sleeve is called a matrix. When crimping a significant number of sleeves of different sections, you have to constantly select punches and dies, so in such cases the set of these elements must be impressive.
Some tools are available with one replaceable punch or rotary dies designed for different cross-sections. In order to adjust for a specific sleeve, you do not need to reinstall or select anything, just turn the matrix in the other direction and make a few turns with the punch screw.
Some tools do not have dies or punches at all - crimping is done using curly staples.
Basic mistakes when crimping connections
The main mistake when crimping is the wrong choice of sleeve. If it is significantly less, then the conductor will be strongly pressed by the edge of the sleeve. This may cause the flattened wire to break.
On the other hand, if it is too large, then the contact will not be very reliable. In such a situation, the wires may wobble inside the core. Over time, such connections will heat up and burn, which will ultimately lead to loss of contact.
The second mistake is incorrectly selected punches and dies. This can lead to a similar effect, resulting in over or under crimping of the sleeve. This problem is complicated by the fact that the working elements of the tool wear out over time and lose their primary characteristics.
IMPORTANT! Do not shorten the factory sleeve - this will reduce the reliability of the contact. The third mistake is using a chisel and hammer to crimp cable lugs and sleeves.
From the point of view of officially accepted methods, this is a terrible crime, but in life there are various situations and, in extreme cases, their use takes place. If it is possible to purchase good tools, then there should be no alternative.
The third mistake is using a chisel and hammer to crimp cable lugs and sleeves. From the point of view of officially accepted methods, this is a terrible crime, but in life there are various situations and, in extreme cases, their use takes place. If it is possible to purchase good tools, then there should be no alternative.
In the end, we present the recommended combination of cross-sections of cores and cable sleeves:
1. The total cross-section of the cores in the press sleeve is 7.5 mm/sq. Cable press sleeve – 4-1. Press jaws – PK-3.
2. The total cross-section of the cores in the press sleeve is 13 mm/sq. Cable press sleeve – 5-1. Press jaws – PK-3.
3. The total cross-section of the cores in the press sleeve is 15 mm/sq. Cable press sleeve – 4-2. Press jaws – PK-3.
4. The total cross-section of the cores in the press sleeve is 20 mm/sq. Cable press sleeve – 6-1. Press jaws – PK-3.
5. The total cross-section of the cores in the press sleeve is 26 mm/sq. Cable press sleeve – 5-2. Press jaws – PK-3.
6. The total cross-section of the cores in the press sleeve is 41 mm/sq. Cable press sleeve – 6-2. Press jaws – PK-3.
How to crimp wire lugs: list of suitable tools
To install metal connectors on wires, do not use tools that are not designed for this purpose. There are special ferrule crimpers for wires. Each of them has unique capabilities and can therefore be used in certain conditions. Scope of use of various types of tools for crimping wires with lugs:
Most often, hydraulic or press pliers are used for crimping tips.
- Press pliers PK2M and PK2 are designed for crimping wires whose cross-sectional size does not exceed 10 mm².
- Press pliers PK1M and PK1 are manual pliers that are much more powerful than the previous version.
- Hydraulic pliers – designed for crimping cables with a cross-sectional size of up to 10 mm².
- Manual press – used in industrial production on wires up to 240 mm² in size.
- Electrically driven hydraulic press – designed for crimping wires with a cross-section of up to 300 mm².
A tool equipped with hinges has increased pressing force. In this case, a person does not have to make a lot of effort to install the tip. The most convenient to use devices are those with a ratchet mechanism.
Technology of crimping terminals for wires: single, double and power
If this is your first time splicing wires using a ferrule, it is advisable to practice before you begin. To do this, you can use an unnecessary piece of cable. Otherwise, the master risks ruining not only the connector, but the entire wire.
Before performing crimping for the first time, it is recommended to practice on an unnecessary cable.
Recommendations for using single pin lugs for wires:
- To prevent the wires from falling out of the socket, when placing the wire in the hole of the tool, it must be secured.
- Crimping with pliers is carried out until the moment when the ratchet mechanism is connected, which locks the tool, preventing it from opening.
- If the connector is installed manually, the degree of its quality can be determined by pulling the tip by hand. If everything is done correctly, the part will sit tightly and will not move.
- The use of a double-circuit crimping tool is allowed. In this case, the insulator and bushing are compressed in sockets having different diameters.
Connecting two wires to a phase can be done using one contact. If modular machines are installed, special jumpers must be used for connection. As a result, two cables are connected to one contact. In this case, it is advisable to use NShVI for crimping wires with lugs.
This procedure has its own characteristics:
- two cables are inserted into the cuff at the same time;
- For crimping, it is preferable to use press pliers with a matrix size of 6 mm².
Otherwise, the installation process for a double connector is the same as for a single connector.
The wires must be carefully fixed in the socket so that they do not fall out in the future.
For crimping power cable lugs, it is recommended to use copper products with a tinned protective coating. Sometimes after cutting a wire, its edge fluffs up and increases in size. If this happens, you need to remove excess on the edges using a sharpener. The wire must be turned so that the grinding wheel cuts off the excess along the veins, but in no case bends them.
Regardless of the type of tip used, combining the crimping method with soldering is not allowed. The contact part on the wires must not be made of pure tin. Tips, as a rule, are crimped 1-2 times at a distance of 1-2 mm, sleeves - from 2 to 4 times.
Before installing the tip, you need to make sure that all the wires on the cut are the same length. Otherwise, the connection will be poor quality. Sometimes the wires become damaged or broken, so the wiring should not be twisted before installing the lug. If this requirement is ignored, they will be crushed during the crimping process, and current transmission will be disrupted.
In general, anyone can do cable crimping at home. The main cause of errors is the mismatch between the sizes of the wire and the tip. It is not recommended to use homemade connecting parts in your work. It is also not allowed to cut the sleeve into two parts in order to save money.
Instructions for arranging wiring from a panel in an apartment with your own hands
It is impossible to imagine a modern apartment without electricity supply. But installing the wiring on your own is quite possible.
To do this, you will need to be patient and study a little about the methods and procedures for performing electrical work.
In this article we will tell you how to make, change or install (lay from scratch) electrical wiring from a panel in an apartment with your own hands.
Basic rules for installing household electrical networks
The main regulatory document regulating the activities for the arrangement of electrical networks is the Rules for the Construction of Electrical Installations (PUE). Before you begin installing electrical wiring yourself, you should familiarize yourself with the PUE and especially carefully study the sections related to the selection of equipment, installation rules and safety precautions.
Basic rules to follow when installing electrical wiring:
- Distribution boxes, meters, input panels, switches, sockets and other key network elements are mounted in easily accessible places.
- The switches are located on the side of the vestibule, inside the room. Installation height – 60-150 cm from the floor. Wires to switches are supplied from above.
- Sockets are located at a height of at least 50 cm from the floor, the maximum allowable distance is 80 cm. Wires to the sockets are supplied from below. Sockets must be located more than 50 cm from powerful current consumers, a gas stove and grounded elements related to other communications.
- Sockets are installed at the rate of 1 pc. for 6 m² of space, excluding the kitchen. In the kitchen, the number of sockets corresponds to the number of electrical appliances. Sockets cannot be installed in the toilet; the socket group in the bathroom is connected through a separate transformer, or a stationary extension cord with a plug is installed, which is plugged into one of the sockets in the kitchen as needed. In this case, it is advisable to separate it into a separate connection group.
- Wire routes must be strictly vertical or horizontal. Turns are made only at right angles. The location of all cables must be marked on the plan.
- Cable laying routes are located at a strictly defined distance from the load-bearing elements of the ceiling, pipes, and edges of openings.
- The wires are laid so that they do not come into contact with metal elements of building structures.
- The distance between the wires laid in one channel is at least 3 mm, or each of them must have individual protection (channel or corrugation).
- Wiring and connections are carried out in junction boxes. All connections must be insulated; connections of copper and aluminum wires are not allowed.
- To attach protective and neutral conductors to devices, bolted connections are used.
Step-by-step wiring diagram
Let's look in detail at how to make electrical wiring in an apartment with your own hands. Proper design and thoughtful wiring diagram is the key to the safety of apartment residents.
In the process of developing a circuit, you can optimize the arrangement of internal network elements, correctly calculate the required amount of materials, and select the type of wire.
Having a wiring diagram and plan will also protect you in case of future repairs, eliminating the risk of accidental damage during repairs.
For an example of a wiring diagram in an apartment with your own hands, see the photo:
Important
If you lack experience at this stage, it is better to turn to qualified electricians, but it is quite possible to draw up a connection diagram yourself. The plan and calculation of the internal electrical network is subject to approval by the energy inspectorate, so if there are serious errors, it will have to be redone.
Wire preparation technology
Press pliers for crimping sleeves and wires
You can complete the termination yourself with a special tool. The technology is simple - just take the tip, put it on the conductor all the way and crimp it. The number of clamps can be different - crimping of a matrix with point contact is carried out in two or more places, and for sleeves one crimp is sufficient. Several crimping tests are necessary for more reliable contact, reducing contact resistance and increasing mechanical strength.
Crimping is carried out by professional craftsmen using expensive special tools. For a home specialist, buying such a device is unprofitable, so they choose other options. An alternative can be a stripper for removing insulation with a press or a crimper (special crimp). All devices can be purchased at a regular hardware or electrical store.
There are solder tips. Then termination is carried out in two stages - the stripped core is placed in the tip and solder is poured into the hole. This is a more reliable and high-quality method, which is often used in electrical wiring.
Mounting features
There are several common ways to attach a cable clamp. They all differ in complexity, connection quality and the need for additional equipment. Terminations are installed on the wire using the following methods:
- Crimping - clamping the tip with the cable inserted into it with special pliers.
- Fastening using a bolt or screw. Such fixation is possible only in special products designed for this purpose. They have a hole complete with a bolt. The wire is inserted into the tip until it stops, and a bolt of suitable size is completely tightened. Provided the work is done well, the connection is quite strong.
- Welding.
- Soldering.
The simplest method is crimping, however, in the absence of press pliers and the need to crimp the power cable, this method will be very difficult. Therefore, you can use soldering or, if possible, a screw connection. In industrial conditions, a mechanical or hydraulic press is used for crimping.
Dependence of termination on core material
Current-carrying conductors of wires are made of aluminum and copper. Aluminum has the following disadvantages:
- instantly oxidizes when in contact with air, which leads to deterioration of contact at the point where the wire is connected to the device;
- when current passes, the conductor decreases in cross-section, this leads to a weakening of the connection;
- poor contact leads to an increase in the temperature of the conductor, and the metal is destroyed.
Copper conductors do not have such disadvantages. The reliability of the connection in this case depends on the quality of the termination.
Methods for terminating conductors
Termination of wire and cable cores can be carried out in several ways, which are selected depending on the required reliability of the connection, simplicity of technology, and concepts of efficiency. This can be crimping, soldering, welding, mechanical clamps.
Crimping
Suitable for both copper and aluminum wires. However, crimping an aluminum core has its own characteristics: to avoid oxidation, the contact areas are covered with a special quartz-vaseline paste. Moreover, this must be done not only during the formation of contact, but also during operation. Quartz destroys oxidation during crimping, and Vaseline protects the conductor during operation.
The crimping process itself is quite simple: take a tip, put it on the core and crimp it. The number of clamps varies. Several crimping tests are performed, this contributes to greater contact reliability, reduced contact resistance and increased mechanical strength. It must be taken into account that the contact surface must be clean before starting the process. It is necessary to remove all insulation and dirt from the tips and clean the internal area until a metallic sheen appears.
The range of tips is wide. They are different for aluminum and copper conductors, for single-core and multi-core cables. They are marked according to GOST and have their own purpose and operating conditions. When choosing a tip, you need to know the cross-section of the current-carrying conductor.
Crimping tools differ in the size of the wire cross-section. They come in two types: press jaws (crimpers) (for cross-sections up to 10 square mm) and hydraulic matrix presses (up to 1000 square mm).
Soldering
The method is used mainly for copper current-carrying conductors using special soldering tips. For wires with a cross-section of up to 10 square mm, you can use a regular soldering iron; in cases with larger thicknesses, a gas or gasoline burner is used.
The soldering termination process is carried out in two stages: the core is stripped to a metallic shine and treated with neutral solder, then inserted all the way into the tip, after which solder is poured through a special hole.
Welding
To terminate aluminum conductors with a cross-section of 240 square mm or more, gas, electric or thermite welding is used. Welding work is carried out only from the ends of the cores in a slightly inclined or vertical position. The process itself is performed in special forms. To prevent aluminum from leaking out, the places where the wire comes out are sealed with asbestos.
Protection of aluminum from oxidation during the welding process and cleaning of the welded cores from the oxide film occurs using special fluxes. Upon completion, the termination and connection areas are cleaned, washed with gasoline, moisture-resistant varnish is applied and insulating tape or plastic caps are used.
Mechanical clamps
When connecting single-wire aluminum conductors with a cross-section of 2.5-10 square mm, and copper conductors (with a cross-section of 0.75-10 sq. mm), a termination method such as bending into a ring is used. In this case, the internal diameter of such a ring should be slightly larger than the diameter of the clamping screw. The process is performed with round pliers. For stranded conductors, they are pre-crimped, then twisted into a ring, and there must be a straight section of the core that has been stripped of insulation. After this, tinning with solder occurs. To prevent the core from being squeezed out from under the screw, use shaped washers or apply crimping using a ring tip.
Also, single-core and stranded wires with a cross-section of up to 6 mm square can be connected without twisting into a ring. To do this, use terminals specially designed for such a connection, which prevent the cores from being squeezed out.
The choice of conductor termination method is influenced by various factors. The main ones are the types of terminals of devices and instruments, clamps and other contacts to which the wire will be connected. Also, the method depends on the material and cross-sectional size of the conductor.
Connection of current-carrying conductors up to 10 mm/sq.
To organize branches and connections of aluminum and copper conductors, press jaws and standard sleeves are used. Connections in such cases can be one-sided, when the wire is inserted from one side of the sleeve, or two-sided. The material of the sleeves is selected in accordance with the material of the cores
Cable crimping algorithm:
1. At the ends of the cores, the insulation is removed by 2-3 centimeters. They must be cleaned to a metallic shine. If the conductors are aluminum, then they must first be lubricated with quartz vaseline paste. Copper wires, in turn, can be left clean.
2. In accordance with the technical table, punches, dies and sleeves are selected. If the sleeves are too large, then the free space can be sealed using additional cores. When using stranded conductors, removing the conductor wire to adjust the cross-section is not allowed.
3. The cores must not be twisted. They are laid parallel to each other, after which the connecting sleeve is put on. If copper wires are used, then before putting on the sleeve, they must be wrapped in two layers of copper or brass foil. The thickness of the foil is 0.2 millimeters and the width is 20-22 millimeters.
4. The connections are crimped using press pliers using the local indentation method. The degree of crimping is determined by the technical table.
5.After crimping, the connections are wiped with a rag soaked in gasoline and insulated.