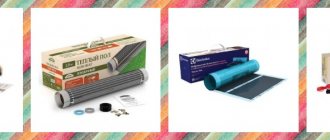
Warm floors are a practical, modern and efficient heating system that is gaining popularity and is actively used in new apartments. It is not very expensive and is accessible even to citizens with average incomes. In addition, unlike a water system, infrared heated floors under laminate are much easier to implement, which is another plus.
Principle of operation
Conventional heating systems operate using a direct heat exchange scheme. For example, batteries receive energy from hot water, which is heated at a nearby boiler house. This energy is then transferred to the air in the room, thereby spreading heat throughout the room. The same thing happens when using electric heaters, only the heating element is heated there.
In heated floors created on the basis of water or electric (not infrared) systems, the simplest heat exchange also occurs, only in this case the screed, under which the cable or pipes are located, is heated. The disadvantage of such systems is inertia. To preheat the floor, you need to spend a lot of resources, but the cooling of the floor when the power is turned off occurs slowly, since the pipes or cables under the screed do not cool down for some time.
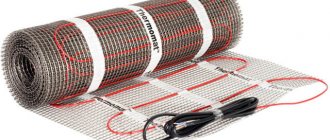
Film heated floors under linoleum or tiles work differently. Here, under the surface (tile, linoleum or laminate) there are transparent polyesters with carbon-coated strips (or paste). Each strip is connected to a copper bus—voltage is applied to it. When current passes through carbon paste, a radiation flux with waves 5–20 μm in length is created. The film itself and the tire heat up very little. The infrared energy flow created warms the surfaces it hits, and in this case it is the floor. Consequently, in infrared systems there are no intermediate surfaces through which heat is transferred; here the floor itself is heated - it is this that is the first and last “obstacle” to heat. An analogue is the sun, which is also a source of thermal infrared radiation. Its rays heat surfaces encountered along their path.
The operating principle of infrared systems has long been known and is successfully used in wall, ceiling or wall-mounted heaters. It has successfully proven its effectiveness over the years. With the development of technology, we have learned how to lay infrared heated floors under a laminate or other covering. This became possible due to the development of carbon-coated film heaters.
Features of installation work
And finally, a few tips for installing an infrared heating system:
- humidity in the room where work is carried out should be no more than 60%;
- installation of IR floors is carried out at a temperature of 0 degrees and above;
- Thermal film, even for testing, must be connected to the network only in an unrolled state - it cannot be connected in a roll;
- if the film was damaged in the area where the graphite (black) layer lay, then the place of damage must be isolated on both sides;
- the temperature sensor must be connected so that, if necessary, it can be easily replaced;
- If there is a flood in the apartment, then it is important to immediately turn off the floors and not use them until they are dry.
Infrared heated floor
If the infrared floor heating system was connected correctly, it will last for decades. It is important to carry out all work carefully and carefully - only in this case can you get the desired result!
Advantages
There are a number of advantages inherent to these systems:
- Film thickness - 0.5 mm. This allows you to hide it under any covering, even thin linoleum. This same advantage allows you to implement a film heated floor with your own hands, since the labor-intensive work of pouring and screeding is eliminated. Also, this solution does not involve raising the floor level by centimeters, which is often the reason for using such a system in apartments with low ceilings.
- Uniform floor heating and stable temperature. If the heating elements are located under the laminate, which is very sensitive to temperature changes, then in the case of electric (non-infrared) or water systems there is a possibility of its damage due to a breakdown of the thermostat. When heated above 40 degrees, it may swell or diverge the seams. When using film systems, heating above 40 degrees is impossible even with a faulty thermostat, so laminate or linoleum or tiles will not be damaged.
- In multi-storey buildings, the use of classic underfloor heating systems is sometimes impossible due to the need to fill, which can make the structure heavier. The only possible option is the use of film infrared systems.
- Flexibility - the system can be implemented in all rooms, even with high humidity. You can install infrared heated floors under tiles, laminate, linoleum, or parquet boards. That is, the system can be implemented even in a bathroom or toilet, but since these rooms have a high level of humidity, and water always gets on the floor, grounding or the presence of a protective shutdown device in the electrical circuit is mandatory.
- Energy transfer begins almost instantly when power is turned on. This allows you to quickly bring the room temperature to a comfortable one. Such a system works perfectly with fashionable “smart home” technology and is programmable. That is, you can set the exact time for turning the heating on and off or specify the required temperature - it will be maintained in the room all the time.
- Unlike conventional electric or water radiators, infrared heated floors under linoleum do not burn oxygen or dry out the air, which is especially pleasant for people suffering from chronic respiratory diseases.
- No vortex flows. Conventional radiators on the walls draw in cold air from below and release hot air from above, which moves to the top of the room, cools and sets. As a result, powerful streams are created that drive dust around the room. The infrared floor heats up evenly and slightly, which eliminates point turbulence.
Well, the last plus is the price. Installation of a film heated floor under linoleum will cost much less than the implementation of complex water cooling of the floor. We are talking about the cost of installation, not the film itself. However, depending on the manufacturer, the film itself may be cheaper than “outdated” floor heating systems.
Infrared floor device
The heating system itself looks like a thick film on which strips of carbon paste are applied. It is this that, when connected to electricity, emits a stream of infrared rays. Each strip is connected on both sides by mounting wires to the thermostat. Infrared rays heat both the coating itself and, passing through it, all objects that come under the influence of the flow.
Parallel connection of all elements of the system ensures its reliability - if any element breaks down, the overall functionality of the IR film will not be affected.
The width of the IR film produced by the manufacturer is standard - 1 m or 50 cm. The length of the roll can be different, but it is worth keeping in mind that the film can be cut at 25.7 cm. This will help to configure the optimal layout of the heating elements.
In terms of power, it is enough to choose a heater with 150 W/m2. This will ensure heating of the coating to a comfortable temperature of 40 C. It is not recommended to use more powerful ones, since increased temperature loads can negatively affect the laminate.
The system includes a temperature sensor, a set of wires, and insulating materials. It is recommended to purchase a thermostat unit for each room separately. To save money, you cannot connect the wires of the entire house system to a single temperature controller. This will lead to excessive energy consumption and exceeding the permissible load on the node.
Advantages of film heating:
- Easy installation of the entire heating system. The floor level does not increase. During installation, you don’t have to install a thermal insulating layer.
- The floor warms up evenly over the entire area. The heating of the system elements does not exceed 40 degrees, thereby preventing damage to the laminated panels.
- Infrared (IR) rays can pass through the coating, creating a comfortable temperature throughout the room. They do not dry out the air in the house and create an ionizing background, which not only does not cause harm, but, according to researchers, is beneficial for people living in the room.
- When turned on, the floors warm up very quickly and do not require large energy consumption.
- The system is reliable and durable, with a service life of several decades.
The disadvantages include:
- High price.
- Laying material around furniture. When rearranging, it will be necessary to completely redo the entire heating system.
- Water ingress can damage the system.
The existing disadvantages in relation to the undeniable advantages are practically insignificant. Infrared heated floors are a very good option for floor insulation. It can be used as a separate heating system or in addition to the existing one.
Those wishing to choose an infrared film floor for heating may have questions about the safety of infrared radiation for the human body. It has been proven that IR waves do not have a negative effect on humans. Film floors contain the same radiation that we receive when standing by an electric fireplace or a red-hot stove in an old Russian bathhouse.
The design of the heated floor is such that electromagnetic radiation is practically reduced to zero, so you can be completely sure that there will be no harmful effects on health for people living in the room.
Alignment
The very first stage is leveling the floor. Naturally, the old coating must be completely removed, the surface washed and dust removed. If small holes remain in the floor slab itself (they can form during the construction of the house), then they can simply be filled with sand.
If the floor is flat, then it is necessary to lay a special material directly on it to reflect thermal radiation. The underlay for film heated floors is inexpensive and is laid over the entire area - close to the walls. To avoid shifting, this material can be attached to the floor with double-sided tape - just glue it around the perimeter. The presence of a heat-reflecting surface increases the efficiency of the heated floor and significantly reduces heat loss through the bottom. If the floor had holes, then this material will completely cover them.
Which laminate to choose
The choice of coating model is important for the normal functioning of a heated floor under a laminate. Parquet that is not suitable for the type will be deformed, poorly transmit heat and emit formaldehyde above the permissible norm.
Laminate flooring with heated film must meet the following requirements:
- have a locking connection, it is not recommended to use glue for installing slabs, it creates a rigid seam that breaks when there are temperature changes;
- have high heat-conducting properties, for infrared heated floors the coefficient is 0.05-0.10 m2 x °K/W;
- the optimal thickness of the slabs is 8 - 9 mm; if they are thinner, the locking joint is destroyed when the temperature changes, and thick ones do not transmit heat well;
- do not emit formaldehyde when heated above the permissible limit; floor coverings of class EO and K1 are suitable;
- be wear-resistant, not lower than class 3, the higher this indicator, the higher the strength of the floor.
Based on these requirements, it is necessary to buy laminate flooring. In addition, there must be a special icon on the packaging or in the instructions for the product; it indicates the ability to combine this laminate with heating elements.
Placement of thermal film
Before placing the film itself, you need to plan its position in the room and draw up an approximate connection diagram for the film heated floor. To do this, you need to know in advance the future location of the furniture in the room, since infrared elements should not be located under a closet or sofa. If there is no clear plan, then it is advisable to place the film at a distance of 60–70 cm from the walls.
In residential premises, a standard arrangement of thermal film is often used: several strips in the center of the room along the long side. When the location has been decided, the film strips must be cut into pieces of the required size and laid on the floor with the copper film down or up (depending on how indicated in the instructions). Moreover, they should be positioned so that the eyeliner is on one side.
The distance of the stripes from each other is individual. One manufacturer allows them to be placed end-to-end (most often), another recommends leaving a space of 3-4 cm between the strips. But no one ever allows stripes to be placed overlapping - this is fraught with overheating and failure.
If the distance between two or three stripes is higher than permissible, this will lead to uneven heating of the floor - there will be less and warmer areas on it with a difference of 2-3 degrees, although they are not easy to notice.
Work progress
Preparing the base (base)
The rough flooring must be smooth and unstained - litter and large-sized debris are not allowed, it is also important to remove stones, dust, and sand. It is recommended to test the flooring for strength, repair cracks and gaps, and level them according to applicable specifications.
Important! To prevent the concrete base from becoming so dusty, it is recommended to treat it with a primer mixture, but this operation is not necessary.
A thermal insulation layer should also be laid on the subfloors. It is recommended to use foil. The shiny side must be at the top. The strips are laid end to end.
The thickness of the foil layer that was used should be approximately 2-3 mm. It is more comfortable to strengthen the layer that was used only with the support of double-sided tape, and the gaps between the individual strips can be covered with simple tape.
Next, small recesses will be cut into it to accommodate terminals, wires and other communications. Then the base for the laminate will become smooth. It is also recommended to spread a layer of waterproofing coating on the base of the floor.
Materials that were used and equipment
What can you need to install an infrared heated floor system?
The following devices and materials that were used will be useful to us:
infrared heating film;- heat reflector;
- temperature sensor and temperature threshold stabilizer;
- simple and double-sided tape;
- electric wires;
- clamps and material for wire insulation;
- waterproofing element (for example, film (polyethylene));
- knife;
- scissors;
- pencil;
- ruler;
- roulette.
At the beginning of our article, the display of infrared film was given, but in fact, it is not only carbon.
Heatflow film uses a carbon fiber sheet as a heating agent, which produces a mixture of carbon fiber and carbon paste.
There is also another discharge of IR film. It arose relatively not so long ago, but has already become in great demand. Unlike conventional carbon IR film, the material that was used actually does not fail in any way if there is a defect - that is, the floors will always be warm.
Important ! If you destroy one or several strips of a conventional infrared floor, then it will not be steamed at their location. But when using a film with a continuous strip of carbon, the flooring will begin to warm up, even if it has been damaged. Elementary - in the place of a cut or breakage of the material that was used, it will become a little cooler, but heating will continue.
Installation features
And finally, here are a few recommendations for installing an infrared heating system:
- the humidity in the room where the work is carried out must be no more than sixty percent;
- installation of infrared floors is done at a temperature threshold of zero degrees or more;
- Thermal film, including for testing, must be connected to the network only in an unrolled state - it cannot be turned on in a roll;
- if the film was damaged at the location of the graphite (dark) layer, then the defect space is certainly isolated on both sides;
- the temperature sensor must be turned on so that, if necessary, it can simply be changed;
- If there is a flood in the living space, then the floors must be turned off immediately and not reconnected until they are dry.
If the IR floor heating system was connected correctly, it will serve you for more than ten years. It is important to carry out all work carefully and carefully - only in this case you will be able to get the desired result!
Insulation
The thermofilm usually comes with a special insulating tape with special clamps that are used to connect the floor to the network. Also included are cables, a temperature sensor and a thermostat (not always). Cables usually have a cross-section designed to carry a current of a given power.
Use bitumen film to cover the cut areas of the tire. First of all, they are glued to areas of the side to which wires are not connected. Simply put, it closes “open” contacts. The film must be glued well, that is, without an air bubble. When voltage is first applied, the film heats up, melts slightly and takes the shape of the compound being protected.
On the reverse side of the strip there is an open contact. A clip is attached to each of them - it is included in the kit. You need to install it using pliers so that the special spikes pierce the film and reach the tire itself. The stripped ends of the cable are attached to the clips in accordance with the instructions (it clearly indicates where the phase, neutral, and ground are connected), the open contact is covered with bitumen films. The underfloor heating strips are connected to each other in series so that when voltage is applied they work simultaneously. It is also advisable to fasten them together with tape to prevent them from moving under linoleum or laminate or tiles.
Floor configuration and structure
The film heated floor set consists of:
- Heating elements with an average width from 500 to 1000 mm. The length varies, but no more than 8 meters is recommended. The canvas is cut to the required size using special strips.
- Terminals for circuit connections.
- Thermal sensor - it is responsible for the heating level.
- Thermostat (control unit) - can be electronic or electromechanical. It has a different design and display system, but the connection to power, heating elements and temperature sensor is similar.
- Often the kit contains a cable of the required size.
- Be sure to have insulation material in the form of bitumen tape.
When choosing a heated floor for laminate, it is necessary to take into account the power level. The standard is 150 or 220 W/m², not often, but sometimes 440 W/m². For laminate flooring, power above 150 W is not required; this is enough to heat the floor up to 40 ºС, especially since temperatures higher than this are contraindicated for laminate flooring.
You will need a flooring underlay with a thickness of at least 3 mm. Ideally, it should have one foil side that reflects infrared radiation from the base, thereby all the heat goes upward. It is important that it does not conduct current. You will need tape, single or double sided.
An infrared film floor is a narrow sheet equipped with heating elements; a floor covering (laminate) is laid on it. For these models, carbon strips serve as heating sources; they can be solid or coated, which are covered on all sides with lavsan or polyurethane material. The thickness of the structure is from 0.2 to 2 mm.
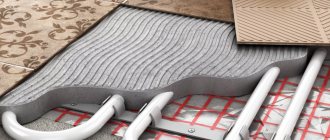
When laid, the structure of the infrared heated floor consists of the following layers and looks like this:
- Laminate flooring.
- Backing - vinyl or polyethylene is suitable. It allows heat to pass through and retains water, which is important.
Connection
The ends of the cables are connected to the thermostat, which should be mounted on the wall. It may not be included in the kit; sometimes the regulator needs to be purchased separately. In addition to “phase” and “zero”, you also need to connect the temperature control sensor cable to the thermostat. The sensor itself fits under the black stripes of the film - it measures the temperature on them, which allows the system to accurately control the heating. Since the sensor has some volume, it can create a bulge on the floor. To ensure the floor is level, a small hole is cut out in the insulating material for it.
The thermostat is installed on the wall - in a place to which residents have free access. Cables are connected to it: phase, neutral, grounding, from the temperature control sensor. The connection is carried out according to the instructions of the selected thermostat or the heated floor itself, but everything is intuitively clear to a person who at least has experience installing and connecting conventional sockets. If a film heated floor under carpet, laminate or tile is made of several elements, then you cannot twist the wires from them - there are certified terminal connections for this.
Before you connect an infrared heated floor to your home wiring, you need to know what load it is designed for. Most often, if the floor power exceeds 2.5 kW, then the wire from the regulator is led into the panel - to a separate machine. It would be stupid to “hang” such a powerful system on the home wiring. When everything is connected, the system is tested. If everything works fine, then you can proceed to the next step.
Reviews
Oleg, 39 years old, Tomsk
I bought film heated floors about 7 years ago. I regretted spending money on an expensive option and chose something from the middle segment. For the first few years everything worked well, the floor was warm and it was pleasant to walk on. But every year the effect became worse. When I disassembled the laminate, it turned out that out of two dozen modules, only five were working. Over the course of 7 years, the system became unusable, although the packaging indicated a service life of 15 years.
Olga, 44 years old, Moscow
I decided to install laminate flooring in the bedroom a few years ago and put a warm infrared floor underneath it. I like it – it’s nice to get up in the morning, you can walk barefoot. I turn it on on a timer for several hours a day, so I don’t have to pay much more for electricity. 3 years have passed and so far everything is fine.
Irina, 29 years old, Novosibirsk
When we bought laminate flooring, we were advised to install infrared heating underneath it. Since we had a small child at that time, we decided to try it. Everything, of course, is not cheap, but my husband installed the system himself literally in the evening after work, everything is simple, the instructions are clear and detailed - with photos and diagrams. We usually turn it on for several hours a day, everything warms up quickly, the room becomes hot if the warm floor is running constantly. So far there are no complaints.
Kirill, 42 years old, Leningrad region.
I decided to put a couple of strips on the passage in the hall to heat the floor in winter. It would be better not to take it - a year later a persistent burning smell appeared in the room, when I dismantled the laminate, it turned out that several mats had already turned yellow and even melted a little. This miracle heating almost burned down the apartment. But here it’s my own fault - I bought a cheap option, although the seller advised me to take something from well-known companies. Therefore, it is better not to save money - it is unsafe.
Infrared heated floors are well suited for installation under laminate flooring. The main thing is to choose high-quality products and carry out the work strictly according to the instructions, not forgetting to prep the surface.
Laying waterproofing and laminate
To protect the floor elements from water ingress, a waterproofing film is placed on it. It has no relief and is very thin, so it does not affect the efficiency of the installation and freely transmits infrared radiation. The waterproofing layer is not applied over the entire floor area, but on the films themselves with protrusions along the edges. Well, then comes the laying of laminate, tiles, linoleum or parquet boards. This is how you install a film heated floor with your own hands. That is, everything here is intuitive even for the most inexperienced master.
As for laying the flooring, standard schemes are used here.
Which substrate is better to choose and why?
There are a large number of products on the modern market that are used as reflective underfloor heating.
When choosing a substrate for a film floor, you should not be guided only by savings; you need to build on the technical features, characteristics of the room and the material. Let's look at the most effective and safe types.
Substrate thermal insulation and heat-resistant tape STEM Energy
Extruded polystyrene foam
The structure of extruded polystyrene foam is evenly spaced closed cells. The material has a low density and a high degree of moisture resistance.
It does not bend, so it is often used as a backing for laminate flooring. In addition, it has great strength and good thermal insulation properties.
The product is produced in rolls and sheets. The IR film spreads directly onto this substrate.
Lavsan
The substrate is made of foamed polyethylene with a lavsan metallized layer - the product is resistant to aggressive chemicals and microorganisms.
Lavsan flooring is laid under the film, thereby minimizing energy loss, increasing the efficiency of the floor, and ultimately leading to cost savings.
This type of reflective substrate is most suitable for infrared floors. It has a certain power density. Therefore, when choosing a lavsan bedding, the floor covering that is planned to be laid on a heated floor is taken into account.
Cork
Cork is a natural material made from crushed and compressed tree bark. The product is environmentally friendly and safe for health. It's not cheap, but it will last a long time. Available in rolls or sheets.
In addition, cork is resistant to deformation (it can take its original shape), has good heat and sound insulation, and is easy to install. The main disadvantage of cork bedding is its sensitivity to moisture. But this drawback is important to take into account when arranging water floors, and for infrared systems, cork is quite a suitable material.
Self-adhesive backing
The self-adhesive backing is equipped with a heat-reflecting foil layer on one side, and an adhesive layer on the other, with which the product is attached to the concrete base. The material is ideal for use on uneven and non-standard surfaces.
The advantages of these linings are high sound and waterproofing, and ease of installation, due to the ability of the product to be self-adhesive (no additional fixation is required).
Izolon, Penofol
These types of insulation consist of polyethylene foam. Their advantages are that they simultaneously act as both a reflector and a heat insulator.
These substrates are durable, have excellent noise insulation properties, are durable and practical. Recommended for laying film flooring in a “pie” with a laminate or parquet board finish.
Fiberboard
Fiberboard - boards made of cellulose fibers and various additives. It has increased rigidity and reliability, so it is ideal for laying under a film with a topcoat made of ceramic tiles or laminate.
Magnesite slabs
Magnesite boards are moisture resistant, have good sound insulation, are durable, and have a high density. The product is environmentally friendly, as it is made from natural raw materials.
This type is recommended for installation in the “pie” of an infrared floor, as it has sufficient density, despite good flexibility. Therefore, it perfectly levels any surface.
For your information! It is not recommended to lay a lining with an aluminum foil layer under the infrared floor, because this coating is a conductor of electricity. It is better to use a reflective metallized layer.
Exploitation
After the film infrared heated floor is installed under the laminate, it is necessary to save a plan for its placement in the room, indicating the distances from the walls. This will allow you to rearrange the room correctly, moving the furniture elements to areas with infrared stripes. If you need to install any elements on the floor with fastening to the ceiling, then the layout of the heating elements will also come in handy.
When the connection of the infrared heated floor is completed and the floor covering is laid on top of it, it is not recommended to turn on the installation immediately at full power. Linoleum or laminate must “adapt”, so to begin with it is advisable to set the temperature to 15–20 degrees, adding 3–4 degrees every day. If tiles are laid on the floor, the adhesive (or mortar) on which it is fixed must first dry at natural temperature. And a slow increase in temperature will allow you to understand the full efficiency of the film heated floor under the tile or laminate and determine the optimal value.
Infrared film heated floor under laminate: proper installation technology
Planning and rules for placing lanes
Before proceeding with installation, you need to determine the connection method, draw up a diagram of the arrangement of the elements of the heating system, on which:
- depict the placement of furniture;
- calculate the width and length of each strip;
- determine the required system power;
- draw a diagram of the location of elements emitting infrared radiation, indicate the location of the temperature sensor, determine the order of connecting the wiring so that the cables do not cross.
Example of a connection diagram
When drawing up a diagram, you need to take into account some nuances and requirements:
- The length of the film can be cut in 200-250 mm;
- elements should be laid along the room - this will reduce the number of network connection points;
- the strips are laid at a distance of 250-300 mm from the walls;
- laying the material under furniture is excluded - carbon strips may burn out due to overheating of the heating elements;
- the distance between rows should be about 50 mm;
- the temperature sensor must be placed in the center of the strip, with the condition that the length of its “native” wiring will be sufficient to connect to the thermostat.
Example of film placement plan
Materials and tools
The manufacturer's instructions for laying a warm infrared film floor under a laminate lack an important step - a list of additional materials and required tools. Let's close this gap.
You will need to additionally purchase:
- temperature sensor with included wire;
- thermostat;
- foil backing;
- polyethylene film, which performs the functions of waterproofing the heating system;
- electrical tape;
- masking or regular tape;
- construction knife (scissors);
- pliers;
- roulette;
- a simple pencil with a thick lead or a ballpoint pen.
Manufacturers' delivery of film heated floors includes:
- the film itself (standard width - 0.5, 0.6-1.0 m in increments of 0.2 m);
- wires for connection;
- fastenings-clamps for fixing the film;
- clip contacts;
- bitumen tape.
Film heated floor set
Preparing the base and laying thermal insulation
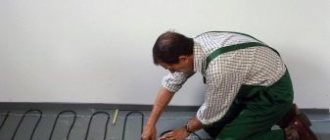
The film of the heating element is very thin, reacts to any unevenness in the floor, and is easily damaged. The subfloor screed must have a dry, flat surface, without the slightest bumps or protrusions.
Before you begin installing infrared film heated floors under the laminate, you must:
- thoroughly sweep and then vacuum the surface of the screed;
- lay the foil backing with the reflective side facing outward so that the heat is transferred not to the base of the floor, but to the coating;
- Tape the joints of the strips with foil or masking tape.
Sealing joints
To install the temperature sensor in the substrate, you need to cut a recess (the same operation is performed for terminals and wires after connecting the system to the thermostat.)
Place for temperature sensor
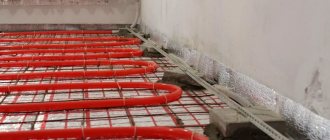
Lay out the film
The heating film is laid out in accordance with the developed scheme. Installation is carried out carefully so as not to damage the integrity of the canvas. The film should be cut into sections of the required length using scissors only according to marks specially designed for cutting.
Heating elements are placed at a distance of at least 0.2 m from walls and furniture, and at a distance of 1 m from other heating devices. Such standards are established in order to prevent the floor from overheating and failure.
The film is laid with copper bars to the subfloor and secured with tape. The maximum length of strips is accepted to be no more than 8 m.
The film should not be laid overlapping; the distance between the strips should be about 5 cm. To reduce wiring costs, the film is laid towards the thermostat, that is, along the room.
It is necessary to perform high-quality electrical insulation of the areas where the current-carrying busbar was cut, in places not used for connecting cables. For this, bitumen tape is used: for better sealing, it is pressed tightly on all sides.
Cutting film according to marks
Installing a temperature sensor
The temperature sensor should be placed in the central part of the blade directly on the carbon strip (black). At this point, a hole is made for the sensor and channels for the cable are laid.
The body of the device is fixed with bitumen tape. After installing the sensor and connecting the wires to the thermostat, the film is placed in place and secured with tape.
Mounting the temperature sensor
Terminal Installation and Cable Connection
Terminals are installed where the floor is connected to the electrical network. The top of the element is placed in a special slot, and the bottom plate is left outside at the bottom of the film. Using pliers, the clip is crimped - this ensures a high-quality connection with the silver part of the copper busbar.
Connecting the Cable
The cable is then connected. The supply wires are stripped and inserted into the terminal, crimped with pliers. To insulate the terminal, strips of bitumen tape are glued to the top and bottom and carefully connected. To increase the tightness of the assembly, all detected air bubbles are removed and the surface is smoothed.
Connecting the thermostat
The advantage of underfloor heating systems is the self-regulation of the heating system. It is done using a temperature sensor and thermostat.
The peculiarity of the laminate flooring laid as the finishing layer is that it requires precise temperature setting using a thermostat. The device has a control unit equipped with special connectors for connecting wires. According to the installation technology, it is necessary that all the wires converge at one point - the place where the thermostat is installed. Twisting of wires is not allowed, as this can lead to overheating of the entire system.
To avoid connection errors, the manufacturer’s instructions include a pictogram that shows areas for connecting grounding, load and voltage cables.
After connection, the wires are laid in specially made grooves. The device is installed at a planned point convenient for use.
Connecting the thermostat
Test run of the system
Before laying the flooring, you need to make sure that the connection is made correctly and that the system is working properly.
First of all, the integrity of each element and the entire system as a whole is checked. The test temperature is set low, since the main purpose of testing is to check the connections of the heated infrared floor. If there is no overheating or sparking, then it is concluded that the film is laid correctly and all connections are working properly. If there are any problems, you need to fix them and then start laying the floor.
The power supply to the system is turned off and the laminate is laid.
Laying the covering
Laying the elements of the laminated covering is carried out only after waterproofing the heating system from water spilled on the floor. Any conductive liquid that comes into contact with the coating can cause a short circuit). To do this, a polyethylene film is overlapped over the top of the substrate and heating elements, with obligatory overlap on the walls.
Layout of underfloor heating layers
Next, the laminate is laid according to the chosen pattern. You can watch in detail the stages of installing a laminate over a heated film floor in the video.
Infrared heated floors are considered an interesting and effective heating option. The disadvantage of such systems is increased energy consumption and selection of laminate brand. When laying heating film under an existing floor covering, you need to make sure that it is compatible with the heating system.
Manufacturers
Speaking about which film heated floor is better, we can give examples of different manufacturers offering effective solutions. Today the most popular manufacturers are Daewoo, Caleo, Heat Plus
Caleo is considered the best brand - this is a South Korean company that offers cool modern solutions in the form of infrared heated floors for laminate, parquet boards, and tiles. Kaleo films are reliable and durable, very thin; if installed correctly, they will last for ten years, the only drawback is the fragility of the product. The thickness of the film is only 0.42 mm, so when laying infrared heated floors under laminate or linoleum it is necessary to do it very carefully, otherwise you can simply damage the film.
Heat Plus is a popular brand that produces premium films. If you need to install an infrared heated floor with your own hands under the tiles, then with a high probability you will have to choose films from this manufacturer, namely the “Silver” model. It has a high melting point, which makes it safe and effective when used with ceramic tiles.
Which laminate to choose for IR heated floors?
Before you finally decide on the infrared type of floor heating, you need to study information about which laminate can be laid on top of this type of heaters without harm to itself. Suitable material must have a special marking in the form of a “snake”. It is this designation that informs the future owner of a warm laminated floor that the laminate is suitable for installing a heating system.
The process of laying laminate over IR heated floors
On a note! Experts recommend purchasing Belgian laminate from Quick-Step. Its service life is more than 25 years if treated with care.
Tips for installing film flooring
Experts advise laying film flooring following a number of rules:
- do not connect rolled film to the network;
- Installation of heated floors should be done at a humidity of no more than 60% and a positive temperature;
- if damage is detected on the graphite surface of the film, the hole must be insulated on both sides;
- Installing a film floor under a laminate cannot be done on a damp surface;
- if the heated floor is flooded, you need to quickly unplug it and let it dry naturally;
- install the temperature sensor in free access so that it is easy to change if necessary;
- save the layout of the film floor.
Infrared film is very popular today, as it can heat both an apartment and a house. By adhering to the installation rules, you can easily and quickly install this heating system with your own hands. In addition, if she has the right attitude, it will not be financially costly.