An electric heated floor can become not just an additional source of heat, it can be used as the main type of heating. It is relatively economical and quite easy to install. However, before you start installing it, you need to figure out which cable for underfloor heating is best to choose. The efficiency of the entire system often depends on this.
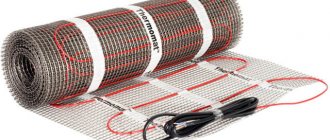
Cable for underfloor heating photo
How to choose?
Before you think about which electric heated floor is better to choose, you should solve two questions:
- Firstly, will the heated floor be used for the main heating of the room or only as an additional one.
- Secondly, how it will be mounted: in the screed layer or on top of it.
If the heated floor becomes the main source of heat, then the recommended power per square meter should be from 130 to 150 W. If as an additional one – 110-130 W.
It is also worth considering the possibility of changing the power density of the floor by the distance between the loops of the heating cable. The closer the turns are, the more cable will be needed, but less powerful models can be used. In this case, the area of the heated floor should not be less than 70% of the total area of the room.
It is not the total area of the room that should be taken into account, but only the area free from massive furniture.
Another consideration when choosing cable length to achieve the required power is the type of floor covering on top of the heated floor.
There will be minimal heat loss when laying cables under the tiles. Accordingly, you can get by with less power per square meter.
Laying cables under parquet or carpet will require more power due to the low thermal conductivity of these coatings.
The type of cable also depends on the installation method. When it is located inside a cement screed, cables of any diameter can be used for these purposes.
If it is laid on top of the screed, then in this case it will not be possible to do without an ultra-thin cable
However, the ultra-thin cable has one important limitation: it is only suitable for additional heating
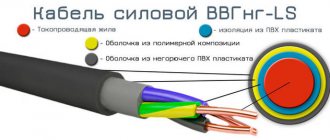
When selecting components for a heated floor, you must also take into account the condition of the electrical wiring. If it cannot withstand the high power of a heated floor, then all calculations and work should begin only after replacing the wiring. The next point when choosing components is the question of which cables to use: single-core or double-core
This will depend on the method of connecting the heated floor to the thermostat and the possibilities of laying the cable itself
The next point when choosing components is the question of which cables to use: single-core or double-core. This will depend on the method of connecting the heated floor to the thermostat and the possibilities of laying the cable itself.
If it is possible to evenly spread the cable over the area of the room and connect both ends to the thermostat, then it is quite possible to get by with a simple single-core cable.
However, if the configuration of the room does not allow laying the cable according to all the rules and bringing their ends to one point, then in this case the choice should be made in favor of two-core models. Cables with two cores are connected to the thermostat with only one end, while the other end can remain in any convenient place.
When ordering a heated floor, you should not forget about choosing a suitable thermostat.
Without this device, it is simply impossible to achieve the desired floor temperature. In addition, the thermostat will help significantly reduce energy costs.
In total, there are three types of thermostats.
Manual models. Their features are simplicity, low cost and minimum functionality. Their entire interface consists of a power key and a manual power control.
Thermostats with display. Such models are interesting because they allow you to set the temperature to the nearest degree. In this case, the current and desired temperature can be reflected on the existing screen. However, to use these features you will also need to install a temperature sensor.
Thermal sensors should be installed at an equal distance from nearby turns of the heating cable. If this requirement is not met, then setting the desired floor temperature will become impossible.
Programmable thermostats. Their capabilities allow you to set a specific floor temperature for a given period of time. For example, with their help you can automate turning off the heated floor during the daytime during the work week. In addition, some models of such thermostats can control several zones of heated floors at once.
How to calculate the power and amount of cable for heating a room
Before proceeding with the installation of a self-regulating heated floor, it is necessary to calculate the power and length of the circuit. We also suggest finding out how much electricity a heated floor consumes per 1 m2 per hour, per month.
Heating Cord Power Calculation (Carbon Heating Cord)
Power calculation
It is necessary to calculate the thermal power of a self-regulating heating system taking into account the heating characteristics. That is, the main or additional source of heat will be the warm floor.
But as mentioned above, the self-regulating cord periodically relieves tension to maintain the floor surface in a comfortable condition. Therefore, the heat will not be enough to heat the room, and it is not recommended to use a self-regulating floor as the main one.
As auxiliary heating, it is recommended to use a cable for such a floor with a power of at least 110 - 140 W per square meter. Moreover, in order for the heating level to be high, it is necessary to make thermal insulation.
The size of the room in which the heating element will be installed is also of great importance. It is not recommended to place the circuit under heavy furniture and plumbing fixtures; this is an unnecessary waste of electrical energy.
Based on this, the load calculation looks like this: the area of the heated room is multiplied by the norm per square meter.
Defining the Length of a Path
To calculate the required size of the kennel, you need to look at the cable product data sheet. It reflects the power per meter of wire. It varies from 5 to 150 W. This variation in the voltage of the self-regulating cable is caused by the huge scope of its use.
Let's look at determining the length of a contour using an example. When the electrical cord heats up to 28 degrees, and the lower surface of the floor covering up to 25, a wire with a power of 17 W is required. An area of 10 m2 will require 70 meters of heating circuit.
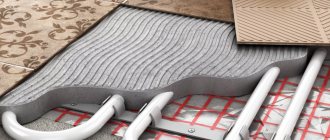
Installation of heated cable floors
When installing cable floor heating, proceed as follows. First, the base is cleaned and leveled. If necessary, a screed with a thickness of 3–7 centimeters is poured for this purpose. A level base is important.
If this requirement is neglected, then heating will not be uniform. When an air bubble appears under the resistive cable due to unevenness of the base, it will soon burn out.
On a prepared, clean base, in order to reduce heat loss, install thermal insulation, consisting of two parts: a tape laid around the perimeter of the room, and insulation.
When choosing an insulating material, pay attention to its heat resistance - it should easily withstand temperatures up to 100 degrees.
If there is a cold basement below the room, a thicker layer should be created, and if there is another apartment, then 2 centimeters will be enough. If the heat insulator is not used, a third of the system’s power will go down.
You can save money by purchasing regular insulation and laying a film with a reflective effect on top of it. At the same time, experts do not recommend using foil, since it will collapse in a few months. You can buy heat insulation in both rolls and slabs.
It is unacceptable to leave gaps between the sheets and strips of insulation: they are laid closely, since any gap creates a cold bridge through which heat leaks out.
Depending on the base, the following can be used to attach heat-insulating materials: double-sided tape, staples plus a construction stapler, and adhesive. For joining points, tape is used - it can be mounting tape, but the best choice would be metallized tape.
When there is often high humidity in the room, waterproofing is placed on top of the thermal insulation layer. To do this, use polyethylene film or other modern material.
Then you can proceed in one of two ways. In the first case, a small height preliminary screed is laid from a mixture of sand, cement and water. Thanks to its presence, heat is distributed more evenly and overheating of the floor heating cable is prevented.
The second method involves installing a mesh with cells of 10–15 millimeters or a special mounting tape on top of a polyethylene film. The tape must be placed with a laying step of 40–50 centimeters. The grids are mounted close to one another.
Installation of “warm floor” with heating cable
Self-installation - step by step
To install a “warm floor”, you will also have to purchase a thermostat and a temperature sensor (if they are not included in the offered kit). The variety of thermostats is very large; they can be simple, with only a thermostat function, or programmable, capable of working according to a given algorithm. But the diagram of their connection practically does not change.
An example of an electronic thermostat with a temperature sensor included
Most of these devices are designed to be installed in a standard socket. The choice is based on the buyer’s financial capabilities and preferences - from the simplest inexpensive ones to the “sophisticated” ones.
thermostats for heated floors
If everything is purchased, you can start.
| Illustration | Brief description of the operation performed |
| Some kit manufacturers include a lined “blank” in the box to create a scaled, detailed diagram. For example, like this... | |
| The first step is to use a special drill to select a socket for a standard socket box in the location intended for installing the thermostat. | |
| A vertical groove, approximately 20x20 mm, is cut down from this nest. It should house a corrugated tube with a temperature sensor and the cold end(s) of the heating cable. | |
| Before installing the circuit, all construction debris is immediately and thoroughly removed. | |
| It would be a good idea to prime the floor surface, since the mortar will be laid ahead, and the adhesive qualities of the surface are very important. | |
| The floor has already received the necessary thermal insulation - it is covered with a screed. But the craftsmen decided to enhance the effect and cover the surface with a layer of roll insulation with a reflective surface. The feasibility of such a step, given high-quality insulation, is very controversial, but, of course, it will not make things worse. | |
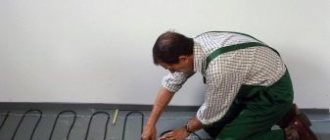
| After laying the insulation, mounting tapes are attached to the floor surface, which are convenient for fixing the cable. You can fasten, for example, with ordinary dowels. The distance between parallel strips is not regulated, but usually within the range of 500÷1000 mm. | |
| The surface is ready for laying out the cable. | |
| The tapes are often “arranged” with staples and tabs – they are very convenient and easy to secure the cable. | |
| The cable is laid out and fixed strictly in accordance with the diagram. You can, of course, attach it differently. For example, first a polymer reinforcing mesh is laid out, to which a cable is then tied. The “cold end” of the cable (in this example it is two-core) should approach the groove cut into the wall. | |
| A temperature sensor with a signal cable is inserted into the corrugated tube. It is dragged to the very end of the tube. | |
| This far end of the corrugation is then capped with a plastic cap. | |
| The corrugation with the temperature sensor is placed in its designated place and fixed. Its opposite end fits into the cut out hole. | |
| The cold end of the cable is placed there, in the groove, after which it is sealed with a suitable mortar. | |
| Naturally, by this moment a socket box should already be installed, into which there is a temperature sensor wire and a 220 V power cable. Switching is carried out - to the thermostat terminals. Everything is simple here - the terminals are labeled, and it’s almost impossible to make a mistake. The circuits are tested, the resistance of the laid cable is measured (indicated in the passport), and the system is tested for literally a minute to make sure that heating has started. If everything is normal, the system is de-energized, and the owner will be even calmer if the thermostat is removed before the end of the work, so that no one accidentally turns it on. Putting this device back in place is a five-minute task. | |
| Next, the cable must be closed with a tie. Since in our example it was decided to lay additional insulation, we will have to cut out windows in it for contact of the screed with the base. The windows are cut about 200 mm long, 50 mm wide, in a checkerboard pattern, with a spacing of about a meter in one row. | |
| If necessary, a beacon system is installed. Well, what takes longer is laying out the mortar and leveling it. The laying (pouring) technology may be different, depending on the chosen composition for the screed. | |
| The poured screed is left until completely dry. In the first week, it is recommended to moisten it daily and then cover it with plastic wrap. It is strictly forbidden to “speed up” the readiness of the screed by turning on the heating system - all the work will go down the drain. The screed must gain strength exclusively under natural conditions. |
After this, if other repair tasks in the room are completed, you can install a thermostat and start the system. But even here some caution is required. It is not recommended to turn on the “warm floor” immediately at full power. They usually start at 15 degrees, and then add five degrees every day until they reach the planned regime. This way the floor structure will gradually fully adapt to the heating system.
Additionally, we recommend that you familiarize yourself with information about which manufacturer of heated floors is best to choose based on the 2019 rating