Advantages of LED lighting
New lighting devices have retained all the advantages of traditional technologies and collected modern scientific achievements.
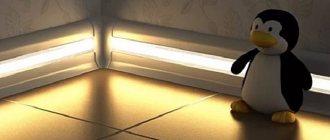
- Mechanical strength and durability. The service life of such devices exceeds ten years, while the original technical parameters do not deteriorate. Lighting strips are mounted in durable metal cases, which completely eliminates mechanical damage.
- Various colors. LED backlighting is most often white, but if desired, consumers can install all the colors of the rainbow. The luminous flux can be stable or variable according to an electronic program.
- Safety. Lighting devices operate on 12 V or 24 V, such voltage does not pose a danger to users.
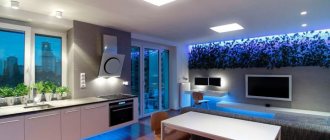
LED lighting for the kitchen work area
Strip lighting
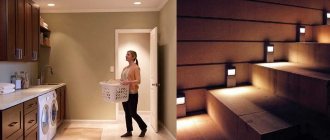
The convenience of work and the appearance of the interior depend on the correctly selected and positioned lamp. LED lighting for the kitchen work area is becoming increasingly popular. It is a continuous flexible tape dotted with small point diodes, on which the degree of illumination of the room depends. The optimal number of points is considered to be 100-120 diodes per linear meter.
Types of desk lamps
Manufacturers offer various solutions for desk lamps. There are different types of housings, materials for their manufacture, luminous flux power, etc.
| Lighting type | Brief operational and technical characteristics |
| They are sold fully assembled and ready for installation or in separate parts. The second option requires professional knowledge of electrical installation, but makes it possible to create the most optimal options for each specific case. Finished equipment is installed within a few hours, but in many cases it is impossible to make adjustments to them. LED lamps are used as lighting devices. |
| They allow you to separately zone small spaces and focus attention only on those areas that are necessary for performing kitchen work. Each device operates separately and can be switched on either manually or automatically. Housings of various sizes and geometries can be metal or plastic. |
| The cabinets are hidden in kitchen furniture or walls above the work area. The most difficult installation option; installation requires special tools. Disadvantages: recessed lamps take a long time to install; they are not suitable for all sets of kitchen furniture. And this applies not only to design, but also to technical difficulties. |
When choosing a specific option, it is necessary to take into account the maximum number of individual factors, including the architectural features of the kitchen, the type of furniture and the cost of the system.
Prices for LED strips
LED strips
What is needed to install an LED strip with your own hands?
Everything you need can be easily purchased at electrical supply stores. Pay attention to the quality of components.
- LED Strip Light. Sold by the meter, so please take measurements of the surface to be installed in advance.
- Power unit. Since the voltage of the LED strip is 12 W, and the network produces 220 W, a power supply is required. It is better to select it with a power reserve of 30%.
- Flexible two-core wire with a cross-section of 0.75 mm.
- Soldering iron with solder.
- Electrical tape or heat shrink tubing.
- Switch or toggle switch
Once you have purchased everything you need, you can begin installation.
Step-by-step instructions for connection
As an example, we will look at one of the many options for installing an LED strip. If you understand the principle and sequence of actions, then any other types of lighting will not be a problem.
Illumination of the work area in the kitchen
For installation, an LED strip with a power of 9 W/m is used. linear
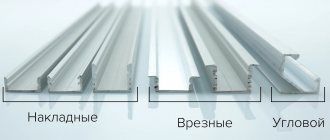
Tape and power supply
The power of the power supply is selected depending on the length of the tape. To protect against mechanical damage and contamination, the tape is inserted into a special corner profile, which has a matte screen for uniform dispersion of the LED light flux along its length and a wire for power supply.
Profile with diffuser and wire
The tools you should prepare are an electric drill or screwdriver, a grinder with a metal disc, a soldering iron with all accessories, a degreaser, wire cutters, a screwdriver, a mounting knife, self-tapping screws and measuring tools.
Tools
Prices for popular models of screwdrivers
Screwdrivers
Step 1
. Remove the plastic light diffuser from the profile and drill holes for hardware on one side.
Drilling holes for hardware
The diameter depends on the fastener, the distance is approximately 40–50 cm. We specifically chose the option of fixing the profile to hardware; it is very reliable, although it requires more effort.
The profile will be fastened with hardware
Professional electricians categorically do not recommend mounting it with liquid glue; there is a high probability that over time, due to the influence of high humidity, the structure will come off with all the unpleasant consequences.
Step 2
. Screw the profile to the bottom of the wall-mounted kitchen furniture.
Fixing a profile
Practical advice. A little longer, but much more effective, before screwing it into the bottoms, drill holes of a slightly smaller diameter than self-tapping screws.
The fact is that the vast majority of furniture is made from laminated chipboard, and these boards crumble when screws are screwed in; you cannot install a self-tapping screw twice in the same place. If it becomes necessary to correct minor errors, problems will arise. It is much easier, after drilling holes in the profile, to place it in place, transfer the pitch of the holes to the furniture, and then make holes along them.
Step 3
. Prepare the profile for a corner connection, if such a need is caused by the design features of the furniture above the desk.
How it's done?
- Accurately measure the length of the required profile. Be sure to take into account the size of the plug, otherwise it will protrude slightly beyond the plane of the cabinets.
- Carefully trim the element. When cutting, do not overheat the metal and do not allow the decorative coating to burn.
- Prepare a hole of the appropriate diameter at the location where the power cable is connected.
Profile measurements and markings
Profile cutting
Drilling a hole for the wire and attaching a section of profile to the cabinet
Continue installing all remaining profiles using the same algorithm.
Step 4
. Solder the LED strip to the power cable, be sure to pay attention to the polarity.
Soldering the tape
There are special marks on the tape, and the wires have different insulation colors. Standards regulate the color of only two wires: ground (green with yellow streaks) and neutral (blue). Phase wires can have different colors, they are established by industry regulations.
How to solder LED strip
Wires are soldered to the tape
The current supply wire must be hidden behind the back walls of kitchen wall cabinets.
Step 5
. Glue the tape to the inner surface of the profile.
Important. Despite the fact that the profile seems clean and does not require preliminary preparation before gluing, it must be degreased.
Profile degreasing
The fact is that the technology for producing rolled products in bending machines uses technical lubricant. If it is not there, then microcracks and roughness will form on the metal surface. The lubricant layer is very thin, invisible to the eye, but it has a negative effect on adhesive compositions - adhesion indicators decrease by an order of magnitude. There is a risk that the tape will peel off and fall onto the diffuser; in some places its glow will become much brighter than the average length. This position does not have a negative impact on the performance characteristics of the lighting, but the appearance suffers.
Step 6
. Glue the tape to the profile.
Gluing tape
Remove the protective tape step by step and press the lamps tightly. The excess length must be cut off. Keep in mind that you only need to cut according to the marks. If it's a little longer, that's okay, bend the excess.
Step 7
. Reinstall the diffuser and install the plugs.
Diffuser installation
The plug is on
Step 8
. Connect the power supply. It can have different sizes and appearance; such factors do not influence the installation process. The power supply is connected in several stages.
- Remove the front housing cover. Behind it are terminals indicating the polarity of connecting the LED strip power wire.
- According to the polarity, firmly connect the wires to the terminals.
- On the other side of the power supply there are three terminals: ground, neutral and phase. Screw the power cable wires to them.
- Install the device in an unused space of the kitchen furniture. Most often it is placed next to the hood fan.
power unit
Turn on the backlight, if everything is normal, then you can safely use the device.
Using lighting in the kitchen work area
LED lighting is used not only in the kitchen. For example, tapes are used to create the effect of a floating stretch ceiling. You can make such a design from different materials, and which ones you can read on our website.
Video - Installation and connection of LED strip
Light in a small kitchen
It is the luminous flux, adjusted to the smallest detail, that can become the lifesaver that will save your tiny kitchen from despondency and forever make it friends with harmony and comfort.
You can always display a powerful chandelier with one large shade. It will provide decent illumination in the center - this is a plus. At the same time, the corners can be darkened - and this is a serious disadvantage. Point light sources or track systems will help correct the balance. They should be used for zone lighting: the work area, the sink, the set as a whole.
110 best small kitchen design ideas + a complete design guide can be found here.
Often, if there is a lack of usable space, it is possible to build general lighting solely on the basis of spots. Select them at the rate of 1 piece. by 1.5 sq. meters. But how to arrange it gives you complete freedom for your design inspiration.
Designer tips
Irina Polyakova
founder of the interior studio, architect and interior designer. The main area of work is kitchen design
There is an unspoken rule - to outline the contours of the kitchen set installed in the kitchen with spots. Most often in small kitchens they are either straight or angular, so a symmetrical linear construction will be required.
When developing a kitchen design project, give preference to light colors when decorating walls and selecting furniture. Still, they reflect light better, and this will greatly facilitate your task of creating a cozy atmosphere in the room.
Lamps should not hang very low from the ceiling. This visually reduces the height of an already small room. And too bright light in the immediate vicinity of the head blinds the eyes and does not add comfort.
Place the switch
Shot: Magazine “How to do it yourself” / YouTube
If you planned a stationary switch at the renovation stage, then it should already be installed. In the case of a cord switch, build it into the bottom of the cabinet by pre-drilling a hole. Or use a mounting plate: attach it to the kitchen eaves or other convenient place, and then insert the switch into the plate.
Shot: Westline furniture fittings / YouTube
When using a contactless switch, hide it in one of the cabinets, and place the IR sensor in a suitable place by drilling a hole of the required diameter in the bottom or wall of the box.