Why install triple sockets
Connecting a triple socket is most often required by people who do not plan to carry out repairs in the near future, but want more convenience for using electronics and electrical equipment. Connecting such a device has advantages and disadvantages.
Advantages:
- low cost;
- safety and reliability of fastenings;
- no need to lay additional wires;
- the ability to quickly improve the functionality of the electrical network in the apartment;
- the ability to carry out repairs easily and quickly in case of malfunctions;
- ease of installation of the triple socket and its use.
At the same time, you need to be prepared for the shortcomings:
- there is a need to drill socket boxes for three modules;
- the use of additional devices (in particular, a hammer drill) will be required;
- During operation, a lot of dust and dirt may form.
Installing a triple outlet can greatly improve the functionality of a room's wiring without requiring additional cable costs or space.
Determining the possibility of connecting an outlet
Before proceeding directly to the connection, we should determine the possibility and correctness of our decision. To do this, you should determine the cross-section of a suitable wire, the rated current of the circuit breaker that powers this group, as well as the absence of prohibitions on installing sockets in a room of this type.
There is no way to do without calculations when installing an outlet.
So:
- Before installing a triple socket into an already operating electrical network group, you should determine whether the circuit breaker can withstand the additional load. To do this, we need to calculate the possible rated current in the outlet. This is done by summing the rated currents of the most powerful consumers of electrical energy that can be connected to a given outlet.
- If we know only the rated power of these devices, then we calculate the rated current based on the formula I=P/U×cosα. Where I is the rated current, P is the rated power of the device (usually indicated in the passport or on the device body) and cosα is the coefficient power of the electrical appliance (the operating instructions for the device should help you find its value, but if you haven’t found it, you can take it equal to 1).
- Now, by summing up all rated currents for a given group, we can check the machine’s compliance with these parameters. Often the machine needs to be replaced with a more powerful one. But if the outlet is designed to connect low-power video and audio equipment, then this may not be necessary.
Note! According to clause 6.2.2 of the PUE, the maximum permissible rated current of the circuit breaker supplying the group network cannot be more than 25A. So, if you already have a 25A machine installed, you will have to think about dividing the group or restrictions on connecting devices to this group.
- Also, if the installation of a triple socket in an already existing group involves monitoring the cross-section of the supply wire. Often, if the machine is not suitable, then the existing wiring will not meet the new requirements. Therefore, again, you will have to think about the restrictions on the connected load for this group.
- Well, finally, you need to decide, is it possible to install an outlet here at all? The socket cannot be installed in bathrooms or storage rooms. At the same time, there is an exception for bathrooms, which allows installation when an RCD is installed in the power circuit of this group.
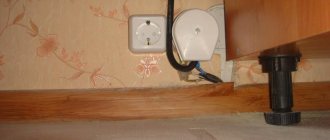
The photo shows metal plugs for a socket on a combustible basis
- In addition, if a triple socket must be installed on a combustible base, care should be taken to ensure its fire safety. To do this, the mountings for the socket must be made of fireproof materials. Typically, steel products are used for this.
Main varieties
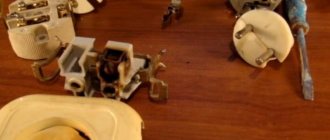
The factory outlet is a device that provides safe contact closure for uninterrupted power supply to electrical appliances. Inside it there are terminals with springs attached to them and contacts. From the outside, the socket design consists of a plastic box (case) with a working part.
There are two main types of sockets:
- Socket C5. Standard Soviet design with a square body and a round cutout for the fork. Such sockets are not grounded and are suitable for most old-style electrical appliances, but are designed for regular 220 V.
- Socket C6 (Euro). Withstands higher current than C5 and is suitable for connecting devices with Euro plugs and connectors. Has grounding. It is safer than the first option and is securely mounted on the wall.
Over time, the need to improve the functionality of outlets increases, especially when it comes to electrical appliances in the kitchen. According to modifications, sockets today can be divided into the following types:
- internal for hidden wiring;
- external (external), having a protective cover;
- built-in and overhead;
- with and without grounding;
- having a circuit breaker for overload protection.
Regardless of the type and modification, when installing a triple socket, the so-called block assembly method is used. It involves the installation of three separate sockets with a frame connecting them. If there is a need to purchase parts separately, then when selecting this frame, you need to pay attention to the correspondence of its shape and dimensions to the structure.
There are also triple sockets that connect to one socket box. They have a triangular shape, take up a little less space, but are not as convenient and safe to use.
Electrical equipment, light, lighting
0 votes
+
Vote for!
—
Vote against!
In the modern age, when innovative technologies are developing by leaps and bounds, it is impossible to imagine life without electrical appliances, which not only simplify the life of a modern person, but are also an integral addition to it. Even an inexperienced person who has never encountered electronics before does not need an explanation of the operating principle of electrical devices, since everyone understands that their operation requires connection sources, the function of which is performed by a socket. There is also no need to tell you what a socket is. The house, as a rule, has sockets, and not just one, but often there is a need to install an socket in the event of carrying out repairs or operating a larger number of electrical appliances. What to do in this situation? You can use the services of a professional electrician by calling him to your home, or you can learn the basics of installing electrical outlets and do it yourself. How to connect a triple socket in accordance with modern standards will be discussed in this article.
Content
- Socket and its varieties: an electrician’s view
- Triple rosette: main varieties
- Installing a triple socket: preparations
- How to install a socket box for a triple socket?
- How to wire a triple socket?
- How to secure the socket box?
- How to connect a triple socket?
- Safety instructions for installing a triple socket
Socket and its varieties: an electrician’s view
A socket is a specialized device designed to ensure absolutely safe closure of contacts, resulting in an uninterrupted supply of electricity to electrical appliances. The design of the socket is represented by a plastic case, including a working part. The internal part of the socket is represented by terminals to which springs for the plug and contacts are attached. Most modern sockets, including the triple grounding socket, are equipped with grounding contacts, which reduce the voltage from all electrical appliances and increase the safety of the system. The modern market of electrical appliances and their components offers the consumer several types of sockets, in the selection process of which it is necessary to take into account the specifics of the operation of electrical appliances.
Despite the fact that the design of the socket is, at first glance, simple, it is necessary to distinguish between the following types of sockets:
- Type C5 sockets are a standard Soviet socket, familiar to most residents of standard high-rise buildings. They are characterized by a square body shape, in the center of which there is a round cutout for an electrical appliance plug, as well as two round holes into which the electrical appliance plug is inserted. These sockets are not grounded and are also suitable for most older electrical appliances. Despite the fact that they are successfully camouflaged on the wall, their design and appearance leave much to be desired;
- Type C6 sockets , or, in other words, Euro-sockets, are characterized by a more attractive appearance and, unlike Type C5 sockets that can withstand no more than 6A, are able to withstand current up to 16 A. In addition, for most modern electrical appliances, Euro-sockets are used. sockets that are characterized by a wider opening for the plug. Another advantage of modern sockets is the ability to ground them, which makes such sockets safer.
However, contrary to the opinion of amateurs, the appearance of the sockets is not their only difference. Sockets of all types also have internal design differences. This is due to the desire to improve the design of the outlet, making it safer.
Important! Type C5 sockets are characterized by the simplest design, on the inside of which two transition contacts are attached to a plastic or ceramic base and attached to the electrical wiring. The operating principle of this type of socket is based on the closure of two transition contacts, which occurs when you insert the plug into the socket.
The types of electrical contacts also vary. There are spring and petal contacts of type C5 sockets, while the latter are considered less reliable, due to their ability to lose their rigidity and subsequently spark when the plug is inserted into the socket. The reliability of spring contacts is due to the wear resistance of the springs that make up the design of the sockets, due to which such sockets can be successfully used for several decades.
Triple rosette: main varieties
The age of progress and the growing energy intensity of electrical appliances determines the constant increase in the popularity of triple sockets, which are becoming increasingly difficult to refuse in everyday life. This problem is especially acute in the kitchen, where we spend a quarter of our lives and make the most of many electrical appliances. As already mentioned, now is the age of innovative technologies, which have not spared triple sockets, which differ in accordance with their modification, shape and size. Like other sockets (double, single), there are:
- Triple internal sockets designed for hidden wiring;
- Triple external sockets, so-called external sockets), characterized by a high degree of protection and the presence of a protective cover;
- Triple surface-mounted and built-in sockets;
As for modern modifications of triple sockets, there are:
- Triple sockets with grounding and without grounding;
- As well as triple sockets with protective shutdown, which involves shorting the wires and turning off the socket, whereas when installing a regular socket the meter is simply knocked out.
The design features of triple sockets, which have one power wire, allow you to connect up to three electrical appliances simultaneously. Regardless of the modification of the socket, be it external or internal, during their installation they use the block assembly method, also called “prefabricated sockets”. This method involves the simultaneous assembly and installation of three separate outlets. To ensure convenience and aesthetic appearance of the design, experts suggest combining the external frames of three separate outlets, replacing them with one common frame, which must be purchased separately. When purchasing an external frame, you need to select it in such a way that the shape of the inside of the front panel matches the shape of the frame.
Important! Experts advise purchasing sockets that have a square shape on the inside of the front panel, as they are a more universal model.
It must be remembered that manufacturers produce frames of various shapes and colors. More expensive models are sold separately: one box contains the inner part with contacts, and the other contains the outer part along with the frame and decorative cover.
Triple socket photo
Installing a triple socket: preparations
Repair involves not only plastering, painting and wallpapering the walls, but also other tasks, the solution of which is also important. According to the requirements of modern design, the installation of electrical sockets must be carried out in accordance with Euro standards, implying their location at a height of 20-40 cm from the floor. This is due not only to convenience, but also to aesthetic beauty, since the cables of electrical appliances in this case will not be visible. When carrying out electrical installation work, it is important to clearly understand that if installation products such as sockets and switches are selected incorrectly, a fire may occur. This issue becomes especially relevant in the case of installing a triple socket. This is due to the fact that any element of the electrical network is designed for a certain operating current, and in case of discrepancy, there will be an overload of the electrical network and, as a result, overheating and burnt contacts.
How to choose and install a triple socket correctly? First of all, it depends on the type of wiring, which can be hidden or external. If you plan to work with hidden wiring, you need to be more careful about the work. In this case, it is important to make sure that it is designed for triple load. Otherwise, the electrical network may be overloaded, which will lead to the need to replace the burnt wire, which is an extremely troublesome task.
Before connecting a triple socket, you need to mark its installation location. If with a single socket everything is much simpler, then all the components of a triple socket should be located on the same level, since the slightest deviation from the same level will greatly “hurt” the eyes. Having determined the installation location of the triple socket, which, in accordance with Euro standards, should be located at a level of 25-40 cm from the floor, mark it, which is best done using a thick marker. If the marking for a single and double socket is not difficult and involves drilling one hole in the wall, then with a triple socket things are somewhat more complicated. To do this, set a building level and draw a horizontal line, after which the centers of the sockets are marked, taking into account the distance between them. This is done as follows: mark the first center of the socket and set aside half the width of the socket cover from it. This can also be done by placing the overlay on the first center and measuring the second vertically located center, in accordance with the width of the overlay.
Important! To avoid problems with cable routing when installing a triple socket, experts advise installing it where a single socket was previously installed.
If there is a need to lay wiring in a new location, it is necessary to draw vertical and horizontal lines on the wall (they must be straight!), since oblique and curved routes will further complicate the process of finding and repairing damaged wiring.
How to install a socket box for a triple socket?
Experts recommend installing a triple socket in one socket box, which is a block with three sockets located on a single frame. If you use three single sockets as a triple socket, which you install in parallel, experts recommend using single sockets. Due to the fact that installing a single block of three sockets is similar to installing a single socket, the installation of three sockets in single socket boxes will be considered next.
If you plan to work with brick or concrete walls, before you begin, you need to prepare the following materials and tools:
- Hammer;
- A specialized attachment, which is a crown with a diameter of 70 mm, equipped with carbide cutters;
- Voltage indicator;
- Curved and straight screwdriver;
- Hammer;
- Chisel;
- Medium and narrow spatulas.
Before you install a triple socket, get a hammer drill designed for a concrete wall or a drill for a brick and plasterboard wall, as well as a hole saw for socket boxes. The drill must be pressed against the previously marked centers of the sockets and carefully begin drilling holes until the bottom of the crown rests against the wall. After this, they pull it out and finish drilling.
Important! Experts recommend breaking up the remaining concrete left after drilling using a hammer drill chisel or a regular hammer and chisel.
After you have drilled the holes, take the electrical box and punch out holes on the back of it, the number of which corresponds to the number of cables that go into it. For a triple socket, this quantity is 3 pieces, therefore, it is necessary to press out three holes.
Important! When working with brick and especially plasterboard, you must take precautions and work carefully, as these materials tend to crumble.
Also, it is important to remember to drill two wire holes between the three cable holes. For these purposes, select a drill diameter that matches the diameter of the small corrugation into which the wires are inserted. Experts recommend using corrugated pipe, but you can often refuse it. If you are installing a socket in a plasterboard wall, the cable in the corrugated pipe must be thrown along the mounting profile.
How to wire a triple socket?
The wires must be connected in accordance with a parallel circuit, which means that two wires are connected to each wire from the panel, coming from additional wires going to the second and third sockets. Using an indicator screwdriver, you need to determine the phase and zero, after which the electricity in the panel must be turned off. Next, twist the wires, remembering that to carry out reliable twisting, experts recommend using specialized contact tips, which must be inserted into the socket terminals and screwed. After the first twist, the wire is thrown onto the second socket and its socket is inserted through the hole in the back cover. A similar action must be performed with the third hole. Once you have done this, all three socket boxes are ready for installation.
How to secure the socket box?
Having prepared a mixture of alabaster and water, coat the holes drilled in the wall with this mixture and insert socket boxes into them. Experts recommend making the mixture thicker, which will speed up the setting of the alabaster. If you see that the socket boxes are falling through, add alabaster, and if they stick out, tap them with a hammer.
Important! Despite the fact that this event seems quite simple, it must be treated with due care and all socket boxes must be placed on the same level, for which it is necessary to use a building level. It is also important to keep an eye on the top screws, which should be located at the highest points of the socket and hold them in place. After you have installed the socket box, you need to leave it until the alabaster dries completely, which will take 1-2 hours, and then start connecting the socket.
Triple socket diagram
How to connect a triple socket?
Let us remind you that we are connecting a triple socket in three socket boxes. In this case, the connection is made in accordance with a parallel circuit. It is important to know that there are sockets that are connected in series via a cable. They are not recommended for connecting several electrical appliances with high power consumption at once. In this case, the socket is connected according to the diagram supplied with the socket. In the case of our socket, all the wires must be connected to its clamps and pressed tightly with terminals and screws, depending on the type of socket. Then the wires are twisted inside the box, after which the central part of the socket is installed. To correct its level during the installation of the socket by attaching the screws, lightly tap the metal body to level it. After this, tighten the screws. Having installed the central part of the triple rosette, install the decorative overlays.
We can say that the sockets are installed and ready for use. To make sure of this, you need to check their functionality by turning on the machine. To turn on the socket for the first time, it is not recommended to use complex electrical appliances, preferring a table lamp.
Safety instructions for installing a triple socket
- Before you begin electrical installation work, be sure to turn off the electricity, and then make sure that the electrical network is disconnected;
- During the work it is necessary to use only special tools with insulated handles;
- If you have to work with a long length of electrical wire, lay it carefully in the wall or cut it to the required length;
- If it is necessary to extend the wire, it must be soldered and not twisted;
- When installing a socket into the wall surface, it is important to monitor the tightness of its installation and insulation;
- It is necessary to use equipment and wires designed for rated power and current and intended for electrical installation work.
By following these simple rules, you will be able to carry out electrical installation work related to connecting electrical outlets as safely and efficiently as possible.
How to connect a triple socket video
Preparatory activities for installation
You should begin preparing for installation by choosing the installation location. The Euro standard involves fixing the device at a distance of about 20–40 cm from the floor. This is important in order to comply with basic safety and aesthetic rules.
The second important activity is the calculation of current strength. It must be remembered that network elements are always designed for a given operating current. If this point is not observed, operational safety is sharply reduced, and there is a high probability of overloads and, as a consequence, overheating. The wire cross-section must also match the load. In this case, it should be at least 1 square. mm for copper and at least 2.5 sq. mm - for aluminum. The three-core option will be the most successful.
Parts and products for installing sockets should be selected based on the specified room parameters and operating current. It is also important to respect the aesthetic features of the apartment, to choose the safest and most suitable materials in color and appearance. Installation of hidden and external devices also has different requirements.
At a distance of 20–40 cm from the floor, you need to make markings using a pencil or marker. It is also advisable to use a level to create a straight horizontal line. To do this, marking the first installation center, you need to set aside half the width of the trim on the socket box. It is also useful to apply markings in the form of horizontal and vertical lines.
Wall decoration
Finishing should begin after the solution has completely hardened in the drilled holes. If you immediately start sealing the grooves, the mechanical impact of the cable may cause the socket boxes to move from their place.
The finishing of the panels is carried out in the following sequence:
- The grooves are cleaned of foreign objects, dust and crumbs.
- The surfaces are treated with a deep penetration primer. If the liquid is quickly absorbed, the operation is repeated.
- A solution of sand and cement is mixed. They are used to seal large gaps, chips, and holes. After applying the solution, a longitudinal depression 3-4 mm deep should remain.
- Completely dried cement is cleaned of protruding fragments and treated twice with a liquid primer.
- The starting putty is being prepared. It is applied and leveled so that 1-1.5 mm remains for the finishing coat.
- The base is cleared of grains and covered with impregnation.
- The finishing putty is mixed and applied. After it hardens, the wall is rubbed down. It should be ensured that no traces remain of the previously laid grooves.
The final finishing is chosen by the owners depending on their own tastes and the purpose of the room. This can be wallpaper, tiles, paint and other facing materials.
Installation of a socket box
If a solid socket with three sockets was selected for installation, only one socket box may be needed. A block with three separate mechanisms is fixed on single socket boxes. Difficulties may arise when installing the unit on a brick and concrete wall, since additional devices may be required. It is easier to make socket boxes with drywall.
Required tools:
- hammer drill or drill (for concrete, drywall and brick);
- a nozzle in the form of a rounded crown with incisors;
- two types of screwdrivers: straight and figured;
- hammer;
- Master OK;
- chisel;
- voltage measuring device.
Stages of placing socket boxes:
- Using a drill or hammer drill and a nozzle, make a round hole in the wall (you should drill until the crown is completely immersed in the wall).
- On the back of the socket box, press out three holes for the prepared cables.
- Drill two holes for the wires between the three holes for the main cable.
Working with drywall and brick requires compliance with basic safety rules. It is important to remember that such building materials are very fragile and often crumble when working with them.
In order for the socket boxes to stay in place well, they need to be secured with a thick aqueous solution of alabaster. Before installing a socket box in the wall, the hole made must be lubricated with the resulting mixture. The devices usually hold up well on a well-prepared mixture, but if they fail, more alabaster should be added to the solution. After electrical installation, the solution must be left to dry for two to three hours.
Do not forget about high-quality grounding - it is important not only for ease of use, but also for safety purposes.
The meaning of grounding and how to install a grounded outlet
It is impossible to imagine human life without the use of various electrical appliances.
We should not forget that they not only significantly facilitate human life, but also pose a danger to life.
In order to protect yourself, you must use grounding in the room.
You need to know how to install a grounded outlet so that it works reliably and is safe.
The essence of grounding and its significance
Electric current moves between two points, which differ from each other by different electric potential and electric charge. To start the flow of current, you need to connect two points. This can be done using copper wire.
Grounding in the house
In an electrical outlet, one socket has a charge of 220 V, and the other - 0. When the device is turned on, these two points are connected, which sets the current in motion. Only under this condition will electrical appliances function.
Each socket has 3 holes: neutral, ground and phase. The ground is connected to the wire directed to the screw type terminal. This wire performs the following functions:
- Guarantees safety from electric shock. If there is a current leak, the supply is immediately stopped.
- Ensures stable operation of the automatic shutdown system.
- Responsible for the correct operation of network filters, which are part of the designs of imported rubble equipment.
Grounding according to functionality can be divided into the following types:
- All parts of the equipment body that are electrically conductive are connected to zero. This type of grounding is known as grounding. When a phase gets on the housing, a short circuit occurs, which leads to the automatic safety system being knocked out.
- If there is a ground loop, all parts of the equipment that have the ability to conduct electric current are connected to it. The result of using this type of grounding is that in the event of current flow, the circuit receives the same voltage as the equipment frame.
The disadvantage of the automatic grounding system is its low response speed. The earth absorbs electrical current much faster, putting human life at risk.
Types of sockets with grounding
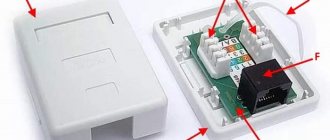
When purchasing sockets, it is important to know the difference between sockets with and without grounding. You can see the differences if you disassemble the device body. The one with grounding is equipped with 3 contacts (side, which is divided for the neutral and phase wires; central).
Double socket with grounding
The difference is also noticeable upon visual inspection. They depend on the device manufacturer:
- France. Their design is equipped with a special auxiliary pin.
- America. They do not have side holes with slots.
- Germany. In their central part there is a recess, which has the shape of an oval, equipped with holes for a fork. On the sides of the recess there are metal brackets. It is these brackets that are responsible for grounding the outlet.
The main distinctive feature of a device with grounding is that when the device is turned on through it, the grounding contacts come into contact with the current first, and only after them the zero and phase contacts of the plug come into operation. Due to this, if the device is damaged and current leaks, the device body is grounded before electric current enters it.
If you plan to install electrical outlets yourself at home, experts recommend giving preference to those rated at 10A or 16A. Such devices have the ability to withstand heavy loads from different types of devices.
If the socket with grounding is correctly connected, you need to apply a little force to remove it from the network.
Connecting a double socket
There are often cases when residential premises do not have enough sockets to connect all household appliances. You can get out of this situation by installing a double device.
The design of this type of device has 1 clamp and 2 - 3 distribution strips. This design ensures that electrical current is supplied to both outlets at the same time. In this case, the current power supplied to both parts is directly dependent on the power of the devices that are connected to them.
Based on their design features, double devices can be divided into the following types:
- Closed. Their holes for the forks are masked with a curtain. When the plug is connected, they move to the side. The curtains only work when you press them simultaneously. Such sockets are excellent for installation in rooms where there are children. If a child decides to put a foreign object into the socket, its curtains simply will not move back.
- With grounding contacts, but without grounding. The presence of contacts ensures protection of electrical devices from electric shock. For installation in rooms where the humidity level is higher than normal. They can be distinguished by the IP-44 marking. Their design is equipped with a special housing that protects the device from high humidity.
- For installation outdoors. They are marked IP-55. Their body has a high level of strength. In addition, it is resistant to moisture and dust.
Once the decision has been made to install a double device, you need to know exactly how to connect a double grounded outlet.
First of all, you need to pay attention to the wire. It must be made of the same material as the wire leading to the main line. In addition, the cable must have the same cross-section as all wiring in the room. This is necessary to ensure even distribution of electrical energy.
Wiring
To connect the wires, you must use a parallel circuit. In this case, two of the additional wires are connected to each existing wire, which will be directed to the second and third sockets. Next, use the indicator to determine zero and phase, then turn off the power supply. After this, the wires are twisted, passing them one by one to other socket boxes through the holes in their rear walls.
Connecting a block of three sockets with one socket box requires the use of a cable. This installation option should be avoided, as it will be less safe and the product will wear out quickly.
Three sockets in one frame
The second option, although more labor-intensive, allows you to obtain a high-quality and modern socket design.
Three socket mechanisms in one frame
These are three socket mechanisms in one triple frame. To make three sockets out of one, you need to drill holes in the wall for the other two sockets. If you have wallpaper pasted, you need to carefully remove it so that you can paste it back.
One socket from which you can make three
Making holes for sockets
Next to the hole for the socket, we drill two more, on the right or left. If your wall is concrete, then drilling holes will be difficult, and not always possible. For example, in panel houses, it is generally forbidden to drill or tap walls, but many do not even know about this. If the wall is plaster, this is the simplest option for installing sockets. On a brick wall, it won’t be a big problem either; monolithic concrete is a difficult option, but at least possible, unlike panels.
Making holes in the wall for sockets
How to make holes for sockets depends on the wall material. A plaster wall can be knocked out using a hammer drill with a spatula attachment. It is most convenient to drill with a drill bit, but not always and not everyone has such bits. Buying a crown for 2 sockets is expensive; it costs at least 600 rubles at retail.
When gluing a plaster wall, the main thing is not to overdo it and not to go all the way through it. Typically such a wall has a thickness of 75-80 mm. A brick wall can also be chipped with a spatula attachment. A good option is to drill holes around the socket box with a 10-12 mm diameter drill. and the insides are removed with a spatula. We tap carefully, because we have a live wire here.
We arrange holes for sockets
You can find reinforcement in the wall that you can cut with a grinder, or simply bypass it by moving the sockets a little if you cannot install the sockets to the required depth. After the hole is ready, we try on the socket boxes.
We moisten the hole for the triple socket with water, that is, remove dust; this can be done with a brush. Be careful, because we have a live wire here.
A set of three sockets in one housing allows you to connect a large number of devices to a single power source. The three-module device also reduces the number of wires used. A triple socket is in demand in the kitchen, bedroom or office.
Connecting a triple socket
When connecting a triple socket with separate socket boxes, you must connect the wires to the terminals and press them with the terminals. Next, they should be twisted inside the device and the central part should be installed. Only after this can the decorative part, as well as the lid (if necessary), be secured.
Important! Installing a new socket in an existing lighting group may require replacing the machine. This must be checked before starting work.
The socket installation is complete. Now you can check its functionality by connecting the local power supply in the room. It is best not to use devices that consume a lot of energy when checking.
Connecting electrical wiring
This procedure is not complicated, because you just need to connect a couple of wires, but the main thing here is not to make mistakes.
The first step is to turn off the electricity in the entire room for safety. We take an indicator screwdriver and touch each wire to make sure that the wires are de-energized and do not pose a threat.
Next, remove approximately 2-3 centimeters of insulating winding from the ends of the wire. After this, the exposed area is bent into a ring, and in the case of a stranded wire, it must be divided into two parts so that it acquires a V-shape. The exposed core of the wire needs to be slightly flattened with pliers to increase the contact area with the terminal.
There are only three terminals on the socket itself: two conductive and one grounding. The wires in all three terminals are clamped with bolts. When using wiring with standard color markings, you need to connect the yellow-green wire to the ground terminal, the blue wire is connected to zero, and the remaining wire to phase. It is quite difficult to confuse the connection sequence, because there are not many options, but still, you need to be careful.
The unit is connected using a solid cable or a star. The first option involves moving contacts from one socket directly to the next element. The star method involves laying a wire from each socket to a common point, and then connecting phase to phase, and zero to zero. It is worth noting an important point that the rules for electrical installations strictly prohibit the installation of grounding with a loop. In this way, only phase and neutral can be connected, and grounding must be connected using the star method.
Installation Safety Guidelines
All work must be carried out in accordance with basic safety regulations. This will prevent damage to the device and accidents. It is important to comply with the following requirements:
- Before carrying out work, turning off the electricity in the room and breaking the circuit is mandatory.
- You can only use specialized devices and tools with rubber or plastic insulation.
- The electrical wire must be of appropriate length. It is unsafe to use too long.
- If it is necessary to connect wires, the best fastening option is soldering.
- You should avoid buying cheap products.
- Using a cable during installation may reduce the safety of the installation.
- It is important to monitor the condition of the insulation and, if necessary, use plastic tubes for wires.
- The wires and socket must match the available power.
Thus, in order to efficiently and quickly install a triple socket, it is necessary to correctly select mechanisms and materials, as well as ensure maximum safety during operation. In this case, the best installation option is three sockets with their own sockets, fastened with a solid frame.
Installation of accessories
Connecting the outlet can be done before or after finishing work; the sequence does not matter here. Everything is decided by the feasibility and need for an additional point.
Installation is carried out in the following sequence:
- If the cable is not marked, phase, neutral and ground are determined. The wires are marked. Then the room is de-energized at the input batch switch or by unscrewing the plugs. To make sure there is no voltage on the line, you should use a tester.
- Using a knife, remove the outer insulation of the cable. Depending on the design of the rosette, it is cut off by 3-6 cm.
- The ends of the cores are stripped to 10-12 mm. You need to cut the plastic off them very carefully so as not to interrupt the thin copper wires from which the cores are woven.
- The copper, freed from insulation, is etched with acid and soldered. Coating metal with tin will prevent it from corrosion during operation.
- The contact bolts are loosened. Wires are inserted into them. The green/yellow ground wire is connected in the middle. The black or brown phase is attached to the right, and the blue zero is attached to the left. The bolts are tightened tightly, the quality of fixation is checked by lightly tensioning each core.
- The slack of the cable is folded like an accordion so that it fits freely and compactly in the installation box.
- The socket is slowly and carefully inserted into the hole. After the plank rests against the wall, the product must be firmly secured. Self-tapping screws and spacer tabs are used for this.
- The cover and decorative trims are installed. This procedure is carried out in accordance with the instructions included with the product.
- The strength and reliability of the socket and mounting box are checked. To do this, a plug from a powerful electrical appliance is inserted and removed several times into the product. When the work is done correctly, the product maintains a constant position.
Finally, current is supplied to the room and the functionality of the device is checked.