Connection rules
If the apartment has a voltage of 220 V, then connecting the device will not be a problem. If a similar 380-volt option is implemented in the room, then it is necessary to use combination ovens that can operate at this voltage. It is best to install it in the kitchen of an apartment, where there is a special outlet for such a device. But here you need to have a dedicated electrical line.
According to the wiring category, you should select a specific type, brand or cross-section of the wire supplying electricity. If the installation is carried out externally or hidden, then the supporting power conductor should be determined. The cross section of 2.5 millimeters should be replaced with 3.5 millimeters, because manufacturers produce modern models with a power of at least 3.5 kilowatts.
It is important to note that the branch that supplies energy to the electric oven must be equipped with its own circuit breaker. Its power should be calculated taking into account the current consumed by the equipment. Usually we are talking about an indicator of 16-20 A. But if you also need to use the same hob along with the oven, then the selection of the machine should be based on the total power of both devices.
It is imperative that there is grounding, because the safety of using such a device will depend on it. In private buildings there is no such problem, but in apartments of an old building it happens that there is no grounding.
Then you have to do it yourself, by pulling an additional wire core into the common panel, which is located in the entrance, and connecting it to any element made of metal.
The installation and subsequent connection of an electric oven will be no different from the installation of a gas analogue. Another thing you will need to do is equip the oven cable with a plug. But everything is simple here - the cable is usually three-wire, and the yellow wire of the three will be the ground. It should be connected to the ground terminal, and the remaining 2 should be screwed to the other two terminals. The contacts should be crimped well so that they do not heat up and the wire insulation does not melt. Otherwise, it may cause a short circuit.
And the last stage of installation will be to check the functionality of the device and start it in idle mode. You should activate the oven, check the display, and start heating. When you are sure that all heating elements are active, you need to run the device at full power. You should set the temperature on the thermometer to about 160 degrees and burn out the lubricants inside, applied at the manufacturing plant.
Errors
It should be said that if the connection is made by a non-specialist, then the risk of various problems and errors during operation of the oven increases significantly. Let's look at the most common cases of problems with such equipment. One of them is that the oven constantly knocks out the machine. There may be several reasons for this.
- It is possible that other household electrical appliances are connected to the network at the same time as this device, which simply increases the load on the network. You can try turning them off.
- The problem may be that there is a voltage surge in the network. That's why the RCD is triggered.
- Due to a violation of the wire insulation, electric current may enter the device body. Then the oven will short out if the main cable is damaged.
- Physical damage is caused by the plug, the cord itself, or the socket where the device is connected.
- The power selector may also fail. A sign of this will be the operation of the machine after some time of operation of the device.
- If there are problems with heating elements.
- If the fan breaks down and the oven simply overheats.
Another common problem is that the device does not heat up. First, you need to exclude such trivial problems as a broken surge protector, a faulty extension cord, a broken socket, a lack of voltage in the network, a broken power cord, a broken plug itself, and so on. After this, you should ring the elements of the device to determine the location of the breakdown. As a rule, the technician will find a problem either in the control unit of the device, the power switch, or when checking the heating elements. As a rule, the latter case is where the problem lies. It may also be caused by faulty wiring.
Another fairly common problem is overheating of the electric oven. As a rule, there is a malfunction of the thermostat. But such a problem can only be fixed by a specialist who has the appropriate equipment at hand. It also happens that the device gets very hot from the outside. In this case, most likely, we will be talking about a malfunction of the cooling fans. A specialist will fix this problem in an hour.
There are also other malfunctions. For example, the oven simply does not turn on. Then you should check the voltage supply to the electrical appliance. That is, sometimes the causes of oven malfunction can be a regular power outage or problems with the outlet. It also happens that the cord simply burns out. This problem especially often occurs when the cord is long and it burns out somewhere in a place that is not externally accessible to the user. If a problem occurs, you should immediately check the integrity of the cord in all places.
It also happens on modern models that even if a microcrack appears somewhere on the door, this will break the tightness of the structure. So if a problem occurs, you should very carefully examine the integrity of the device door. Another common error that users encounter is a broken temperature sensor. This element is extremely important because it protects the furniture that surrounds the oven from fire.
Another reason that can cause any error is a faulty control board. Let's say right away that this board cannot be repaired, it just needs to be replaced. And you shouldn’t try to repair it, since after soldering it still won’t work for a long time in normal mode. It should be noted that connecting an oven is a rather responsible process that must be approached with the utmost seriousness. You should not try to make a connection if you do not have basic knowledge in the field of electrical engineering, then it is better to contact specialists. And if you have such knowledge, connecting the oven will not be difficult in just a couple of hours.
In the next video you will see how to connect the oven.
Can it be connected to a regular outlet?
Many people who are faced with connecting electric ovens are interested in the possibility of connecting such a device to a regular outlet that was previously used for a kettle or microwave. This is permissible, but subject to three conditions:
- The socket must have wiring in the form of a 3-core wire made of copper, which has a cross-section of at least 2.5 square meters. mm;
- the oven itself should have a power of no more than 3.5 kilowatts;
- in the electrical panel, a simple circuit breaker with a thermal splitter should be replaced with a differential solution with a rated voltage of no more than 16 amperes.
There may be certain difficulties and inconveniences due to the third condition. Usually, many people have a 16-25 ampere circuit breaker installed for the entire group of sockets and one circuit breaker for lighting in the apartment. If the outlet circuit breaker is replaced with a differential 16-amp version and the oven is connected, then it will become almost impossible to use other electrical appliances while the oven is running and cooking is in progress.
But here you will have to choose - either not to do new wiring, not to install a separate outlet, or choose the option of convenience and comfort. It is not worth leaving a simple modular type machine in the shield. Installation of a new socket for the oven should be carried out no more than 0.9 meters from the floor.
The most important point here will be ease of use. Also, the outlet should not be located directly behind the oven.
Selection criteria and cost
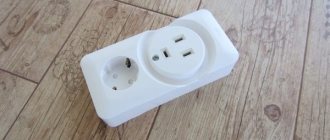
Legrand single-phase socket
The characteristics of the sockets must correspond to the voltage that appears immediately after connecting the device.
You can find this indicator yourself. For example, the total power of the hob is divided by the mains voltage. But to reinsure yourself, the resulting indicator needs to be increased slightly, by about 5 units.
You need to know that hobs are more powerful than ovens. They easily get the job done with 220 W of power and a 25 A socket. Most cooking models can also be connected to conventional 32 A systems. But a separate device must also be at least 40A.
When choosing a model for electric stoves, it is worth keeping in mind that for their operation there are overhead and built-in systems. If equipment is being installed in a wooden structure, it is recommended to use only overhead installations with open wiring. To protect yourself from fire, the wire must be in a special cable channel.
Single-phase, two-phase and three-phase devices for ovens and hobs are produced by many manufacturers. For example, the manufacturer of high-quality Legrand units. There are cheaper analogues, but they cannot provide a guarantee of safety.
The cost of single-phase plugs varies from 1300 to 2000 thousand rubles. Two-phase models from 880 to 1200 thousand rubles. The purchase of a three-phase one will cost no more than 2,500 thousand rubles. Products in this price category can provide high-quality and safe work.
As a rule, the cost of cheap ones is reduced due to the substitution of production materials. But at the same time, the level of security decreases.
What sockets are needed for powerful equipment?
The oven requires power sockets of 16-32 A, depending on the technical characteristics of the equipment.
The cable and socket for the oven should be selected according to the power of the device. It is usually indicated in the technical documentation for the equipment. Basically, ovens operate at a voltage of 220/380 V. The current strength here is 25/32 A. It all depends on whether the equipment in front of the master is single-phase or three-phase.
More often, the following sockets for stoves and ovens are used for powerful cabinets:
- For 16 A and 220 V. Designed for standard household appliances with a power of up to 3.5 kW.
- At 32A/220 V. Used with single-phase ovens with a power of 3.6-7 kW.
- At 20 A/380 V. Designed for three-phase equipment.
All power points for powerful equipment are grounded. Therefore, they have more terminals than standard elements. For single-phase sockets, there are two supply points and one ground. Three-phase ones have 3 feeders, one for grounding, one for zero (5 in total).
Wiring Requirements
Particular attention should be paid to the quality of electrical wiring, on which the safety and correct functioning of the entire system depend.
- The following factors are taken into account:
- The oven and hob are connected via grounding. The plug or socket for the oven must have 3 or 5 contacts (in the first case for a 220 Volt network, in the second - for 380 Volts). In the tasks of the old building, this condition was not always adhered to. However, modern requirements are different, so a new cable will be required.
- Electrical wiring is connected to the distribution box only through an RCD (residual current device).
- Low-power equipment (up to 2.5 kilowatts) is connected to the existing electrical network (if it meets modern requirements). To connect powerful equipment you will need a dedicated line.
The optimal cable cross-section is 6 square millimeters. A wire with this cross-section will withstand a long-term load of 10 kilowatts. The recommended protection class for the machine is C32. If the panel power does not exceed 8 kilowatts, a cable with a cross-section of 4 millimeters and a circuit breaker with protection class C25 will be sufficient.
The correct choice of cable is VVGng or NYM. When purchasing a cable, take into account the diameter of the conductor. For a wire with a cross-section of 4 millimeters, the diameter will be 2.26 millimeters, and for a 6 mm conductor - 2.76 millimeters.
The data for the residual current device is one point higher than the rating of the circuit breaker. For a 32 Ampere device you will need a 40 Ampere RCD.
Core cross-section and machine rating
If you have to draw a new line, first you need to decide on the cross-section of the cable cores. On average, the maximum power consumption of ovens is 3-3.8 kW. But these are peak loads in which the equipment operates very rarely. In normal mode, consumption is rarely more than 2 kW.
However, it is correct to calculate the wiring specifically for maximum consumption. For cables with copper conductors, the recommended cross-section is 2.5 mm2, the automatic is 16 A. This has a significant power reserve (recommended load up to 5.9 kW), but these are the recommendations of almost all manufacturers and only under such conditions do they retain their warranty obligations.
Cable cross-section selection table
Another nuance: all modern household appliances are designed to be grounded. That's why the cables use three-core cables. For installation in a house or apartment, you can use VVGng, VVGngLs and its other non-flammable varieties. NYM is also suitable. These cables have an optimal price/quality ratio. You will need three-core ones - 3*2.5. Just when choosing, measure the diameter of the wire and calculate the cross-section. Too many manufacturers began to make the cores thinner than stated to save money. Therefore, control is mandatory.
When installing more powerful ovens - with built-in steam generators - it is recommended to use cables with a wire cross-section of 4 mm2. A 25 A machine is installed on the line.
In general, connecting the oven to electricity with recommendations for the cable used and ratings of protective equipment (automatic devices) is described in detail in the product data sheet. And it’s better to listen to the manufacturer’s recommendations. They are not interested in breakdowns of their own products and issue recommendations with a margin of safety.
RCD - necessary or not
In addition to the automatic safety switch, it is recommended to install an RCD on the oven. The machine protects the line from overheating and short circuit currents. At the same time, it is not able to protect against breakdown of the body, and this is a real danger. That is why it is recommended to install a combination of RCD + AB or a difavtomat (a device that combines all functions). Then, if the insulation breaks down on the housing or if a phase is accidentally touched, no one will get hurt.
Wiring diagram for an oven with an RCD
The choice of RCD rating is simple: one step higher than the machine. If there is a 16 A circuit breaker on the line, the RCD should be 25 A. You also need to select the leakage current. For leased lines this is 10 mA.
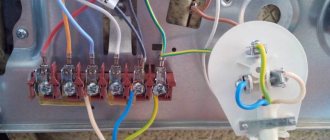
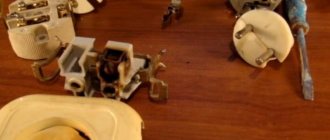
Installing the Terminal Block
Connecting household appliances via a terminal block is considered more reliable. Contact here is ensured by clamping screws, which is more reliable than when connected through a plug and socket. The disadvantage of this connection is the relative difficulty of breaking the circuit. You will have to remove the cover, unscrew the bolts that hold the wires, and pull them out. Therefore, it is used only if there is a circuit breaker on the line. Moreover, it is desirable that it be bipolar and break both phase and neutral at once.
In terminal blocks of the “old” type - carbolite - the contacts are open; it is better to install such a block in a small box. In order not to overpay for the box, you can use a standard junction box. A three-pin block fits perfectly into a square one. If you need to connect the oven to a three-phase network, you will need to install an oblong model under the five-pin socket.
Option for installing a terminal block for connecting an oven
The box can be fixed to the wall surface. This option is suitable if the wiring is pulled after the repair is completed. If the cable is laid in a groove, it makes sense to recess the box into the wall.
When connecting, you will need to insert the wires stripped of insulation under the metal plates and tighten the contact with clamping bolts (screwdriver). In this case, you need to make a decent effort so that the contact is good. Please note that the wires cannot be mixed up when connecting. The phase wire from the oven should be opposite the phase wire that came from the panel, the neutral (zero) should be strictly opposite to zero, the ground should be opposite the ground wire. It is important. Be careful.
Distinctive features
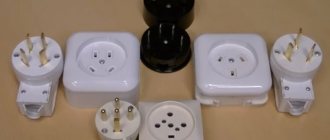
Regardless of whether the outlet will be installed for the hob or oven, a power outlet must be installed for them. There are quite a few varieties of them - each manufacturer can make a design at its own discretion, while complying with the requirements of GOST or PUE. Its main difference from household ones is the ability to work with high power currents, which is reflected in the thickness of the conductive contacts.
The vast majority of electric stoves, hobs and ovens have external metal parts that, under unfavorable circumstances, can become live. To protect people and equipment from electric shock in such cases, grounding is used, the contacts of which in ordinary sockets have the form of clamping antennae. The oven socket cannot be equipped with such protection, since it is insufficient for high amperage currents. As a result, the socket grounding contact is located on the plug itself with a separate pin. Some people confuse a three-prong plug with a three-phase one, but in fact it is phase, neutral and ground.
Possibility of connecting the oven to a regular outlet
It is not recommended to connect the oven to a regular outlet. Fire safety standards establish that separate power lines must be installed for powerful kitchen appliances. This is due to the fact that oven and frying equipment consumes more power than standard appliances: washing machine, hair dryer, kettle, etc. If you do not make a separate line, the machine will constantly work in the house or an emergency will arise due to melting/ignition of weaker wiring .
The exception is ovens with a power of up to 3.5 kW. They can operate from a standard outlet.
Power calculation procedure
Often, when users unpack a brand new oven, they are faced with an unpleasant surprise - the appliance does not have a power cord. This is not a mistake by the supplier, but an opportunity for the owner to independently choose the desired connection method.
Often such devices are connected directly to the panel, without intermediate elements (sockets).
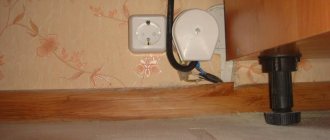
Connecting an oven without an outlet
Connecting the oven using a socket
This method is safer in terms of fire, but the ability to turn off the device sometimes becomes a necessity. For example, if you need to wash the oven, clean it and other similar procedures, it is easier to remove the plug from the socket and turn off the power to the device than to go to the control panel and select the desired machine.
To correctly select the type of outlet and supply wiring, you need to know the operating characteristics of the device. The main parameters of electrical equipment are indicated in the passport or on a special nameplate installed on the surface of the oven, usually on the back side. The parameter we are interested in is the power of the device.
Oven power 2480 W
It can also be denoted by the Latin letter P, for example, P = 3200W means that the oven power is 3.2 kW. Using this indicator, you can calculate the current strength, for which the power (in watts) must be divided by the voltage in the network:
Since differential machines according to the standard are manufactured for current strengths of 6, 10, 16, 25, 40A (etc.), in our case we need a 16A differential machine. If the calculation turns out to be 18 or 20A, the difavtomat should be selected for 40A.
Difavtomatic 16A
Difavtomat 40A
In addition, you can determine the required wire cross-section. To do this, it is not necessary to make complex calculations; it is easier to use an online calculator or the table below:
Wire cross-section selection table
A current of 14.5 A requires a 2.5 A wire.
Now you can understand why a separate socket and machine are used for each powerful device. The point is the difference in parameters. If two devices with a significant difference in cutoff current are connected to the same power point, one of them will be connected with a large margin.
If it has problems, the machine may not respond, since its settings are designed for a much higher current. This can cause many troubles, from electric shock to people to fire. Therefore, you should not neglect the rules and hope for “maybe”; nothing good will come of this venture.
Locations for installing power points
The oven socket cannot be installed in the following areas of the kitchen, according to established standards:
- on the wall in close proximity to hot equipment;
- in the area of wet objects: washing, draining, water pipes;
- at a height much larger than the working surface;
- near gas pipes - sockets are removed from them by at least 40 cm;
- in close proximity to the floor - it is advisable to raise the power point 15-20 cm from its level, ideally 100 cm.
A good area to install a power point is the wall under the countertop - under the built-in furniture. In this case, access to the outlet is always open, and the area where it is located remains dry. Connecting the plug to the socket is very simple here.
Craftsmen recommend refraining from the decision to make an outlet behind the oven. The feeding point should be located in a dry place accessible to the owner’s eye. It should not be exposed to temperature changes. And in any case, this is inevitable when the cabinet is operating.
Another point worth considering is the operation of the combi oven (steam supply to industrial installations). Even in small quantities, condensation can settle on an outlet located behind the equipment. This is already an assumption of an emergency situation.
A power point installed immediately behind the cabinet may prevent it from being organically integrated into the overall “ensemble” of the kitchen. The equipment will unsightly protrude beyond the same common line with the furniture.
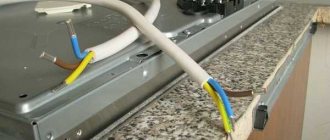
Hob fork
To supply electricity to the hob, a three-core copper cable is used. If you need 380 volts, you will need a cable with five cores. The cable cross-section is selected based on the existing load and according to calculations of the operating current. However, the cross-section should not be less than 4 square millimeters. The machine should be rated at 32 Amperes, and if a 6 mm cable is used, the machine should be rated at 40 Amps.
The peculiarity of the hob is its extremely fast heating. This circumstance is caused by the high power of the device, which can reach 7 kilowatts.
The plug is connected as follows:
- Buy a 220 Volt power plug (alternating voltage).
- Remove the protective panel. There are 6 pins on the inside of the plug that are used for connection.
- Terminals numbered 1, 2 and 3 are used to connect the phase conductor (L). These terminals are connected with a jumper.
- Contacts numbered four and five are used to connect zero (N).
- The sixth terminal is intended for grounding.
Note! If the phase conductor is connected incorrectly, the protective device (RCD) or differential circuit breaker will trip.
How to connect?
Only a specialist should connect the components of both the oven and the hob. Incorrect selection of materials can be life-threatening. During the installation process, the master is required to use protective elements. Otherwise, mistakes made may lead to overheating of the system, causing a short circuit and fire.
As mentioned earlier, conducted electricity can be single-phase, two-phase and three-phase. Plugs and sockets are matched to them. Depending on the level of absorbed electricity of household appliances, sockets and plugs are produced at 20A and 32A.
Single-phase/two-phase connection:
- Cable. For a single-phase network, a 3×4 or 3×6 wire, brand VVGng, is used. Its configuration can be round or flat. The cross section is selected in accordance with the power consumption.
- Sub-unit and box. For wall mounting of an oven socket, you can use a special overhead box. It must have similar dimensions and match the amperes. In other words, the socket and the box must have exactly the same markings.
- Internal installations are carried out only in conjunction with a special subdivision specialist.
- Devices and RCDs. A separate connection line should be drawn not only to kitchen appliances, but also to the electrical panel. This ensures safe connection of wires and reliable protection from electrical shock in the event of a mechanism failure.
Each machine is selected individually for the outlet. If the stove does not require high power consumption, install single-pole 20A devices. Such systems include small and medium-phase equipment with a voltage of no more than 4 kW.
For more powerful ones, with electricity consumption from 4 kW - at 32A. The RCD must correspond to the characteristics of the machine, and be 1 step stronger in power. For example, if the machine has a voltage of 32 A, then you need a 40A/30mA RCD.
Three-phase connection
Equipment with such power must be treated with great care. Home owners need to make sure that they will not have problems after connecting it
The fact is that in many houses, to this day, old electrical wiring is installed, which is not able to pull more than 220 Volts. Exceptions include new buildings, since developers install a three-phase network with a voltage of 380 Volts during the construction phase.
Its installation requires a completely different set of components, namely:
- A three-phase cable designed for VVGng(A) 5x4 is provided for systems from 4 kW.
- Automatic machines and RCDs. Devices corresponding to this phase at 20 or 32A are required, in accordance with the electrical power of the panel, as well as 4-pole RCDs. Since in the first case, they must be at a nominal value greater than the machine.
- Sub-unit and box.
Elements are selected based on whether the connection point will be mounted internally or externally.
Mounting options
As mentioned above, there are two installation options:
- Hidden - the socket and wires are built into the wall.
- External - laid directly on the wall.
The first installation option is more reliable and looks aesthetically pleasing , but the use of this type is only possible if the wiring in the kitchen meets all standards (the standards will be discussed in more detail below).
Or it is possible to lay new wiring inside the walls (when repairs to the room have not yet been made). If the wiring is old or not designed for the required load, you should lay the wiring in special wiring boxes and use an external type of outlet.
According to the “European standard”, sockets should be placed at a height of 15 cm from the floor, but you should not blindly follow this rule
Connecting an induction hob
Let's look at the connection using an Electrolux induction hob as an example. Such a panel has high power; it is plugged not into a regular household outlet, but into a power outlet designed for a current of more than 16 A.
The power socket for connecting the induction cooker is selected according to its load. The total load of an induction cooker can be on average 25-32 A, depending on the number and power of burners.
To power the induction cooker, in this case, an individual electrical wiring line must be laid. The cable cross-section depends on the load of the induction cooker: for a current of 25 A, a copper cable with a cross-section of 4 square meters should be laid. mm, for a load of 32 A - 6 sq. mm.
For safe operation of the induction cooker, the electrical wiring must have a working protective ground. That is, for a single-phase network, a three-core cable must be connected to connect the induction cooker. Accordingly, the purchased power socket and plug set must also have a third grounding contact.
If it is not possible to purchase a power outlet of the required power, then as an alternative, you can connect the induction hob to the terminal block installed in the installation box. The terminal block must be able to withstand the rated current of the induction cooker connected to it.
As for the cable through which the induction cooker is connected, in this case it all depends on the configuration. If the power cable is included, then it is enough to connect it to the terminal block directly on the induction cooker, and then to the purchased power plug or in the terminal block, depending on the chosen method of connecting the induction cooker.
If the cable is not included, it must be purchased separately. When purchasing a cable, you must pay attention to its cross-section - it must correspond to the load being connected. It is necessary to purchase a flexible three-core cable with a cross-section of 4 or 6 square meters. mm for rated currents of 25 and 32 A, respectively.
To avoid errors, it is recommended to connect the cable to the stove itself, as well as to the plug, according to generally accepted color markings: brown or black - phase conductor, blue - neutral conductor, yellow-green - protective grounding conductor.
- If the cable is already connected to the terminal block of the electric stove, then you need to check that it is connected correctly. The following terminal markings are usually indicated on the terminals of an induction cooker:
- L - phase output or L1, L2 (L3) - phase outputs for two-phase (three-phase) connection;
- N - zero output;
- PE is the connection point for the protective grounding conductor.
Two-phase and three-phase connection of an induction cooker
Certain types of induction hobs may provide a two or three-phase connection to the electrical network. If the house has a three-phase input, then such an electric stove is connected as recommended by the manufacturer - to two or three phases of the electrical wiring with a four or five-core cable.
The electric stove is connected to a single-phase household electrical network with a three-core cable, and special jumpers between the phases, which are usually included, are installed in the terminal block on the induction cooker. If there are no jumpers, then the connection to two or three phase terminals is made with a wire of a cross-section corresponding to the load of the electric stove.
It should be taken into account that if the kit includes a cable for two- or three-phase connection, then it is not designed for single-phase connection, since when the induction cooker is connected single-phase, the load on the phase conductor increases to the total load of all phases.
Therefore, when using a four (five) core cable to connect to a single-phase network, two (three) phases on the plate are connected to the cable cores, and at the other end of the cable, when connected to a plug or terminal block, the phase conductors are short-circuited with each other and connected to one phase of the electrical network .
Or a new three-core cable is purchased, which has sufficient load capacity for a single-phase connection of an electric stove.
Hob electrical power kW
- The power of the hob is an important parameter when choosing a device for three main reasons:
- The speed with which your dishes undergo heat treatment depends on the power. Agree that it is better when it is possible to prepare dishes as quickly as possible.
- Modern stoves have burners of different power, and this is very convenient. If you only need a small amount of heat, why waste extra gas or electricity on uselessly heating the air in the kitchen. However, the other side of the issue should also be taken into account - the power of the largest burner should also be sufficient to quickly cook a large pot of soup.
- Modern kitchens often have air conditioning installed. When heat energy is released in too large quantities, the load on the air conditioner increases accordingly. At the same time, the extra costs for both heating the air and cooling it are completely unjustified.
So, it is worth choosing a hob with such power that the cooking time is fast, but the heat generated is optimal.
An electrical device of a traditional design consumes the most electrical power of all the types considered, so we will start the review with this option.
- The most common stoves on the market these days are those with four burners. Thus, the standard number of heating points has not changed over the decades of the existence of home stoves. The connection is also similar. However, manufacturers have gone to modernize the heating points, so they have different power:
- the first burner has the lowest power - 0.4-1 kW;
- two burners have an average power of approximately 1.5 kW;
- The fourth burner has the highest power - up to 3 kW.
An induction hob is the most modern type of equipment for heating food in the kitchen. Its average power is about 7 kW. However, please note that this is the consolidated power of the device.
Due to the fact that cooking on an induction surface takes a minimum of time, the simultaneous operation of all disks is almost impossible. And even if this happens, the short period of peak energy consumption is quickly replaced by inaction, since the cooking has already ended - the soup has finished cooking, the fish has finished cooking, the kettle has boiled.
Thus, although the power of an induction cooker is equal to the power of a conventional electric cooker, by heating exclusively the bottom and lower part of the cookware (and not the air underneath), electricity is spent only on heat treatment of the products. It is important to note that saving energy requires the use of special cookware in cooking.
Cable for electric stove
The correct choice of cable for an electric stove is primarily important for electrical safety. The choice of cable for the stove depends on the power of the stove itself, as well as on the type of network (single-phase, three-phase).
- Let's consider the stages of connecting the stove, starting from the circuit breaker, that is:
- cross-section and type of cable for laying from the circuit breaker to the power outlet where the stove will be connected (single-phase network);
- wire and its cross-section from the stove itself to the outlet.
In a single-phase network, a separate cable with copper conductors is connected from the circuit breaker to the stove. The cable cross-section for an electric stove is selected based on the rated current of the machine (Table 1), which in turn is selected based on the design load.
Having determined the design load (power of electrical appliances), the design current is determined, according to which the rating of the machine is selected, the closest in current, but greater than the design one.
We recommend that you familiarize yourself with PUE 3.1. If the power of the stove is less than 9 kW, then in this case the cable for the stove is connected to a circuit breaker rated 32 A; if the power is 9 kW or more, then the input circuit breaker must be designed for a current of 40 A.
Correspondence of the machine current to the cable cross-section:
| Cross-section of copper cable for the stove (number of cores per cross-section in mm 2) | 3 x 1.5 | 3 x 2.5 | 3 x 4 | 3 x 6 | 3 x 10 |
| Rated current of the machine, A | 10 | 16 | 25 | 32 | 50 |
| Maximum current of the machine, A | 16 | 20 | 32 | 40 | 63 |
As a cable brand, we recommend using 3-core power cables VVG, VVGng, NYM of the appropriate cross-section. As a rule, the cross-section for copper is taken from 6 mm2. If you purchased a stove with a power of up to 9 kW, the wire cross-section is at least 4 sq. mm.
At the connection point of the stove, a power socket with three contacts for a single-phase network is installed.
Since there are quite a lot of variations for connecting a stove, manufacturers do not always provide a cable for an electric stove with the product. We recommend using flexible cables of the KG or PVS brands as a cable for connecting the stove from the outlet.
The optimal cable length is 1.5-2 meters. For standard stoves (6 kW) for 220 V, PVS 3x4 or KG 3x4 cables are suitable.
Common mistakes
A common problem that users have to deal with is that properly connected kitchen equipment turns on and off spontaneously. Possible reasons:
- Child lock activated.
- Accumulation of water condensation on the control touch display.
- False positive as a result of accidental pressing.
This situation is associated with a lack of contact on one of the power lines or with a blockage that occurs when three-phase equipment is connected single-phase. It is performed programmatically and is corrected by adjusting the settings.
Safety precautions
Now let's say a little about the safety rules when connecting a built-in oven. Caution must be exercised not only when working with electrical wiring, but also when connecting a built-in or separate oven. First of all, we are talking about personal safety.
Considering the fact that an electric oven has a fairly serious energy consumption, additional electrical wiring should be installed under it, using an undamaged and undeformed wire with a conductor cross-section that will conduct a current of 2.5 or 4 square millimeters.
But this will be relevant if you have to work with an oven whose power exceeds 3.5 kilowatts.
The connection of the current-conducting wire must be carried out exclusively through a separate machine, where it is easy to connect a hob that runs on electricity. The machine itself, which will work at home, should be selected depending on the value of the entire load that is supplied to it, and add about another 10% to this indicator.
To ensure that the subsequent use of such a device is safe, grounding must be done correctly. And if the house is private, then this will not be a problem. But if we are talking about a room in an apartment building that was built several decades ago, then here you will have to ground the individual core itself to the bus of the common electrical panel. If we are talking about equipment with not very high power, up to 3 kilowatts, and the wiring in the house is quite good and can fully cope with the loads, then ordinary European sockets can be used for installing ovens.
Types of devices
No housewife can do without an oven. Modern ovens can be divided into two groups, the differences between which lie not only in design, but also in the methods of providing power. Thus, when choosing an oven model, you need to remember that they come in:
- Dependent.
- Independent.
The first type of device is most often installed in special niches of kitchen furniture. In this case, the oven and hob should be located one above the other. This is due to the fact that both devices are connected by a single power system. The general control panel is located on the oven.
Connecting a panel without a plug
An outlet that extends a few centimeters from the wall does not always suit the owners of the room. The solution is to hide the protruding elements of the outlet.
You can do this in one of two ways:
- Using GML sleeves (tinned copper sleeves).
- Using the KlK-5S mounting box.
We immediately decide on the conductors. On some models, an already connected four-wire wire is removed from the panel. However, in many cases there are only 3 wires in the socket box. Such surfaces are designed for both a single-phase 220-volt connection and a two-phase 380-volt connection. Half of the burners will be powered from one phase, and the other half from the second phase.
There is a misconception that the second phase is only needed to power the control. In fact, the power is equally distributed over both one and the second phase. To connect to 220 Volts, you need to insulate one of the wires.
It remains to connect the neutral (blue conductor), the ground wire (yellow-green) and the phase (black or brown wire). If desired, connect two phases into one through a tip.
Note! Some Bosch hobs with a permanent cable come with a tip by default.
Sometimes there is equipment with a five-core cable. Such surfaces are characterized by high power (more than 7 kilowatts) and are designed for 380 Volts. To connect the panel to a 220-volt network, you need to connect 2 wires in pairs. For example, black and brown wires are sent to phase, and blue and gray conductors are sent to zero. The earth (green-yellow color) will remain single.
Note! The specified connection does not entirely comply with the rules, since the protective conductor PE must have the same cross-section as the phase conductors. In the described case, the protective conductor will be twice as thin.
Power supply
Since the device being installed is an energy-intensive product, a separate cable with three cores and a sufficiently “powerful” outlet will be required to supply power to it.
It is important to pay attention to the fact that one of these cores is in yellow-green insulation, which indicates the presence of a PEN protective ground wire (PE) in the cable. The thickness of the wires of the power supply cable must correspond to the rated power of the oven, which is usually 3-3.5 kW. Taking into account the indicated consumption value, their cross-section is selected to be about 2.5 mm²; in this case, the maximum current in the line can reach 16 Amperes
With higher power, the cross-section of the wires will need to be increased to 4.0 mm², since the current in the supply circuit increases in this case to 32 (40) Amperes
Taking into account the indicated consumption value, their cross-section is selected to be about 2.5 mm²; in this case, the maximum current in the line can reach 16 Amperes. With higher power, the cross-section of the wires will need to be increased to 4.0 mm², since the current in the supply circuit increases in this case to 32 (40) Amperes
The thickness of the wires of the power supply cable must correspond to the rated power of the oven, which is usually 3-3.5 kW. Taking into account the indicated consumption value, their cross-section is selected to be about 2.5 mm²; in this case, the maximum current in the line can reach 16 Amperes. With higher power, the cross-section of the wires will need to be increased to 4.0 mm², since the current in the supply circuit increases in this case to 32 (40) Amperes.
According to these two numbers, circuit breakers are selected and included in a separate supply line (25 and 40 Amperes, respectively). The Euro standard socket installed for the cabinet is designed for a current of at least 16 Amps.
When the device power is over 3.5 kW, preference should be given to an outlet equipped with a circuit breaker and rated for currents of at least 32 Amps.