The problem of how to connect a motion sensor to a light bulb can be solved in a few minutes, provided that the operation diagram is clearly understood and the correct model of the control device and lamp is selected. In addition, you will need to think about how to install the sensor, how to turn it off and calibrate it, and perform a short test before proceeding with the installation of the equipment.
How does a motion sensor work?
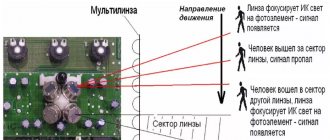
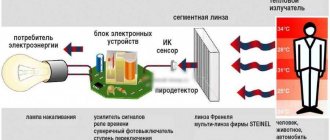
The sensitive element detects the movement of any object in the lighting control zone. The lamp responds to a signal from the sensor by turning on/off.
The signal formation is caused by the reaction of the sensor’s sensitive element to changes in the parameters of the following processes:
- Change in ambient temperature. Infrared radiation from the human body, focused using lenses and mirrors, hits the sensor, which, closing the circuit, turns on the lighting.
- Changing the frequency of ultrasonic wave pulses. The sensor is equipped with an ultrasound generator. When a moving object appears in the generator's field of activity, its operating mode changes and a signal is issued to turn on the light bulb.
- Changing the parameters of the reflected signal. The principle of radar is used here. The sensor operates on high-frequency waves, which, when reflected from a moving object, change their characteristics. This causes transients inside the sensor, to which the lamp reacts by turning on.
- The information for the signal can be a symbiosis of any of the parameters presented above. Such combined systems provide better control over the surveillance area. However, servicing such devices causes certain difficulties; if they fail, a complete reconfiguration of absolutely all systems will be required.
Installation, connection and configuration
A spotlight with an automatic motion detector can be installed on any stable surface or object. To ensure the reliability of its further operation, the following must be taken into account:
- The height of the location to prevent its theft.
- Viewing angle corresponding to the area of the illuminated object or territory.
- Service efficiency.
In accordance with standard operating rules for electrical equipment, the spotlight must be grounded, so its connection must be made through a three-wire wire according to the manufacturer's diagram. The spotlight, as well as the detector, are usually sold complete with a specialized bracket. The devices are mounted on it using fasteners corresponding to the surface on which they are attached.
Configuring the device after installation is carried out according to three main parameters:
- Motion sensor sensitivity threshold.
- Natural light sensor.
- The period of operation after switching on the motion detector.
Lamp design features
The sensor interacts with any of the types of lamps on the market - incandescent, LED, and others. LED lamps with motion detectors are in greatest demand on the market.
In addition to the fact that they themselves provide energy savings, their compactness and ease of installation provide an advantage in competition with other lighting options.
Based on the method of using lamps, the following categories are distinguished:
- stationary, the installation of which requires the presence of a power supply network;
- portable, which operate on autonomous sources (batteries, solar and conventional batteries) and are not tied to an electrical outlet.
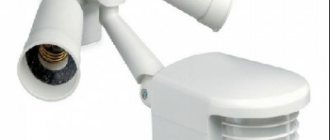
There are two options for connecting the sensor to the light source: remote and built-in. In a remote design, the detector and lamp are made in the form of separate elements, between which there is a wired connection. In another embodiment, the light bulb and the motion sensor are mounted in one housing.
Light bulbs with a sensitive motion sensor for the home and a similar street lamp differ in the degree of protection from external factors. Weather conditions in the form of rain, snow and other natural precipitation, temperature changes impose certain requirements on the design of a street lamp in terms of the degree of protection from dust and moisture ingress.
Installation and connection of a “smart” spotlight
Each spotlight must be accompanied by instructions describing how to connect it. But even if it is not there, preparing the lighting device for work will be quite simple. All electrical installation work in an existing network should be carried out with the power turned off (the switch is turned off).
We fix the spotlight at the chosen installation location using fasteners on its body or a special bracket supplied in the kit. To connect to the electrical network, we use a PVS or ShVVP wire. It must be 3-wire if the spotlight will be connected to ground. If not, a 2-wire is enough. The wire cross-section must be at least 0.5 mm2 for an LED lighting device. A halogen cable may require a larger cross-section - this depends on the power of its lamp.
If there is a socket near the spotlight with supply wires of a suitable cross-section that can withstand the load, then you can use it. It is enough to measure the required length of the cable and connect a plug to it or directly connect it to the socket contacts. But usually the wire has to be pulled to the nearest electrical distribution box. The ideal solution in any case is to lay the cable to the house panel and connect it through a circuit breaker rated at 6–10 A and installed separately specifically for the spotlight.
Connecting the lamp
When pulling the wire through buildings, we lay it in a corrugated pipe with an internal diameter of 16–20 mm, which we attach to the wall. If you need to run the cable over a long distance or to a street lamp on a pole, the method should be used aerial or underground.
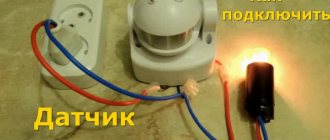
The simplest way to connect a spotlight is with a motion sensor, which is built-in or rigidly fixed to the body of the lighting fixture. In this device, the sensor and lamp are already connected to each other. You just need to open the cover of the spotlight's contact box, insert the wire inside through the hole provided for this purpose and connect it in accordance with the color and letter markings:
- black or blue to the same wire and terminal with the symbol 0 or N - this is zero;
- red or brown to F or L is a phase;
- yellow-green to the terminal with 3 dashes and a stick on top - this is grounding.
Installation of a lighting fixture
Some lighting fixtures have a length of cable already connected and routed out of the spotlight body. We connect it with our wire according to the color marking, preferably through a separate terminal box fixed next to it.
If the sensor is installed separately, you will also have to pull the cable between it and the spotlight, and also connect them correctly. In this case, you also need to follow the color coding. The main thing is not to make a mistake when connecting the sensor, otherwise it can be burned. We connect its brown wire (terminal designation L) to the phase, and the red wire (contact A) to one of the spotlight terminals. We connect the second conductor of the lamp and the blue sensor (terminal N) to zero.
Selection Criteria
The parameters of the motion sensor influence the characteristics of the installation location and the conditions of use. The main criteria here will be the following:
- the power must correspond to the load consumed by the lamp;
- the operating voltage is the same as in the installed circuit;
- the maximum viewing angle (usually from 30° to 360°) should ensure tracking of moving objects;
- the range of action (it ranges from 8 m to 120 m) should not be too large so as not to include the movement of foreign objects and reduce the number of unnecessary triggers;
- the recommended installation height should be at least 1.2 m in order to maximally eliminate the reaction to the movements of pets during installation, for example, in an apartment;
- The presence of a light indicator will make the operation of a light bulb with a motion sensor visually more effective.
For proper operation, it is necessary to take into account basic recommendations when choosing.
- The installation location (apartment, garage or external wall of a house) requires choosing a sensor with an appropriate degree of protection. There are no special requirements for connecting a light bulb with a motion sensor for your home.
- It is necessary to take into account obstacles during installation, for example, in the form of walls. Here, sensors that use microwaves will operate efficiently.
- If a light bulb with a motion sensor is installed in a room where there are several doors, you should choose a sensor with a 360° viewing angle and place it on the ceiling. For one input, it is enough to limit yourself to a device with a viewing angle of 180°.
- The choice of sensor range depends on the size of the controlled area. For a small apartment, a parameter of about 6–8 meters is quite enough.
Operational problems or connection errors
Problems with motion sensors include:
- Connecting phase and neutral. According to the operating logic of the device, it does not matter where the zero and phase are connected. But for safety reasons, the break should be located precisely on the conductor connected to the phase. An analogy for such inclusion can be given with a lamp socket.
- False positives. Possible if the sensors are positioned incorrectly, installation near warm or heating elements, installation outdoors, near tree leaves or other extraneous factors.
- Unreasonable activation immediately after deactivation. If a lamp or other light-emitting device is directed at the photorelay of the sensor, this will cause this behavior of the device. A nearby lamp with an incandescent lamp, which does not go out immediately when turned off. The sensor can detect IR waves and start the lighting activation chain. Cases of an endless cycle of activation by IR waves cannot be excluded.
- Mounting the motion sensor on the wall, although according to the passport it is ceiling mounted. It’s not for nothing that the technical specifications indicate the mounting option (wall/ceiling). This has to do with the design of the diagrams. Such devices have different viewing angles and, as a result, problems arise if installed incorrectly.
- Glare and air currents. Factors such as glare and strong air currents cause the IR sensor to react. If a similar situation with glare is discussed in the third paragraph, then with wind things are different. Installation directed towards windows, split systems, or outdoors where there is a strong draft is not recommended.
- Cracks or contamination on the sensitive element when connected to the spotlight. This element in the sensor is the Freckel lens. It is needed to focus IR radiation using concave segment mirrors located inside. If there is a lot of dirt or a crack appears in the front, this means that the device is not working properly.
How to connect a sensor to a lamp, options
Various connection schemes can disable/enable automatic lighting control, temporarily exclude the participation of a motion detector from control, as well as other ways to provide wider functionality with the participation of this device.
The standard circuit consists only of a motion sensor and a lamp.
Here it is important to correctly connect the sensor’s power wires to the network - phase (L) and neutral (N). The electrical circuit of the sensor and an indicator screwdriver for finding the phase will help you decide. However, the standard scheme does not have the ability to force the light on/off. If the sensor is faulty, there is a risk of being left completely without light.
The following connection modifications will help eliminate the shortcomings of the standard scheme.
- The switch is connected to the sensor in parallel. It can independently control the light on/off.
- A switch connected in series with the sensitive element has the ability to turn it off during daylight hours, that is, when it is not needed.
- A combination of the two above schemes will allow you to turn the light on/off if necessary, as well as use automation for this purpose. In this circuit, the switch must have two keys.
- Additional savings can be achieved by adding a daylight sensor to the lamp control circuit. Thus, the light device will not turn on if the level of natural light is sufficient.
We recommend reading: step-by-step instructions on how to connect a photo relay for different circuit options.
Installation recommendations
When installing motion sensors, various nuances must be taken into account. Let's look at the main ones.
Sun protection
When direct sunlight enters through an open window or car reflector, false alarms may occur. Manufacturers protect themselves from this in several ways. The Fresnel lens is reinforced with a special material that provides protection from light. The pyrosensor can be located on the circuit board so that the top of the infrared sensor protects from excessive sunlight, drafts and dirt.
RF Interference Protection
High-performance radio transmitters and radio waves can cause confusion and false alarms when the motion sensor operates. An effective solution is to install a pyrosensor with a metal cover. Unfortunately, some manufacturers do not pay enough attention to this. Therefore, in some cases, interfering radio waves can cause users several unpleasant minutes.
Protective cover and masking
People don't often check their alarm system sensors and wiring. An attacker, taking advantage of this circumstance, can tear off or cover the sensor lens, making it inoperable. To protect the device, infrared devices with a higher level of protection and higher price range are covered with a protective cover. An infrared transmitter LED and a photodiode receiver are installed in the sensor. The emitted beams from the transmitter LED only reach the receiver diode if the sensor lens is covered and the signals are reflected from that surface. Then the operation of the photodiode leads to the appearance of a signal.
Protection against false positives
Below is a brief description of the installation and use conditions of the devices. They can significantly reduce the possible false alarms of motion detectors.
- Avoid places with drafts - natural, air-conditioned or from a fan. Doors and windows must also be closed during security mode.
- Do not point the detector at infrared objects such as radiators, air conditioners, fax machines, laser printers, or other devices that produce heat.
- Strong light effects may cause interference, so infrared rays should not be exposed to direct sunlight, reflected sunlight or car headlights. Avoid installation near radio transmitting equipment.
- Care should be taken to ensure that the surface on which the infrared port is installed is vibration-free and stable, especially for a dual diode system.
- Do not point the sensors at areas that may cause instability, such as reflective, glossy surfaces, or pool water.
- If you have pets, you will need to consider selecting specific motion sensors and a specific installation method. Choose only a pet-proof infrared detector.
House material, wall thickness and drafts
The more rigid and durable the house, the more stable the motion sensor will work, since it will not be able to detach from uneven wall surfaces. This reduces the possibility of false alarms. Air currents will also have less impact on the lenses, which are housed in a fairly durable housing. Air flow causes a false alarm primarily through the lens. Rapid temperature changes caused by drafts affect lenses with a high coefficient of thermal expansion. Due to the rapid change in the size of the areas of the lens, the rays also change. This leads to the sensor mistaking changes in ray fluxes for movement and triggering a false signal.
To learn how to properly configure the motion sensor, see the following video.
How to position and configure motion sensors
For the sensor to operate correctly, it is important to position it so that the capture zone is directed in the direction from which the object approaches the place where the lighting is controlled. It is not always possible to do this. In such cases, additional sensors are installed that will maximally cover all directions of approach of the object.
The sensor connection option is presented in the diagram:
If you need to expand the functionality of use, you can add a switch to the circuit.
To select operating modes after installation, you should use the settings that are available on almost all sensors.
Setting up a motion sensor to turn on the light, as can be seen from the image, includes the following basic parameters:
- Temporary settings - set the period of time during which the lighting will work from the moment the movement stops. For the controller to operate, the speed of the object plays a role. Here you should follow the recommendations - at fast speeds, reduce the time delay to a minimum, and for rooms (garage, utility room), where objects move slowly, set the delay for a longer period of time.
- By adjusting the illumination parameter, the sensor’s operation during the day and night is adjusted. If, for example, as the evening approaches, the room becomes dark, adjusting the light level will ensure that the light turns on.
- The complex indicator for the sensitivity threshold, after which the illumination is activated, includes distance adjustment and adjustment according to the size of the object. If the sensor is triggered by small extraneous movements, the sensitivity should be reduced.
Important: devices operating outdoors must be reconfigured depending on the time of year. Some of them may change under the influence of climate indicators.
Installation
The spotlight can be installed on any flat surface. Often, pillars or a wall of the structure are used for this. Hardware should be selected that is reliable so that it can withstand the weight of the spotlight. Additional strengthening is carried out using clamps. Alternatively, you can integrate it into a niche. The sensor must be placed so that it is inaccessible to intruders, and at the same time the coverage area is as wide as possible based on its technical characteristics.
Connection
Even if you have practical skills, you should read the instructions before connecting any electrical device. If this is not done, there is a risk that the device, or more precisely, its sensor, will not work correctly.
The spotlight is connected to the network using PVS or SHVVP wires. To also make grounding, you should choose a three-core cable. If you are connecting an LED spotlight, you can get by with a two-wire one.
Since the spotlight will be used constantly, it is better to provide for it not a socket, but a separate cable that comes from the panel or the nearest junction box.
Connection methods differ slightly depending on the type of spotlight (versions are suggested above). The first case is when the motion sensor is built into the body of the spotlight or rigidly fixed to it. This model is the easiest to connect, since the main difficulty - connecting the motion sensor to the lighting element - disappears. All that is needed in this case is to insert the power wire into the spotlight box. Some models even have connections for connection, so you don't have to disassemble the device.
If the motion sensor is placed separately from the spotlight, then the connection is somewhat more complicated, but you can still connect it yourself. The first thing you need is to connect the motion sensor to the spotlight using a separate cable
Here it is also important to carefully connect the wires, otherwise there is a risk that if it crashes into the network, the spotlight will simply burn out
The connection diagram looks like this:
The main attention should be paid to connecting cables with appropriate markings. Brown connects to the phase one, red - to the output from the spotlight
The second wire of the device and the blue cable to neutral. The color of the cables may vary; please refer to the manufacturer's instructions.
Settings
Setting up a floodlight with a motion sensor, or more precisely, the sensor itself, is easy
It is important to know the order of this process. Most sensors have 3 main characteristics that affect whether the spotlight turns on/off
More specifically:
- Day Light. This adjustment helps adjust the sensor's sensitivity to outdoor light. When configured correctly, the spotlight turns on only at night, and does not trigger on moving objects during the day. By setting the extreme left position, the device is programmed to turn on in the dark. The extreme right position starts the floodlight to work around the clock.
- Time. The regulator makes it possible to set the glow time, that is, how long after switching on the light is on. The minimum threshold in most devices is 5 seconds, maximum 5 minutes. After the set time, the light will turn off.
- Sens. The third adjustment is not available in every device. If it is present, it will help configure the device to trigger an object of a certain size. That is, to exclude false activation of the spotlight if a medium-sized cat or dog runs by.
It is recommended to carry out all settings experimentally; in this case, it will be possible to achieve the required clarity of operation in each specific case. Often a motion sensor is part of a security system; if conditions are met, it can be connected to a siren.
Where can I buy
You can purchase smart lamps both in a specialized store and online in an online store. In the second case, the budget option for purchasing products on the AliExpress website deserves special attention. For some products there is an option for shipment from a warehouse in the Russian Federation; they can be received as quickly as possible; to do this, when ordering, select “Delivery from the Russian Federation”:
| Plutus-Quinn LED Night Light with Motion Sensor | LED ceiling lamps with motion sensor | Goodland LED Solar Light with Motion Sensor |
| Smart lamp KARWEN E27 with sound/passive IR motion sensor | LED night lights with motion sensor | Ceiling light, LED, with motion sensor |
TOP best manufacturers in the domestic lighting market
This market segment has been firmly conquered by Chinese manufacturers, among which Feron and Mighty Light stand out. They were one of the first to present their products, which are distinguished by a powerful luminous flux.
High-quality lamps with motion sensors are offered by German manufacturers Steinel and Euroelectric. The first offers LED lamps with a motion sensor based on a sensor that perceives infrared radiation. The second specializes in outdoor options that operate in a wide temperature range. One of the best models for wall mounting is ST-69-2.
We recommend reading: how lighting of stair steps with a motion sensor can be implemented.
The Polish company Hardt supplies lamps with motion sensors protected from moisture and dust for the needs of housing and communal services; the Led-Hardt model would be an excellent choice.
Moscow and the regions of Russia are in the field of activity of numerous dealer centers and online stores, where fast delivery of any types of lamps with motion sensors will be ensured.
Correct setting of device operating parameters
Once connected, the LED lamp requires adjustment of the luminous flux angle and sensitivity to turn on the lighting device when the light level drops. The installation is carried out according to the instructions and is guided by considerations of comfort for residents.
Initially, you need to check the factory settings, and if they do not correspond to the illumination in the room, then you need to adjust the directions of the luminous flux of the lighting element. Some new lamp designs include the ability to adjust the viewing angle. If the user of the lamp does not understand the adjustment conditions, it is better to ask a specialist to make the adjustment so as not to unbalance the DD. When installing and setting up the luminaire, it is important to follow safety precautions:
- Turn off the mains voltage before starting installation;
- follow the installation instructions;
- protect the device from moisture;
- The DD can only be switched off using a switch.
Modern lighting devices are equipped with a shutdown device with a countdown timer and two relays of opposite action - if there is movement, the first relay is activated, a point response and the light bulb lights up, after a period of time set by the timer, the second relay is activated, turning off the light.