How does a motion sensor work for lighting and its design, what the user needs to know about
Just imagine that you no longer have to look for the light switch in the dark to get to the toilet or kitchen. The system will do everything itself. When a person appears in the visibility zone, the sensor is triggered, lighting the lamp attached to him. This process takes a few seconds: the device closes a circuit through which voltage is supplied to a light bulb or group of lamps indoors or outdoors. Most motion sensors have several options that make it convenient to control:
- setting the time interval for lighting activation;
- sensitivity adjustment (needed so that the device does not react to the movement of pets);
- illumination zone.
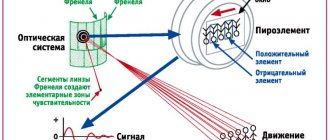
Diagram of the design and operation of an infrared motion sensor. Please note that the device responds to a thermal emitter
GOOD TO KNOW!
It is better not to use such devices in the bathroom or toilet, otherwise you will often have to wave your hands to trigger the sensor and keep the room illuminated.
Types of motion sensors and their main features
A great way to protect yourself and your home from unwanted visits from scammers is to install a motion sensor on your lighting. However, first you need to understand the types and their principles of action.
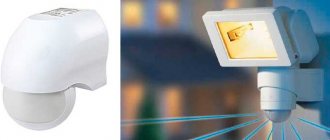
Outdoor infrared motion sensor for turning off lights - sensitive to any movement
Infrared DD is capable of saving energy, preserving the service life of the lighting. This type of device is triggered exclusively by thermal movement, that is, if the objects of movement are animals, people or a running vehicle. Using touch lenses, the device receives a signal and activates the lighting. The coverage area of the DD (motion sensor) depends on the area where the lenses are placed. The device has several disadvantages:
- often triggered by a warm wind;
- does not see a person if he puts on material that reflects heat;
- reacts poorly in wet and rainy weather.
Infrared DD is harmless to humans and animals, as it does not emit specific signals that irritate the body.
Ultrasonic sensors are suitable for entrances in apartment buildings and lamps in apartments
The occurrence of dust and humidity does not affect the performance of the device in any conditions. It is better not to use such structures in your yard or house. The fact is that the device is capable of responding to sudden movements. If you smoothly walk past the device, then the DD will not work. This device is not safe for pets, because they perceive ultrasound. Has several disadvantages:
- low response area;
- sensitive to mechanical stress;
- triggers with any movement (which is inconvenient).
The difference in air temperature around the ultrasonic DD is not an obstacle to its performance.
Security motion sensors, or microwave DD
Despite its small size, the DD is able to respond to movements with minimal activity. The microwave motion sensor is capable of emitting electromagnetic waves, which, when reflected from a moving object, trigger the touch panel, and it, in turn, activates a given function (siren, lighting). The disadvantages of this design are:
- expensive;
- dangerous to human health as they emit high power microwaves;
- false alarm (if the object moves outside the yard gate).
The device has proven itself to be excellent for security purposes: it is able to respond to body movements behind glass walls, without being triggered by changes in air temperature.
Combined universal motion sensor
Combined models are so practical that they are suitable for installation indoors and outdoors. They do not respond to the climatic state of the environment. Combined motion-sensing devices contain several technologies that trigger simultaneously. If the ultrasound method is unproductive, then it will be replaced by infrared radiation. In the DD, microwave and ultrasound or IR and ultrasound can operate simultaneously.
Motion sensors for LED lamps: what is their difference
Before purchasing a device, be sure to check the conditions under which it can be used. It is known that LED light bulbs are the most economical lighting sources; accordingly, not all LEDs are suitable for them. Infrared sensor devices are suitable for these conditions. Their operating range is 3 meters, and such installations are intended only for LED strips. The devices have less power than traditional devices. Among the disadvantages it is worth highlighting:
- high cost;
- small area coverage;
- demanding to use.
Features of lamps with a motion sensor for entrances
The lamp combined with a motion sensor is an alternative to hopeless incandescent lamps. New devices are able to control the voltage supply to turn on the lights the moment a moving object is noticed. Using this device you will be able to significantly increase the life of the light bulb.
Connection diagram and installation of motion sensor
If you yourself are not very strong in electrical matters and are even afraid to pick up a battery so as not to be shocked, then you should entrust the installation of the motion sensor to some familiar specialist. He will cope with this task easily and quickly.
If you want to try your luck on your own, then you need to proceed as follows:
Step-by-step instructions for installing a motion sensor
Step 1 . De-energize the line on which the installation will take place. To do this, simply turn off the light with the switch. To be extra sure, you can unscrew the plugs or even go and turn off the power to the whole house (just kidding).
Step 2 . Next, we mount the following “electrical circuit”: I’m showing it on a regular light bulb to make it easier. The same will happen with the chandelier and other appliances.
The two wires coming from the light bulb must be connected to the red and blue wires of the sensor using the supplied connector:
Step 3 . We connect the electrical wires that stick out from the ceiling.
It is important that the connection proceeds exactly according to the diagram. It is included in the instructions and is even printed on the motion sensor itself:
The letter “N” denotes the “zero” of the electrical network, while the “phase” is denoted by the letter “L”. The wires protruding from the ceiling must be connected correctly. In order to distinguish “phase” from “zero” you can use a conventional electrical voltage detector. It is not that expensive and is sold in any self-respecting electrical goods store. In general, this is a very useful thing on the farm. I recommend purchasing it. It costs a penny (about 50 rubles), but it can easily save lives when fiddling with electricity.
In my particular case, the blue wire turned out to be “zero”. This is what I connected to the middle terminal. One of the wires from the light bulb was connected to it. Brown wires were connected to the outer terminals. One is from a light bulb, the other is the one that stuck out from the ceiling.
The confusion with the colors of the wires in my photographs is explained by the fact that I took the first photographs with standard wires that were left by the builders. However, they turned out to be very thick and not flexible enough. No matter how hard I tried, I could not complete the installation. Therefore, at some point the standard wires were replaced with more flexible ones - green ones.
So that you have a clear understanding of how to connect a motion sensor to a light bulb and wires from the ceiling, I provide below an electrical connection diagram:
I hope everything has fallen into place now.
Step 5 . Installation of the sensor in its original location
The location for the sensor must be chosen so as to prevent false alarms. For example, if a door is always open in a room and someone walks past it without going inside, an incorrectly placed sensor will react and turn on the light.
Therefore, before attaching the device to a wall or ceiling, it is worth testing the entire system in action, so that you do not have to drill new holes and cover old ones.
In my case, the finished system looked like this:
I know, the position of the sensor seems somewhat controversial. It seems to be blocked by a lampshade. However, the latter does not interfere with the operation of the system at all, since it is “empty” inside.
Result - the problem with an incorrectly installed switch is solved. A motion sensor costing 380 rubles saved a lot of time, nerves and, possibly, electricity.
Why "possibly"? Probably because at home we don’t often forget to turn off the light in the bathroom. But just imagine how useful this system will be in a public toilet!
Practical advice on how to choose a DD installation area
Before installation, you should decide on the best place to place the device. After all, how correctly the device will work depends on this moment. Depending on this, a wall or ceiling motion sensor can be used. It is ideal to place the device so that its trigger mechanism is directed towards the door to the room. Also pay attention to the diagram below, which details where the motion sensor will see movement and where it will not: To accurately trigger the motion sensor without failure, you need to adhere to the height of its placement. It must be at least 2.5 m
- First of all, it is necessary to prevent false alarms of the device. Do not install the device opposite a window; it is better to choose a corner area.
- You should not install the motion sensor next to heat mains or heating devices; they also emit heat and can cause the lighting to work constantly.
- It is better not to place this device in a kitchen that has a microwave. Household appliances will interfere with the performance of the device.
HELPFUL INFORMATION!
To connect the light detector there is no need to make additional cable routing in the electrical distribution box. You can connect the device to the network using a plug with a wire through a socket.
TOP 7 best motion sensors for turning on lights
Here is a rating of the best representatives of sensory equipment.
The TOP 7 includes the following models:
- Orbit 360 degrees CIRCUMAT PRO CR white DU OB134912;
- Brennenstuhl 1170900;
- Feron Sen 30 230V 500W 5-8 cm 30 with white cable 1.5 m 22068;
- TDM DDM-02 SQ0324-0021;
- Camelion LX-28A 6438;
- Rev Ritter "Action" 110;
- EKF PROxima dd-ms-22B.
Orbis 360 degrees CIRCUMAT PRO CR white DU OB134912
What is important to consider before connecting a motion sensor
There are several important points that you need to know before putting the device into operation. Let's look at it in detail in the table.
| Illustration | Parameter | Description |
| Viewing angle | Typically, the problem of determining the response zone is characterized by wall-mounted models of regulators. You will have to choose a tilt angle in the range of 15-50°. Otherwise, check the operation of the device every time you turn it. | |
| Device sensitivity | Using the adjustment lever, you adjust the desired sensitivity threshold. To begin with, set the value to min and check how the device works for all family members; if this is not enough, increase the value a little and check again. | |
| Response time | There is also a knob for this option, designated TIME. The time threshold in these devices is 3−15 seconds. You need to set yourself the desired indicator, that is, adjust this parameter to suit you. | |
| Area illumination level | It is important to configure the motion relay correctly here. It is better to do this in the daytime, and in the evening just reduce the level of illumination until the sensor starts to work. The regulator is designated LUX. |
NOTE!
There is no need to disassemble the motion sensor in search of the LUX adjustment lever; on some models it simply does not exist. Therefore, first determine the functionality of the light detector.
Correct connection diagram for a motion sensor for lighting: two connection options
There are several options for connecting motion sensors that regulate lighting in a room or yard. You can connect several sensors to the lighting system or just one, and also organize the operation of the detector in conjunction with a switch.
Method for connecting one or more motion sensors for light
Wire switching can be done in two different ways in accordance with a specific circuit. Using this diagram, you will make an error-free connection of the light detector. Most models of motion sensors have three terminals for connecting conductors. To connect the power circuit, you need to use pins L and N.
The devices also have a Lout terminal - this is the second part of the contact connection, which is connected to the L terminal, as shown in the diagram. Thus, it can be seen that the connection of the motion sensor occurs by breaking the electrical circuit coming to the lamp. If you plan to use two or more sensor devices, then they must be connected in series.
Connecting conductors when installing a motion sensor with a switch
For this method, a separate circuit is used, which provides for connecting a motion sensor, lighting and switch in parallel. Pay attention to the photo below. Connection diagram for a DD with a switch In this case, zero and phase come from the electrical panel to the distribution box. From here the neutral conductor goes to the detector and to the lamp. The phase is connected to the DD phase and returns to the switch contact, after which it leaves it, returning to the distribution box, where it is connected to the red wire of the sensor device.
The switched wire goes to the contact of the light bulb.
Connection.
ATTENTION! All work on installing a motion sensor to turn on the lighting should be carried out with the 220V voltage turned off.
.
Everything is simple here too. As a rule, the sensor comes with standard instructions for its installation, connection and configuration. First, a schematic diagram of connecting the ceiling and wall motion sensors:
Phase L
wire (1), and zero
N
wire (2) supply 220V power to the motion sensor. The phase comes out of the sensor with wire (3) and comes to one end of the incandescent lamp. The second end of the lamp is connected to the neutral wire. The relay contact is shown conditionally to make it easier to understand the principle of operation of the sensor.
When movement appears in the controlled area, the sensor is triggered, the relay contact closes, and the phase is supplied by wire (3) to the lamp. The lamp turns on.
Here it must also be said that it is advisable to connect the phase wire exactly as shown in the circuit diagram that comes with the instructions. You can read how to determine the phase wire here.
How to connect a light bulb to a motion sensor: detailed instructions
The motion sensor works on a similar principle to a traditional switch, but is automatic, since a person does not need to make an effort to turn on the light. For everything to work as described, you need to make the correct connection, and our instructions will be a useful guide to this process.
| Illustration | Description of action |
| To work, you will need the following tools: stripping equipment, a screw clamp, an electrical wire, a plug, a light bulb with a socket, an indicator and the sensor itself. | |
| Having connected the light bulb with the plug and checked its functionality, you can begin connecting the DD. | |
| We determine the contact with the phase in the socket. During the test, the light in the indicator screwdriver will light up. | |
| The plug conductors must match the contacts in the socket, otherwise the light bulb will not light. | |
| We break the electrical circuit between the plug and the light bulb, having first disconnected it from the network. We strip the insulated conductors on both sides, and then connect the motion sensor to this gap. | |
| We make all connections similarly to the previous diagrams; for this we use three screw clamps. |
After switching the wires, we check the functionality and set the required time period of operation, as well as the sensitivity threshold. If everything is done correctly, you can operate the device.
NOTE!
All contacts must correspond to each other, and a special tool should be used to strip the conductors, since a regular knife can damage the conductor if moved carelessly.
Popular motion sensor models
To organize automatic lighting in your home, it is recommended to use high-quality models of touch detector devices for light.
Our editors have prepared for you a review of the five best models that function perfectly and have a long service life.
| Model | Characteristic | Average price, as of May 2022, rub. |
| Navigator 71 965 NS-IRM04-WH |
| 400 |
| Feron SEN50 - motion sensor, mini, 230 V, 500W, 6 m, 360° |
| 500 |
| Xiaomi Mi Smart Home Occupancy Sensor |
| 1 000 |
| ARLIGHT MW14 (angle − 360°) |
| 1 000 |
| Wireless motion sensor MatiGard DHW01O |
| 1 200 |
Motion sensor IEK DD010
It cannot be said that I went to the store specifically for this sensor. It was simply quite sufficient for my purposes. In a large room, you would have to install something more serious or even use several sensors connected in a certain way.
The DD010 motion sensor seemed like a good choice and I bought it.
Inside the neat box was the sensor itself, instructions in Russian, and a pair of screws and dowels for attaching the device.
The device itself is small and not heavy at all. The ball-shaped sensor housing can be rotated slightly left and right. But the rotation angle is relatively small. You won't be able to turn it 180 degrees or point it down. This must be taken into account during installation.
The instructions offer a description of several sensors at once. Therefore, we must always remember that we have in our hands a device marked DD010, and look exactly at its parameters.
From features and technical characteristics.
The motion sensor is powered directly from the electrical network; no adapters required. The device can be installed on a wall or ceiling, depending on the situation.
The operating temperature range is from -20 to +40 degrees. You can put it outside and use it in winter. The IP44 protection class, in principle, allows you to leave it outdoors without special measures against precipitation and dust. However, I would make some kind of rain canopy.
The range of the device is up to 10 meters. This means that it is quite suitable for a room, kitchen, bathroom, entrance, porch. But for a hangar, a workshop, a large garden - no longer. You need to buy something more powerful or use a whole network of the same low-power sensors. Sometimes you actually have to install several of them. For example, if the room is L- or U-shaped.
The maximum power of connected devices is 1100 watts. That is, light bulbs, small chandeliers, speakers, tape recorders, and other household appliances can be connected. For example, you can connect a siren.
But an electric kettle, iron, heating radiator and other more powerful household appliances require a different sensor.
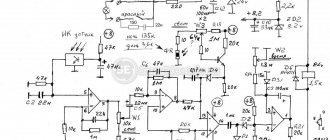
The nuances of making a motion sensor with your own hands: video instructions
For the job, you will need tools that any electrician should have on hand:
- special scheme;
- screws and screwdriver;
- indicator and conductors with red and blue insulation;
- soldering iron and multimeter;
- camera body or cameras (made in the USSR).
After preparing everything you need, read the video instructions and follow the specialist’s recommendations.
If you have your own recommendations for this article or have any questions, be sure to leave comments, we will consider them soon.