To conveniently control lighting devices and reduce the cost of using electrical energy, users increasingly began to resort to the use of automatic control devices based on motion sensors of various configurations. The installation of such devices is carried out according to certain schemes, which we will consider in this article.
Characteristics and features of choice
First you need to select the voltage at which the street light sensor will operate: 12 V or 220 V. Another important characteristic is the protection category. Due to the fact that the device will work outdoors, the protective class must be at least IP 44. That is, objects larger than one millimeter in size will not penetrate into such a device and they will not be afraid of splashes of water. The next selection criterion is permissible temperatures during operation.
It is recommended to choose light sensors for day/night street lighting that slightly exceed the average temperatures in your area.
You need to select a twilight sensor based on the power of the connected light bulbs and the electric current of the load. Here, too, it is better to take devices with a small margin.
Some devices provide the ability to adjust sensitivity. It is recommended to reduce this indicator when snow falls. In this situation, the light reflected from the snow surface may be perceived by the sensor as dawn. As a result, the lighting will constantly turn off and on.
The response delay is also considered a very useful option. For example, if at night the light from car headlights hits the photo relay. If the delay is very small, the light will turn off. But this will not happen if it is at least five to ten seconds.
How to place the sensor
For a device with a sensor to perform its functions, it must be placed correctly. To obtain maximum savings, it should be installed in areas with the greatest concentration of people.
Ceiling sensors are installed mainly in small rooms. If possible, they are installed at a height of 2.5–3 m. Then the range of action will be 10–20 m.
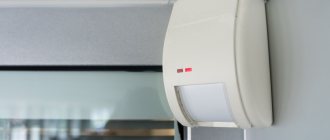
Wall sensors are popular in indoor and outdoor applications. They need to be installed at a height of two to three meters. To get a larger viewing radius, it is better to mount it in a corner
It is important not to forget to point the device at the place where people pass
In exceptional situations, the device can be placed outdoors at any height up to 10 m. Then the device must be installed so that it hangs at an angle of about 40 degrees to the horizontal surface
It is important to remember that the larger the radius, the higher the chance of false activation
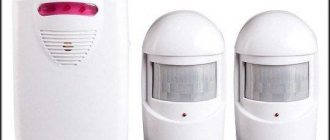
Instructions Motion Sensor DD 008
Motion sensor for lighting. This sensor also takes into account the light level. To switch load circuits, an electromechanical intermediate relay built into the sensor is used. Most often, motion sensors are used to control street or residential lighting. Currently, we install motion sensors to automatically control the lighting of vestibules and staircase landings of residential apartment buildings. Soon I will publish about 1. Subscribe to receive notifications about the release of new articles on the site.
The subscription form is located at the bottom of the article and in the right column of the site. The relevance of using motion sensors to turn on lights is due not only to convenience and comfort
When using motion sensors, the consumption of electrical energy is significantly reduced, which is important in our time, and the service life of the lamps themselves is also increased. Operating principle of the sensor
The principle of operation of the motion sensor to turn on the light is very simple.
The sensors are designed to automatically turn on and off the load at a given time interval, depending on the presence of moving vehicles. MOTION SENSORS are used to automatically turn on and off lighting for economical use.
When any movement appears in the sensor’s sensitivity zone, it begins to determine the light level. And if the illumination level is below the trigger setting, then the sensor is triggered, thereby turning on the lamp with its output contacts. Everything is correct. The logic can be seen here. After all, if there is movement during daylight hours, then why turn on the lights, because it’s already light during the day. The power of the sensor output circuits depends on the type and type of sensor.
For example, for a motion sensor type DD - 0. VA) for energy-saving lamps and 1. W) for incandescent lamps. Agree, it’s very good. Motion sensor for turning on the light type DD To implement the above, I use infrared sensors type DD-0.
DD-0.24.V from IEK. There were no problems with them, so I recommend them for use. This is what he looks like.
And these are its overall and installation dimensions. The main characteristics of the infrared sensor are presented in the table below (click on the picture to enlarge): Installation of motion sensors. Now let’s look at the issue of installing sensors, i.e. To avoid frequent false alarms, the location of its installation is carefully selected. It is prohibited to install a motion sensor if in its sensitivity zone there are: fans (moving and rotating parts, blades) passing vehicles (heat from engines) air conditioners (effect of negative temperature) heating pipes (effect of positive temperature) trees and shrubs various electromagnetic interference. Don't forget about the viewing angle of the sensor. When installing the sensor on the ceiling, the viewing angle is 3.
If you install it on the side wall, the viewing angle is reduced to 1. The motion sensor is attached to the surface in the following sequence. Turn the sensor protective cover clockwise and remove it. This provides access to two mounting holes and adjusting screws. "LUX" - control of the response setting depending on the level of illumination "TIME" - control of the time delay in the on state "SENS" - control of the setting of sensitivity to infrared radiation. Motion sensor connection diagram.
The motion sensor must receive power through a circuit breaker or fuse, i.e. the wires are connected to the terminal clamps. The wire cross-section should not exceed 1.5 square meters.
This circuit is the easiest to connect. L - phase, N - zero, A - switched (output) phase from the sensor to the lamp. Option 2. The second option (not standard) of the connection diagram, see below. This sensor connection diagram can be used if you need the light to be on for a certain period of time, regardless of the light level and movement. To do this, we connect a regular single-key switch to the circuit, parallel to the sensor (a two-key switch is also possible when using one contact). Option 3. The third option for connecting a motion sensor to turn on the light must be used provided that the total output load (power of the lamps) exceeds the limit value (I talked about this at the very beginning of the article). To do this, add a contactor to the circuit with a coil voltage of 2.
This video discusses the main types of motion sensors. There are three wires in total and the instructions do not seem to be in Chinese).
How to make a sensor
Let's look at how the most common motion sensor for alarm is created.
It is done based on this scheme. You need to prepare the following tools and parts:
- voluminous body (can be taken from an old camera);
- Soviet-style control element base (buy at any electrical goods store or at a flea market);
- soldering machine;
- wires;
- screws;
- screwdriver;
Step by step guide
An autodyne is assembled on the basis of a transistor, which has now become a local oscillator and a mixing device for signaling. As soon as air vibrations (movement) are detected in the field protected by the device, the signal level will change. It fully corresponds to the Doppler shift, and will be equal to several hertz.
Video: how to make a motion sensor with your own hands
Next, with the help of a capacitor (in the diagram C2) and a low-pass filter (shown as C1, L3, the pulse will be sent to the alarm contact, which will also be a filtering part. Thanks to this, the pulse will reach its maximum and maintain these parameters for a certain time. Resistor (on Figure R11) will adjust the sensitivity of the circuit.
The comparators in this case are VD3 - a zener diode and a small relay (K1). It is imperative to take into account that the nominal mains voltage is 11 volts. Because of this, we also recommend connecting a signal-boosting stabilizer to the circuit.
Step two: adjust the board to the required parameters
There is an antenna at the top of our board; it needs to be thoroughly polished and treated with degreasing solutions; it is very advisable to cover it with rosin or at least acetone, because there is a high probability of oxidation of the antenna material during its use.
Next you need to wrap coil L1 and coil L2 with twelve turns of small-section wire (we took PEL-0.23).
Using a screw with a diameter of 3, screw the bushing to the central hole of the future sensor, secure it, and check the strength of the connection.
Now let's start fitting our body. We measure it, we need the board to fit into the box freely, i.e. the body is either sawn or another one is selected. In it we mark the location of the center of the board and there we also drill a similar hole, as in the diagram, treat it with acetone, and try on the board.
Three millimeters need to be drilled into the corners of the housing where the electrical circuit is installed. Some deviation is allowed depending on your mounting screws.
The screws, sleeve and plates can be of any material, but be sure to check that the holes and legs are even. In some cases, you will still need to drill holes for future LEDs, but basically they are visible through the body.
The simplest sensor is ready, when assembled it will look something like this. The installation is carried out according to a clear scheme: we connect a room lamp or a fluorescent lamp to the detector.
How to set up a motion sensor?
Changing the device settings is done using the handles on the body. Their number depends on the device model, usually there are 2 to 4 switches. Near each knob there is a designation of the setting for which it is responsible (alphabetic and symbolic), as well as the direction of rotation of the knob.
It makes sense to select the optimal parameters and settings before installing the sensor. After connection, especially if the device is mounted under the ceiling, testing the settings and changing them will not be very convenient.
LUX stands for dimmer. This setting sets a light threshold beyond which the sensor will not respond. When connecting for the first time, the value is usually set to maximum.
The TIME motion sensor setting is responsible for the period of time after activation during which the light will be turned on. If the movement continues after the first trigger, the timer starts counting again, so with the basic setting the time is usually set to a minimum.
SENS and MIC (sensitivity and microphone control) settings on household motion sensor models are rare. The first is responsible for the “sensitivity” of the sensor and is set to the maximum value, the second is for the sensitivity level of the microphone (set to the minimum).
Adjusting the motion sensor to turn on/off the light
The first thing you need to do is set the time on the device. The sensor allows you to select an interval from a second to 10 minutes. It will be easier to decide over time if you listen to the following tips:
- the optimal period for supplying light to the stairs is a few minutes, because they rarely stay longer in such a place;
- The normal period of time for supplying light to a utility room is 10–15 minutes, because something often has to be taken from such a room.
The sensor is supposed to set a response delay after detecting the movement of an object. This value can range from a few seconds to 10 minutes and is determined by how fast the person moves. For example, a corridor is crossed quickly, so it is better to mount a sensor with a shortened “Time” parameter in it.
Without configuration, the device will not work correctly
The illumination level, dependent on the “Lux” regulator, should be adjusted so that the sensor performs its task at times when the room is illuminated less than usual. It is recommended to equip a room where a lot of light enters from the windows with a motion sensor with a “Lux” regulator set to the initial or middle position.
The sensitivity of the device, which triggers certain actions in response to human movement, is controlled by the “Sens” regulator. This value is influenced by the distance of the device from the moving object and the weight of the person who made the sensor work. Therefore, if the light sensor turns on for no reason, it is necessary to make the sensor less sensitive. And it’s worth thinking about increasing the device’s response rate only if there is no action from the sensor while a person is passing by it.
The motion sensor has a complex design that must be adjusted to special operating conditions. Ignoring the rules risks the fact that the device will work contrary to the wishes of the owner of the premises.
Sensor selection
To correctly select a recorder for automatically turning on lighting devices, you should familiarize yourself with the technology of their operation, namely:
Application area. It is necessary to first determine the installation location of the device (in the interior or exterior of the room) due to the fact that dust- and moisture-proof options are available on the market, and according to the mounting method - mounted, built-in and on support holders.
The power of the lighting device to which the connection will be made. This is due to the fact that recorders have an operating voltage of 200 W or more. So, it is advisable to install a recorder with a maximum viewing angle to a street lighting device, and install a cheaper option in an apartment
Particular attention should be paid to the power when planning to combine the device with an energy-saving lamp. Before purchasing, you need to calculate the total load and if the load specified in the instructions is exceeded, you will need to install an intermediate relay or distribute the load between devices.
Viewing angle
Indoors or on the outside of the building (installation is carried out on any wall), a standard sensor with a horizontal viewing angle of 180 degrees or even less is best suited. You can also install a device that has two sensors, the total viewing angle of which will be equal to 180 degrees. To ensure the maximum viewing angle, a device with three sensors is installed, in this case the viewing angle is 360 degrees. Such devices are mounted on the ceiling.
Type of lamp and lighting fixture. The use of sensors is possible with any type of lamps and lighting devices. The market provides sockets and switches with built-in recorders that are ideal for home or office use.
Radius of action. This indicator characterizes the maximum distance of an object from the device at which a moving object can be detected. For infrared sensors, the coverage area is 12 meters.
Two-pole or three-pole. The first type of recorder is used in combination with incandescent lamps. They are connected in series. The latest models are more universal and can be used with any type of lamp.
Design and principle of operation
Structurally, the motion sensor contains several components that will differ depending on the type.
Rice. 1. Motion sensor device
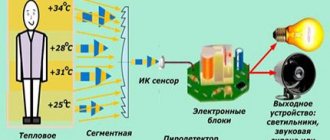
For example, consider the device of an infrared sensor, which consists of:
- PIR pyroelement, which responds to changes in the physical parameters of the environment;
- field-effect transistor T1, acting as an electronic key;
- shunt resistor R1 connected in parallel to the pyroelectric element.
The principle of operation is the ability of pyromaterial to change its own characteristics depending on the degree of thermal radiation falling on it. The light flux reduces the resistance of the PIR pyroelectric element and a signal comes through it to open the field-effect transistor. In this state, current will flow through the load, which can be a relay coil or other logical element. If a person or other object appears in the area of the sensor, the light flux will be interrupted and will no longer affect the pyroelement, and the automatic system will operate, issuing a corresponding signal about the occurrence of movement.
Instructions for installation and operation of motion sensors
Motion sensors are ideal for practicality and energy saving. The operating principle is based on the use of a heat-sensitive PIR element, which detects changes in temperature in beams formed by special optics.
The sensors are triggered (turn on the light) when a moving object emitting heat (for example, a person) enters the sensor’s sensitivity zone. They are equipped with a timer that automatically turns off the light after a time clearly set by the user and a sensor that allows natural light to be taken into account.
Application: in corridors, entrances, passages, rooms where people stay for a short time.
SAFETY INFORMATION.
Using the sensor outdoors is only possible if it is installed correctly by a specialist. Before installation, ensure that the trunk cable is securely insulated. If in doubt, consult a qualified electrician before commencing any work involving the installation and installation of electrical products.
1) SELECTION OF LOCATION.
Make sure that the sensor is located at a sufficient distance from any flammable materials and/or surfaces. Use Figure 1 for guidance. Further guidance on sensor location is provided in Chapter 4) MOTION SENSOR LOCATION.
2) INSTALLATION.
- After selecting a suitable location, you need to mark the position (position) for the screw holes (use the sensor mounting bracket as a template). Attach the mounting bracket with screws to ensure secure attachment and safe use. Temporarily install the sensor in the selected location.
- On the back of the sensor, locate the terminal box; remove the screws that secure it and remove the cover to allow easy access to the contacts. Through the channel located at the base of the box, pass the main cable inside and secure it with a clamp. Connect the main cable to the corresponding contacts (see Fig. 2).
- After you have connected, tighten the screws of the contacts and the clamp for securing the main cable. Close and secure the terminal box cover.
- Attach the screws to the sensor mounting bracket, making sure it is securely attached to the surface. Adjust the angle of the sensor by loosening the screws located on the sides of the mounting bracket. When the desired angle of inclination is achieved, tighten the screws to their original state. Make sure the cable does not touch any sharp objects and is located safely.
3) MOTION SENSOR.
The motion sensor has three adjustment dials (see Fig. 3)
| Time regulation: | The time the light stays on can be adjusted from 6 seconds to 20 minutes. |
| Adjusting the light sensitivity sensor: | Light sensitivity can be adjusted from 0 to 30 lux. |
| Adjusting the sensitivity of the sensor range: | The sensor range can be adjusted from 0 to 12 meters (max). |
4) LOCATION OF MOTION SENSOR.
Sensor location is important for optimal performance. Study the following diagram for guidance (see
Rice. 4)
The sensor may turn on when it is not required in the following cases:
- getting into the range of the hot air flow sensor or sudden gusts of wind;
- heat emission from the engine of a passing car;
- in the daytime, if the sensor is placed in a shaded place (under a roof, trees).
The sensor will not perform satisfactorily if it is positioned in such a way that there are obstacles in the motion sensor's path of action.
If the temperature difference between the object to be detected and the sensor's surrounding area is too small (eg in summer), the sensor will respond later and the detection range should be reduced to 6 meters instead of the maximum 12 meters.
5) BASIC TECHNICAL DATA.
| Width (mm) | 138 | 138 | 138 | 185 |
| Height (mm) | 195 | 195 | 195 | 296 |
| Depth (mm) | 115 | 115 | 115 | 145 |
| Maximum power (W) | 1000W | 500W | 150W | 500W |
| Degree of protection | IP 44 | IP 44 | IP 44 | IP 44 |
| Radius of action | 10 meters | 12 meters | 5-12 meters | 5-12 meters |
| Viewing angle | 180° | 180° | 120° | 120° |
| Delay time | From 5s to 10 min | From 5s to 10 min | From 5s to 10 min | From 5s to 10 min |
Repairing a motion sensor with your own hands - SamElectric.ru blog
This article is a continuation of the article about the Design and circuit of a motion sensor, which caused heated discussion and many questions. Well, since I receive a lot of questions about repairing motion sensors, I decided to include them in a separate continuation article.
The most important thing I want to convey is that the main thing is not to know how to solder and check the integrity of the elements. The main thing is to be able to think logically and critically, research, and analyze. And gain experience.
I recommend that those who want to repair such devices themselves also read my article about repairing a chandelier controller with a remote control. There are also a lot of practical tips and repair examples.
There are many motion sensor schemes, but the principle is the same. This principle and much more regarding this device is given in the link at the beginning of the article; once again I recommend studying it and the comments to it. The same article contains links to other articles about motion sensors, you can download instructions and datasheets for the details of the sensor's electrical circuit.
Typical motion sensor malfunctions
The motion sensor for turning on the light may have the following faults:
- Doesn't turn on.
- Doesn't turn off.
- It turns on or off at the wrong time.
Below we will analyze these faults in detail.
Once again about the schemes
So, I will give the most popular motion sensor circuit again:
Motion sensor circuit 3
This diagram was sent by my regular reader Alexander from Korolev in December 2014, for which I thank him again. I will rely on this diagram throughout the text of the article, since it is the most typical. It should not be confusing that the circuit in our example will be scattered across two boards - low-current and power.
At the end of the article, a refinement of this scheme will be given.
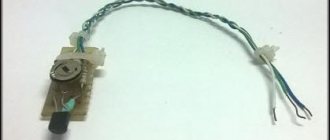
Now I’m publishing photos of motion sensor boards sent by another reader of mine, Renat.
Low current motion sensor board
Motion sensor power board
Here is our correspondence with Renat:
Renat did a great job with his own hands, and I will try to help him in this article.
Where to start repairs if the sensor does not work
These arguments and methods of mine apply not only to a specific motion sensor, but also to many electronic devices. For example, to a light sensor, the circuit of which is much simpler, but the principle is the same.
1. Check that the connection is correct. At this stage, you also need to find out why the motion sensor does not work and under what circumstances. Options (brainstorming):
What's new in the VK group Samelektrik.ru?
- leap of light,
- turned off the electricity
- construction work,
- an electrician came to the neighbors,
- some kind of smell
- the children were spinning
- hit
- the dog chewed
- neighbors flooded
- there was wind yesterday
- sometimes it didn't work well
- etc.
At this stage, it is already possible to identify the direction in which to move further.
You need to check that the connection is correct, make sure that the sensor is receiving the correct power, and if there are indicators, they should be on. Some. Sometimes. Next, simulate a situation in which it should work.
2. Correct adjustments. The regulators may be installed incorrectly, and it is enough to adjust the sensor correctly. To do this, it is necessary to put the controls in positions in which it is most likely to turn on: Set the illumination level to a position at which the sensor will operate both day and night. Set sensitivity to maximum. Set operating time to minimum. In any case, it’s worth turning the controls and analyzing how the sensor behaves and whether it reacts at all.
Opening the sensor
If after the first stage the sensor does not work, you need to get down to real work.
We open the sensor and look at the boards. The first thing you need to pay attention to is the integrity of the elements. In addition, the smell will tell a lot to a knowledgeable person. There should be no suspicious parts - darkened, cracked, swollen, loose.
The PCB tracks must be intact. Sometimes it happens that they crack or break near the ration points (nickels). And of course, if the track is burnt out, you need to restore it with a jumper and analyze the reason.
We carefully check the soldering. In case of the slightest suspicion, we shake the suspicious parts and solder these places. Often the input wires and wires between the boards are sealed off, as well as adjusting elements (variable resistors).
Test run
Connect power to the sensor. I recommend using an incandescent light bulb with a power of 25-60 W as a load to indicate the operation of the sensor. Otherwise, if you focus on the clicking of the relay, you may not hear or understand whether it is on or off. Now we check the relays and connections.
I highly recommend turning on any devices during repairs through the minimum possible circuit breaker. In this case - 1-2 Amperes. This is necessary to avoid troubles.
A better option is to connect through a transformer (with an output voltage of 220V) or a difavtomat, this will significantly reduce the risk of electric shock (we will work with open live parts!).
Another option is through a 60-100W incandescent light bulb, this will save you from a short circuit. But it's not convenient.
I recommend your article on the use of circuit breakers.
We check that the required supply voltage is present on the power board.
I won't tell you how to use measuring instruments or how to check parts. If you have questions, write in the comments.
In addition, I urge you to be careful and remember your safety! During repairs it may get fucked up!
Once again we return to where we started the repair (point 1). There is a high probability that after inspection, soldering, and replacement of visually faulty parts, everything will work.
Checking the power
In the motion sensor, the 220V input power is converted into DC voltage required to power the circuit. As a rule, these voltages are 8, 12, 15, 24 V in different combinations, depending on the circuit.
All voltages are measured relative to zero. The point where you can take a zero - for example, the minus of an electrolytic capacitor at the output of a diode bridge.
In this case, you first need to check the +24V voltage (see diagram at the beginning of the article). If it is not there, you need to check the limiting (quenching) elements in front of the diode bridge, and the diodes themselves.
It is possible that the subsequent circuit “extinguishes” or adds power. To verify this, you need to disconnect the subsequent circuit from the power supply circuit.
We also check the low voltage +8V, which is used to power the operational amplifier circuits.
Motion sensor diagram for lighting
The DD reacts to moving objects and turns on the light; if there is no movement, it turns off
Under the back cover of the device there is a terminal block with three colored wires routed outside the housing. The wires are connected to terminal clamps or to insulated lugs if the connection is made using a multi-core cable. The sensor is connected to the network, power flows through the brown wire of the L phase and through the blue wire of the zero phase. At the exit from the housing, both phases go to the incandescent lamp of the lighting device or to other devices, the inclusion of which is necessary when signs of movement appear in the coverage area. If movement is detected in the sensitivity area, the device is triggered, the relay contact closes, supplying current to the lamp, and it turns on.
You can obtain comprehensive information about the design of the purchased motion sensor from the manufacturer's instructions included with the device. In addition, a schematic representation of the optimal connection method is indicated on the cover of the model.
The principle of operation is simple. When a moving object appears in the coverage area, the electrical network is instantly closed, including devices and equipment connected to the sensor: lighting, air conditioning and ventilation systems, etc. If there are no signs of movement for a certain period of time, the electrical circuit is opened and all devices are turned off. In this way, it is possible to avoid the continuous operation of energy-intensive devices and economically use their working resources.
Which DDs are better for adjusting lighting?
Based on the principle of motion registration, sensors are divided into three types, these are detectors:
- ultrasonic;
- microwave;
- infrared.
Ultrasonic
DD is used to record the movement of an observation object by perceiving a reflected wave in the VHF range. The sensor propagates sound waves with a frequency from 20 to 60 kHz in the control zone. The detector picks up the reflected signals and compares their characteristics with the outgoing signal. If the parameters diverge, the DD alarm device is triggered.
Ultrasonic devices are insensitive to ambient temperature and humidity. They are immune to the thermal background of the object and scare away insects and small animals that hear ultrasound. However, DDs may not react to a person walking slowly. This is a significant disadvantage in the use of devices in security systems of apartments and private houses.
Microwave
Unlike ultrasonic devices, these sensors emit electromagnetic pulses with a frequency of 5.8 GHz. The operating principle is similar to the operation of a radar station (radar). The sensor emits electromagnetic waves in a certain sector of space. In the absence of movement, the reflected signal is compared with the original pulse. If the frequency of the reflected signal is stable, the device will be in standby mode. Otherwise, the DD is triggered, recording the movement of a body.
The disadvantage of microwave sensors is that electromagnetic radiation can be harmful to human and animal health. Therefore, DD of this type is used in automated systems where the presence of people is excluded.
Infrared
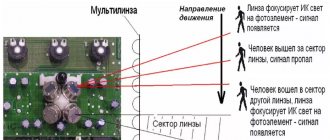
The operation of the infrared sensor (IDS) is based on recording changes in the thermal background of the surrounding space. All living organisms emit heat in the infrared range. The main part of the IDD is a pyroelectric element (Fresnel lens).
When the thermal background of the controlled area changes, the concentrated reflected IR rays change the potential of the electric field of the lens. As a result, a relay is activated, which closes the power supply circuit of the signaling device and lighting devices.
Operating principle of the traffic control system
Note! From all of the above, we can conclude that the best option for a device as a regulator of lighting modes is an infrared motion sensor. This is interesting: Why the LED strip can blink and how to fix it - we study thoroughly
This is interesting: Why the LED strip can blink and how to fix it - we study thoroughly
What else do you pay attention to when buying a motion sensor?
If a motion sensor for a spotlight has not yet been purchased, then when choosing it, in addition to the features of the devices listed above, you should pay attention to the manufacturer and some important characteristics for operation
Prices for LED spotlights
LED Spotlight
- Among the companies that are popular with consumers due to the quality of their products are “Theben” and “Brennenstuhl” (Germany), “Orbis” (Spain), Russian brands “Camelion”, “Feron”, “TDM”, “ ERA". Many of the listed devices are assembled in China, but there are no particular complaints about the quality. And purely Chinese brands “Ultralight” or “REXANT” are also considered quite worthy and competitive models.
- The permissible load power must be at least not lower than the power consumption of the spotlight intended for joint installation. In general, it’s better to have a certain reserve, about 30%.
- For outdoor placement, it is necessary to select sensors that have a housing protection class of at least IP44.
- The most important parameters are the operating range and the angular width of the viewing sector.
- The manufacturer may indicate a recommended sensor installation height. This recommendation should be followed so that the automatic light switching system works correctly, without failures and “idle” starts.
- High-quality devices have several adjustment controls - turn-off time delay and sensor sensitivity. In inexpensive models, these parameters can be preset and cannot be adjusted. This can be very inconvenient to use.
- Another adjustment element may be changing the light level for the device to operate. As a rule, a photo relay is included in the design of the motion sensor. That is, the device will respond to movement by turning on the light only in low light conditions, below a preset level. Agree, there is no point in operating such a system during the day.
If there is no photo relay, then you will have to turn the power on and off manually every day. Or still purchase an additional photo relay and include it in the overall circuit. How this is done will be shown below.
Specifications
Selecting a motion sensor to turn on the light requires several parameters. The type was determined to be passive infrared. All other characteristics largely depend on the installation location. There are also additional features that will be useful, but, in the case of a limited budget, you can do without them. Let's talk about everything in a little more detail.
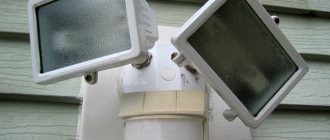
Miniature motion sensor can be built into lamps
Motion sensor to turn on the light: main criteria for choosing a model
In this section, we will look at the main characteristics that you must pay attention to.
- Range. For indoors, the detection range can be minimal - 5 meters; more is hardly needed. Unless it’s a production or warehouse space, or a flight of stairs. Here the distance to the object can be 10 meters or more. For outdoor installation, you select the range yourself. Just keep in mind that the reliable reception area is often 20-30% smaller than stated. So it is better to take a motion sensor to turn on the lights on the street with a reserve in range.
- Viewing Angle:
- Vertical. Can be from 15° to 180°. Determines the height of the detected zone. The larger it is, the more likely the object will be identified. But it could be a cat, a dog, or even a bat. Accordingly, wide-angle sensors are not always needed. Cats and dogs are usually less than a meter tall. Therefore, to reduce the number of false alarms, it makes sense to capture a strip at a height of a meter or more. And for this, a small vertical view is enough.
Horizontal viewing angle of the motion sensor. Can be from 90° to 360°. The choice of a motion sensor to turn on the light in this case depends on where people may be approaching from. If only on one side (doors in the room), a narrow-band model is sufficient; if only from two directions, you can install either two with a narrow detection zone, but point them in different directions, or install a wide-angle one. Depends on the directions of approach, but, as a rule, two sensors with a small angle are cheaper than one wide-angle.
When choosing a motion detection sensor to turn on the lighting, the material of the housing and its color are also important
Even if these are not security systems, it is worth paying attention to this detail. It is advisable to choose a color to match the wall, roof, pillar - the surface on which it will be installed
Sensor connection
Usually the device is connected to the network instead of a switch - the circuit is closed automatically. If you need to provide a mode in which the lamp does not go out after a specified period of time, a separate switch is built into the circuit. The connection diagram provides for parallel operation of the sensor and a conventional switch.
In a large room, one device may not cope with the volume of the room. Then a scheme is used with two sensors located in opposite corners, which control one lamp or zone lighting
It is important to ensure that both devices operate from the same phase, otherwise a short circuit will occur.
For cases when it is necessary to turn on several powerful lamps when receiving a signal from one sensor (for example, when organizing street lighting), a connection diagram with a magnetic starter is used.
Wiring
Installation and configuration
Having purchased a lighting device with a motion sensor, read the attached instructions and follow the connection diagram at each stage of installation. The procedure is quite simple and does not require calling a professional technician.
The step-by-step actions look something like this:
- Select the location where the sensor will be placed. Imagine in advance how the inhabitants of the house move through the room, focus on the location of the doors.
- Connect a standard type rocker switch in parallel. Otherwise, the indicator on the touch switch may burn out due to power surges. The switch will also allow you to disable the sensor and operate the lamps like regular chandeliers.
- Connect the luminaire with the sensor to the contacts on the switch and the industrial network cable. Lead the wire with the phase from the sensor to the switch. Avoid direct connection to the mains phase. Connect zero to the network. If necessary, install grounding.
- Provide high-quality insulation of all wires.
- Configure the operation of the sensor - the time to turn off the light when there is no movement and other parameters. Use the manufacturer's recommendations and requirements contained in the instructions, or act at your own discretion.
To connect an autonomous battery-powered LED lamp, proceed in a similar way, but instead of an industrial network, use the terminals on the battery.
Blitz tips
The device body is made of plastic, so it should be protected from mechanical damage
Particular care must be taken when handling the lens, which is the most important element of the device's optical system.
When installing the device outdoors, you should ensure that the recorder is not exposed to direct sunlight and precipitation. Experts recommend installing protective canopies.
It should be taken into account that the sensors are not sensitive to direct movement towards them, in such cases it will not work. Therefore, placing it in the room above the door, located on the opposite side in the center, is not advisable.
Not all motion recorders for lighting work accurately with LED and fluorescent lamps. Devices using conventional electromechanical relays operate uninterruptedly. Therefore, before purchasing it, it is advisable to obtain comprehensive information regarding this feature from the seller.
Useful tips
Proper connection of the motion sensor to turn on the light is far from the only condition for the reliability of its operation. A number of conditions must also be met:
- All extraneous lighting devices must be removed from the device’s coverage area, including light from a street lamp.
- Heating radiators and other sources of air currents should not enter the sensor lens, due to which it may begin to trigger falsely.
- There should be no large objects, decorative elements, or furniture between the detector and its scanning area.
Recommendations for choosing an installation location in different conditions
In everyday life, a motion sensor for turning on the light can be installed in a variety of situations, and there are individual recommendations for its installation and adjustment:
- In the garage, attic, pantry, boiler room and other utility room, the device is mounted opposite the door so that the lighting is activated immediately.
- In the bathroom, toilet, toilet, it is better to use a ceiling sensor that operates on a permanent basis.
- It is necessary to install several sensors and lights on the stairs so that its entire surface is covered by the devices.
- On the street, in the yard, over the gate, on the path in the garden and in the parking lot, detectors can be installed for each lamp separately, taking into account adjustments to cover the entire trajectory of movement.
When choosing a sensor to turn on light in a rectangular room (standard rooms) based on the movement of an object, preference should be given to those models that have a circular or oval detection diagram.
General recommendations before connecting
Correctly installing and adjusting motion sensors to turn on the lights is not enough - it is important to comply with the conditions for safe handling:
Basic installation recommendations
While paying a lot of attention to adjusting the motion sensor to turn on the light, we must not forget about the features of its installation:
- To prevent the detector from triggering when a cat or dog runs by, it is necessary to adjust the angle of the field of view so that the detection zone begins at least one meter above the floor level.
- When installing the device with a visibility of 180 degrees, the best location for it will be a wall or ceiling.
- Models whose viewing sector has a customization function can be installed anywhere in the room (taking into account the range). However, you need to remember that the lens must include doors or a passageway.
Attention! Modern models of motion sensors are multifunctional devices that can not only turn on the lights, but also the air conditioning system, audio and video system, TV and other electrical appliances in the house.
Useful tips Connection diagrams Principles of operation of devices Main concepts Meters from Energomer Precautions Incandescent lamps Video instructions for the master Testing with a multimeter
Important Features of a Motion Sensor
Before thinking through the connection diagram for a motion sensor for lighting, it is important to make sure that the model is suitable for the operating conditions. The following parameters of the tracking device are taken into account:
- Mains voltage and power consumption. Typically, the packaging indicates 220...230 V. Depending on the complexity of the device, the passivity or activity of the system, the sensor consumes 0.5...5 W.
- Detection range or coverage angle (sensing zone angle). Determines at what angle the rays “diverge.” In addition, the position of the device plays a role - on the wall, on the ceiling, and the height of placement. The area of the serviced area is 1…150 sq.m. and more.
- The term “range of action perpendicular and frontal” logically continues the concept of “coverage area”. Frontal range is the zone from which the rays come at a slight angle (less than 30 degrees) to the surface of the lens. The transverse (perpendicular) rays incident on the lens determine the size of the transverse range zone. The smaller the angle between the lens surface and the incident beam, the smaller the zone. Not all models determine the location of an object directly under the sensor. Their description indicates a “presence zone”.
- The additional function “anti-sneak protection” determines the complete coverage of the controlled area. In sensors with this function, the additional lens faces down.
- Dimensions, material and degree of protection of the device. For indoor use, protection from dust and moisture and the housing material are less important than for outdoor installation. Standard marking includes the IP designation with a two-digit numeric index. The housing is usually made of polycarbonate, an impact-resistant plastic.
When figuring out how to connect a motion sensor to reduce lighting costs or increase safety on site (indoors), it is important to consider the listed characteristics of the devices
Types of motion sensors and their operating features
Before you start setting up the motion sensor parameters, you need to decide on its type. Recommendations for the place of use and adjustment of its characteristics will largely depend on this. All detectors are divided according to the mechanism for identifying a moving object into the following types:
- Infrared.
- Acoustic.
- Microwave.
- Ultrasonic.
- Combined.
According to the principle of operation, they are all divided into active and passive. The first type includes combined, ultrasonic and microwave. They consist of a transmitter that sends a signal into space within the coverage area, and a receiver that receives them in the event of reflection from an object. The second (infrared and acoustic) are based on reading thermal radiation from a motion source.
Infrared models have become most widespread in everyday life. their main advantages are optimal cost, wide coverage area and the ability to be configured with three regulators. In long premises it is recommended to install acoustic and ultrasonic devices (switched on from a great distance), and for security systems - microwave devices, as they work even through walls.
Assembly diagrams
This can also be used in alarm systems. One option is to use a special thermal switch that will turn off the coffee maker. This is explained by cheap components, a simple assembly scheme, the absence of additional complex settings, and a wide temperature range of operation. Microwave assembly circuits To control open spaces and monitor the presence of objects in the desired area, there is a capacitive relay.
Scheme 3. All work is carried out only after removing the general voltage B.
Video 2. The MGTF wire is used to connect the sensor with fluoroplastic insulation.
We connect the wires as follows: we connect the phase wire of the power cable together with the brown and white phase wire from the sensor.
Related article: how to open an electrical laboratory up to 1000v
Circuit with two sensors
If you have a very long corridor, and even with turns, you have to install several sensors along the wall.
In order not to draw separate power to each of them directly from the switch, use a parallel connection diagram.
The number of devices here is not limited. How it works? For example, you went to the beginning of the corridor, the first sensor was triggered, the lights came on. We left his area, reached the second device - the lighting continued to burn.
We went around the corner where the third sensor is located, its elements are short-circuited, the lights are still on. And only when you leave the coverage area of all elements, the light will go out after a specified period.
Parameters that require correct configuration
When installing a motion sensor, it is important to correctly configure it according to the viewing angle
Accurate adjustment of the motion sensor depends on the correct settings of the most important options. In modern devices, sensitivity and illumination, installation angle and delay time can be improved. At optimal values, these parameters make it possible to save up to 50% of energy.
Installation angle
First of all, they regulate the lighting area of the device - the installation angle. Most modern lamps are equipped with detectors that are mounted on hinges
The angle must be adjusted so that the infrared rays spread over the largest possible area, and it is important to take into account the height at which the sensor is located
Sensitivity
Sensor sensitivity is the second important operating parameter
The second most important parameter is the sensitivity of the device, the adjustment of which is considered the most difficult. To adjust, use a special wheel on the sensor body with a range from minimum to maximum
The parameter is configured so that the detector does not react to small animals, but immediately triggers if it detects a person. For this purpose, the value is set to maximum, then they wait for the flashlight to turn off and begin to gradually reduce it to the required level.
Illumination
It is necessary to regulate the lighting so that the device is set to turn on the light only after dusk. During the initial setup, set the maximum value of the parameter and bring it to the desired value in the evening. If the detector does not have a regulator, you can additionally connect a special sensor to the device.
Price
The price of motion devices depends on the country of origin, technical characteristics, method of receiving the signal and the principle of operation of the device.
The current market provides several leading manufacturers, with the majority of factories located in China. There are also Russian manufacturers who assemble devices from Chinese spare parts in our country. The price of such models is slightly higher, but the warranty period is also correspondingly higher.
Considering that the technical parameters are almost identical according to data sheets, domestic street-type models are more resistant to low temperatures.
The average price of a registrar is, rubles:
- Ultrasonic – 550 rubles.
- Microwave – 810 rubles.
- Infrared – 625 rubles.
Wiring diagram for a motion sensor for lighting. Motion sensor dd 008 instructions for use
How to set up a motion sensor for lighting - instructions
When we talked about how to make street lighting economical and at the same time functional, we strongly recommended that you install a motion sensor on your floodlights. This device will allow you to automate the lighting system and turn it on not only when it gets dark, but also if movement is detected in the detection area. However, it is not always possible to configure the settings the way you want, as a result of which the sensor is triggered at the slightest vibration of the branches or when it is not too dark outside. That is why we have prepared detailed instructions for our readers, in which we clearly explained how to set up a motion sensor for lighting with two and three controllers.
How can you adjust the detector?
In modern motion sensors (MS), you can adjust the sensitivity, illumination, delay time for turning off the light and installation angle.
All these parameters, when properly configured, can save up to 50% of energy, which is a very significant figure. However, it should be immediately noted that not all motion sensors have three controls. In older models, you can adjust only two parameters - delay time and sensitivity, or delay time and light level, as in the photo below:
We recommend viewing the instructions, which explain how the detector works:
Sensor overview
Now we will look separately at how to set up a motion sensor on a spotlight or other type of lamp.
Installation angle
The first thing to do is to correctly adjust the DD detection zone. In modern luminaire models, detectors are represented by separate elements mounted on a hinge. This is what you should configure in such a way that the infrared rays are directed to the maximum possible detection area. Here, not only the installation angle plays an important role, but also the height at which you decide to connect the motion sensor. The optimal and worst installation methods are discussed in the diagrams below:
Sensitivity
The second parameter that you must adjust is sensitivity, which is indicated on the case “SENS”. As a rule, a wheel with a range from min (low or -) to max (high or +) is used for adjustment. Setting the sensitivity of the motion sensor is the most difficult. You should adjust the setting so that the detector does not trigger on small animals, but at the same time turns on the light when it detects a person. In this case, it is recommended to immediately set SENS to maximum, wait until the flashlight turns off and check how the sensor will work.
Gradually you will need to reduce the sensitivity until you find the "golden mean"
Please note that if you have a large dog in your yard, it is unlikely that you will be able to configure the sensor so that it does not react to it.
Illumination
The next setting is the illumination threshold, marked “LUX” on the case. This parameter is necessary in order to configure the sensor to turn on the light only when it gets dark. For example, why should the lighting turn on when motion is detected during daylight hours? It won’t do anything anyway. When setting up for the first time, it is recommended to set the maximum LUX value and, when evening comes, adjust the appropriate time at which the sensor will operate.
If your detector does not have a LUX regulator, you can additionally connect a light sensor. In this case, you will still be able to configure the spotlight so that it turns on only at night.
Delay time
Well, the last parameter is the turn-on delay, designated “TIME”. Time is the easiest to set; the range can vary from 5 seconds to 10 minutes. Here you must decide for yourself what time is best
Adjustment (setting)
Tilt angle
For those sensors that are mounted on walls, you first need to set the angle of inclination. They are mounted on rotating brackets, with the help of which their position changes. It must be selected so that the controlled area is the largest. It is impossible to give exact recommendations, since it depends on the vertical viewing angle of the model and on the height at which you hung it.
Adjusting the motion sensor begins with selecting the angle of inclination
Sensitivity
On the body this adjustment is labeled SEN (from English sensitive - sensitivity). The position can be changed from minimum (min/low) to maximum (max/hight).
Delay time
Different models have different shutdown delay ranges - from 3 seconds to 15 minutes. You need to insert it the same way - by turning the adjusting wheel. It is usually signed Time (translated from English as “time”).
Glow time or delay time - choose what you like best
Everything is relatively easy here - knowing the minimum and maximum of your model, you can approximately choose a position. After turning on the flashlight, freeze and note the time after which it will turn off. Next, change the position of the regulator in the desired direction.
Light level
This adjustment relates to the photo relay, which, as we agreed, is built into our motion sensor to turn on the light. If there is no built-in photo relay, it simply will not exist. This adjustment is labeled LUX, the extreme positions are labeled min and max.
They can be located on the front or back side of the case
When connecting, set the regulator to the maximum position. And in the evening, at the level of illumination when you think the light should already turn on, turn the regulator slowly to the min position until the lamp/lantern turns on.
The best expensive lamps with motion sensors
The model does not have a dimmer, nor is there any adjustment of brightness or light temperature, but there is a choice of operating mode. You can turn on night mode, when the sensor reacts to movement or light level, or use the device as a regular or portable lamp.
Expert opinion
It-Technology, Electrical power and electronics specialist
Ask questions to the “Specialist for modernization of energy generation systems”
Power type The lamp is equipped with an infrared motion sensor, the response zone of which covers 180, and the range of action reaches 10 meters. Ask, I'm in touch!
How does an infrared device work?
An infrared motion control device is also called passive. If we compare roughly, we can associate it with a thermometer. It is triggered when a heat source enters its range of action.
But for such a device to work, additional settings will be required. For example, you installed such an infrared device and configured it to detect the appearance of an adult. If a child enters the room, the sensor may not work. Everyone’s body temperature is the same, but the amount of heat that an adult and a child study is different. In this case, setting the device to the very minimum is also not a way out of the situation; it will then begin to react to any cat or dog running into the room. This is the disadvantage of infrared models - they will require careful manual adjustment. Another disadvantage of this sensor is that it falsely triggers heating devices operating indoors.
But such a sensor also has a number of advantages:
Learn more about the infrared sensor in this video:
How to connect a three-wire sensor to two wires
Is it possible to connect a 3-wire sensor not in parallel, but instead of a one-key switch? That is, throw it out of the circuit and put it in a phase break as in the very first case, connecting only two wires and without connecting zero?
With some LED bulbs this trick may work. But you will need additional components.
diode VDI 1N4007
capacitor 2.2 microfarads at 400V
The diode is installed between two terminals:
A-output from the sensor
N – zero connection point
The capacitor is soldered parallel to the light bulb. Schematically, it turns out that only the phase will arrive at the sensor. Moreover, it enters contact L and exits from contact N.
The normal output “A” remains empty. Only the diode leg “sits” on it and no more conductors need to be connected here.
This diagram is useful for those who have only a 2-wire cable, and you don’t want to change or redo anything. However, it does not work with all lamps. Models must be selected individually.
Some types may catch fire, but the pulsation coefficient on them will be of such magnitude that it will seriously harm the eyes and vision.
Any other load besides LED lighting (door opening, alarm, incandescent lamps) cannot be switched on using this scheme. It simply won't work.
In addition, the total lighting power for such a connection is no more than 80W.
Motion detection settings
When the question of how to connect a motion sensor with your own hands has been resolved, one more mandatory procedure should be performed. Like any technical device, a motion sensor for lighting requires configuration after installation for maximum effective use.
To set up, manufacturers usually install three control knobs (or levers) on the device body, marked “TIME”, “LUX” and “SENS”.
Each of the regulators is designed to control one of the motion detector parameters:
- “TIME” – regulator of the signal hold duration. Simply put, when connecting a detector to a lighting fixture, this time will indicate how long the light will remain on after the detector is triggered. If before the end of this time another movement is detected by the sensor, then the time begins to count down again. Typically, the regulator allows you to set a range of values from 1 second to 10 minutes;
- “LUX” - regulation of the light level at which the detector will not respond to movement and give a signal. Used to prevent lighting from turning on during the day, especially if a motion sensor for turning on the light is installed for outdoor lighting;
- "SENS" - sensitivity of the device. By adjusting the sensitivity, one achieves a response to the desired impact and inaction with less influence. Thus, a properly configured detector will turn on the light when a person approaches, but will not react to a less massive cat. The distance at which the response occurs also depends on sensitivity. At a high sensitivity level, the percentage of false positives increases.
From everything described, it is easy to conclude that connecting a motion sensor to the indoor lighting system of a private house or apartment is a very effective and convenient way to improve comfort. In addition, introducing such a device into your home can significantly save your budget by reducing the consumption of electricity, which will not be spent on lighting rooms where no one is.
Posting rules
Before you set up the motion sensor, you need to install it correctly. Motion detectors are subject to external influences from magnetic fields, precipitation, winds and ultraviolet radiation.
DD should not be installed near fans, heaters and air conditioners. The field of view should not include moving parts of operating mechanisms. It is necessary to avoid places where there are sources of electromagnetic fields.
When connecting the sensor to a spotlight on a free-standing mast, you must ensure that the detector is equipped with a moisture-proof housing. Such sensors are installed in rooms with high humidity levels: greenhouses, greenhouses, swimming pools, etc.
Important! When externally connecting DDs on the facades of houses, they are mounted under roof overhangs or protective canopies.
Device connection options
There are several ways to connect the sensor.
The second method involves connecting a phase wire connected directly to the sensor, combined with a switch contact, the second from which the circuit on the light bulb is closed, involves connecting a neutral wire. Actually, the only difference between these options is the presence of a switch.