If you need to hang a chandelier weighing several kilograms on the ceiling, then there are usually no difficulties. But when hanging a massive heavy chandelier, work needs to be done by choosing the type of fastener and the correct method of fastening.
The chandelier hangs at a height, is connected to electrical wiring, people pass under it, so the reliability of the fastening must be taken with full responsibility in order to prevent the lamp from falling on someone’s head.
If the lamp weighs less than a kilogram and is an electric socket with a light bulb, then you don’t have to worry about the hanging method and attach the chandelier directly to the electrical wires. I used this method of hanging during the renovation of the apartment since all the lamps were removed from the ceiling. If the chandelier consists of fittings and shades, then it is necessary to install a special mount in the ceiling in the form of a hook or anchor.
Types of chandeliers and features of their fastening
Fasteners for a chandelier are selected based on its type. By type, lamps are divided into ceiling and pendant. The latter are devices attached to the ceiling at some distance using a cord, chain or rod. Such devices are ideal for rooms with high walls. As a rule, they have several shades directed up, down or to the sides. A hook is usually used to secure this type of device.
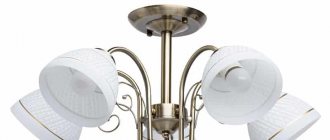
Ceiling chandeliers are designed for rooms with low ceilings. They provide less light, so they are often installed in corridors, bathrooms, and kitchens. The shape can be oval, round, square or rectangular. They consist of a frame plate on which the lampshades are fixed, and a decorative overlay made of glass or plastic. A special strip is used as a fastener for chandeliers of round or oval shapes of different sizes.
How to “drown” a chandelier in a suspended ceiling
Some lamp models have a large base diameter (40-60 cm) and a high side that covers the transformer. Such a chandelier looks more aesthetically pleasing if you “recess” it a little into the ceiling.
For installation you will need a large diameter tread ring to match the size of the base. But such thermal rings are not sold in stores, so you will have to make them yourself. You will need a PVC sheet about 2 cm thick. This is an inexpensive material that is sold in many construction stores. A ring with a diameter slightly larger than the base of the chandelier is cut out of the panel. Then they place the lamp on the ceiling and trace it around with a marker. A homemade ring is glued to this outline. To make it smoother, you can apply the composition not immediately to the entire surface. First, opposite points are glued, then between them, etc.
Note! In this case, you can attach the embedding platform after stretching the canvas, since the hole will be quite large. The installation procedure is the same as in the previous method. But the platform must be located above the ceiling level so that the side of the chandelier is completely hidden behind the canvas.
When the ring is fixed, the film inside is cut out and removed. But not flush with the tread, but leave about 2 cm. Then the inner edge of the canvas is cut, folded inward and glued to the ring. Next, a plank is screwed to the mortgage and a chandelier is attached to it, but the base will be recessed into the plane of the ceiling. Thus, thanks to homemade protection, the PVC film will not be damaged.
Types and methods of fastening
There are several types of chandelier mounting:
- hook;
- bracket;
- plank
Usually, the instructions for the lighting device indicate the appropriate installation method, and in some, everything necessary is supplied in the kit. However, sometimes standard mounting methods are not suitable, for example, when you need to attach a suspended chandelier to a suspended ceiling without a hook.
Installation with ceiling hook
The easiest way to attach a hanging chandelier is to use a special hook. You can carry out installation even without any special skills.
It is important to understand that this method is only suitable for solid foundations: concrete, wood. If the surface of the ceiling is covered with decorative material (plasterboard, plastic panels), you need to dismantle them and install the fasteners directly on the base ceiling.
When installing a lamp weighing up to 4 kg, a simplified technology is allowed: a hole is drilled in the ceiling to fit the dimensions of the fastener, a dowel is driven in, and a threaded hook is screwed in. When working with a wooden ceiling, they do without a dowel - the fasteners are screwed directly into the hole.
For massive products whose weight exceeds 4 kg, more thorough fastening will be required. It is best to use an anchor bolt (butterfly). It is securely fixed to the base, withstanding heavy loads. An anchor is inserted into the drilled hole and tightened until it stops. Fix the lamp and connect the wires. To disguise the fastening, a special bowl cover is put on the hook.
Advice! To prevent the dust generated during drilling from flying into your eyes and scattering around the room, put a plastic or paper cup over the drill.
Installation using a mounting strip
The strip is a type of fastening designed for ceiling lamps. It is a plate fixed to the ceiling using self-tapping screws, onto which the lighting fixture is subsequently mounted.
Installation instructions for the chandelier
We are armed with knowledge about the types of fastening of chandeliers, about how to install them on different types of ceilings, is it time to get to work? We will need:
- Stepladder - how else to do work under the ceiling. Don't have a stepladder? You can get by with a table, but only if the ceiling does not exceed 2.5 meters. Of course, the table must be reliable and strong.
- An electric drill or hammer drill, but they must be powered by a battery, not from the mains - you will turn off the electricity.
- A screwdriver, also battery powered.
- Several different screwdrivers, flat and Phillips, an indicator screwdriver for checking the voltage in the wires.
- A device for measuring electrical voltage, called a multimeter.
- A knife for stripping wires must be sharp.
- Soldering iron and solder.
All consumables and mounting tools are usually included with the chandelier. And you will probably need an assistant to carry tools when you are near the ceiling and hold the chandelier.
And finally, a few more very important recommendations:
- Make all connections and connections in strict accordance with the diagram specified in the instructions for the electrical device.
- Wrap the exposed parts of the wires in several layers of electrical tape.
- Do not use random supports when working: no boxes or crates, this is very dangerous. Only a reliable stepladder with a latitude limiter.
- All tools must be in good working order and not slip out of your hands.
- When drilling holes, be sure to ensure that no wiring is running through there. Use a sound locator for this.
- Pay attention to the switches; if they are not connected correctly, you may get an electric shock when connected.
Hanging a chandelier yourself is difficult, but it is possible. The main thing is to approach this issue responsibly and seriously. Follow the strict sequence of work and follow the instructions. Electrical work is associated with increased danger. Wear goggles over your eyes and rubber gloves on your hands.
Methods for attaching chandeliers to different types of ceilings
The correctly chosen method of installing the lamp allows you not only to firmly fix the device, but also to do it in such a way as not to worsen the appearance of the ceiling. The fasteners included with the chandelier are not always suitable for this purpose: different surfaces have their own characteristics. For example, if a plank is selected as the mounting type for a suspended ceiling, then the base for it must be installed before installing the gypsum board.
Plasterboard ceiling
A plasterboard structure is a suspended ceiling that is located a few cm below the floor slab, making it easy to hide communications in the resulting space. However, when installing a lamp on a plasterboard ceiling, certain difficulties arise. Ideally, all work is performed during the construction of the frame and its cladding.
Limitations when choosing a chandelier
Most often, the canvas for a stretch ceiling is made from PVC film, which does not withstand high temperatures. When heated, the material becomes stained and gradually deteriorates. Therefore, chandeliers with a heated metal base are not suitable.
When installing incandescent lamps, the lampshades must be directed downward, and the distance to the canvas must be at least 20 cm.
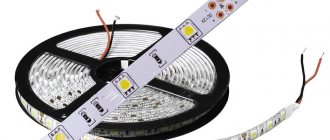
Unlike PVC film, fabric stretch ceilings tolerate temperatures up to +80°C. But in any case, it is better to choose energy-saving or LED lamps; they emit much less heat and last much longer.
The film can be easily damaged by sharp objects. Before purchasing, you need to make sure that there are no protruding edges, casting marks, etc. on the base of the lamp.
If the canvas is glossy, it is recommended to choose closed shades. Otherwise, a lot of glare will be reflected on the surface of the ceiling, unpleasant for the eyes.
There are no restrictions on weight or type of fastening. Any lamps are mounted not on the canvas, but on the base.
Read more: Requirements for chandeliers for suspended ceilings
Connecting electrical wiring
Connecting the chandelier to the electrical network is an important step when installing a ceiling lamp. First of all, you need to determine the types of cables on the ceiling. There can be 2 or 3 of them, most often they differ in color:
- blue – zero;
- red, brown or black – phase;
- green-yellow – grounding.
If the marking is missing or there are doubts about its correctness, do this:
- turn on electricity in the room;
- an indicator screwdriver is applied sequentially to the bare end of each cable - when contacting the zero, the indicator does not light up, but when contacting the phase, it lights up.
From each lampshade of the chandelier there are 2 marked wires (zero, phase). They need to be collected into 2 groups according to type, twisted, and both of these twists should be connected to those on the ceiling. Connect them using terminals.
Electrical wiring: how to avoid getting tangled in wires
The wires are connected according to the instructions that come with the lamp. However, problems often arise at this stage.
Wiring phasing
When checking phasing, you only need to work with one hand; holding the wire even by an insulated section is strictly prohibited! This poses a risk of electric shock. For the same reason, you should not touch the tip of the tester during operation.
It is recommended to carry out phasing while standing on a rubber mat.
To check that the wires are connected correctly, turn off the light at the switch (there is no need to turn off the circuit breaker). Touch the tester tip to the phase conductor; if everything is correct, the light bulb will not light up.
Calling
If you don’t know exactly how the wires run, and you need to make a hole to mount the lamp, then you need to carry out a test. Otherwise, you may damage the cable.
To find the wires, follow this plan:
Then disassemble the structure and begin installation work.
Required Tools
To attach the chandelier to the ceiling you will need:
- a stable chair or stepladder;
- indicator screwdriver;
- insulating tape;
- chandelier fasteners;
- drill or hammer drill with a set of drills;
- hammer;
- screwdriver;
- dowels
Important! Before installing the ceiling lamp, you should turn off the power to the room in which the work will take place. You can make sure that no current is supplied by using an indicator screwdriver (it must be brought close to the wiring).
Pros and cons of main light sources
- Incandescent lamps - the lowest cost is compensated by an unrealistically low efficiency. Most of the absorbed energy simply heats the surrounding area. Therefore, such lamps are limited to a power not exceeding 60 watts. The minimum distance to the ceiling must be at least 25 cm, which is not always technically possible.
- The efficiency of halogen lamps is only slightly higher than that of incandescent lamps. However, the halogen environment allows you to significantly increase the temperature of the coil. The spectrum of these lamps is most identical to ordinary daylight. However, due to the increased temperature of the flask, the power limit is 35 watts.
- Energy-saving lamps have a relatively high efficiency and heat up quite slightly. All heating occurs mainly under the influence of the power converter. Restrictions relate to high room humidity, since dampness negatively affects the operation of the power converter. Insignificant heat generation allows such lamps to be installed as close to the ceiling surface as possible.
- The best option is chandeliers with LED lamps. They have maximum efficiency, minimal heat generation and a huge life cycle, regardless of switching on and off. Beam direction does not require reflectors. The only limitation is to remove the power supply from under the suspended ceiling to avoid overheating and failure.
Useful tips from experts
To create high-quality indoor lighting and avoid installation errors, it is worth studying the recommendations of electricians:
- The location where the lamp will be located should be determined during the renovation work. This way you can route the wiring to the desired area, and you won’t have to extend the cable if it’s not long enough.
- Before installation, it is advisable to remove lampshades and other decorative elements from the device: the weight of the chandelier will decrease, it will be easier to work, and fragile parts will not be damaged.
- Be sure to study the information in the technical data sheet of the device - it indicates the weight, type of chandelier mounting, and other useful information.
- All work must be carried out after turning off the electricity supply.
Choosing a suitable chandelier mount and installing the lamp yourself is a completely feasible task. The main thing is to approach the process competently, study the recommendations of the lighting device manufacturer in the data sheet and take into account the type of ceiling. It is very important to follow safety precautions when connecting wires.
Did you manage to solve your problem using the recommendations from the article?
Yes!
46.39%
No. More answers required. I'll ask in the comments now.
38.56%
Partially. There are still questions. I'll write in the comments now.
15.05%
Voted: 804
Basic methods
First, let's figure out what options there are for installation on the ceiling. Today there are two types of fasteners:
- Hook - used for old-style chandeliers, as well as very heavy lamps
- A mounting strip or bracket is a modern fastener that is used for light chandeliers and lamps
The specified types of fastening involve working with a concrete slab. Therefore, you cannot do without special tools. Next - details on how to attach a chandelier using the above methods.
Mandatory preparatory activities
In order to cope with the task and do everything correctly, you need to prepare the tools so that during the process of installing the chandelier on the ceiling nothing distracts the master:
- you need a stepladder of sufficient height (you can get by with a table);
- hand-held electric drill or hammer drill;
- pliers and wire cutters or side cutters (from electric shock, handles must be insulated);
- various screwdrivers (including with indicator function);
- a roll of electrical tape;
- several mounting blocks (with a reserve) for wire clamps;
- the necessary fasteners on which the chandelier will be installed on the ceiling.
Before fixing the ceiling chandelier, be sure to read the instructions for connecting it to the electrical network. Usually it gives a detailed description of all operations, so a master who knows a little about electricity should not have any particular difficulties.