In household networks, various devices are used to illuminate rooms: spotlights, chandeliers, LED strips. Most lighting devices are connected to the electrical network with two wires, but there are also those whose connection causes some difficulties for ordinary people and novice electricians.
The most striking example is a ceiling lamp with five shades, called a five-arm lamp, in which instead of two wires there are ten at once. To simplify the installation process, a connection diagram for a five-arm chandelier in two variations will be given below.
Example of a five-arm chandelier
Preparatory work
The number of shades in a chandelier determines not only the glow points, but also the number of leads from them; each bulb in horn chandeliers has two leads. It's good if they are already connected to the socket, otherwise the leads are simply inserted into the corresponding guides, but not connected to anything.
In this case, it is necessary to test each connection for the presence of a circuit using a multimeter. If the measuring device shows the presence of a connection, then you can proceed to the next step, otherwise you need to remove the lampshade and connect the wires to the socket contacts.
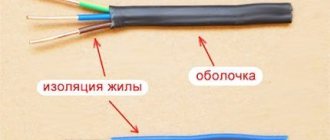
The leads in the chandelier are connected to one point from each horn. The blue wires are connected to the common node of the electrical circuit - this will be the zero terminal. The brown or red wires are connected into a node for connection to the phase conductor. The color marking of the wires may vary significantly depending on the manufacturer. The number of phase nodes will depend on the electrical circuit through which the lighting device is connected.
Chandelier repair
Having de-energized the electrical wiring in the apartment, I disconnected the chandelier wires from the terminal block and removed it from the ceiling hook. The disconnected lampshades immediately made it possible to see the unsightly state of the electric cartridges. The edges were deformed and partially crumbled. This prompted a complete disassembly of the lighting fixture.
Disassembling an indoor chandelier
These electric sockets are made of plastic and are clearly not intended for the “hundredth” lamps that they liked to screw into them. The insulation of the wires closer to the points of their connection with the cartridge turned into a hard crust on top of the wires and cracked. The central contacts inside the cartridges, which initially were not of high quality, burned and “crushed” - they lost any elasticity.
5 lamp sockets
The replacement cartridges, although not ceramic, looked much better than the previous ones. The outer diameter is 40 mm instead of 36 mm, which indicates an increase in wall thickness. The internal metal contacts are also of sufficient thickness and even with a special coating. In such a situation, if you are not a professional in repairing chandeliers, when selecting a replacement, as funny as it may seem, you need to go to the electrical goods store with the horn disconnected and the lampshade from it, this is the easiest and most reliable way to “not miss” pairing new ones structural elements with old ones.
Plastic socket for chandelier
The new electric cartridges have new wires and everything in supporting structures, which are assembled together by fastening to a common central element. Before connecting the wires inside the chandelier, I figured out the wires hanging from the ceiling and to which the chandelier should be connected, a screwdriver helped with this - an indicator after applying the mains voltage. Black wire “0”, gray phase No. 1, yellow-green “ground”, blue phase No. 2.
Useful: Microwave motion sensor: circuit and connection to Arduino
Wire connections and adapter
Connection to a single-key switch
This option for connecting a chandelier is suitable in situations where you need to ensure maximum luminous flux during the entire period of operation of the lighting equipment.
To do this you will need:
- directly the chandelier itself;
- single-key switch;
- connecting wires for extending neutral and phase conductors;
- screwdriver and soldering iron for installation work.
An example circuit is shown in the figure below:
Connection to a single-key switch
As you can see, in this connection diagram the neutral wires need to be connected together and brought to the corresponding terminal on the ceiling. The common point of the phase wires is connected to a single-key switch to break the circuit.
It should be noted that when connecting all components of the circuit, you must use soldering, a terminal or bolted connection; twisting is never allowed - this is a rather dangerous contact, since over time it will weaken and lead to heating.
The disadvantage of this connection scheme is that there is only one operating mode - with a rated load. A chandelier power supply circuit from a double switch will help solve this problem.
How best to connect the wires
As a rule, electricity does not forgive mistakes, even small ones, sooner or later, but the results will not keep you waiting long. Basically, the problems relate to poor-quality connections of wires, both in the process of forming groups and in the process of connecting them to electrical wiring.
A bad twist will always make itself felt after some time, since the contact is broken and begins to heat up. Based on the latest requirements, when connecting a chandelier to electrical wires, it is undesirable to make twists, although high-quality twisting is not inferior in reliability to terminal connections. Most chandeliers produced nowadays are equipped with similar terminals, moreover, they can be purchased in any department of a hardware store that sells components for electrical wiring.
You need to connect the wires from the chandelier and the switch in the terminal box
Often problems arise due to the fact that a twist of several wires does not fit into the hole. In this case, there is a way out: a conductor no more than 10 cm long is soldered to the twist. If we talk about modern chandeliers, they use a fairly thin wire, so a twist of even 5 wires easily fits into the hole in the clamps.
After the groups (twists) are formed, they are inserted into the terminal block and securely clamped with screws. After this, they begin to connect the chandelier on the ceiling, performing a similar operation with the wires. They are also inserted into the terminal block and securely fixed with the same screws. The most important thing is to correctly connect the neutral and phase groups.
In the video you can familiarize yourself in detail with the process of forming groups of many wires, as well as with their correct connection to the terminal block.
How to connect a chandelier. How to connect wires. Installation in Kyiv 0974288408
Connection to a two-key switch
In this chandelier connection diagram, the lamps are turned on in groups, each of which is connected to the corresponding contacts of a two-key switch. This method is shown schematically in the figure below:
Connection to a two-key switch
As you can see, all the lamps in the chandelier are divided into two groups - with 2 and 3 bulbs, respectively. So if you need to turn on the dim light, press the switch key for the 2nd group.
If you want to make it a little brighter, press the button for the 1st group, and the entire two-key switch will produce the maximum luminous flux.
When using this diagram, the following features of connecting the chandelier should be taken into account:
- Electrical wiring must be provided with two phase conductors and one neutral conductor. Therefore, for laying and connecting ceiling wiring, it is better to take an electrical cable with three or four wires.
- The wiring to the electrical socket should be connected by crimping, soldering or clamping to ensure reliable contact connections.
- The switch is selected only as a switching device; there should not be any voltage division functions. Depending on the type of wire fixation, there are models with a screw or a clamp; the second option is simpler for ordinary people.
Connecting a two-gang switch
Video on the topic
We have selected a video with which you can correctly connect a chandelier to a double switch for 5 bulbs.
In the final part of the review, we note that each of the considered methods of switching on lighting fixtures with a different number of lamps assumes a certain level of total illumination for a given room. The number of simultaneously switched on light sources depends on the usable area and volume.
Please click on one of the buttons to find out if the article helped or not.
Safety precautions when connecting a five-arm chandelier
When performing installation work, do not forget about your own safety.
To prevent a threat to your life and health, follow these simple rules:
- When laying and connecting wiring, installing and connecting a chandelier and switch, be sure to remove the voltage from the power supply. To do this, turn off the circuit breaker on the panel; it is better to break the circuit for both the phase and neutral wires.
- Before making the connection, check that there is no voltage in the network; it may happen that the disconnected machine does not operate with power to the line you need or there is a zero in the gap. To check, you can use a multimeter or an indicator screwdriver.
- To power the chandelier, always use the phase at the connection stage; if you put the neutral terminal in the gap, a person may come under mains voltage when trying to replace the light bulb.
- If you are going to drill holes to attach the chandelier to the ceiling, use glasses to protect your eyes from dust. This operation should be performed without voltage in the lighting line.
- The metal body of the chandelier should be connected to a protective ground. Due to this, in the event of damage to the insulation between the current-carrying elements and the housing, the current will flow to the ground terminal and circuit.
- When testing the chandelier for the first time, protect your eyes from glass in case the glass lamps break. The easiest way is to turn away or wear safety glasses.
How to connect (hook up) a single switch: installation work
For the convenience of installation work, use a special tool, with which you will not only quickly but also easily cope with the work.
Installation features:
- Cabling;
- Installation and connections of the switch.
Provided that the cable has already been laid, this makes the work easier, since there is no need to waste time on it. But if there is no cable, then it must be laid. To do this, a groove is made in the wall from the junction box. The depth of the groove should be sufficient for laying the cable.
Note! Before making the groove, you should use a hammer drill to drill a niche for installing the socket box.
After the niche for the distribution box is made, we install a socket box into it. First we thread the cable into it. Installation can be done using dowels with self-tapping screws or alabaster.
Next, we strip the wire to connect to the switch. It is important to understand that in order to connect a single switch, a double wire of a certain cross-section is sufficient.
Next, we disassemble the switch. Using a flat-head screwdriver, remove the keys and unscrew the front panel. Then we connect one of the wires to the switch contact and tighten it with a screwdriver. Next we connect the second one.
After this, we install the switch in the socket box and screw it using fastening screws. After that, in the junction box, we connect one of the wires going to the switch to the supply phase, and the other one to the wire going to the lighting device. Apply voltage and check the functionality of the device.
All about connection
When connected to a single rocker switch, the connection is very simple. We have two wires going to the chandelier - phase and neutral, and there are two wires in each horn. We connect all the blue wires of the horns (1,2,3,4,5) to the blue lead wire (6), which goes through the body. We connect all the brown wires of the horns (1,2,3,4,5) to the brown lead wire (7). Let's isolate these two connections separately. There is no blue (8) wire with a single key switch (this is precisely the additional wire that we inserted).
When connecting to a two-key switch, we divide the horns into groups. You can break it any way you want. The best option is when the chandelier has an even number of arms. Then even horns are 1st group, odd horns are 2nd group. For example, a chandelier has 6 bulbs, then 1,3,5 bulbs are group 1, 2,4,6 bulbs are group 2. Everything will glow very beautifully and symmetrically.
Since I had an odd number of horns, I made 2 groups like this: 1,3 horn - 1 group, 2,4,5 horn - 2 group. Thus, I separately use one switch key to turn on light bulbs 1 and 3, and use the second switch key to turn on light bulbs 2, 4, and 5. When two keys are turned on, the lamps of the entire chandelier light up simultaneously.
The general principle of connection is this: in order for the light bulb to light up, a phase and a zero (2 different wires) must match it. When connected to a two-key switch, we have 4 wires coming out of the ceiling: grounding (yellow-green wire), one wire (8) is “zero”, the other two (6,7) are “phases”. “Zero” (8 blue wire) always remains common and all “zero” wires of all horns are connected to it into one connection. To one “phase” (for example, wire 6) we connect the phase wires of the lamps of the first group. To the second phase (wire 7) we connect the phase wires of the lamps of the second group. “Phases” are interrupted by a switch, namely: one “phase” (wire 6) is turned off with one key, the second “phase” (wire 7) is turned off with a second button. The switch is off - there are no phases, the lamp does not light. We turn on one key - a phase appears on one wire (6) - the bulbs of the first group light up, turn on the second key - a phase appears on the second wire (7) - the bulbs of the second group light up.