What is Arduino?
Arduino is a company that develops devices and programs for robotics and more. In fact, the company began in 2003, when Hernando Barragan created the first version of the Arduino Wiring platform as part of his educational work.
Wiring is a C/C++ programming language library. This "extension" is designed to work with Arduino boards. The Arduino IDE is used to transfer code to our board . This is where the program is written.
Arduino IDE development environment
Variables
A variable is an SRAM memory cell that has its own unique name and stores numbers according to its size. We can access a variable by its name and get the value, or change it. The power of two continues to haunt us, because the volume of one memory cell in the microcontroller is also a multiple of it:
- 1 byte = 8 bits = 256
- 2 bytes = 16 bits = 65,536
- 4 bytes = 32 bits = 4,294,967,296
Yes, more than four bytes will no longer fit into an Arduino (more precisely, an AVR To work with different ranges of values, different types of data (variables) are used. Essentially, you can use 4 bytes to store anything, but this is not optimal. It's like knowing that you will need to carry a maximum of 200 ml of water (less than 1 byte), but you still take a 19 liter bottle (2 bytes). Or a railway tank for 120 tons (4 bytes). If you want to write beautiful and optimal code, use appropriate data types. By the way, here they are:
Data types
| Name | Alto. Name | Weight | Range | Peculiarity |
| boolean | bool | 1 byte | 0 or 1, true or false | Boolean variable. bool on Arduino also takes 1 byte, not a bit! |
| char | — | 1 byte | -128… 127 | Stores the number of a character from the ASCII character table |
| — | int8_t | 1 byte | -128… 127 | Integer type |
| byte | uint8_t | 1 byte | 0… 255 | Integer type |
| int | int16_t, short | 2 bytes | -32 768… 32 767 | Integer type |
| unsigned int | uint16_t, word | 2 bytes | 0… 65 535 | Integer type |
| long | int32_t | 4 bytes | -2 147 483 648… 2 147 483 647 | Integer type |
| unsigned long | uint32_t | 4 bytes | 0… 4 294 967 295 | Integer type |
| float | — | 4 bytes | -3.4028235E+38… 3.4028235E+38 | Stores floating point numbers (decimal fractions). Accuracy: 6-7 characters |
| double | — | 4 bytes | For AVR it is the same as float. And so it is 8 bytes on older hardware | |
| — | int64_t | 8 bytes | -(2^64)/2… (2^64)/2-1 | *Very large numbers. Standard Serial cannot output such things |
| — | uint64_t | 8 bytes | 2^64-1 | *Very large numbers. Standard Serial cannot output such things |
*I haven’t seen any mention of this in official sources, but Arduino (more precisely, the compiler) also supports 64-bit numbers, respectively, the int64_t and uint64_t data types. The maximum size of all data types is stored in constants, and it can be used in the code as needed:
- UINT8_MAX – will return 255
- INT8_MAX – will return 127
- UINT16_MAX – will return 65,535
- INT16_MAX – will return 32,767
- UINT32_MAX – will return 4,294,967,295
- INT32_MAX – will return 2,147,483,647
- UINT64_MAX – will return 18,446,744,073,709,551,615
- INT64_MAX – will return 9,223,372,036,854,775,807
In addition to integer types (byte, int, long), there are more interesting ones:
- bool (boolean) is a logical data type that accepts the values 0 and 1, or true and false. Essentially behaves like a bit, but takes up 8 bits. What injustice! There are several ways to store boolean variables so that they occupy 1 byte, but we'll talk about that later. Also does a boolean variable evaluate to true if you assign a value to it? different from zero , that is, boolean a = 50; a will be true, and boolean b = -20; will also be true! Example: boolean flag = true;
- char is a character data type, in numerical equivalent it takes values from -128 to 127. In the case of char, these values are character codes in the standard ASCII character table. Can accept and store data in character format (a letter or symbol within single quotes), for example char var = 'a';
- float – floating point data type (eng. float – floating), i.e. decimal. float var = 3.1415;
There are several more non-standard types that are sometimes found in other people's code:
- size_t is a “synonym” for uint16_t, designed to display the size of an object in bytes. For example, this type is returned by the sizeof() function and some others.
- Extended char: char16_t, char32_t and wchar_t. Needed to store large character data for alphabets of different countries, not just English.
Declaring and initializing variables
Declaring a variable – reserving a name for data of a specified type. Initialization is the assignment of an initial value to a variable using the = operator.
- data_type name; // announcement
- data_type name = value; // declaration and initialization
- You can also declare and initialize several variables separated by commas: int a = 0, b, c = 10;
byte myVal;
int sensorRead = 10; byte val1, val2, val3 = 10; Important points:
- The variable must be declared before calling itself, literally located higher in the code . Otherwise you will receive an error “variable not declared” – Not declared in this scope
- Global and static variables have a default value of 0 when declared, even if not initialized
- Local variables (created inside functions during program operation) can have a random value when declared, because allocated from dynamic memory (may have the last value of a local variable from another function and so on). It is highly recommended to initialize them if they are expected to have a null value in further code.
void setup() { Serial.begin(9600); } int valG; // global, 0 void loop() { static int valS; // static, 0 int valL; // local, can have any value }
Type Conversion
Sometimes you need to convert one data type to another: for example, a function accepts an int, but you want to pass a byte to it. In most cases, the compiler will figure it out on its own and convert byte to int, but sometimes an error like “an attempt to pass a byte to where an int is expected” appears. In this case, you can convert the data type; to do this, just indicate the desired data type in parentheses before the variable to be converted (data_type) variable; sometimes you can see the entry data_type (variable). The result will return a variable with a new data type, but the data type of the variable itself will not change (works within one action). For example:
// variable of type byte byte val = 10; // pass to some function that expects int sendVal( (int)val );
That's all! (int)val will be treated as an int rather than a byte.
Convert _cast (Pro)
Sometimes you can see type conversion using the cast operator. You can look at an excellent article on Habré, and I will briefly describe the 4 main castes:
- reinterpret_cast – type casting without checking, direct instruction to the compiler. It is used only if the programmer is completely confident in his own actions. Does not remove const and volatile, used to convert a pointer to a pointer, a pointer to an integer and vice versa;
- static_cast – Converts expressions of one static type to objects and values of another static type. Conversion of numeric types, pointers, and references up and down the inheritance hierarchy is supported. The conversion is checked at the compilation level and in case of a type conversion error a message will be issued;
- dynamic_cast – used for dynamic type casting at runtime. In the case of an incorrect type cast for references, a std::bad_cast exception will be thrown, and 0 will be returned for pointers;
- const_cast is the simplest type cast. Removes const and volatile, that is, constancy and refusal to optimize the variable by the compiler. This conversion is checked at the compilation level and if a type conversion error occurs, a message will be issued.
How to use: using the previous example
// variable of type byte byte val = 10; // pass to some function that expects int sendVal( static_cast(val) );
Installing Arduino IDE
To use the Arduino IDE, you can install the program on your computer or use the online version of the program (registration required). Let's look at how to install the program on Windows 8/10.
- Go to the official Arduino website. In the Download section, select the required operating system.
- We get to a page with the opportunity to donate money for the further development of Arduino. Click on the “Just download” button to install the program without donations.
3. We are sent to the Microsoft Store website, where we click “Get.”
The program is installed and ready to use.
Connecting libraries and files
In real work, you will very often use libraries or simply external files; they are connected to the main file (firmware file) using the #include directive, this directive tells the preprocessor to find and include the specified file in the compilation. The specified file may drag along other files, but everything is already registered there and is connected automatically. Let's look at an example:
#include // includes the Servo.h library #include “Servo.h” // also includes the Servo.h library
What is the difference between <> and ""? When we specify the name “in quotes,” the compiler first looks for the file in the folder with the sketch, and then in the folder with libraries. When using <checkmarks>, the compiler looks for the file only in the library folder! Speaking of folders with libraries: there are two of them, both of which will be used to search for libraries.
- My Documents/Arduino/libraries
- C:/Program Files (x86)/Arduino/libraries (or C:/Program Files/Arduino/libraries for 32-bit Windows)
Libraries go to the first folder (in documents) when they are connected using the “connect .zip library” command. It is not recommended to connect libraries in this way, because the library does not always come to you in an archive, and it will be easier to copy it manually to Program files. Also, if both folders contain libraries with the same name, this will lead to a conflict, so we simply copy the libraries to the libraries folder in Program files/Arduino.
Important note: the library folder, located in C:/Program Files (x86)/Arduino/libraries, must contain the library files and folders, and not just one folder with the same name as the library itself. This will result in an error; the collector will not be able to find the files!
Arduino IDE Hotkeys
To simplify work, the Arduino IDE uses “hot keys” or hotkeys , from the English hotkeys, which in translation means “hot keys”. These are combinations of keys on the keyboard that perform various actions in the operating system and programs. All commands are available through the “File” menu, but working through hotkeys is much faster.
Let's look at the hotkeys and their purpose.
Edit
| Ctrl+Z | canceling one operation |
| Ctrl+Y | return one canceled operation |
| Ctrl+F | search by code |
| Atrl+A | highlighting all code |
| Ctrl+P | print tab contents |
| Ctrl+X | cut the highlighted code |
| Ctrl+C | copy highlighted code |
| Ctrl+V | paste highlighted code |
Compilation and loading
| Ctrl+R | sketch compilation |
| Ctrl+U | upload sketch |
| Ctrl+Shift+U | upload the sketch using the programmer |
Saving and working with tabs
| Ctrl+S | save current sketch |
| Ctrl+Shift+S | save the current sketch with a choice of the name of the saved file |
| Ctrl+W | close current tab |
| Ctrl+Shift+N | new inset |
| Ctrl+Alt+Right Arrow | switch to the tab to the right of the active one |
| Ctrl+Alt+Left Arrow | switch to the tab to the left of the active one |
Other
| Ctrl+N | open a new editor window |
| Ctrl+O | open an existing sketch file |
| Ctrl+Slash ( / or Russian dot) | commenting out a line |
| Ctrl+K | open folder with sketches |
| Ctrl+T | auto-formatting code |
| Ctrl+Shift+M | port monitor |
| Ctrl+, (Russian letter B) | Arduino IDE settings page. |
Decor
Formatting
There is such a thing as formatting (alignment) of code, that is, maintaining spaces and intervals. Just for the sake of example, compare these two pieces of code. Which one looks more clear and visual?
Don't be afraid, all serious development environments have code autoformatting, it works both as you write and on call. Arduino IDE is no exception; it formats code using the hot combination Ctrl+T
- a space between mathematical operations, comparison signs, assignment signs and the like.
- As in regular text, a space is placed after and not before a comma, colon, or semicolon.
- The indentation from the left edge of the screen is a tab sign, the code is shifted to the right and commands from one block of code are formed at the same distance. In the Arduino IDE, one tab is equal to two spaces. You can use the Tab
- Each action is performed on a new line (autoformatting does not fix this)
- The curly braces at the beginning and end of a block of code are usually written on a separate line. Also, many people write an opening bracket on the line with the operator, this saves the line and does not bloat the code in height
- It is customary to write the names of variables starting with a small letter, to name them so that they are clear. Yes, it would be nice to improve my English! Example: value
- If the variable name consists of two or more words, they are separated by upper case of the first letter of each new word, or the words are separated by an underscore. Example: myButtonState, button_flag
- It is customary to capitalize the names of data types and classes. Example: Signal, Servo
- Constant names are usually written in upper case, separated by underscore. Example: MOTOR_SPEED
- When writing libraries and classes, it is customary to write the names of internal (private) variables starting with an underscore. Example: _position
- Several common abbreviations for variable names, you will often see them in other people's firmware and libraries: button - btn, button. I usually shorten the button to butt (from English - zhop@), because I'm funny
- index – idx – i, index
- buffer – buf, buffer
- value – val, value
- variable – var, variable
- pointer – ptr, pointer
- get – get value (getValue)
Program template. setup() and loop() functions
Comments
It is customary to include some comments at the beginning of the program. Here the author of the code can write about himself, about the program and its purpose. To indicate a comment at the beginning of a line, write 2 characters “//”, for example:
// The file “matrixb.h” contains the definition of the Matrix_B class, the implementation // of its methods in the program “program2.vcproj” // The Matrix_B class is the base class for the Matrix_D class // Program creator: Ivan Ivanovich Ivanov, 7a // Version 1.0 from 14.02 .14
Program template
The program itself resembles a home. Our “house” consists of 2 parts:
- The setup() function acts as the “foundation of the house.”
- The loop() function resembles the living part of a house: the program itself “lives” here.
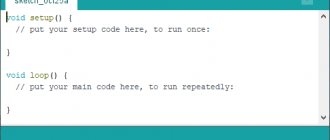
Let's launch the Arduino IDE and write a program template:
void setup() { } void loop() { }
After setup and loop, the brackets () are written without a space. There is no space inside the brackets. The functions themselves are written in small letters. Curly braces are placed one below the other on the following lines after the function name.
If you wrote everything correctly, your function will become a different color.
Let's take a closer look at the purpose of each function.
setup() function
The setup() function is preparation. This is the first function performed by the program. It is performed only once, immediately after turning on the board or restarting it with the reset button. setup() is used to introduce new functions, configure board PINs, and create variables. The function must be included in the program even if there is no content in it.
loop() function
After the setup() function, control passes to the loop() function. Translated from English, “loop” is a loop. The function does exactly what its name means - it is continually re-executed. It allows the program to change something, return data and control the Arduino board.
Code structure
Before we get into the structure and order of the code parts, there are a few things to remember:
- A variable of any type must be called after its declaration. Otherwise there will be an error
- Declaring and using classes or data types from a library/file should be after including the library/file
- The function can be called both before and after the declaration, because C++ is a compiled language, compilation takes place in several stages, and functions are “allocated” separately, so they can be called anywhere in the program
When we start, the Arduino IDE gives us a template in the form of two required functions: setup and loop
The code in the setup() block is executed once every time the microcontroller is started. The code in the loop() block is executed “in a circle” throughout the operation of the microcontroller, starting from the moment setup() completes. For the curious : if you are already familiar with the C++ language, you will probably ask “where is int main() and the main.cpp ?” Everything is very simple: int main() has already been written for you inside the main.cpp file, which lies deep in the “kernel” files, and setup() and loop() are built into it as follows:
// main.cpp // somewhere in the depths of the Arduino core int main() { setup(); for (;;) { loop(); } return 0; }
Over the course of several years of working with Arduino, I formed the following sketch :
- Firmware description, useful links, notes, authorship
- Tuning constants (define and regular)
- Service constants (which should only be changed with full knowledge of the matter)
- Connected libraries and external files, declaration of corresponding data types and classes
- Global Variables
- setup()
- loop()
- Its functions
Example code
/* This sketch smoothly rotates the servo back and forth between min. and max. corners by AlexGyver */ // ——— SETTINGS ——— #define SERVO_PIN 13 // servo is connected here #define SERVO_SPEED 3 // servo speed #define MIN_ANGLE 50 // min. angle #define MAX_ANGLE 120 // max. corner // ——- LIBRARIES ——- #include Servo myservo; // ——- VARIABLES ——- uint32_t servoTimer; boolean servoDirection; int servoAngle; // ——— SETUP ———- void setup() { myservo.attach(SERVO_PIN); } // ———- LOOP ———- void loop() { turnServo(); } // ——— FUNCTIONS ——— void turnServo() { if (millis() — servoTimer >= 50) { // every 50 ms servoTimer = millis(); if (servoDirection) { servoAngle += SERVO_SPEED; if (servoAngle >= MAX_ANGLE) { servoAngle = MAX_ANGLE; servoDirection = false; } } else { servoAngle -= SERVO_SPEED; if (servoAngle <= MIN_ANGLE) { servoAngle = MIN_ANGLE; servoDirection = true; } } myservo.write(servoAngle); } }
This is a convenient structure for a “sketch”; large projects are not recommended to be written this way and you should accustom yourself to the more mature approaches described in the lesson on developing large projects.
Namespace (Pro)
Namespace is a very convenient feature of the language, with its help you can separate functions or variables with the same names from each other, that is, protect your dataset of tools from name conflicts with other names. A “namespace” is defined using the namespace operator:
namespace mySpace { // functions or data };
To use content from a namespace, you need to access it via its name and the scope resolution operator ::
mySpace::function_name
More detailed example:
namespace example
namespace mySpace { byte val; void printKek() { Serial.println("kek"); } }; void setup() { Serial.begin(9600); // printKek(); // will result in an error mySpace::printKek(); }
There is also a using statement, which allows you not to use the namespace every time. For example, in a separate file we have a namespace with different functions. To avoid writing a namespace shortcut with :: in the main program file every time, you can write using namespace_name;
And below in the code it will be possible to use the contents of the namespace without accessing it through the name::
Servo Library
The library allows you to control servos. Supports up to 24 servos on any available GPIO. By default, the first 12 servos will use Timer0 and will be independent of any other processes. The next 12 servos will use Timer1 and will share resources with other functions using Timer1. Most servos will work with the ESP8266's 3.3V control signal, but will not operate at 3.3V and will require a separate power supply. Don't forget to connect the GND common wire of this source to the GND ESP8266
Other libraries not included with the Arduino IDE
Almost all libraries that do not use low-level access to registers of the AVR microprocessor should work without any modifications. Today we can say for sure that the following libraries have been tested and are fully functional:
- arduinoWebSockets - WebSocket server and client for esp8266 (RFC6455)
- aREST REST API handler library allows you to manage GPIO via http requests like https://192.168.1.101/digital/6/1
- Blynk is an easy-to-learn IoT framework (Kickstarter page). An article on our website about this library and the ESP8266 mobile application - Controlled from a smartphone via Blynk
- DallasTemperature DS18B20, DS1820, DS18S20, DS1822
- DHT11 - use the following parameters for initialization DHT dht(DHTPIN, DHTTYPE, 15)
- NeoPixelBus - Arduino NeoPixel library for esp8266
- PubSubClient MQTT Library by @Imroy. An article on our website about this ESP8266 library: connect to OpenWRT+Mosquitto+mqttwarn and transfer data to ThingSpeak, EMAIL, Android, iOS, Twitter, CloudMQTT in 100 lines of code in Arduino IDE
- RTC - library for Ds1307 & Ds3231 for esp8266
- Souliss, Smart Home - framework for Smart Home, built on Arduino, Android and OpenHAB
Basics
A few formal things, that is, those that everyone knows about, but sometimes forget...
In the Arduino IDE, as in C/C++, you need to be aware of character cases. Keywords such as if, for are always written in lowercase. Each instruction ends with ";". The semicolon tells the compiler which part to interpret as an instruction.
Brackets {..} are used to denote program blocks. We use them to constrain function bodies (see below), loops, and conditional statements.
It is a good practice to add comments to the program content, this makes the code easy to understand. Single-line comments begin with // (double slash). Multiline comments start with /* and end with */
If we want to include any library in our program, we use the include command. Here are examples of connecting libraries:
Laboratory power supply 30 V / 10 A
More details
#include // standard library #include “svoya_biblioteka.h” // library in the project directory
Transfers (Pro)
Enumerations (enum - enumeration) - a data type, which is a set of named constants, is needed primarily for the convenience of the programmer. Just an example from experience: let’s say we have a mode that is responsible for the number of the device’s operating mode. We remember for ourselves which value of the variable which mode will correspond to, and write it down somewhere, for example, 0 – normal mode, 1 – standby mode, 2 – setup_1 mode, 3 – setup_2 mode, 4 – calibration, 5 – emergency mode, error. When writing or reading a program, you will often need to refer to this list so as not to get confused. You can take the first step towards optimization: name each mode using a definition:
#define NORMAL 0 #define WAITING 1 #define SETTINGS_1 2 #define SETTINGS_2 3 #define CALIBRATION 4 #define ERROR_MODE 5
This way, instead of numbers, you can use understandable words and it will be much easier to navigate the code. Using enum simplifies this construction a little more: an enumeration allows you to create a variable (by default of type int) that can only accept the “names” that are specified for it. This is convenient because one program can contain different mode keepers with the same names, and unlike #define, this will not lead to errors. Declaring an enum is somewhat similar to declaring a structure:
enum label {name1, name2, name3, name4, name5};
This is how we declared the shortcut. Now, using this shortcut, you can declare the enum itself:
label enum_name;
Just like with structures, you can declare an enumeration without creating a label (why do we need an extra line?):
enum {name1, name2, name3, name4, name5} enum name;
The enumeration created in this way is a variable that can take the names specified for it, and it can also be compared . Now comes the most important part: the names for the program are numbers, starting with 0 and then increasing in order by 1. In the abstract example above, name1 is 0, name2 is 1, name3 is 2, and so on. In addition to the indicated names, a number can also be directly equated to an enumeration, but why would that be necessary? Let's look at an example!
Great example with enumerations
// create an enumeration modes // without creating a label enum { NORMAL, WAITING, SETTINGS_1, SETTINGS_2, CALIBRATION, ERROR_MODE, } modes; void setup() { Serial.begin(9600); // for debugging modes = CALIBRATION; // assigning a value // we can compare if (modes == CALIBRATION) { Serial.println("calibr"); } else if (modes == ERROR_MODE) { Serial.println("error"); } // assign a number modes = 3; // in our order it will be SETTINGS_2 }
You can also change the auto-numbering order of enumerations by setting the initial value. From it, everything will continue to change by one: enum {SET1 = 1, SET2, SET3, SET4, SET5} settings;
So SET1 has the value 1, SET2 will have the value 2 and so on in order.