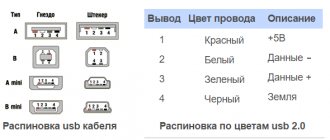
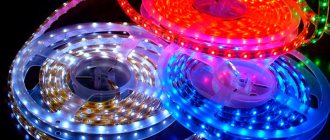
Some people, having heard all sorts of horrors about power supplies, controllers, dimmers and other additional devices, refuse to purchase an LED lamp at all. The reason for this is the “increased” price tag. If only they knew about the 220 V LED strip. This is a special device that does not require a power supply to convert the power to the required level. The device is powered from a full mains voltage of 220 Volts. A controller is also not needed for this device if the owner does not need to adjust the brightness and color program. The colors are switched using a button on the rectifier, which makes using the LED strip much easier.
Types of LED strips for 220 V.
The modern market of LED devices offers 2 types of 220 V LED strip:
- With rectifier;
The rectifier is built into the LED strip itself.
- without rectifier.
It is connected separately.
Both options are divided into lengths that are multiples of 50 centimeters or 1 meter. This rule occurs due to one production feature: there are 60 LEDs on each section of the device. Therefore, it is impossible to cut off 25 centimeters or 2.3 meters, respectively, 30 and about 270 LEDs.
LED strip for lighting: design and performance characteristics
Proper operation of LEDs depends on the design of the light source and its power supply. The first part of the article is devoted to the analysis of these issues.
What types of LED strips are there: what is important for every master to know
The basic composition of the structure is polyamide plastic with a substrate thickness of about 0.2 mm with dielectric breakdown characteristics of the insulation layer of about 7 kV/mm.
LED strip lighting is available in various lengths, and its width is only 10 or 20 millimeters. An electrical circuit is mounted on it:
- LEDs;
- buses and current supply circuits;
- current limiting resistors;
- contact pads.
The electrical circuit is based on separate sections of LEDs and resistors, to which a voltage of 12 or 24 volts is supplied via current-carrying busbars.
At the edges of each section there are oblong contact pads. Wires are soldered on them and a long structure is cut along them into short sections required by installation conditions. It cannot be cut in any other places.
The number of LEDs and the density of their arrangement at the same lengths are different. To create a monochrome white glow, current is supplied through two lines of positive and negative potentials.
Monochrome white color is most often used for additional lighting of rooms.
Four-channel buses are placed on RGB strips to create color effects. Through them, positive potential is supplied to the channels of the red, green, blue glow, and negative potential is supplied to the general, earthly one.
The color effects of RGB tapes are used for decorative purposes.
The external design of LED strips for white lighting and RGB backlighting is approximately the same. I show them in the photo below. Compare.
The simplest monochrome lighting circuit can be represented by connecting a resistor and LEDs in series at a voltage of 12 volts.
LED strip marking: how to communicate with the seller
Modern industry produces LEDs for lighting using old, proven technology and new, improved technology.
In both cases, the letter designation SMD (surface mount equipment) is used for marking, as well as the dimensions of the length (the first two digits) and the width of the pad (2 more digits) of the semiconductor matrix in tenths of a millimeter.
For example: SMD 5050, SMD 5630 or SMD 3528.
The small 3528 module is made of a single semiconductor junction die, while the 5050 consists of three 3528 cell dies. They can be connected for monochrome or color spectrum transmission.
The 5050 module has increased power and luminous flux.
Newer LED production technology is based on the use of improved materials. It produces tape 2835. Inside one of its modules there are 3 crystals. They have even smaller sizes, but increased brightness.
The process of heat removal from the 2835 tape occurs better, which extends its service life. Another advantage is its cost. It is cheaper than the similar model 5050 due to more affordable and economically feasible production technology.
The next marking number indicates the number of LEDs along a section of one meter. Their number can be: 30, 60, 120, 240.
Important characteristics are the power consumption, indicated in watts per meter of length, and the amount of luminous flux, expressed in lumens.
The power consumption depends on the number of LEDs and resistors connected to them. Increasing it increases the luminous flux and requires additional measures to remove heat from the electronic circuit.
The degree of protection of an LED design is indicated by the letters IP and two numbers, for example:
- IP20 (without protective coating) for dry and clean rooms;
- IP23, IP43 or IP44 with a protective layer against moisture and dust for work in unheated but protected from precipitation areas;
- or IP65, IP67, IP68 with a layer of transparent insulation for outdoor use.
Protective coatings of the “Elite” and “Premium” classes do not turn yellow or peel during storage and use, while the standard coating may lose its properties.
My recommendations for the optimal use of LED strips are summarized in the table.
| Preferred operating conditions for the light source | LED type | Number of LEDs per linear meter |
| Internal cavities of cabinets, shelves, racks | SMD 3528 | 60 |
| Additional lighting for the bedroom, children's room | SMD 3528 or SMD 5050 | 60 |
| Additional lighting for large rooms | SMD 5050 or SMD 2835 | 60÷240 |
| Lighting of large industrial premises, e.g. shops, offices | SMD 5630 or SMD 5730 | 60÷240 |
| Car interior lighting | SMD 5050 | 60÷120 |
| Terrace, gazebo, entrance to the house | SMD 5050 with IP65 rating or higher | 60÷120 |
Why the LED strip burns out: what to look for when purchasing and using it
You can, of course, blame unscrupulous sellers or manufacturers of lighting equipment for everything. But I am considering purely technical issues of reducing the service life of high-quality devices.
I will explain below why the LED strip burns out or the light flickers during operation.
Light emission is created only when the polarity is directed directly across the semiconductor junction. If an alternating current is passed through it, then strong blinking will be noticeable due to the formation of pauses in the glow during the passage of negative semiharmonics.
The magnitude of the luminous flux of a semiconductor junction strongly depends on the strength of the flowing current. Moreover, its increase is accompanied by a sharp increase in heat losses.
Manufacturers carefully select the optimal current value: excessive heat significantly reduces the resource built into the design.
To reduce the heating of the semiconductor layer, engineers use two technological techniques:
- Dissipation of generated heat into the environment.
- Clear stabilization of current strength.
The first method is based on the fact that the printed circuit board of the LED housing of the lamps is mounted on an additional heat sink.
For tapes, special aluminum profiles of various sections and dimensions are used.
However, this is not enough. The fact is that even a small fluctuation in the input voltage, which the stabilized power supply cannot prevent, causes a noticeable change in the current through the LED.
Therefore, to connect LED strips, specialized electronic devices - drivers are used. They complement the operation of power supplies and are often built into their design.
Long-term and reliable operation of LEDs is ensured by only two things: the elimination of overheating of the semiconductor junction and a stable current of optimal value through it.
I published other characteristics of LED lighting in a special article. For those who are interested, read here. The material is useful for general development.
LED strip 220 V differences in the color of the glow.
Different ribbons can play different shades. Some devices can reproduce all the colors of the rainbow, while others specialize in only one. So, classification by color:
- single-color (monochrome);
- multicolor (RGB).
Brightness adjustment.
To change the intensity of the glow and set the program for changing shades, you need to get a special controller, which is difficult to buy separately from the tape itself. You can also change the brightness level using a dimmer, but this device will not be able to influence the change in colors and the dynamics of their play.
Connecting an RGB amplifier.
If the power of the RGB controller is not enough to connect all the necessary tape, an RGB amplifier is used. The connection principle is the same as in the case of a single-color amplifier, but adjusted for the 4 contacts of the RGB strip. An LED strip with a total power not exceeding the power of the controller is connected to the RGB controller, then the output of the RGB controller is connected to the input (“Input”) of the RGB amplifier. The remaining tape is connected to the “Output” of the RGB amplifier if its total power does not exceed the power of the amplifier. Then a 12V power supply is connected to the power input (“Power”) of the amplifier. This can be a second separate power supply or connected to the first power supply if its power is sufficient to power the entire tape.
Thus, using RGB amplifiers, you can connect any number of RGB strips to one RGB controller.
Features of 220 V LED strip.
To operate this tape, as already mentioned, you do not need a voltage stabilization unit. But it should be noted that the mains voltage fluctuates between 190 and 240 V, and the device needs exactly 220 V for full and safe operation. The brightness of the lighting directly depends on the number of volts received: the more volts there are, the brighter the device shines, and vice versa. It would seem that what’s wrong with this, it’s shining, and it’s shining. But a line that constantly receives 240 V will last significantly less than its intended life. Otherwise, if there is insufficient voltage, of course, the device will live longer, but the lighting will also be dimmer. If the power supply is unstable, the best solution would be to purchase a power supply. It will normalize the operation of the device and maintain the network voltage at the optimal level: 220 Volts.
The main differences between types of devices:
- features of functioning;
- appearance;
- possible lengths of segments into which the tape can be divided.
Connecting multicolor LED RGB strip.
A prerequisite when using RGB tape is the presence of an RGB controller. Unlike a single color strip, RGB LED strip is connected with four wires instead of two. This is due to the specific operation of such a tape - each diode contains three crystals of different colors: red (R - red), green (G - green) and blue (B - blue). Three wires are responsible for controlling the corresponding colors, the fourth is responsible for power. By mixing these three colors in different proportions, you can achieve almost any shade. This mixing is what the RGB controller does. The wires of an RGB LED strip are usually marked with colors: red - R, green - G, blue - B, black or white - power “+”. There is also always a marking on the ribbon train. Four wires of the RGB strip are connected to the corresponding connectors of the RGB controller, the controller is connected with two wires to the power supply.
It must be remembered that the power of the RGB controller, as in the case of dimmers, must be sufficient to connect the required amount of LED strip.
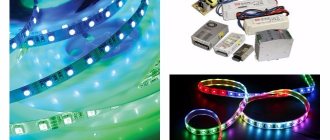
Application of 220 V LED strip
Businessmen often use LEDs for outdoor advertising: billboards, banners, signs and other ways to attract customers. Successful entrepreneurs are serious people who won't buy a bad product. LED lighting has earned trust in its ease of use, reliability, efficiency and long service life. The relatively low cost also played an important role, which decreased due to operation from a 220 network. The once mandatory power supply was removed from the entire structure, leaving only a diode bridge.
Due to the absence of a stabilizing unit, the tape voltage is pulsed with a frequency of 60 Hz, which contributes to the blinking of the diodes. The human eye does not see the altered glow, but the central nervous system and brain suffer from a similar phenomenon. Therefore, it is not recommended to decorate rooms where people are constantly present. For example, for a residential building, a 12 and 24 V tape is more suitable. There is an option to simply add a power supply for the 220 device, which will normalize all processes and protect the health of people and the device itself.
Thus, if a person wants to save money and not worsen his well-being, he will not be able to do this with an option that runs on 220V. For proper functioning you need to purchase certain parts. Of course, you can do without them, but on the condition that people are not constantly near the tape.
Power supplies for 12 volt LED strips: 4 types of design for different operating conditions
Since LED lighting equipment is available in 12 and 24 volts, special power supplies are created for each of them. There are no particular differences when choosing for purchase and operation.
Therefore, I will talk about them using the example of twelve-volt devices.
The power supply operates on the principle of inverter conversion of electrical power through the use of:
- a network filter that blocks electrical noise from entering the circuit;
- diode rectifier with smoothing filters, which together create a stabilized voltage of a strictly constant value;
- high-frequency inverter generator generating rectangular pulses with an operating voltage of 220 volts;
- a power transformer that reduces the voltage to the optimal value of 12 or 24 volts;
- output rectifier with a filter that finally prepares the output signal.
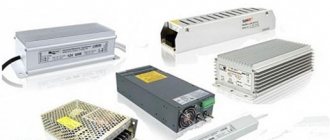
Power supplies for LED strips produced by industry can be divided into 4 classes according to their operating conditions:
- in dry and clean rooms with normal dimensions;
- or in a confined space;
- in a damp environment or outdoors;
- with powerful lighting fixtures.
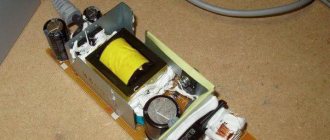
A typical power supply is not specifically limited by its size. It has a wide terminal block with a protective strip made of dielectric plastic and a perforated metal cover. Through its holes, air exchange and heat removal from the heating electronics are ensured.
A small-sized power supply is limited by its size. It also has ventilation cutouts, but fewer terminals. You can visually compare the appearance and dimensions of modules of the same type in this photo.
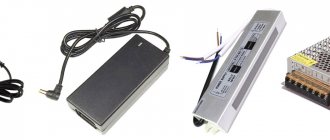
The sealed switching power supply is designed to operate in a humid environment. Its electronic filling is reliably protected by a special housing coating with IP67 class.
It is able to work reliably outdoors, in the bathroom, bathhouse, swimming pool and other similar premises. However, do not try to immerse it in water, for example, in an aquarium. Nothing good will come of such an idea.
The most powerful power supplies are equipped with a forced ventilation system. They have a built-in cooler inside the case, like a computer unit. Its use is caused by the need to effectively remove heat from heating electronics.
The fan creates a small problem for owners: noise, which can be annoying for some people. This should be taken into account in advance: consider a place to place a powerful unit and ways to reduce annoying sounds at the stage of planning electrical installation work in the apartment.
You cannot refuse forced airflow: problems will immediately begin with swollen capacitors, broken diodes and failed power transistors.
For the same reason, you should take care of good air circulation through the internal circuitry of the case. It should flow freely into and out of the electrical circuit, removing excess heat from the electronic components.
DIY power supply for LED strip: useful recommendations
The operating principle and circuit of a switching power supply is not as complicated as it might seem at first glance. It is where the inverter converts electrical power.
The main difficulty that DIYers will have to face is assembling and setting up a high-frequency generator. There are many schemes for the operation of this cascade.
The most promising direction is the push-pull scheme.
I have already reviewed it, as well as other similar devices, in a separate article devoted to UPS repair. For those who are interested in the painstaking work of assembling such modules, I recommend reading the information there.
The process of self-assembling a pulse unit is quite complicated. Nowadays it is much easier to use ready-made structures left over from worn-out electronic equipment to connect to an LED strip.
One such option is a computer power supply. It is built on the same principles, so it will cope perfectly with LED loads.
You just need to connect it to a 200 volt network, and take the output potentials +12VDC and -12VDC from the corresponding sockets of the 20 or 24 pin output plug.
Do not forget that UPSs do not like idle mode. To check them, it is recommended to assemble a resistive load circuit.
Without its connection, expensive electronic components may fail prematurely.
The laptop power supply is also well suited for connecting to the LED circuit. Pay attention to its power output. It is indicated on the housing label.
In some cases, the backlight can be powered by batteries or rechargeable batteries. Such technical solutions are already commercially available for use in the interior spaces of cabinets, shelves, and racks.
Any homemade or factory-made switching power supply must be analyzed and selected according to its technical characteristics before connecting to the circuit and load . Its reliable operation requires the creation of a power reserve.
Advantages and disadvantages of 220 V LED strips.
So, having familiarized ourselves with all the nuances of popular lighting, we can highlight all the good and bad sides.
Pros:
- no need for a power supply;
- compactness of additional devices;
The straightener fits completely in your pocket.
- low current strength;
By using thin wires instead of thick ones, money is saved and installation time is reduced.
- functionality and practicality;
- strength;
The device is resistant to external influences: rain, frost, strong wind. Therefore, it can be used as street lighting.
- length up to 200 meters in one piece.
Minuses:
- undesirability of use in a crowded place due to flickering;
- impossibility of repair;
If the device is damaged, it cannot be repaired. You will have to buy a new one, which will significantly affect the budget.
- it is possible that harm will occur to a person during installation due to high voltage;
- Certain conditions for dividing the tape are not always comfortable for owners.
Connection
Anyone who is able to replace the switch in the house with their own hands can connect a 220-volt LED strip. Above, we have already said more than once that for connection you will need a rectifier (also known as a diode bridge). It is better to purchase it immediately with a ribbon in the store; a sales consultant will help you decide on your choice.
When choosing a rectifier, pay attention to its power; it should not be less than the power consumed by the tape. For example, to connect a low-power tape 100 meters long, you will need a 700-watt rectifier. The same bridge can power a powerful ribbon 40 meters long.
Those who want to save money can make their own straightener. To do this, you will need to solder 4 LEDs using a diode bridge circuit. If this is not familiar to you, then you can buy a ready-made diode bridge, solder wires to it and place it in a homemade case.
Connection diagram to a 220 Volt network
Connection algorithm:
- Cut the ribbon to the required length.
- One end is securely sealed with a plug. If there is none, then we use glue or sealant.
- We connect the second end to the rectifier using a special connector
- We also reliably seal the connection.
- We connect the LED strip to the 220 network.
Carefully check all connections; they must be properly sealed to avoid moisture ingress or, even worse, electric shock to a person.
How to connect an LED strip to 220 V.
The connection process is quite simple - you need to connect several wires, taking into account the polarity.
Algorithm of actions:
- We cut the required piece of strip into 50 or 100 centimeters - you need to check the instructions or on the manufacturer’s website.
- When using the sealed version, apply sealant to the end and put on a silicone connector.
- We install the connector and secure it with sealant.
- We connect the strip to the rectifier, observing the polarity.
- We check for tightness and for the absence of moisture inside.
- We mount the tape into the required surface and plug it into a power outlet.
Methods for connecting multiple LED strips
Manufacturers usually produce LED strips in skeins 5 meters long. This is a standard unified length that is convenient for most manufacturers. For various tasks, it becomes necessary to connect several LED strips for their simultaneous operation in different parts of the premises or over a large length of the illuminated area. With such a connection, there are certain nuances and difficulties.
Parallel connection diagram
As with most lighting devices, the most common and convenient option is parallel connection of LED strips. This method is suitable when simultaneous operation of the tapes is necessary without reducing their light output.
The connection looks like this:
- Conductors are soldered (or connected) to the contacts of the tapes;
- Next, the “pluses” of all the tapes are connected together;
- They combine the “cons” of all the tapes;
- The common plus and common minus are connected to the corresponding poles of the transformer with the calculated power.
Methods for connecting two tapes together
If it is necessary to install the tapes on the same plane one after another, then they are also connected in parallel. But to simplify the circuit and save wires, such a connection can be made using connectors or short conductors.
Connecting LED strips with plastic connectors
To simplify the connection and in the absence of soldering skills (or a soldering iron), you can use special plastic connectors for LED strips to connect several single-color or multi-color strips to each other. They are available at most electrical or lighting stores. The principle of connection using such components is simple: the contacts of the LED strips are connected to the contacts of the connector and fixed.
Connection diagram for single-color LED strip 12/24V
Connecting a 12 volt monochrome LED strip is fully suitable for 24 volt models. The simplest scheme is implemented when installing a low-voltage monochrome 5-meter tape. The 220V phase and neutral wires are connected to the power supply.
1.1. Connecting the power supply
The positive and negative output contacts of the power supply unit are connected to the corresponding contacts of the tape. Typically, terminal connectors are used to extend the conductors coming from the tape, or to solder a long cable to them.
You can sequentially connect several individual sections if the final length does not exceed 5 meters. Exceeding is unacceptable, since due to the voltage drop, uneven brightness of the glow is observed in the final sections. And an increase in current in the circuit causes overheating and burnout of the current-carrying tracks on the printed circuit board. As a result, the entire system fails.
If a cable of more than five meters is planned, then a parallel connection of the LED strip to the power supply is used.
When installing a powerful and long tape, one power supply unit is often not enough. If a more powerful power supply is not suitable for the project (you are not satisfied with its bulkiness), then you can implement a circuit with 2 or more power supplies. They are placed either in one place (for example, in an electrical panel), or directly next to the tape fragments.
1.2. Dimmer connection
Next, we complicate the circuit design and add control devices. This is what the option of connecting a dimmer to an LED strip (5 meter reel), controlled by a remote control, looks like.
1.3. Amplifier connection
The following circuit uses 2 power supplies. The amplifier acts as a repeater and repeats the signal. That is, the control signal from the dimmer/controller is duplicated to a parallel-connected amplification device, which performs dimming. It is necessary to first calculate the power of the load, power supply and control devices.
A situation is possible when it is preferable to install one powerful power supply unit in a circuit with a dimmer and an amplifier instead of two or three low-power models. Then we get the following solution:
1.4. Connecting multi-zone brightness control
The following figure shows a multi-zone control with three dimmers. Connection diagram for an LED strip with a remote control for all three zones that are not connected to each other. This circuit solution is implemented when there are several lighting zones in one room, which need to be controlled separately from one remote control.
Example - we highlight the bar counter, ceiling, shelves and TV in the room. With multi-zone control, we can control each zone individually or all simultaneously from one remote control. There is no need to connect the zones to each other with a signal cable, since they are independent.
Safety precautions
- All installation work is carried out with the power turned off.
- When installing the SDL on a conductive surface, the attachment point is pre-insulated.
- Observe polarity when connecting contacts; multi-colored conductors help with this.
- Do not touch exposed conductive parts while the power is on.
- Do not expose the board to mechanical stress (kinks).
- Follow electrical safety rules when working with 220 V networks.
- Related Posts
- Selecting a current-limiting resistor for an LED
- What is a base and lamps need one for it
- Lamps for the home: varieties, shapes, modern models
Possible connection errors and their elimination
The main reasons for LED malfunctions include the use of low-quality products and power supplies, as well as improper installation and connection of the strip. Due to errors, the service life of lighting devices is significantly reduced.
Errors when connecting long tapes
When making a decorative connection, the lighting strip can be 10 or even 25 meters long. At first glance, it seems that you can connect it in series order and everything is ready. However, these are the wrong actions.
A single piece of tape can be a maximum of 5 meters long, because it is pre-calculated that a certain amount of current can flow along its tracks. When connecting another five-meter piece of LED strip, there is a significant increase in the calculated load on the conductive paths in the first piece. Such a connection leads to an uneven glow of the LEDs and will cause rapid burnout.
To illuminate areas whose length exceeds 5 meters, the strip pieces are connected in parallel; for this you will have to use a long connecting wire (5 m or more). Then the current will be transferred to the second piece using this long wire, and not along the tracks of the first piece.
The main thing to consider is the high resistance of a long wire. In this regard, so that the voltage in it does not drop so noticeably, this additional wire must be of double cross-section.
LED strips are connected to one or two power supplies using a one-way or two-way connection. In addition, when installed on both sides, the power of the product must exceed 9.6 W/m. Such lighting will be more expensive because an additional cable will be required, but this is compensated by quality and a longer service life.
Installation of tape without profile
The LED strip must be fixed to an aluminum profile, which acts as a cooling radiator. During operation, the diodes emit not only a stream of light, but also heat, and if overheating occurs, then their light output will decrease, because the LEDs will degrade and collapse.
As a result, it turns out that instead of 5 years of service life of the tape, it will fail within a year. However, if an aluminum profile is present, the LEDs will function at normal temperature conditions. How to select and install a profile is described here.
Overheating is most likely for LED strips with silicone protective film on the diodes. Heat transfer on such tapes occurs only through the substrate, and when gluing it to a wooden or plastic surface, rapid overheating is ensured for such tapes.
Incorrect selection of power supply
It is important to remember that the power of the power supply should be 30% higher than the total power of the LED strip connected to it. Thanks to this power reserve, the device can operate reliably and for a long time. When installing a power supply with approximately equal power parameters, it will operate at its maximum capabilities, which will lead to a reduction in its resource.
Calculating the required power of the power supply is not difficult at all. For example, when purchasing a 15-meter tape, if its power is 4.8 W per 1 meter, the total power size will be 4.8x15+72 V. This will require a power supply with a power reserve of 30%, resulting in 93.6 Watt.
How to calculate the required power supply power is described in detail in the video below:
By independently studying the features of connecting LED strips, you can provide any work or home space with effective and economical lighting. The main thing is to follow simple rules for working with electricity and the calculations performed.