- April 25, 2020
- Electricity
- Marina Lobacheva
LED strip is an ideal option for creating lighting in the kitchen. It is attached to cabinets or other parts of the kitchen unit. With its help, you can not only illuminate the work or dining area, but also improve the appearance of the entire room.
The installation process can be done by yourself, as it is very easy to figure out how to attach the LED strip to the kitchen set. Various methods can be used for this, but it is advisable to take into account the advice of professionals so as not to spoil expensive materials.
Concept and characteristics of LED strip
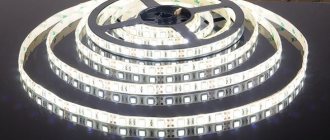
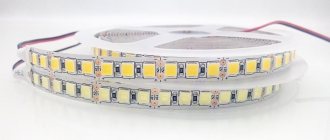
It is represented by a special tape, which is attached in different ways to different parts of the kitchen set, and is available in different lengths and colors. It consists of LEDs, represented by light-emitting diodes. They are semiconductor elements that emit light when electrical current is applied. The intensity of such radiation depends on the chemical composition with which the diode is filled.
The LED strip is connected using a stabilizer. If you connect directly, it may cause overheating and damage to the product. Lighting a kitchen set with an LED strip can significantly simplify the process of using the set, as well as improve the appearance of the entire room. Often the lighting is concentrated on an apron made of matte materials. This allows you to get soft and pleasant lighting.
The LED strip is made of a plastic base, which is equipped with a stabilizing load resistor. It is on this that diodes are applied that emit light.
Features of use
Before attaching an LED strip to a kitchen unit, it is recommended to study its characteristics. These include positive qualities:
- room owners can independently adjust the intensity and even color of lighting;
- the tape can be used to illuminate useful areas in the kitchen or as decoration;
- the strips differ in the number of LEDs and their colors, brightness and direction of light;
- Ribbons are available in multi-colored or plain colors;
- Some tapes are even equipped with a remote control, which greatly simplifies the process of using them, since you can remotely change the brightness and other parameters.
Anyone can figure out how to attach an LED strip to a kitchen unit, so you don’t have to use the help of professional installers. This allows you to save a large amount.
Types, colors and markings
LED strips are classified according to the color of the glow and the types of LEDs used, the direction of the luminous flux and the density of placement based on the light sources, as well as by power, supply voltage and degree of protection:
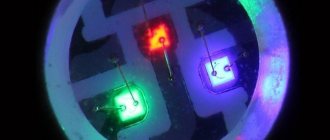
- By the color of the glow . According to this indicator, LED strips are single-color and multi-color, which depends on the type of LEDs used. The main colors are: white, blue, red, yellow and green, but some models have a crimson, turquoise or purple glow. In addition, white color can have several shades of light (warm, cold, neutral), which depends on the color temperature of the LED. Multi-color strips are made from multi-chip LEDs, in which each crystal emits a specific color. The most popular are products based on RGB and RGBW LEDs.
- By types of LEDs used . Currently, the most common models are the series: 5730 and 2835, 3528 and 3014, 3535 and 5050, with the first two digits of the marking indicating the length, and the second two indicating the width of the LED used.
- Directionality of the glow . This indicator characterizes the dispersion angle of the light flux emitted by the LED. According to this characteristic, such LED devices come in front and end types, with the most popular being front models with a dispersion angle of 120˚.
- Installation density . This indicator is characterized by the number of LEDs placed on one linear meter of LED strip. According to the standard classification, at the moment, on one meter of LED strip, depending on the required power and luminous flux, it is assumed that 30/60/90/120/240 light-emitting diodes will be placed.
- By power . The power depends on the type of LEDs used and their number per linear meter of the structure. If the product is sold as a set, then this indicator is indicated in the device passport; when sold by the meter, the power is indicated per 1 linear meter of LED strip.
- Supply voltage . According to this indicator, such products are of two types: those operating on household voltage (220 V) and those operating with a power supply - at a voltage of 12, 24 or 36 Volts.
- Degree of protection . This indicator characterizes the ability of a light source to withstand negative external influences: water, moisture, dust and others. The marking of the degree of protection is the same as for other electrical devices (IP33/IP65/IP67/IP68).
FOR YOUR INFORMATION!
The abbreviation “RGBW” appeared based on the names of the colors of the glow in English, namely: R – red, G – green, B – blue, W – white. Main types of LED strips When labeling their products, manufacturers include all of the above indicators. So, for tape type SMD 5050 60LED/m IP33 12V RGB, the marking is deciphered as follows:
- SMD 5050 – LEDs measuring 5x5 mm are used;
- 60LED/m – number of LEDs per 1 meter of strip;
- IP33 – degree of protection of the model;
- 12V – supply voltage;
- RGB – the color of the LEDs used.
LED strip marking
Benefits of use
Fixing the LED strip on different parts of the kitchen unit has some undeniable advantages. These include:
- long product life;
- high reliability of LED strip;
- absence of hazardous components;
- low electricity consumption;
- the luminous flux utilization rate is considered very high, as it is close to 100%;
- the LED strip is small in size, so it can be hidden in different niches or recesses, which prevents deterioration in the appearance of the room;
- the elements are completely safe to use;
- they are resistant to numerous mechanical influences;
- installation and dismantling are simple actions that can be easily accomplished on your own;
- The structure of the tape is considered simple, since there is no diffuser, reflector or lens.
Usually the tape is fixed directly above the work area, which simplifies the cooking procedure. Often, only lighting is used at all, so there is no need to turn on the central chandelier.
Where is it installed?
The connection of the LED strip is carried out after the formation of a special plan, which shows where its main parts need to be glued. Typically, a strip with LEDs is attached to the following elements of the kitchen set:
- under wall cabinets attached to the wall of the room, which allows you to direct light directly to the work area, which is used for cooking, washing food and other similar activities;
- in the top drawers, which makes it easy to examine their contents;
- in plinths, since they are usually represented by darkened areas of the structure.
If you do not decide in advance on the location of the lighting, this may negatively affect the operation of the entire room. Often it is necessary to completely dismantle some parts of the kitchen unit.
Selecting a power supply
Ecola power supply, for LED strip, 6 W, 220-12 V, IP20
The LED backlight operates on 12 V DC. To obtain it, an electronic transformer is used, receiving power from a 220 V household network.
Power supplies are divided into the following categories:
- Regular. The electronic filling is located in a steel case, which has holes for cooling. They can be mounted in dry areas of the room.
- Sealed. The products have a closed aluminum or plastic case that protects the contents from moisture. Such products can be mounted anywhere, without restrictions.
To calculate the power of the converter, you need to multiply the indicator of 1 m of tape by the number of meters (according to the standard there are 5) and add another 30-50% to the result, since the current consumption parameters change during the operation of the product.
Preparation for installation
If you plan to install the LED strip in the kitchen with your own hands, then initially preparatory work is carried out. To do this, purchase the necessary materials and direct tape, which will be used to create the backlight. The following elements are being prepared for the planned work:
- LED strip of suitable power;
- electrical cable, its cross-section should be 0.74 mm;
- transformer;
- dimmer, sold together with the control panel;
- electric soldering iron;
- sharp scissors;
- material intended for soldering and rosin;
- Double-sided tape;
- electrical tape, which can be replaced with a thermal tube and a hair dryer;
- aluminum profile or PVC corner, which is intended for attaching the tape;
- electric drill;
- brackets for fixation.
The power of the LED strip for a kitchen set is chosen by the direct users, but usually 12 W is used. Installation can be done in different ways.
Using tape
The LED strip is connected to the network using a transformer and stabilizer, but its fixation can be done using various methods. Often, ordinary double-sided tape is used for these purposes. The protective layer is removed from one side, after which the product is glued to different parts of the kitchen unit where it is planned to create lighting.
After this, the second layer is removed, to which a direct tape is applied, which is pre-cut into the required sections. The cutting procedure is performed only along special dotted lines, which are applied by the manufacturer.
In order not to use separate tape, choose a self-adhesive 220V LED strip. On the reverse side it is already equipped with a special adhesive base. First, the protective strip is removed, after which the tape is applied to the necessary elements of the headset. It is allowed to work on both flat and rough surfaces.
The tape is a very flexible element, so it can stick to curved and uneven surfaces. To increase adhesion, additional glue or paint is sometimes used. This method allows you to attach the tape, but it will not be possible to change its location in the future.
Living room with modern lighting
Living room lighting , both spacious and small, requires special attention.
- After all, there must be a sufficiently bright overhead light source to make it convenient to receive guests and celebrate various holidays;
- There should be a source of soft, dim light to create a cozy, homely atmosphere;
- There should be a source of directional light that will allow you to read a book, work on a laptop or do handicrafts without the need to turn on general lighting;
- It is important to create beautiful light accents that will highlight certain decorative items or delimit different functional areas;
- Reception light zoning can often be found in living rooms combined with a dining room or hallway. This method is good because it does not take up precious space and is very beautiful in itself. An LED strip, which can be mounted into the floor covering using a special profile, is perfect for these purposes. Above the light line on the floor, diode spotlights should be placed on the ceiling in the same direction. A light portal is formed that will clearly delimit the space.
Such zoning can be used not only in living rooms, but also in other combined rooms. Also in the living room, LED strip is actively used to highlight certain elements. For example:
- TV area lighting, namely the TV itself, began to be used not so long ago, but instantly won many fans. The diode strip is attached to the back surface of the TV screen as close to the edges as possible. Thanks to this, the glow covers a large area on the wall to which the TV is mounted. Such lighting looks especially impressive in cases where colored tape is used or when the wall has a textured pattern. Each unevenness instantly becomes more pronounced and noticeable;
- Using a warm yellow diode strip you can easily imitate the light from a fire in the fireplacemade with your own hands. Bio- or electric fireplaces are not a cheap pleasure. Therefore, more and more often you can find false fireplaces in the interior, which can only vaguely resemble the portal itself. Even such a small similarity is enough to bring a little warmth and comfort into the interior. Often candles are placed in the area where wood should be burned. This method is not entirely safe. Therefore, it is better to highlight the firebox with tape, but so that it is not visible. The effect will be what you need!;
- A favorite element of all loft-style or mixed-style interiors is a wall lined with artificial brick or another type of stone, which simply cannot do without additional lighting. After all, it is with its help that it will be possible to emphasize the contour of each individual pebble and make the wall “alive”. The tape can be placed either under the ceiling or on the floor in front of the wall. And it’s possible both here and there. The difference between a wall with and without lighting is colossal;
- If you love painting and prefer use paintings to decorate the interior, be sure to take care to present them in the most advantageous light and pay attention to them. Special picture lights certainly look stylish and perform their function well, but the cost can sometimes put them off. You can get by with regular diode tape, gluing it along the contour on the back side of the picture, as is the case with a TV. The light will not be in your eyes when one of your guests wants to admire the work of art, but will be bright enough and noticeable;
- An interesting effect can be achieved by highlighting wall shelves. Moreover, the tape can be glued both to their lower plane and to the upper one, or along the perimeter. The main thing is to place the light source close to the wall so that the light is softly projected onto it. Such shelves themselves will act as decorative elements, so you should not pile them up with various vases, figurines and other small things. One or two items - no more. Better yet, put your favorite photos in glass frames;
- Many of us love books very much and can even boast of having our own, albeit small, home library . Most often, books are placed on an open shelf. This element itself is very rich, as it is replete with a variety of colorful bindings. In this regard, designers recommend using decorative items in rooms where there are such shelving to a minimum, or even abandoning them altogether. It is much better to add the finishing touch by adding lighting to the shelves with books. The tape can be used both monochrome and color. You can highlight sections in different colors in a certain order - checkerboard, diagonally, vertically, etc. In general, rely on your imagination;
- It is impossible not to mention window illumination, namely the cornice. The tape is positioned so that the diodes point down. If you wish, you can glue the tape both in front and behind the curtains. Depending on this, you will get different glow intensities. When lighting in front of the curtains, you can further emphasize their beautiful texture; do not forget about this and do not miss the opportunity to add luxury with the help of expensive textiles;
- Illuminating a sofa or coffee table will create the effect that the furniture is floating above the floor. Especially if the pieces of furniture are low and down to earth. The lighting on the sofa can be placed either behind its back so that the light falls on the wall or on the bottom of the base. If you decide to illuminate a coffee table with a glass top, remember that by placing the strip with the diodes down, you will make its back part visible. This can ruin the aesthetic appearance of the countertop. Therefore, it is better to install the tape on opaque areas;
- Like the hallway, lighting the wall niches in the living room will be a very good idea. In addition, if the doorway in the room is made in the form of an arched portal, you can safely decorate it with ribbon, thereby drawing attention to its graceful curves;
- You can complement the columns with soft lighting, which are an integral element of a living room in a classic style. Just do not glue the tape along the column post under any circumstances. It is better to place it at the very top under the ceiling around the column;
- Various wall curves, decorative protrusions or geometric elements will look much more expressive and deeper with additional lighting;
- Multi-level apartments or living rooms in private houses have an element such as a staircase. And for you it should be a wonderful canvas for creativity. The staircase can be illuminated in a variety of ways. It is worth noting that this not only looks impressive, but also reduces the risk of injury. The main thing is to position the tape in such a way that when you look at the steps, its light does not blind you, but only creates a soft backlight and shows the way. Choose different colors, matching them with the color of the surrounding walls or the covering of the steps. Decorate the railings, the ends of the steps or lay tape in special skirting boards, in general - go for it!;
- Can't be ignored ceiling vault lightingA. In this case, there are a lot of options for placing the tape. The effect you get in the end depends on this. We'll talk about how to attach the tape to the ceiling a little later.
Do not use all methods at the same time. A maximum of two or three ideas within a spacious room, and no more than two in the interior of a small room.
What to do if the tape comes off?
Typically, citizens prefer to glue the product, for which they buy a 220V self-adhesive LED strip. But sometimes manufacturers skimp on the adhesive base, so literally after a few days or months the tape begins to peel off. Usually the reason is poor preparation of the base or poor quality tape.
Therefore, before starting work, it is recommended to carry out some preparatory work with the base. It is cleaned of dirt and wiped dry. Next, a degreaser is applied, and the procedure is performed a few minutes before gluing the tape. If you buy inexpensive tape, it is advisable to secure it with your own high-quality double-sided tape.
Application of glue
People who are interested in how to attach an LED strip to a kitchen set often use glue for this purpose. Only superglue is selected, which has high adhesion and dries quickly. It will allow you to securely attach the tape, so it will not fall off under different influences.
It is advisable to use gel glue, as it is easy to use. In this case, there is no need to apply glue to the entire surface of the tape, since it is enough to use a drop of 5 cm of tape. The glue is applied directly to the surface of cabinets or other parts of the kitchen unit.
Touch LED modules
Recently, touch-sensitive LED strips or so-called linear LED strips, which are equipped with a special sensor responsible for turning the system on/off, have become popular among consumers.
Such systems provide soft, diffused, uniform light and create a comfortable, harmonious, warm, soft environment. Touch-sensitive ice strips can be used to illuminate various areas of the kitchen, including the work area. You can turn the system on or off with a slight movement of your hand towards the touch switch.
LED lamps and ice strips are the best and most successful option for organizing additional kitchen lighting. The main thing is to carry out the installation correctly, taking into account the functional features, layout, and interior of the premises.
Buying aluminum tape
People who do not know how to make an LED strip on a kitchen set often choose aluminum tape. This is what sellers in construction stores recommend. This is due to the fact that the material is reliable and durable.
Initially, the tape is glued to the surface of the headset, and then the LED strip is applied. To increase adhesion, some people additionally apply a small amount of superglue. With this installation, aluminum not only acts as a method of fixation, but also plays the role of a heat sink and reflector.
Bathroom lighting
This room is certainly not particularly spacious. That is why the right solution would be not only to use finishing materials in light colors, but also to fill it with a sufficient amount of light. It is important to choose the right light temperature. Cool white is not suitable for these purposes. Only neutral or, as a last resort, warm spectrum. So, where is it appropriate to use tape:
- Of course, gluing tape to the mirror will be not only beautiful, but also rational. It’s not for nothing that mirrors with built-in LED lighting are sold. Their cost is sometimes simply unjustified, so it is much more economical to use our idea. The tape can be placed both around the perimeter and only on the side or on the top and bottom edges. In any case, it will be convenient for you to apply makeup and perform other procedures;
- The bathtub lighting around the perimeter of the floor looks very interesting. Such a soft glow will be comfortable for the eyes even at night and will slightly expand the space;
- The same can be said about lighting the ceiling in the bathroom;
- Recently, it has become very popular to use lighting for various plumbing fixtures. And we are talking not only about illuminating the bathroom, which is located on the protective screen, but also about illuminating the sink by gluing tape to its lower surface around the perimeter, as well as illuminating the toilet. Whether it’s beautiful or not – judge for yourself from the photo;
- It will definitely look impressive if wall-mounted plumbing fixtures are used;
- It’s simply a sin not to decorate wall cabinets or cabinets in this way. The soaring effect will be achieved to the maximum;
- You can also highlight wall shelves, if any.
When organizing lighting in the bathroom using LED strip, do not forget that this is a room with high humidity. This means that the tape must have the appropriate protection class. And again, don’t try to use all the ideas within this modest space at once.
Installation of aluminum profile
If the choice of LED strip for kitchen lighting falls on products that have high power, then installation of an aluminum profile is required. It can be overhead, mortise or corner.
Initially, with the help of fasteners, an aluminum profile is attached to parts of the kitchen unit. The tape is fixed inside it using tape or glue. Due to the presence of a perfectly flat surface, the product will hold firmly and reliably.
When removing the protective layer, conductive paths are often exposed, so if they are directly applied to the surface of their aluminum, this will lead to a short circuit. Therefore, to prevent such negative consequences, it is recommended to apply a layer of hot-melt adhesive that has insulating properties to the surface of the profile, and you can also make an insulating substrate.
During operation, you can attach a diffuser to the profile, which will soften the light from the backlight. It is fixed with plastic clamps or nylon ties.
What common mistakes are made?
If you do not understand how the LED strip is attached to the kitchen set, you can make many serious mistakes. These include:
- gluing high-power tape directly to the walls of cabinets without using a profile, which leads to the product falling off, and also the LEDs quickly fail;
- using a construction stapler, with which the tape is attached to a surface made of wood or drywall, but if you choose the wrong place for fastening, this leads to damage to the LEDs;
- gluing open LEDs directly to an aluminum profile, which leads to their rapid breakage;
- the use of a plastic profile, which does not provide the desired cooling effect, so you need to use only materials specifically designed for this work;
- the use of hot-melt adhesive, which when heated emits a harmful and unpleasant odor, and it can also lead to overheating of the LEDs.
Therefore, the choice of LED strip for kitchen lighting, as well as additional materials, should be done with the participation of professionals. How durable, safe and attractive the lighting will be depends on the correct choice of elements and the execution of the work.
Where to hide the tape?
In order for the lighting to be beautiful and not spoil the appearance of the room, it is advisable to fix it in such a way that it is hidden. It can be hidden in different places:
- in ceiling niches;
- in recesses or niches on the wall;
- behind the ceiling plinth;
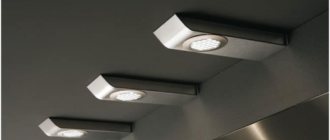
- fastening to the bottom or side of a wall cabinet;
- inside the kitchen unit.
Properly placed and correctly attached LED strip kitchen lighting looks bright and attractive. At the same time, the process of cooking or finding the necessary utensils and products is greatly simplified.
Illumination of the tabletop, dining area
To illuminate the workspace, it is advisable to use bright monochrome strips with white crystals. To achieve maximum brightness, you should use tapes with a density of 120 or 240 diodes per linear meter. To prevent light from blinding your eyes, you need to use a U-shaped profile, which will create a narrow strip of light directed at the desktop. It is better to connect the tape and the profile before attaching it to the cabinets.
To decorate the dining area, it is better to use low-power colored products. You can attach the strip to the end of a wooden table or from the bottom along the perimeter to the glass. Run the cable along the leg and connect to the nearest outlet.