When working with LED strip types, it often becomes necessary to cut off a part of a certain length. This need is due to the fact that the minimum sold unit of tape is one meter. Often, certain ideas are not standard and the length required is arbitrary. Many consumers from time to time ask the question, is it possible to cut an LED strip? In this article we will talk about how to do this correctly.
LED strip device
Today, the LED strip type is a printed circuit board, which is reconnected with a thin elastic type base. On one side, limiting resistors are applied to this tape, which allows you to connect this product to a power source or other device. It is also worth noting that the product has contacts to which, if necessary, connecting wires can be soldered. If you look closely, you will notice that there are lines across three different elements that are located across the product. This is precisely the mark along which the tape can be divided.
There are also tapes that are self-adhesive and with the help of them even a high school student can do installation. In this case, installation does not require screws or any other reinforcing materials; it can be firmly fixed due to its base.
Where should you cut?
Before you start cutting the LED strip, it is important to understand: the luminous thread can be shortened only along specially marked lines - conductive strips. Structurally, they are made so that they are located between the contact pads of the diodes. Accordingly, there is no threat of damage to the LED strip. Cutting in the wrong place is almost guaranteed to destroy some diodes. If the tape is plugged in, a short circuit may even occur or the power supply will burn out. There are 2 conductive strips along the low- and high-voltage strips, and 4 along the RGB stripes.
Places for cutting on the RGB thread are additionally marked with a dotted line or a scissors icon.
How to cut correctly?
The main thing to remember is that it is advisable to cut the tape exclusively through three LEDs. In this case, this distance is from 5 to 10 cm, it all depends on the type of tape itself. In order not to spoil the tape and to cut as correctly as possible, you must use only sharp scissors. Scissors should be carried out exclusively along the line on the tape. Otherwise, you will damage the device.
Regardless of the type of tape, the structure contains segments that contain three LEDs. All these elements contain resistors, the number of which directly depends on how many crystals are in the LED.
For example, an SMD 3528 LED contains one crystal. Thus, one resistor will be enough for each individual section. According to the standard, each individual element contains three independent LEDs. Such elements can be individually connected to a resistor. It is important to know that contact pads can be in different quantities from two to five or six. In this case, two wires will be enough to provide positive power to the structure, but some experts connect a battery to each LED.
What cutting steps occur
Different strip models have different numbers of LEDs per meter. There can be from 30 to 240. A standard 12-volt LED filament is cut in increments of 3 LEDs, a 24-volt filament is cut in increments of 6 LEDs. For a luminous thread with a voltage of 220 V, the cutting step range ranges from 0.5-2 m. This depends on the manufacturer’s brand.
In metric terms, the cutting step will be:
- for 30 diodes – 10 cm;
- for 60 diodes – 5 cm;
- for 120 diodes – 2.5 cm;
- for 240 diodes - 1.5 cm.
How to cut a regular 12V LED strip?
LED strips belong to the so-called LED devices. At its core, this system has exclusively an electrical circuit. The 12V tape is not only flexible, but also elastic. It, like other analogues, consists of separate segments, which usually include three LEDs. You can verify this fact yourself by removing a certain part from the tape and taking a closer look. Along the backlight between the individual segments, the voltage is distributed across the tape.
Due to the fact that the coating has a thin layer, the tape can be cut, clearly controlling where the line is. This is done simply with the use of a stationery knife. If, when cutting a product of this type, you break the rules and do it not along the correct line, this will lead to one of the parties stopping their work.
When producing such tapes, the manufacturer himself clearly distributes the dotted lines where the cut needs to be made.
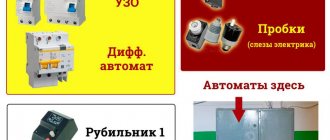
When are connectors needed?
Connectors are used when you don’t have a soldering iron and you need to quickly connect 2 backlight strips or tape with wires. The connector size is selected depending on the width of the backlight. The optimal size is 0.8 and 1 cm. In this case, the LED strip and connector must have the same number of contacts. Connecting parts are divided into 3 types:
- straight lines - connect 2 pieces of tape to each other;
- for soldering sections at an angle of 90°;
- for connecting wires (an angle is formed).
Depending on the method of connection, the products can be pressed, pierced or with a latch. Despite the fact that the connector is easy to install and does not require auxiliary insulation, the cross-section at the junction of conductive contacts becomes smaller. And if the product works for a long time, it overheats. Because of this, the contacts burn out, and the electrical conductivity of the current deteriorates sharply. LEDs that are close to the connector deteriorate or become dim.
Since there is no soldering, the contacts oxidize. Copper parts interact with oxygen and turn green. The current passes through such contacts weaker and damages the diodes. They gradually fade, blink and stop lighting.
How to cut color (RGB) LED strip correctly?
RGB tape has a slightly different separation process. The device is also divided into parts, but each part has several contact-type pads.
Under this condition, it is extremely important that the color channel that was cut off is connected to the pad of the same name so that the color that is intended is lit. Each color has its own immediate parameters, which, if violated, can have extremely negative consequences.
If a single-color LED strip stops working
The greatest consumer demand is for tapes of the same glow color powered by a 12 V DC source. Malfunctions encountered during their operation can be divided into 4 groups:
- Doesn't turn on.
- There is light, but dimly.
- Flickers.
- One of the above symptoms appears on a separate section of the tape.
1) If the LED strip does not light up immediately after assembling the entire system, then you need to ensure the integrity of the electrical circuit. To do this, first check whether the connection polarity is correct: the red wire from the output of the power supply unit (PSU) should go to “+”, and the black wire to “–” of the tape. If everything is correct, then with the power supply turned on, you need to lightly pull all the connecting wires and once again make sure that the contact is reliable at the soldering points
If there are connectors, they should be given special attention. Lack of reliable contact under the connector latch is a common reason why LEDs do not light up immediately after being turned on. The second step towards troubleshooting should be to check the functionality of the power supply
Using a multimeter (voltmeter), check the presence of a constant voltage of +12 V at its output terminals. If the readings of the measuring device differ by more than 10% from 12 V, then the power supply is most likely faulty. If you don’t have a voltmeter at hand, you can check the voltage at the power supply output using a car light bulb
The second step towards troubleshooting should be to check the functionality of the power supply. Using a multimeter (voltmeter), check the presence of a constant voltage of +12 V at its output terminals. If the readings of the measuring device differ by more than 10% from 12 V, then the power supply is most likely faulty. If you don’t have a voltmeter at hand, you can check the voltage at the output of the power supply using a car light bulb.
It’s rare, but it still happens that when the power supply breaks down, the LED strip also burns out. Therefore, you cannot be sure that it will light up with the new power supply. But you can make a diagnosis: take a 9 or 12 volt battery and briefly connect it to the tape, observing the polarity. The LEDs should light up, although not at full brightness.
2) Dim LED lighting can occur for one of two reasons:
- The voltage at the power supply output is less than 10 V, as a result of which the LED strip does not burn at full power.
- Loss of LED brightness caused by overheating of the emitting crystal. In turn, overheating of the crystal can be caused by violation of operating conditions (lack of a radiator or too high supply voltage), or poor quality of installed LEDs.
3) The reason that the LED strip either lights up or doesn’t light up along its entire length is poor contact in the power circuit.
4) Any strip can be conditionally divided into sections of three LEDs and a resistor, connected in series and operating from +12 V. All sections are connected in parallel to each other, that is, they are electrically independent of each other. It follows that a malfunction in one area (failure of an LED, resistor, broken contact, microcrack on a printed conductor) will not affect the operation of the rest of the LED strip. Only 3 LEDs will stop lighting.
Recently, LED strips and LED lines have appeared on sale, connected directly to a 220 V network. They have a primitive power source sealed at one end. The reliability of such an assembly is low. Therefore, if a 220-volt LED strip does not light up after the next turn on, then its repair is hardly possible.
Cutting LED strip for repair
It should be understood that mechanical damage can occur even during the installation of the tape. For example, due to excessive bending. It is important to know that the maximum radius by which this tape can be bent is five centimeters, no more. If you want to wrap an object that is small in size with this tape, then the likelihood of this tape serving for a long time is not high.
It should be noted that faults of this type can be easily and simply eliminated. In this case, the part that has stopped working is cut out. Next, we select a segment of the same parameter and, using a connector, install everything in its place. If soldering is possible, it is better to make the connection this way.
But this type of repair also has its own nuances. For example, if the breakdown is located in a place where the cord is too clearly visible. In this case, you need to have a cord, the length of which will allow you to hide such moments.
If there is no marking
It happens that stores sell LED strips that do not have lines along which blocks can be cut. It is not advisable to purchase them due to their low quality. But if you still have to work with such a light source, you need to focus on the location of the contact pads and LED elements.
Visually, the contact pad looks like an extension of the strip along the edge of the board. It is located across the tape and is on all products. You need to cut in these places, focusing on the middle of the contact pads.
Sometimes there are LED strips on which the contact pads are located on the substrate side.
What you need for soldering
First of all, a soldering iron for LED strip. It should not exceed 25 watts to avoid overheating. It's best to use a soldering station. Use only a thin or medium tip. A good device has a set of twistable attachments.
In addition, you will need:
- Tin-lead solder.
- Rosin or special paste. Or “handicraft” flux: an aspirin tablet, ammonia with glycerin, olive oil, fruit juice. Another option is pine or spruce resin. You need to melt it and pour it into containers (for example, matchboxes).
- Some kind of holder to quietly clamp the board for soldering.
The so-called “third hand” is perfect - with a magnifying glass and a pair of clamps.
But if there is no such holder, you can do without it, it’s just not as convenient.
- Wire cutters.
- Knife (to clean contacts and soldering iron tip).
- Electrical tape or heat shrink tubing (if you have a hair dryer).
- Copper wires with a cross section of 0.75 mm.
Preliminary work
- Before work, we clean the soldering iron from accumulated fumes with a file. Then we turn it on, warm it up and tin the tip. If you haven't done this before, we recommend watching the video:
- Cut the tape. Let us remind you that special marks with scissors are drawn for this:
- Secure the board into the holder.
What you will need for installation
No complex tools or fixtures are required for installation. A soldering iron is used to connect the tape, but it is also optional. Components required for installation of low-voltage LED strip: controller, power supply, connectors.
Controller
This device is designed to adjust the glow mode of the diodes and change the color of the backlight. By connecting the controller, you can use the remote control to make the LEDs flash or shimmer in different colors. For single-color duralight, a controller is not needed. Before purchasing, you need to check how many soldering contacts the tape has in order to purchase a suitable device.
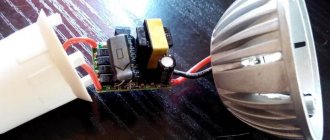
power unit
For proper and long-term operation of duralight, a power supply is required. It lowers the network voltage. The power of the unit is selected in accordance with the LED strip - a reserve is needed. Connect in front of the controller.
If the tape is 220 V, instead of a power supply you will need a rectifier - a diode bridge.
Connectors
Connectors allow you to connect individual parts of the tape without using a soldering iron. But first you need to select a suitable connector: flat or round.
Optionally, a dimmer is also used to adjust the light intensity level, but it does not have to be used.
The tape is ready, it's time to turn on the power.
After you have received a tape of the required length, you need to apply voltage to it - check its functionality and ensure it is ready for use.
Let's look at how to connect LED strips to a power supply. To do this, it is best to solder the wires with contacts on tape; it is convenient to use heat-shrinkable tubing of a suitable diameter as insulation.
If the total length of the tapes is large and a parallel connection is used, the block can be installed both at the output and in the middle between the tape connections.
As an option, a long main wire is used, from which several tapes are powered in parallel.
But it should be remembered that low-quality tapes can quickly melt and fail, and serial connection is allowed only if the tape length does not exceed the standard 5 meters.
RGB technology
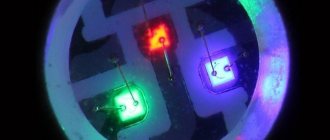
RGB is a module with the ability to configure and adjust parameters based on three primary colors.
A three-color LED consists of 3 multi-colored crystals installed in 1 housing. The required color is obtained using various combinations of the basic colors (red, blue and green). Due to the close proximity, the glow mixes. Control requires a controller that changes color according to the installed program.
Three-color LEDs are different:
- with a common anode;
- with a common cathode;
- with six terminals (without matching through the anode or cathode).
For control it is used:
- with a combined anode - supply of negative pulses to the anode;
- with a combined cathode - supply of positive pulses to the cathode;
- with six pins - any option.
Differences from regular tape
RGB (the same as single-color) is an elastic, narrow board with conductive tracks.
Structurally there can be three types:
- from color SMD 3528 (5050), which are soldered side by side along the entire length of the strip, the controller changes the glow intensity separately for each color;
- from three-color SMD LEDs 3528 (5050);
- from WS2812B (WS2812S) LEDs equipped with a PWM controller.
Regardless of the type of LEDs, all RGB strips are divided into analog and digital. Firstly, the chips are connected in parallel, the controller can only change the color of the strip. Secondly, each diode is connected to a microcircuit that allows the controller to control individual chips or groups of chips.
Analog RGB strips are cheaper and easier to install.
Benefits and uses
Multicolor LED strips make it possible to change the color of lighting manually or automatically, create lighting effects (flickering, shimmering), and light music.
A multi-colored source allows you to create different lighting systems:
- basic (power is selected based on the area and purpose of the room);
- additional (lighting of individual zones);
- workplace lighting;
- decorative.
In residential premises, RGB strips are most often installed around the perimeter on the ceiling or floor, in niches and arches, and on furniture. The ability to adjust the color and intensity of the glow allows you to change the atmosphere in the room and save on lighting stairs and corridors.
But this is not the main area of application; more often these sources are used:
- in shop windows;
- on billboards;
- on stages during entertainment events;
- on the facades of buildings before the holidays;
- for illumination of monuments, bridges, fountains, swimming pools.
LED type
Most often, tapes are made from RGB Led SMD 5050, consisting of three crystals of different colors. These LEDs have 6 pins, light flux 0.6-2.5 lm (depending on the color of the crystal). Power of a roll 5 m long 144 W. Another similar option is SMD 3528 with a light flux of 0.3-1.6 lm.
When purchasing, the type of LEDs is easily determined by size (3.5x2.8 mm or 5x5 mm).
Multi-colored SMD 3528 (5050) can also be soldered onto the RGB tape. The peculiarity of the latter is that there are 3 crystals of the same color in one chip. The luminous flux in this design is 0.6-2.2 lm for SMD 3528 and 2-8 lm for SMD 5050.
WS2812B and WS2812S are only externally similar to the SMD 5050, but have 4 pins and a PWM controller in the case. It allows you to create various lighting effects (“star rain”, “running lights”). You can even make an LED screen from these chips. There are two disadvantages: high price and the need for a special regulator.
Connecting power using soldering method
In fact, soldering wires to the contacts of an LED strip is no more difficult than any other soldering. The main thing is to follow the technology and solder with a soldering iron with the narrow end of the tip, about 2 mm wide, heated to the required temperature. In order to solder correctly and efficiently, you must first cover the surfaces with a layer of solder. In other words, the contact pads of the LED strip need to be tinned. Then you need to tin the ends of the wires. Remove the insulation from their ends and cut them to the length you need. Please note that the insulation is removed by 8-10 mm, and after that they are cut to lengths of about three millimeters.
Now all that remains is to attach the tinned ends of the wires to the contact pads and, in turn, touch each pad with a soldering iron tip with a drop of solder for a couple of seconds to obtain soldering. To check the absence of a short circuit and correct soldering, it is recommended to use a multimeter. It is not necessary to insulate solder joints. But experts recommend putting on a heat-shrinkable pipe and heating the soldering area with a hairdryer. An easier option is to wrap the soldering area with insulation tape several times.
Methods for connecting diode strips
There are two most popular ways to connect diode strips:
- using special connectors;
- by soldering.
The first method - connecting the tape with a connector - is more expensive due to the fact that the parts for connection can be more expensive than the tapes themselves. At the same time, it is quite simple to implement.
Connectors can be straight - for joining sections of tape in areas without relief, and angular - for connecting diodes in places where the base makes a sharp turn, and bending the tape can cause a crease in the current-carrying core.
The second method is cheaper to implement, but requires the performer to have soldering skills and some time.
Cutting during installation
Sometimes during installation of an LED filament you can inadvertently damage it. After all, this thing is quite fragile, and sometimes you have to bend it a lot. Fortunately, this is not a “death sentence” for the LED strip; such malfunctions are easily fixed. You need to cut off the part that has failed and measure its exact length. Then a new piece of strip is taken and installed in place of the old one using a connector. To connect these two parts, it is best to use a soldering iron. If the adhesion is very noticeable, this area (or the entire tape at once) can be isolated.
Advice. To prevent the LED strip from breaking down during installation, do not bend it to a radius of more than 5 cm, wrap it around objects, or weave shapes or knots.