Many of us adhere to standard thinking, in which the LED strip should work through an adapter from a 220 V network. But you can do it differently by using a battery or battery as a constant voltage source. The result is a lamp completely independent of the mains, which opens up completely new possibilities.
Let's look at options for assembling lamps using the example of an LED strip powered by 12 V.
Type of LEDs in the strip
The type and size of the LED is hidden under the marking:
SMD - contacts to the LEDs are soldered into the strip itself. Designed for installation on various surfaces.
- 2.8 x 3.5 mm - for horizontal glow strips with a power of up to 0.08 W.
- 1x3 mm – used in side-illuminated tapes with a power of up to 0.08 W.
- 5x5 mm - in lamps with three crystals with a high brightness level. The highest power is 0.24 W.
When installing an LED strip in a car, the main parameter to choose is the IP protection class. The most common is IP65. But for installation in headlights, it is better to give preference to tapes with a high degree of protection - IP68. And the brightness of the glow is selected according to GOST R 41.48-2004 and should be in the range of 400 – 800 candelas.
Expert opinion
It-Technology, Electrical power and electronics specialist
Ask questions to the “Specialist for modernization of energy generation systems”
Charger from LED strip power supply | Glory to the creators To create lamps, no harmful substances are used that negatively affect human health and the environment. Ask, I'm in touch!
220V LED strip models: differences, characteristics and disadvantages
Like other SMD strips, the 220V LED strip differs in the number of crystals in the LEDs. Mostly Russian companies produce them with markings 5050 and 3528; brands 2835 and 3014 are also on sale.
Powerful models with the designation 5630 are also produced. If you compare them visually, it is difficult to find differences with standard 12-volt ones.
Before purchasing an LED strip on websites or in specialized stores, it is important to first find out the marking indicating the voltage.
The following are the characteristics of the devices:
- voltage (the value is indicated on the model itself);
- cutting frequency (every 50, 100 or 200 cm).
In addition, when purchasing, electricians advise taking other parameters into account. These include color temperature, degree of protection of the shell from moisture (IP67, IP68) and power (indicated in W/m).
Such devices are supplied in a hermetically sealed silicone tube, therefore, it is permissible to connect the diode strip outdoors and at high air humidity.
Among the advantages of the devices are the following features:
- connection to the network via a wire (without a power supply);
- the ability to choose the optimal length (one whole piece can reach 100 m).
In addition, the LED strip, connected to a 220V network, is resistant to rapid changes in air temperature. Its body can be quite flexible or rigid.
It all depends on the foundation. Models with a rigid base reach a length of 1 m and can be connected together in a modular manner.
Thus, by connecting the LED strip, three-dimensional structures can be created. Also, decorative lighting may differ in the installation method.
There are self-adhesive LED strips and models, for attaching which you will need to additionally purchase special glue.
It is worth considering that after connecting the diode strip, flickering is possible.
In addition, such LED devices fail more often than standard models. Due to the limited scope of application, electricians advise using them as an additional light source or to illuminate individual areas in the local area, use them as a decorative detail, lighting for facades, etc.
Nuances of choice
LED products for cars are mainly represented by single-color 12-volt models. This makes it much easier to choose a color to match the body. It is best to choose products that have a self-adhesive backing. This greatly simplifies installation, as well as do-it-yourself connections. Such products can easily be installed on the dashboard of a car.
In addition, these products are divided into two groups according to the type of LEDs:
Another important connection point that plays a role in calculating the total power of the strip is the density of LEDs per meter.
Note! Often sellers say the density for the entire tape (5 meters in a skein), and not for one meter. An incorrectly specified density parameter can lead to serious problems during the operation of the backlight.
What kind of lighting do you prefer?
Built-in Chandelier
- 20 – tape without insulation, so it can only be installed inside the car on the dashboard;
- 65 – the product is protected from moisture and can be used under a canopy. Such products are best installed in headlights;
- 68 – tape of a fully insulated type. It can be safely installed under the car body, where it can be in contact with water and dirt for a long time without any problems.
Based on the selection parameters listed above, you can choose an LED strip for any occasion without any problems.
How does offline connection work?
Before connecting the tape to the battery, you must remember that the most important point here will be the charge of the power source.
Note! All LED strips that exist on the lighting market operate on the same principle. Therefore, they can all be connected and the cabinet, any other furniture or element of the interior of the room (bedroom, kitchen, etc.) can be illuminated according to a single scheme.
LED strip connection diagram
When lighting a closet or any other furniture in the house, you can use any type of battery to power the tape. You can even use rechargeable batteries. This power source has the following advantages:
- is reusable. This means that when the accumulated charge is depleted, they can be recharged and used again to power the backlight. At the same time, in order for the lighting to always be on, you only need two batteries. When creating lighting for the kitchen, it is recommended to use battery-type batteries, since the lighting here should always be on. This will help reduce the frequency of power supply replacement;
- despite the high cost in relation to conventional batteries, batteries actually turn out to be much more profitable;
- high-quality lighting power supply.
For power, you can use both finger and little finger batteries, as well as “tablets”.
Type of LEDs in the strip
The type and size of the LED is hidden under the marking:
SMD - contacts to the LEDs are soldered into the strip itself. Designed for installation on various surfaces.
- 2.8 x 3.5 mm - for horizontal glow strips with a power of up to 0.08 W.
- 1x3 mm – used in side-illuminated tapes with a power of up to 0.08 W.
- 5x5 mm - in lamps with three crystals with a high brightness level. The highest power is 0.24 W.
When installing an LED strip in a car, the main parameter to choose is the IP protection class. The most common is IP65. But for installation in headlights, it is better to give preference to tapes with a high degree of protection - IP68. And the brightness of the glow is selected according to GOST R 41.48-2004 and should be in the range of 400 – 800 candelas.
How to connect and install LED strip in a car
In order to make exactly the right choice and quickly install the LED strip in your car with your own hands, you need to have an idea of its range.
Expert opinion
It-Technology, Electrical power and electronics specialist
Ask questions to the “Specialist for modernization of energy generation systems”
LED strips for a car - how to connect a strip in a car The preliminary, intermediate conclusion looks like this: By inserting LED bulbs in their cars instead of classic ones, car owners, satisfied with their brightness and white light, close the lampshades, headlights and other lamps without knowing that when there is voltage 14.2 volt lamps heat up to emergency temperature. Ask, I'm in touch!
2nd method (without soldering)
To make a more universal device, instead of batteries twisted together with electrical tape, it is better to use a so-called cassette or container.
This is actually a ready-made replacement body. Sometimes even with wires.
All you have to do is solder the toggle switch to the positive output.
In such a device, you no longer have to unsolder and seal the batteries every time they run out.
You simply change them by pulling them out of their seats and installing others. Moreover, such a circuit can be assembled at several voltage levels.
If there are no wiring on the cassette, then buy special contacts.
This way you no longer have to deal with soldering wires to the batteries themselves. By the way, to connect wires to the LED strip, it is also not necessary to have a soldering iron.
Use connectors.
There are a variety of them. And not only for connecting the tape to the tape, but also for supplying power to it.
Connecting car LEDs
The connection process is quite simple. The ice tape has contacts marked “V|R|G|B”. Wires are soldered to them for connection. Connecting single-color tapes to the on-board system is quite simple - the plus is powered to the battery terminal with the “+” sign.
The negative is either output to the car body, or is also connected to the battery to the “-” terminal.
The diagram clearly shows how to install lighting elements on the car body:
The principle of connecting multicolor (RGB) LED strips is the same, but with one exception. The circuit contains a controller that is responsible for automatically changing the color mode.
At the output of the RGB strip there are four wires with symbols, which allows you to connect it correctly:
The terminals are connected to the corresponding pins on the controller, on the other side of which there are the same standard plus and minus. Colors can be changed either automatically or using a remote control.
The tape itself is laid along the car body and secured using special plastic brackets or clamps. For installation directly into the headlights, the LED strip has an adhesive base covered with a protective film.
To solder or not to solder
The battery is attached using soldering. If there are several batteries, it is not necessary to solder each one separately - we use a battery box with 2-6 compartments.
When connecting using a power supply or box, as well as in designs with controllers and amplifiers, connectors can be used. Compared to soldering, this method is simpler, but:
- the connectors gradually begin to oxidize;
- plastic melts at high temperatures;
- diodes located at the connection points lose brightness.
Soldering is not necessary when using power supplies, and connecting with batteries will be safer and more reliable for long-term operation. But you will need certain tools and materials. Connectors are convenient to use in lighting of complex designs, especially high-rise ones.
What can be decorated with LED strip?
Areas of the car that can be transformed with diodes:
The most popular option is headlight illumination. You can carry out the installation procedure for the strip yourself.
LED strips for cars have an adhesive base, so you can simply press it to the desired location. For this, bright LEDs are more suitable, which are found, for example, in SMD 5050. To illuminate the headlights and license plates, a small piece of tape, up to 20 centimeters long, depending on the size of the lighting area, is enough.
Connection
For a monochrome device it is better to use black (minus) and red (plus) wires, and for a multi-colored device - red, blue, green and black. Connection algorithm:
- Determine the length of the mounted section of the device.
- At the site of the cut, make a mark with a pencil or other means.
- Using scissors, cut off the desired section of the tape.
- Clean the wires.
- Solder the device to the wiring.
- Cut off a couple of centimeters of heat shrink tubing.
- We place it in the right place.
- We heat the tube with a hair dryer with a protective nozzle.
Monochrome tapes are connected to the on-board network. Plus goes to plus, and minus goes to the body. The multi-colored one is installed in the same way, only an RGB controller is also attached. To connect the regulator, you need to connect 4 wires from the LED strip to the controller in specially marked inputs:
On the opposite side, the controller receives voltage from the battery. Using the controls, you can not only control colors and turn on or off, but also create your own LED dynamics program. There are models with a remote control, which makes using the tape easier.
Expert opinion
It-Technology, Electrical power and electronics specialist
Ask questions to the “Specialist for modernization of energy generation systems”
How to connect an LED strip in a car or car to a cigarette lighter For light auto-tuning, ice strips are used; this does not contradict either the law or the principle of practicality, durability and durability of the product. Ask, I'm in touch!
What you need to know about soldering
The most important thing in working with LED strips is cutting them correctly into separate fragments and soldering them. In order for everything to go well, you should know the following nuances of carrying out this type of work:
- The product needs to be cut only in special places. Otherwise, the conductive contacts will be damaged and the device will be damaged;
Place for cutting tape
- you need to solder carefully, applying the soldering iron tip to the contacts and wires for just a few seconds;
- the wires must first be tinned;
- After soldering is completed, the contacts should be cleaned of solder residues.
By adhering to these recommendations, the process of soldering individual fragments of the product and connecting to a power source will be as easy and quick as possible.
Useful video on the topic
Interesting information on the topic is in the video.
Leave a comment Cancel reply
Related posts
Aesthetic kitchen lighting with LED strips Illumination of a stretch ceiling with LED strips - features and installation procedure. Video. What are the advantages of LED lamps for illuminating various outdoor objects?
LED panels in the interior
Top 2 best manufacturers of 220 V LED strips
In stores specializing in the sale of electrical goods, it is not difficult to find a wide variety of tapes. But not all of them are suitable for connecting to a 220 V power supply. That is why you will have to choose and look for manufacturers who produce the required samples. High-quality companies that have proven themselves in the market:
- Elektrostandart.
- Sveteco.
Companies not only produce 220 V LED strips, but are also distinguished by the good quality of their products.
Buy products from trusted brands, follow the tips and recommendations, do not deviate from the instructions, and then the tape can be connected to a 220 V network without any problems, even for a beginner who has never worked with electricity or lighting before.
Circuits of stabilizers and current regulators
There are at least four options for making 12-volt voltage stabilizers for cars with your own hands:
- On a roll.
- On a pair of transistors.
- On an operational amplifier.
- On a pulse stabilizer chip.
Let's look at the main features of each of the modifications under consideration.
On a roll
To assemble a simple stabilizer for 12-volt LEDs for a car with your own hands, you will need:
- Microcircuit LM317 or KREN8B (more precisely KR142EN8B), or KIA7812A.
- 120 ohm resistor.
- Printed board or perforated panel.
The images clearly show the location of the main components of the simplest stabilizer circuit for LEDs in a car:
In the second circuit, a 1n4007 rectifying diode is used at the input from the battery.
On two transistors
One of the most popular automotive voltage stabilizers for 12-volt LEDs, which is also assembled by hand, today is a circuit with two transistors.
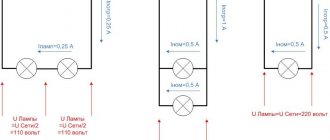
An alternating voltage of 12 volts is supplied to the diode bridge VD1 - VD4, rectified and, passing through filters C1 C2, smoothed. Next, the current goes to the parametric stabilizer VD1 and passes to resistor R2. Then from its engine it is transmitted to the key of the composite transistor VT1 VT2. The level of its openness is determined by the state of the variable resistor R2 - in the lower position of the regulator, the transistors are closed and the voltage is not supplied to the load, and in the upper state of the regulator R2 it is maximum and the transistors are completely open, voltage is applied to the load.
The given model of voltage stabilizer for cars is most often used for daytime running lights based on LEDs and allows you to successfully adjust the parameters of the on-board current to the characteristics of the lighting device.
On an operational amplifier
It makes sense to make a 12-volt voltage stabilizer for LEDs in a car yourself when there is a need for it to operate in an expanded range of operating parameters. Below is a diagram of such a device. Its main feature is that the amplifier itself is included in the feedback circuit and is powered directly from the stabilizer output. The device is characterized by a stabilization coefficient of about 1000, while the output resistance is no more than 10 μOhm with an efficiency of about 50%. The nominal load current is at least 200 µA, and with double-amplitude output voltage ripple - less than 60 µV.
Among the main features of his work are:
- The operating temperature range is from -20 to +60 degrees.
- Thermal drift of output voltage is less than 0.05%.
- Possibility of increasing the output voltage to 27-30 volts.
To solve the last problem, you need to install a 200 Ohm resistor between pins “7” and “+25”. The cascade of transistor VT1 acts as a dynamic load for VT4 and at the same time increases the overall gain. Transistor P702A can be replaced with analogs of P702 or KT805, while KT603G can be replaced with P308 or P309, respectively, and KT201V and KT203V with MP103 or MP106.
On a pulse stabilizer chip
When a high efficiency is required from a voltage stabilizer for a car, it is better to assemble the device yourself using pulse components. The most common is the MAX771 circuit presented below (or analogues 770, 772).
The pulse type stabilizer has an output power of 15 watts. Circuit elements R1 and R2 separate the voltage readings at the output points. In the case when it becomes higher than the base one, pulse rectifiers simply reduce its output value. Otherwise, the device will, on the contrary, increase this parameter at the output.
Do-it-yourself installation of a pulse voltage stabilizer for LEDs in a car is reasonable when its value exceeds 16 volts. If increased load drop occurs, an operational amplifier should be added to the circuit.
Set contents
When purchasing an LED strip, you may want to pay attention to ready-to-use lamps. This is an easier way to illuminate areas in your home.
With some diligence, you can now find lighting fixtures to suit every taste and budget. In addition, sometimes assembly from separately purchased elements can be much more expensive than ready-made products. The tape itself cannot provide lighting without additional devices. For it you should also purchase a power supply, an adapter, an adapter and a certain amount of wire with which it all is connected. For a professional this will not be difficult. But an amateur will have to write down all the required characteristics, draw a connection plan, put all the parts together, try not to mix up the wires and thus not destroy all the purchased materials. And the result may be far from the plan.
At the same time, the master, when assembling the lighting, is able to control the quality of the material used, the work on the installation of the structure and placement. If you want to become a real master and decorate and ennoble your home as much as possible, you need to start small and simple, gradually moving on to more complex elements.
In conclusion, it should be recalled that when assembling more economical lighting, you should not purchase cheap materials. As they say, the miser pays twice, or even more. There are many offers from Chinese craftsmen on the Internet. It’s just that the lack of any guarantees, and sometimes even markings, makes you wonder whether their use will lead to a sharp reduction in service life or to more irreparable problems in the form of an accidental fire or harm to health. It is worth paying attention to the choice of not only the material itself, but also the manufacturer.