Preparation
Any work should begin with preparatory activities, especially if a newbie takes on the job and will have to do everything for the first time. This will avoid many mistakes and save your time. Before hanging the lamp, you should prepare in detail all the necessary tools and devices, and take care to comply with basic safety rules.
Safety precautions
Hanging a chandelier from the ceiling in a 220 V household network is a highly dangerous job. Firstly, there is a danger of electric shock, which can lead to very disastrous consequences. Secondly, you will work at height, which is also fraught with falls, bruises and even fractures. Thirdly, there is a danger of damage from glass and other sharp elements to lampshades, glass beads and other parts.
Therefore, if you decide to hang a chandelier, be sure to follow these rules:
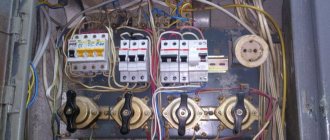
- Before hanging the chandelier, be sure to turn off the power to this section of the circuit using the machine; do not rely on the key switch, it may not be enough.
Disable machine
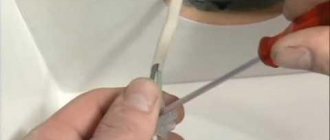
- Check for no voltage using an indicator screwdriver or multimeter. Please note that testing by pressing the switch does not provide a 100% guarantee that the phase does not reach the cable cores.
- Climbing to a height should only be done with the help of a reliable, stable base; the ideal option would be a stepladder that someone in the household will hold for you.
- When drilling the ceiling, it is better to use glasses to protect your eyes from debris, concrete fragments, dust, etc.
- When hanging a chandelier, it is necessary to remove from it all excess glass parts that may fall and break or not install them.
- The same applies to lamps, especially fluorescent ones; they cannot be installed before hanging the chandelier. The latter contain mercury and, if the integrity of the flask is damaged, will lead to the release of harmful substances into the airspace of the room.
If the chandelier has flammable parts, then it is strictly forbidden to use incandescent lamps in them, as they can lead to overheating and fire.
Required tools and materials
Like any work, installing a chandelier requires preliminary preparation of consumables. Most often, materials are required for connecting wires - terminals, sleeves, soldering, bolting, etc. It is important to know that the use of twists to ensure electrical contact is strictly prohibited. To fix the chandelier on the ceiling, you will need fasteners - strips, hooks, brackets, dowels, which are selected depending on the type of ceiling covering.
Among the tools prepared in advance you will need:
- A hammer drill, a screwdriver or an electric drill - depending on the material to which you will attach the chandelier;
Hand Drilling Tool
- Mechanic's tools - pliers, screwdrivers, wire strippers, stationery knife, electrical tape;
- Measuring instruments – indicator, multimeter, non-contact tester;
- Device for lifting to heights.
You will not need all of the above tools to connect a chandelier. Therefore, in each specific case the list is selected individually.
- Phase indicator and wire phasing
Indicator screwdriver
An indicator screwdriver can have several designs, but their main task is to show the presence of potential on the current-carrying conductor. To use it, you need to turn off the power to the output under the chandelier and strip the edge of the wire. If the ends are covered with electrical tape, simply remove the insulation. Then touch the phase indicator to the terminals of the electrical wiring; if the screwdriver does not light up anywhere, then there is no voltage.
Please note that before starting work, be sure to check the functionality of the indicator on those parts that are known to be live. You can also take a wireless indicator, it is safer and there is no need to touch bare wires.
Chandelier hook OBI metal 50 x 3.8 mm 5 pcs
Detailed description
Reliable metal chandelier fasteners are designed to fix the chandelier to the ceiling. The hook size is 50 mm. The fasteners are made of high-quality metal and can withstand significant mechanical loads. Dowel is used for fastening
| Type: | Hook |
| Length: | 50 mm |
| Diameter: | 3.8 mm |
| Material: | Metal |
| Surface treatment: | Galvanizing |
| Amount in a package: | 5 pieces |
| Dimensions and weight (gross) | |
| Weight: | 37 g |
| Height: | 9 mm |
| Width: | 8.0 cm |
| Depth: | 11.0 cm |
Similar products
Hook LUX-TOOLS steel 20 kg
Hook LUX-TOOLS steel 15 kg 25 mm
Hook LUX-TOOLS steel 20 kg 18 mm
Hook LUX-TOOLS steel 15 kg
Articles
- Scandinavian style in the interior
Delivery of online orders
Goods ordered in the OBI online store are delivered throughout Bryansk and the Bryansk region within 50 km from the city limits. Delivery costs are automatically calculated when placing an online order, based on the weight of the product and delivery area.
Minimum order amount for free delivery:
We will deliver your order free of charge if the delivery address is located in the first delivery zone for online orders, and also:
- > 3,000.00 ₽ — for orders weighing up to 5.0 kg
- > 6,000.00 ₽ — for orders weighing up to 30.0 kg
The courier service delivers small-sized orders (weighing up to 30 kg) to the buyer’s door, large-sized ones to the entrance (gate, gate) of the house. Delivery includes free unloading of goods from the vehicle and their transfer within 10 m.
Delivery date and time
Next day delivery is available when ordering before 6:00 pm. You will be offered a choice of one of two 7-hour delivery intervals:
- — from 10:00 to 16:00
- — from 15:00 to 22:00
If you want to reduce the waiting period, you can choose one of the 3-hour delivery intervals for an additional fee:
- — from 10:00 to 13:00 +250.00 ₽.
- — from 13:00 to 16:00 +200.00 ₽.
- — from 16:00 to 19:00 +200.00 ₽.
- — from 19:00 to 22:00 +250.00 ₽.
Rescheduling the date and changing the delivery time interval is possible no later than 24 hours before the previously agreed date and time.
You can learn more about the operating conditions of the courier service in the section Delivery of online orders.
Selection and description of installation method
Installation methods
Depending on the type of chandelier and the characteristics of your ceiling, mounting a pendant lamp can be done in several ways:
- Using a metal hook – suitable for relatively light chandeliers;
- For anchor parts and dowels - if the chandelier weighs more than 5 kg;
- On a metal strip or the back cover of the chandelier itself - used regardless of the weight of the lamp, if provided by the manufacturer.
Now let's look at the features of each fastening in more detail.
Hook.
Hook for attaching a chandelier
The hook mount is used on hard surfaces (concrete, wood, etc.), but it should not be installed in drywall. The hook will tear out the fixation point in the drywall as soon as you hang a more or less massive chandelier on it. For heavy ceiling lights you need to use anchor hooks.
First you will need to drill a hole in the concrete for the dowel. If you want to hang a chandelier in wood, you can screw the hook in directly, use a screwdriver for this, or first make a hole with a thin drill.
If the ceiling is concrete, then a dowel or plug is installed in the hole, in which a hook is then fixed. As a result, the embedded part expands and provides the necessary strength. After checking the reliability of the fastening in the ceiling, you can attach the chandelier.
bracket.
Bracket for hanging a chandelier
The bracket is a rigid metal structure that allows you to remove the lamp body from the ceiling surface. The metal anchor can be supplemented with wooden or plastic elements to fix the chandelier. Brackets can be either factory-made or home-made; any available materials are suitable for this - metal profile, anchor, etc. In some models of lighting fixtures, the function of the bracket is assigned to the back wall of the chandelier.
When attaching a chandelier to the ceiling using a bracket, you must select the points furthest from the wiring and secure it in the center relative to the electrical wiring outlet. Dowels are installed along the edges of the bracket, usually four pieces, but depending on the design, their number may differ. Anchor fastening has become the most relevant for suspended ceilings located at a distance from the base.
Mounting strip.
Mounting strip
The mounting strip is a flat strip of metal with profiling along the edges, ready-made holes for fixing to the ceiling and fastening nuts for attaching the chandelier. By type, mounting plates are linear (for two dowels) and cross-shaped (for four dowels). They provide good adhesion to the surface and uniform load distribution. The more attachment points, the heavier the chandelier can be hung on the bar.
To install the mounting strip, you need to attach it to the ceiling panel; you can select the old hanging unit for the center or measure the middle on the ceiling. Next, mark the points on the ceiling slab where you plan to screw the dowels. Drill holes according to the markings, first check that there is no wiring in these places, otherwise the chandelier will not work. Then take the wiring out from under the strip and attach it to the ceiling, be sure to check the reliability of the fixation.
How to change a chandelier on a suspended ceiling
If the lamp is being replaced, the lighting fixture must be removed to gain access to the fastening elements.
If the lamp was attached to a hook, then you can hang a chandelier on it, which you purchased to replace the old one.
If the installation was carried out on an embedded element, then you can also use this embedded element to fix the new device.
In the case when you need to change the position of the lamp, you may need to install a new sheet, since the hole that was made for installing the old lamp remains.
When installing additional lamps on an already installed structure, the panel will need to be dismantled, the embedded elements installed, the panel installed, and then the lighting system will need to be installed.
Thus, the chandelier can, like other light sources, be installed on a suspended ceiling. However, for this it is necessary to install embedded elements that allow you to create a rigid base for fastening.
Nuances of fastening depending on the ceiling material
In practice, there are various types of ceilings on which you need to hang a chandelier. Their type and load-bearing capacity must be taken into account at the stage of designing the fastening and performing installation work. The most relevant are plasterboard, suspended and concrete ceilings. Sometimes wooden finishing or hanging structures are used, but they are quite rare and fastening to wood is not particularly difficult.
Concrete.
Concrete ceilings are most often found in apartment buildings, offices and industrial plants. This is the most durable material, but also difficult to process. To install a chandelier on concrete, it is impossible to do the work directly. A hole is drilled in the concrete for a dowel, plug or anchor.
The hole is drilled with the same diameter as the embedded part so that the latter fits tightly into it. The depth of placement is selected according to the length of the same dowel or plug. Self-tapping screws or quick installation for fastening the chandelier are installed in ready-made fastening units.
Plasterboard.
Plasterboard ceilings are quite easy to drill and process, however, it is a very fragile material. Therefore, no matter what method you use to attach the chandelier, you must install special dowels in the drywall. The best option for drywall is a butterfly dowel, which has a release mechanism driven by a self-tapping screw. If you need to hang a hook in a suspended ceiling, use an umbrella dowel.
Drywall fasteners
Tension.
There is an air gap between the tension fabric and the base, so it is impossible to fix the chandelier on the film. The base of the chandelier must be mounted on a special bracket, which provides additional surface area near the stretch ceiling. The bracket must be installed before the ceiling is stretched; if the ceiling is already stretched, the hole for the bracket will be quite large and will have to be covered with a decorative bowl.
To mount the chandelier, you need to fix the film around the perimeter of the hole; a mounting ring of the diameter you need is glued onto it. You can either purchase it in a store or make it yourself from scrap materials. After gluing and drying the glue, cut a hole in the ceiling with a utility knife.
Installation under a suspended ceiling
Ceiling plasterboard: what is it and how to attach it
There are plenty of types of drywall. Among them: wall, ceiling, fire-resistant, moisture-resistant, arched, laminated, façade, reinforced. We are interested in the ceiling. What he really is?
- Sheets that are too heavy will be very difficult to attach to the ceiling, so for this it is proposed to use slabs with a thickness of no more than 8-9.5 mm, and to create something shaped, even thinner - no more than 6 mm.
- Select the correct finishing material according to the room’s humidity level. For bathrooms and kitchens, it is better to take more moisture-resistant samples that do not absorb moisture.
- It is unlikely that you can install sheets of plasterboard on the ceiling using glue. For reliable fixation, it is necessary to install guides and ceiling profiles.
- But the installation tool you need is the simplest: a screwdriver, self-tapping screws, a building level and a hammer drill.
Wiring connection
To connect electrical wiring, first turn off the voltage at the input panel.
Then follow these steps:
- determine the power supply system - three-wire or two-wire;
- then mark the separation of the wires at the place where the chandelier is connected to the wiring, the phase wires should have red, brown or black insulation, and the neutral wires should have blue or light blue;
- connect the phase and neutral conductors to the corresponding terminals of the chandelier; if the wiring also has a grounding conductor, connect it to the lamp body;
- if the chandelier has several lighting circuits or each LED lamp has a separate pair of terminals, then the sockets are connected to the wiring through special clamps.
After connecting to the wiring, the lamps are covered with a lamp cap, and decorative elements are installed. If the design of the chandelier includes a decorative cup near the ceiling, then it is also put in place.
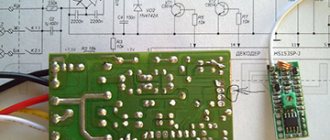
The process of dialing lighting devices
If the wires connected to the terminal have the same color or the marking does not meet the standard, before hanging the lamp on the ceiling, they need to be tested using a multimeter, for which the device is set to the appropriate mode.
Before starting the process, unscrew the light bulbs from the chandelier, and then proceed as follows:
- When the lamp contains metal conductive elements, and there are three or more wires, one of them may be grounding. To find out, one probe of the multimeter is placed on the conductive part of the housing, and the other is touched to the bare end of each wire or to the contacts of the connecting block. A sound indicates that a ground wire has been detected.
- To determine the neutral wire, one of the probes is placed on the side contact of any of the lamp sockets. Unmarked wires are touched until sound appears and a mark is applied to the neutral wire, the rest will be phase wires.
- In multi-arm chandeliers with two stages of lighting, sockets - one or more - are connected to all phase wires. If it is necessary to correlate them with a key on a switch, do this: attach the probe to the phase wire and sequentially touch the central contacts located on the bottom of the sockets. The cartridges connected to this wire are detected according to the sound signal. Do the same with the second phase wire.
When the luminaire wiring contains one phase wire and several stages of lighting, all sockets should be connected to it. In this case, the phase wires coming from the chandelier are combined by twisting or a jumper on the block. When the preparation of the electrical wiring and lighting device is completed, they begin to mount it on the ceiling.