Before you begin electrical installation work yourself or entrust it to professionals, you need to study what features the electrical wiring in a frame house has. In the foreground is the reliability and safety of the entire system. The second equally important point is aesthetics and ease of use. Let's look at how to do electrical work correctly in a frame house, which method is best to choose and what is needed for this.
Features of electrical wiring in frame houses
Frame houses are characterized by numerous advantages, but they have a number of specific properties that affect the electrification process. The main nuance is the use of flammable building materials when arranging walls and ceilings. The tree is coated with special substances, fire retardants, which reduce the risk of fire and the release of toxic substances, but such protection cannot be called sufficient. The slightest spark or significant temperature jump can cause ignition.
In a frame house, the installation of wires is carried out on a combustible base
Another negative point is the low thickness and low strength of the load-bearing surfaces. It will be difficult to secure power lines to thin sheets of plywood or drywall. These building materials are mainly used for interior decoration.
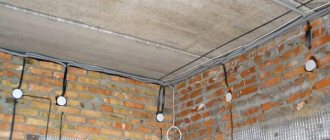
There are several ways to route the cable. Depending on the specific decision, you need to follow a certain order. Electrical wires can be installed before installing the load-bearing parts of the building or after completing the interior decoration.
Organization of hidden wiring during the construction of the frame
Testing and commissioning
After installing the electrical wiring, do the following:
- checking the nominal resistance of the circuits with an ohmmeter;
- testing the grounding loop and cable insulation resistance;
- checking the response threshold of automatic fuses, voltage regulators and RCD units.
Testing is carried out before the installation of the interior cladding of the house and allows you to correct errors with minimal labor input.
You should not refuse to check or delay the procedure, since an incorrect connection leads to a short circuit and ignition of the insulation or frame with trim.
Standards and rules
There are two main documents containing rules and regulations for installing electrical wiring in a frame house:
- PUE, or “Electrical Installation Plan”. "ABC" for electricians.
- SP, or “Code of Rules,” which describes in detail the electrical wiring in a frame house.
When studying these documents, you may come across several inconsistencies and conflicting advice. For example, the PUE assures that hidden wiring in frame houses must be hidden in metal pipes, since corrugations and metal hoses do not provide the required level of safety. But the authors of the joint venture were not so categorical, allowing the cable to be pulled directly inside walls and partitions without the need to hide it in pipes. However, the “Code of Rules” states that the wire must have high-quality insulation made from materials that do not support combustion. These are NYM and VVGng.
Laying cables in metal pipes
It is precisely because of such disagreements that at the beginning of the article we recommended that you turn to professional specialists. At least take advantage of their advice. It would be a good idea to talk to a representative of the Ministry of Emergency Situations.
Wiring and Safety
Most fires in wooden houses occur due to problems in the electrical wiring. Many mistakes are associated with ignoring fire safety, lack of protection from external mechanical influences, incorrect calculations of the total load and the subsequent purchase of small-section wires.
When going to an electrical store, make sure you purchase certified products. Wires must have high-quality insulation. Try to buy products from well-known manufacturers. Cheap Chinese cables may actually have lower physical parameters and properties. Poor insulation will quickly deteriorate, increasing the risk of short circuits, overheating and fire.
Cable VVGng 3*2.5 with non-flammable insulation
Is it necessary to use corrugation or metal hose?
There is no need to use corrugations and metal hoses if certified products are used, and installation is carried out in strict compliance with the rules and recommendations. The presence of such components increases protection, but is optional if all other conditions are met.
Proper organization of electrical wiring in a frame house reduces the likelihood of fire. As for mechanical influences, neither the corrugation nor the metal sleeve will protect the cable if you thoughtlessly drive self-tapping screws into the wall. Be sure to make a schematic representation of the places where power lines were laid.
Using a metal hose for wiring in a wooden house
Many articles write about rodents in a wooden house. In fact, with proper sanitization of wood, you will eliminate their occurrence and prevent a scenario where mice chew through wiring.
Another negative aspect of using corrugation or metal hose is the increase in the total cost of wiring. What's the point of paying more if the level of security is already high?
If you read European sites and try to find articles about wiring in a frame house, the strict need for the use of additional means of protection - corrugation or metal sleeves - will rarely be mentioned. But the checks there are much stricter.
You are mistaken if you believe that the presence of corrugation in the wall will allow you to re-stretch the cable without destroying the finishing layer. Cable lines have many bends, so it is difficult to imagine this process. You will have to place a corrugation, the diameter of which will be several times larger than the total cross-section of the wires being laid. But this is not economically profitable and takes up a lot of space in the wall or partition.
It is allowed to organize electrical wiring without using corrugations
Wiring and vapor barrier: how to run wires in a frame house
Electrical wiring in a wooden frame house must contain the most airtight insulation circuit possible. This is especially true for external walls, because hiding an entire line only in partitions will not work.
One of the best options is to hide the wiring inside the insulation materials installed in front of the vapor barrier on the living space side. The likelihood of damage to the circuit is minimized, and this gap makes it easy to install socket boxes.
Installation of cable in the insulation layer
The second option is to place the electrical cable behind the vapor barrier loop. This is much more difficult to accomplish and will require more financial resources. You will have to drill racks along the entire length of the cable line and stretch the wires. If communications consist of several cables, then the rack will turn into a sieve, which will reduce its strength. The vapor barrier is damaged and you have to reseal it.
Laying methods
Let's consider the main methods of laying an electrical cable in a frame house.
Outdoor
External installation of an electrical cable in a frame house can be done independently. There are several options.
Open cable
When arranging this wiring, a rigid wire with double/triple insulation made of materials that do not support combustion is used. To secure the line to the walls, install special brackets. To reduce the risk of fire, an asbestos or metal backing should be placed between the cable and the wooden wall. Its width directly depends on the thickness of the cable and is made 20 mm larger (the line is laid right in the middle).
External wiring in a frame house
This method is the cheapest and most reliable, but the electrical wiring does not look aesthetically pleasing. The system looks even worse if there are several wires nearby. On the other hand, this option is suitable for houses in retro design or loft style.
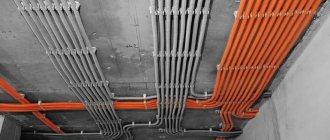
Electrical pipes
Electrical wires can be hidden in special corrugated pipes made of non-flammable materials. They can withstand high temperatures and have a diameter that allows multiple cables to be accommodated inside. Using special clips, the pipe is fixed to the wooden walls of the building.
Wiring takes up a minimum of free space, increases electrical and fire safety, and reduces the risk of mechanical damage during operation. However, we can again talk about unaesthetics associated with the untidy appearance of metal pipes. They will attract dust and dirt from the street.
Laying wires in electrical pipes
Cable channels
Such protective devices for electrical wiring have a more laconic and thoughtful design, which is what makes them better than corrugated pipes. The products are available in different colors, so they fit into any interior or exterior. Ideally straight cable channels can reveal a potential drawback of a frame house - the curvature of the walls. But if the house is built to last, then this will not happen.
Cable channel is a plastic box installed on walls or ceilings. Self-tapping screws or glue are used for fixation. The plastic from which the products are made does not support combustion and retains its properties when exposed to high temperatures.
Cable channels are available in different colors and dimensions. The specific width is selected depending on the communications. After fixing the box on the wall, lay the cable inside and then hide it under the cover.
Open wiring in cable channels
The main disadvantage of cable channels is associated with the potential shrinkage of the frame house, due to which the products will begin to crack. As a result, you will have to re-do the electrical wiring and change various components. To the advantages listed above we add the moderate cost of the products and ease of installation.
Wiring hidden in the casing
The PUE lists the basic rules and recommendations that should be followed when laying cables inside walls or ceilings. We wrote above that hidden wiring must be additionally protected by metal pipes. You will have to buy a lot of pipes, so the total cost of electrifying the house increases significantly. In accordance with the joint venture, you can get by with a more budget-friendly option by replacing the pipes with corrugated or metal hose. However, if finances allow, it is better not to save.
When purchasing metal pipes, try to select products with a wall thickness of 2–4 mm. This value will allow the products to withstand high temperatures resulting from short circuits. To avoid rust, paint the pipes inside or outside, or purchase galvanized elements.
Metal pipes for cable laying
Any electrical wiring has numerous bends and other route features, so the pipes will have to be welded together or secured with threads. To simplify the installation process, preference should be given to copper products, but they are more expensive than galvanized steel. To protect the plastic insulation layer, place protective sleeves on the ends of the cut pipes.
Pipes are installed at the initial stages of construction. You are guaranteed to need physical assistance. This type of wiring in a frame house requires a lot of time and serious investment, and therefore is extremely irrational.
Selection of materials
It is strictly not recommended to save on the purchase of tools, cables and other materials. It is better to buy high-quality, certified products from trusted manufacturers, which will significantly increase the durability of the system and the safety of network users.
Electricity must be supplied to the house using a thick cable with aluminum conductors; the wiring inside the building is made of copper products. Preference should be given to three-wire wires in order to ground powerful electrical appliances without any problems in the future. When connecting lines, copper or brass bars are used.
Preparatory work
Design is the first stage of building electrification. You should decide where the sockets, switches, distribution boxes will be located, how the cable lines will run, and so on.
Installation tools
A man who considers himself a master must have all the tools necessary to install electrical wiring. If they are not there, then you are unlikely to install cables in the house yourself.
Let's list the main tools:
- drill and/or screwdriver;
- wire cutters;
- Screwdriver Set;
- screwdriver with indicator;
- stationery knife;
- tape measure and pencil;
- level;
- ladder or other devices to reach high points.
Tools for electrical work
Pliers, a saw and a hammer may also come in handy.
Consumables
In addition to the electrical cable, to supply electricity to the house and lay communications inside the building you will need:
- protective devices: corrugations, metal hoses or pipes;
- distribution boxes;
- socket boxes;
- mounting boxes;
- sockets and switches;
- clips or other fasteners to secure the protective devices and cable inside;
- clamps for fastening the input cable;
- self-tapping screws;
- electrical insulating tape.
Wiring materials
Drafting
Next, you need to draw up an electrical wiring diagram, which displays all electrical points (switches, sockets and lamps, heaters), distribution boxes, panels and the cable line itself. Switches should be installed near the doors, sockets should be installed closer to the places where electrical appliances will be located. Otherwise you will have to use extension cords.
When drawing up a diagram, you need to take into account all the objects located in the room: doors, windows, pipes and heaters.
Calculate the total load of appliances used in each room. In accordance with the obtained value, select the correct cable cross-section, which should be 15–20% larger than the recommended one. The total load in the house will allow you to decide on the differential circuit breakers used.
Layout of electrical wiring in the house
After drawing up the diagram, mark the interior using a building level, a pencil (marker), a tape measure and a ladder. Display “crosses” at the locations of the electrical points. The distance between the floor and the socket must be at least 300 mm, between the floor and the switch - 900 mm.
Requirements for external wiring in the apartment
So, you decided that bothering your neighbors with a hammer drill and hammering into walls is a bad idea, and you chose the option with external wiring. Ok, then take a look, or better yet, write down the requirements for its installation in a notebook.
First of all, draw a diagram of the location of all wiring lines. Typically, wires and cable ducts are oriented either vertically or horizontally in relation to the walls, floor and ceiling. All other directions are prohibited by safety regulations.
On the diagram, clearly and clearly indicate all the places where you plan to install sockets, switches, distribution boxes and other electrical appliances. Calculate the number of sockets and lamps you will need. Read about how to properly place sockets and other electrical appliances in your apartment in previous materials.
When drawing up a plan, keep in mind that the wiring lines should be located at a distance of 15 - 20 cm from corners, window and door openings. Old standards recommend placing sockets at a height of 60 cm from the floor, and switches higher - 150 cm. The modern standard is for a switch 60 cm, for a socket - 20 cm from the floor level.
And here is the list of recommendations for laying external wiring, which follow from the rules for installing electrical installations in residential and public buildings. If you are interested, you can find this serious technical document in its entirety here, and we will outline only a few points from it that relate to external wiring:
Do not lay external wiring cables near heat emitters - radiators, heating elements. Wire insulation and plastic cable ducts will deteriorate over time from exposure to heat.
Do not route the wiring line under pipes where condensation may accumulate. For example, in a bathroom, kitchen or toilet, condensation on cold water pipes is a common occurrence. Do you remember: water is the first enemy of electricity. Even a simple corrugated pipe or leaky cable duct may not be enough.
Cables laid in wet areas must have additional protection. Double or even triple insulation will be just right.
Do not simply connect wires inside ducts and pipes. This should only be done in junction boxes.
Place distribution boxes in places where they can be easily reached in case of emergency. In damp areas, use sealed boxes. And in general, remember about the protection class, and place only waterproof electrical appliances in wet rooms.
Do not expose wires unnecessarily. The insulation on the wire must be intact along its entire length, from the box to the outlet, switch or other box.
If you are doing open wiring without pipes and cable ducts, then use special plastic brackets selected according to the diameter of the conductor to secure the wires and cables. Such staples are sold at any hardware store in the electrical goods department. The distance between the staples should not be too large, otherwise your wires will sag under their own weight.
Place the mounting brackets on both sides of the wire. Fastening brackets are required near the points of connection to sockets and switches. If the power cable is laid horizontally, place the staples at a distance of no more than 40 cm from each other, and for a vertical cable - no less than one meter apart.
For thin wires, the distance between the staples is reduced: horizontally - every 25 cm, vertically - every 40 - 45 cm. The distance from the last staple to the socket or switch should not exceed 10 cm. Better yet, place the last staple directly in front of them.
Do not bend wires unnecessarily. Try to make all turns and bends of the line using junction boxes. If this doesn’t work, make sure that the minimum bending radius of the wire is at least 3–5 cm.
If the wiring does cross a non-electrical pipeline, try to move them away from each other by at least 3 - 5 cm. At the intersection, drive the cable into additional protection, for example, into a piece of plastic pipe.
To run wiring through a wall, bury a piece of pipe into the wall and push the cable through it.
Entering the house
Connecting the house to power lines is done using a thick cable with aluminum conductors. It is laid through the air or in the ground. Accordingly, holes should be made in the ceiling slab or plinth.
Air laying is carried out using a powerful and elastic steel cable. First, it is pulled, and then an electrical cable is attached to it using clips. Underground entry involves digging a trench, laying a pipe and pulling a wire through it. The pipe will protect the line from ruptures due to soil heaving. A flexible steel adapter is placed at the point at which the cable enters the house.
Input of electricity into a frame house using SIP cable
Do not forget to follow SNiP. In accordance with this document, the cable is connected to a meter located outside the building. To protect the device from environmental influences, it is hidden in a sealed box and behind a transparent window. Behind the meter there is a batch switch that interrupts the power supply in the event of an emergency.
Cable entry and grounding installation
At the next stage, it is necessary to make a branch from the main power line in order to supply electricity to the house. For this, in most cases, an aluminum SIP cable is used, which has reliable insulation protected from ultraviolet radiation and other influences, and has a self-tensioning function.
It is fixed on the vertical surface of the house (usually a pediment) using special devices - hooks or other devices. A ceramic insulator mounted on a reliable metal bracket can also be used for this. In any case, installation must be carried out at a height of no lower than 2.75 m from the ground surface.
The entrance point should be equipped with a metal tube (sleeve), which will prevent the cable from coming into contact with the wood, and also protect it from damage in the event of shrinkage of the house or movement of the wall.
Next, grounding is done using long copper electrode pins, buried in the ground to a depth of 50-70 cm at a distance of 2.5 - 3 m from each other. They are connected with a metal tape, and then a flexible cable is pulled from the finished circuit to the distribution panel.
Distribution panel
The shield is installed where the cable enters the house. You can make it yourself, but ideally you should purchase a factory-made product.
The following are mounted in the shield:
- introductory machine;
- buses for switching;
- RCD;
- automatic machines;
- ventilation;
- set of fuses.
Installation of a distribution board in a wooden house
Important! A secure lock must be placed on the switchboard doors.
General recommendations
The electrical system of a private home includes a ground loop, which is installed in the ground. There are factory-made devices and home-made structures made from steel profiles. If a gas boiler is to be used in the room, then it is necessary to check the grounding resistance by a laboratory and issue a certificate.
For installation of switches or sockets, it is recommended to use sealed housings from Kopos. The products are made of elastic, non-flammable plastic and prevent sparks from hitting wooden elements. Cable breaks in junction boxes are sealed with a sealed coupling, and the ends of the metal sleeves are protected with heat-shrinkable tubing.
What type of wiring to choose
The updated collection of rules for electrifying a private home involves the use of wires with copper conductors. Aluminum wiring is a thing of the past, so if it is discovered, inspectors may simply refuse to put your house into operation.
The choice in favor of a three- or five-core cable depends on the voltage supplied to the house - 220 or 380 V, respectively. And the wire cross-section is selected depending on the total load of energy consumers.
The optimal cross-section is considered:
- 1–1.5 sq. mm for lamps, luminaires, video cameras and alarms;
- 2.5 sq. mm for sockets and switches;
- 4 sq. mm for boilers, electric stoves, microwave ovens.
Wire cross-section and load
Also try to buy wires that do not change their useful properties when exposed to high temperatures and other negative factors. Choose a cable with better insulation, which will eliminate the need to install metal pipes.
Wiring internal
The most important regulatory document for an electrician is the PUE (electrical installation rules). According to these rules, internal wiring (also called hidden wiring) in wooden houses must be carried out in metal pipes. Since frame house construction is made of wood, this requirement must be observed for them as well. Can you imagine the financial costs of such a number of pipes and their installation?
You can use metal sleeves or boxes, but if money allows, still use pipes. These auxiliary means must have a wall thickness of 2.5 to 4 mm (depending on the cross-section of the conductors) so that in the event of a short circuit the metal structure does not burn out. It is advisable that the pipes inside be painted or galvanized, this will protect the walls from rust. Video example:
Naturally, there will be bends and turns along the cable laying path; in these places, the pipes should be connected by welding or threading. It is very convenient to use copper pipes; they bend easily, but they are too expensive.
To avoid damaging the insulating layer of the cable, plastic bushings are mounted at the ends of the pipe.
Such installation is carried out during the construction stage, and, as you can see, it is quite expensive both in terms of finances and in terms of labor, time and effort. Therefore, the most correct choice for a frame house is still external electrical wiring.
Load distribution
To prevent overheating of the contacts and fire of the line, you should distribute the load as evenly as possible and distribute the wiring in the house. For the calculation, data obtained when the network was operating at design capacity for 20–30 minutes is used.
Group consumers according to the following principles:
- similar devices;
- summarized indicators;
- powerful devices with long operating time.
Place the installations along the lines, and upon completion of the calculations, select the number of directions, differential circuit breakers, RCDs, cross-section of cable cores and type of sockets for individual rooms.
Electrification of a wooden frame house is a complex process that requires compliance with numerous rules and recommendations prescribed in the PUE and joint venture. Without proper knowledge and experience, it is almost impossible to do it on your own. It is recommended to seek help from specialists, at least for consultation. Only competent installation of wiring and selection of high-quality materials guarantee the electrical and fire safety of the building.
Electrification project
Drawing up a plan for home electrification is not only determining the location of network elements, but also calculating the load, type and quantity of materials needed. Of course, in such matters it is better to trust the professionals. Don't want to spend money on specialist help? You can do this yourself, but you still have to familiarize yourself with some rules.
If you have a floor plan, mark on it the locations of sockets, lighting switches, wiring, and, of course, the meter. If you don’t have a drawing, arm yourself with a tape measure and a pencil and mark the locations of the electrical network elements on the walls.
According to European standards adopted in Russia, sockets should be at a height of 30 cm, and switches should be 90 cm from the floor.
Decide on the number of household appliances and their location to understand how many sockets and wires you will need.
Calculating the load on the electrical network should be done with a reserve, because in the future the number of household appliances used at a time may increase.