It is difficult to imagine a house in 2022 that is not equipped with an Internet connection. Typically, providers themselves install a modem or router for use by one computer. However, if you want to create a local network and add IP television or several more computers to it, you will need to study the technology of laying Internet cables, which are otherwise called twisted pairs. I will tell you about the correct crimping of twisted pair cables without errors using a special tool or improvised means.
Crimping Tools
To create a fully functional patch cord, you will need a standard network cable, as well as two or more RJ-45 connectors. The installation tool kit includes:
- Press pliers (crimpers).
- Stripper is a device for removing insulation.
- Knife.
- Screwdriver.
- Wire cutters, pliers.
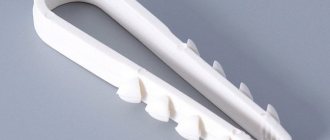
On the right is a cheap, inconvenient one, and on the left is a good, expensive crimper
Two types of connectors - regular and with a metal casing.
Also, for crimping, prepare several adapters and plastic protection in case the cable breaks.
Stripper
In many cases, the use of a tool for cutting the cable and removing the outer layer of insulation will make the work easier and faster. Such a tool is called a stripper. The recommendations for choosing are the same: it is better to buy a tool that is suitable specifically for the required work.
What are the differences between 3G and 4G networks: features, advantages and disadvantages
In this regard, strippers are divided into:
- designed to work with twisted pair cables;
- intended for other types of work;
- universal (multifunctional).
For working with patch cord, tools of the first and last types are suitable.
Note! It would be nice if the stripper has an adjustable cutting depth for the insulation.
With the right tool you can:
- cut the cable to the required length;
- remove external insulation.
Possible schemes
There are 2 main schemes used for crimping Internet wires. To choose the appropriate option, you need to figure out which devices the cable will connect.
An old skein with broken connectors that we will use for experiments
Direct connection
This type is required for connecting the following devices and devices:
- Personal computer – router.
- PC – communicator;
- Router - communicator;
- Router – SMART TV.
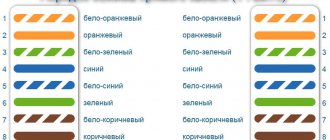
The main difference between direct pinouts is the identical arrangement of the wires of the two devices when connected to the connector of each. When connected directly, the wires are arranged in the following order:
- White-orange.
- Orange.
- White-green.
- Blue.
- White and blue.
- Green.
- White-brown.
- Brown.
You cannot swap colors at different ends, otherwise there will be no signal. Sometimes you can use not 8, but 4 wires. So, for data transmission at speeds of up to 100 megabits, only 1,2,3 and 6 numbers are used. Therefore, to save money, you can buy “cables with two twisted pairs” if you plan to connect low-speed devices. The same RJ 45 connectors are used for connection.
Cross connection
This type is used to connect two devices with the same operating principle: PC-PC, router-router. The difference from the first type of connection is that the first connector uses the same wires as for a direct connection. In the crossover, two pairs change places: orange - orange-white, green - white-green. The remaining positions do not change.
Crossover mode is used when connecting two computers to each other
This complicated scheme is used less and less often. The fact is that most new devices are equipped with an Auto MDI-X interface, which automatically recognizes the connection type and adjusts the optimal operating mode. This means that you will only need to connect the wire in a straight line.
How to work with crimping pliers - important nuances
The process of crimping wires is intuitive - a sleeve or tip is put on the wire(s), a pliers matrix is attached to it, the handles of the tool are closed and the contact is ready. In practice, most often the “first pancake”, or even several, turn out “lumpy”, and almost in the literal sense - the connections may be far from ideal. There have also been cases when contact in a seemingly well-crimped wire deteriorated over time.
If the shape of the terminals is not maintained
In the first case, the culprit is the settings for the compression force of the matrix parts, which can be different both for individual wires and for the tips themselves. Because of this, professionals prefer to have at least two tools so as not to have to reconfigure the spring to work with different wires or sleeves.
The quality of work is also influenced by the material from which the sleeves are made and their thickness. Crimping for dense terminals is always much easier and they subsequently hold their shape better than those made of soft materials.
The correct orientation of tips with a “U”-shaped cross-section is a requirement that lies on the surface, but is often ignored, and the misalignment of parts in any mechanism does not always fall within the zone of permissible error.
Twisting stranded cores before crimping
For every experienced electrician who started with twisting and soldering wires, this movement is most likely already a reflex, but when crimping for stranded lugs is performed, then you need to get rid of it. The validity of this statement can be verified by a simple experiment - take a pair of single-core single-wire wires, arrange them crosswise and squeeze them with pliers. In some cases, both wires are deformed, and sometimes only one, but in this case it will be almost completely broken and begin to dangle on a thin isthmus. Of course, the conductivity of this vein will decrease significantly.
If the wires do not twist, then when crimping the tip they will be located parallel to each other and when deformed they will simply fill all the voids without squeezing each other.
The nuances of lining wires in the video:
Color marking of sleeves and dies
Some manufacturers mark different sizes of sleeves with separate colors and the same marks are applied to the plier matrices.
We must remember that a unified system for this has not yet been developed, so if you purchase cartridges based only on color, you may end up with consumables that are not entirely suitable.
Using self-crimping connectors
I recently learned that there are connectors that do not require a crimper and a screwdriver for crimping. All you need are the tools to remove the top braid of the cable and align the row of wires. The operating principle is as follows:
- Remove the top braid.
- Unravel and straighten the wires.
- Open the lid of the device and add steam from the top. Each wire is in its own groove. Once connected, the clamps will prevent the wires from just flying out.
- Now close the lid until it clicks. The fixed knives will be connected to the wires, allowing the cable to be used to connect different devices.
The price of such a connector varies from 75 to 500 rubles, depending on the manufacturer. However, it is compensated by the fact that you do not need to purchase and use additional tools. This connector is considered reusable. If necessary, remove and install it back.
How to crimp a cable - process and methods
First, remove the outer insulation.
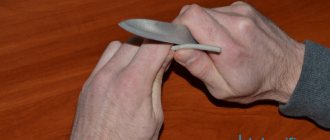
Option 1. Purely Russian. Using a knife, pressing lightly, we carefully go along the contour of our cable (if you press too hard, you will damage the core or accidentally cut off the half of the cable).
Option 2. Thoughtful. The cable, as a rule, has a special thread (usually white nylon), we take it and pull it along the cable. This way it will cut the outer insulation, and the excess can then be cut off with the same knife.
Option 3. Best. Most advanced crimpers have long had a built-in blade for removing insulation - just insert the cable into the hole, squeeze the tool handles and then remove the winding with your hands. It’s convenient, even, and the insulation is cut, one might say, snugly.
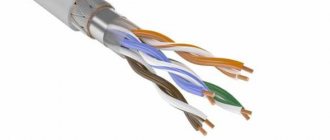
Now our cable without insulation consists of 4 pairs of twisted cores and a nylon thread. You can cut the thread immediately. You won't need it. Next, we untangle the veins and try to straighten them as much as possible.
Now we need to determine what type of cable we will make, because how to crimp the cable (in what way), and there are several of these methods.
Checking crimp quality
There are several ways to ensure cables are crimped correctly:
- Connecting devices for which twisted pair cables have been crimped. If the computers start interacting, then you haven't made any mistakes.
- Attach a multimeter to each wire on the connector, setting the level or minimum resistance. If there is no characteristic cracking sound when touched, then it needs to be replaced.
Set the switch to beep - Insert one end into the ethernet connector, and at the other, measure the resistance on each wire. If it is too large, then an error was made during crimping. Also, the resistance of both pairs should be approximately equal.
- When visiting a home, technicians use special LAN testers to assess the condition of communication lines. You can buy the same one and help your friends check it.
The design of LAN testers consists of 2 blocks, to which different connectors are attached. After connection, connect the device to the network and look at the indicator lights. If some of them do not light up, then these wires are not working.
Cable tester
Antenna for a computer to strengthen the Wi-Fi signal
If it was not possible to install the connectors on the cable correctly, this can be seen immediately by the non-functioning network connection. But there can be many reasons for network inoperability, including hardware failure or incorrect network settings. To exclude a non-working cable from this list, it needs to be checked. There are cable testers (LAN testers) for this purpose. They are divided into several classes:
The simplest testers
They operate on the principle of direct “dialing” of connections. Consist of two parts, connected on both sides of the crimped cable. The main and only advantage of such devices is their low price.
Advanced devices
They can show the type of damage and determine the connection diagram. Equipped with built-in tone generators for increased ease of use.
Multifunctional devices
In addition to the cable tester, they contain one or more devices. The kit may consist of a crimping device and a lantester, or a cable tester and a generator for “testing” individual wires.
Professional devices
The most expensive, but working with them is a pleasure. They will show the type of damage, the distance to it, and are equipped with protection against counter voltage. Information is displayed on the screen.