Crimping schemes
There are several crimping schemes (2). They are used for various types of connections. If you crimp the cable incorrectly, there may not be a connection. So the main thing here is not to get confused. So, what schemes are there?
Fig.1. Straight Cable Crimping
- Straight cable. Used to connect a computer to a router, TV and other devices of the same type. It is this circuit that is used when crimping a cable to provide access to the Internet.
Fig.2. Crossover crimp
- Cross cable (Crossover). It is used exclusively to connect two or more computers into one network. In this case, the use of routers, hubs and other equipment is not expected. Exclusively PC with another PC. Directly.
If you need to make a cable specifically for connecting to a router and providing access to the Internet, then you need to use exclusively the first option. If you crimp the crossover, there will be no connection.
Types of color schemes for crimping LAN cables
According to the EIA/TIA-568 specification, there are several color schemes for crimping twisted pair lan cables (patch cords) into an RJ-45 connector to connect computers to a router, hub, switch, or connect two computers to each other.
What is the difference between a patch cord and a twisted pair cable? A patch cord, or as it is also called a patch cord, is designed to connect electronic devices to each other, for example, a computer with a hub, switch, or two computers with each other. To make a patch cord, you take a twisted-pair cable, the cores of which are made of stranded wire so that they do not break due to frequent kinks. To crimp such a cable, special RJ-45 connectors are used.
What is needed for crimping?
In general, it is advisable not to use improvised means, but to crimp the twisted pair cable with a special tool.
This will allow you to achieve the best quality connection. But you don’t always have a crimper at hand. What is needed to perform the crimping operation?
Fig.3. Crimping kit
- Twisted pair network cable of the required length.
- Set of connectors. Minimum – 2 pieces. On one end and the other. But it’s better to have 4 of them. Just in case.
- Insulating cap . Plastic or rubber. Installed at the junction of the cable and the connector and prevents fractures and bends. Not required.
- Crimping tool (crimper) . It is inexpensive and can quickly fix the connectors on the cable without any problems.
- If there is no crimper, then you can use a flat screwdriver . And a knife for stripping contacts.
Method No. 1. We use a crimper
This option is the simplest and fastest. It involves using a special tool to crimp the cable.
The crimper can replace all other tools. Therefore, many specialists love to use it.
The design of the crimper is such that it can be used to easily perform all cable crimping operations. There are even special blades on the handles for convenient cutting and comfortable removal of insulation.
Fig.4. Crimping with a crimper
- So, first you need to strip the cable insulation. We insert it between the blades on the crimper and slightly squeeze the handles. Turn the tool clockwise. After this, we simply tighten the already cut shell.
- Now we straighten the twisted wires so that they lie flat.
- We trim the veins with a crimper.
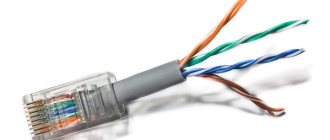
- We take the connector and insert each wire into a separate groove in accordance with the direct twisted pair crimp diagram.
- We try to ensure that the connector slightly grips the cable insulation. This will make the connection more reliable.
- If all the wires have been distributed, then insert the connector into the special socket of the crimper.
- Squeeze the handles of the tool until you hear a characteristic click.
- We put on the insulating cap.
- We repeat everything that was done above for the second end of the twisted pair.
That's the whole crimp. Now you can connect the router to the computer’s network card and try to establish an Internet connection.
If everything is done correctly, the connection will appear in a matter of seconds. If something is wrong, you will have to redo the entire cable.
Method No. 2. We use a knife, screwdriver and other available tools
Everything is much more complicated here. Crimping the cable using improvised means will take much more time.
And it’s not a fact that the operation will be successful the first time. Moreover, certain skills in working with the appropriate tools will be required.
To carry out the crimping procedure, you will need a sharp knife, a flat-head screwdriver, a twisted pair of the required length and a set of connectors.
The algorithm of actions is simple, but it will require some skill and extreme caution.
Fig.5. Crimping a twisted pair cable with a screwdriver
- First, remove the cable insulation. To do this, use a punch to carefully cut the rubber tube of the cable. The cut should be minimal, since it is important not to damage the wires. After making the cut, you can pull the insulation off with your fingers.
- We cut off the sharpening veins with some kind of pliers. 20 mm wires will be enough. They fit perfectly into the connector.
- Now you need to take the connector and carefully insert the wires into the grooves in accordance with the straight twisted pair crimp pattern. It is advisable to somehow secure the cable and connector itself, since further actions will require complete immobility of the components.
- Take a flat-head screwdriver and carefully press in the metal contacts on the connector . Care must be taken here, as pressing too hard can damage the contacts. And they won't work.
- We also press in the plastic connector clamp , which should grip the cable insulation.
- We put on the insulating cap.
- We repeat the operation for the second end of the cable.
Overview of crimping circuits
Correct operation of the wire is ensured by a certain arrangement of cores in the connector. There are two main pinout schemes for an 8-core cable and another for a 4-core cable, which almost no one uses anymore.
If a switching device - router or switch - needs to be connected to a PC, laptop, all-in-one, then direct pinout is required. When connecting two computers directly - cross-over.
Both circuits have a digital designation:
- direct – 568V;
- cross-over – 568A.
It is better to learn the location of the wires in both cases, since both diagrams can be useful for home use to create an internal network.
Direct scheme. During the crimping process of both connectors, the wires are positioned identically, as if in a mirror image. The order of the conductors and their color ratio are also important.
Wires cannot be swapped. If orange follows white-orange, then neither blue nor green, nor any other cable should be connected - the cable will not work.
But there is one point - the orange and green wires are interchangeable, that is, No. 1 can be white-green, then green, and so on.
Cross circuit. More complex and requires memorization, since the conductors are connected not just in reverse, but in a special order, and the position of some remains “straight”
If suddenly, instead of the popular 8-core cable, you have to crimp a 4-core cable, used only for connecting peripheral devices, then a completely different circuit will be required.
When using the same connectors, the order of connecting the conductors changes.
Direct pinout diagram for 4-core cable. The peculiarity of the connection is that some tracks remain free. Pins 1-3 and 6 are active, only orange and green conductors work
The contact numbers are stamped on the connector; they must be taken into account when installing the wires . In order not to get confused with the order of placement, it is enough to find the number 1 or 8.
Read more about crimping twisted pair cables onto 8 or 4 cores.
Checking the cable functionality
There are several options for checking the functionality of a newly crimped twisted pair. This must be done before using the cable.
This way you can correct shortcomings even before connecting the cable to the network.
Method No. 1. Using a simple tester (multimeter)
This option is the most acceptable, as it allows you to check the functionality of the cable before connecting it to the network.
It can be used by both professional IT specialists and ordinary users.
All you need is a regular tester (multimeter) used to check the current. It allows you to quickly identify a malfunction and eliminate it.
And using this device is quite simple. No one will have any problems.
- So, first we switch the tester to resistance or sound signal mode. This is done using the mode switch. It may look different. Depending on the tester model. Simply set the switch to the speaker icon.
- Now we “poke” one probe of the tester into any contact on the connector, and the second one into contact with the same color of the core on the other connector.
- If there is a beep, then there is resistance. This means there is also contact.
- Let's move on to another contact.
- We check the rest in the same way.
- If there is no signal somewhere, then we try to press the contact manually and check again.
- If everything is in order, then plug the cable into the network and enjoy a high-speed connection.
Read also: Cutter for a planer
This method of checking twisted pair cables helps to quickly identify the malfunction and eliminate it.
Moreover, for the most part the fault lies in insufficient connection of the contact with the cable core. Regular pressure will help.
Method No. 2. Connecting the cable to the network
The simplest and most accessible way to check. It does not involve the use of any specialized tools.
It also does not allow you to determine which part of the twisted pair the problem occurred in.
All that is needed for such a check is a computer with a network card on board, a router (switch, hub, modem, etc.) and the cable itself.
In the future, you may need a multimeter. To pinpoint the location of the problem.
Fig.7. Twisted pair in a router (modem)
- So, we insert one end of the cable into the RJ-45 connector on the user’s computer.
- We insert the second connector into the router.
- Let's start the PC.
- The network card should automatically detect the cable and make the connection.
- If this does not happen, check that the installed drivers are up to date.
- If everything is fine with them, then the problem is definitely in the twisted pair cable.
- We take a tester (multimeter) and look for the specific location of the problem.
- We fix the problem and try to connect again.
This option is good because if no problems arose during the check, then you can immediately start using the Internet.
No need to waste time connecting and setting up. Very convenient for those who do not have free time.
How to crimp an Internet network cable (RJ-45): with a screwdriver, pliers
Good day to all!
This article will talk about a network cable (Ethernet cable, or twisted pair, as many call it), thanks to which a computer connects to the Internet, a home local network is created, Internet telephony is carried out, etc.
In general, such a network cable in stores is sold by the meter and there are no connectors at its ends (plugs and RJ-45 connectors, which connect to the network card of a computer, router, modem and other devices. A similar connector is shown in the preview picture on the left). In this article I want to tell you how you can crimp such a cable if you want to create a local network at home yourself (or, for example, move a computer connected to the Internet from one room to another). Also, if your network disappears and after fixing the cable, it appears, I recommend taking the time to re-crimp the network cable.
The note! By the way, stores have already crimped cables with all connectors. True, they are of standard length: 2m, 3m, 5m, 7m. (m - meters). Also keep in mind that it is difficult to pull a crimped cable from one room to another - i.e. when you need to “stick” it through a hole in a wall/partition, etc.. You can’t make a large hole, and a connector won’t fit through a small one. Therefore, in this case, I recommend stretching the cable first and then crimping it.
What do you need for work?
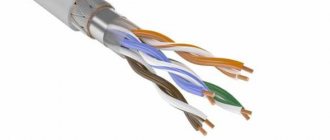
1. Network cable (also called twisted pair, Ethernet cable, etc.). Sold by the meter, you can buy almost any meter (at least for home use you can easily find it in any computer store). The screenshot below shows what such a cable looks like.
twisted pair
2. You will also need RJ45 connectors (these are connectors that are inserted into the network card of a PC or modem). They cost pennies, so buy them immediately with a reserve (especially if you haven’t dealt with them before).
RJ45 connectors
3. Crimper. These are special crimping pliers with which RJ45 connectors can be crimped onto a cable in a matter of seconds. In principle, if you do not plan to pull Internet cables often, then you can borrow a crimper from friends, or do without it at all.
Crimper
4. Knife and regular straight screwdriver. This is if you don’t have a crimper (which, by the way, has convenient “devices” for quickly cutting the cable). I don't think their photo is needed here?!
The question before crimping is: what and with what will we connect via the network cable?
Many people do not pay attention to more than one important detail. In addition to mechanical compression, there is also a little theory in this matter. The thing is that depending on what you connect and with what, how you need to crimp the Internet cable depends!
There are two types of connections: direct and cross. Below in the screenshots it will be clear and visible what we are talking about.
1) Direct connection
Used when you want to connect your computer to the router, TV to the router.
Important! If you connect one computer to another computer in this way, then your local network will not work! To do this, use a cross connection.
The diagram shows how to crimp the RJ45 connector on both sides of the Internet cable. The first wire (white and orange) is labeled Pin 1 on the diagram.
2) Cross connection
This circuit is used to crimp a network cable that will be used to connect two computers, a computer and a TV, and two routers to each other.
That is, first you decide what to connect to what, look at the diagram (in the 2 screenshots below, it’s not so difficult to figure this out even for beginners), and only then you start work (more about it, in fact, below)…
Crimping a network cable using pliers (crimper)
This option is simpler and faster, so I'll start with it. Then, I’ll say a few words about how this can be done using a regular screwdriver.
1) Trimming the shell
A network cable consists of: a hard shell, behind which are hidden 4 pairs of thin wires, which are surrounded by another insulation (multi-colored, which was shown in the last step of the article).
So, the first thing you need to do is trim the sheath (protective braiding), maybe by 3-4 cm at once. This will make it easier for you to distribute the wiring in the right order. By the way, it is convenient to do this with pliers (crimper), although some prefer to use a regular knife or scissors. In principle, they don’t insist on anything here, whatever is more convenient for you - the only important thing is not to damage the thin wiring hidden behind the shell.
The sheath is removed from the network cable by 3-4 cm.
2) Protective cap
Next, insert the protective cap into the network cable; doing this later will be extremely inconvenient. By the way, many people neglect these caps (and by the way, I do too). It helps to avoid unnecessary cable kinks and creates an additional “shock absorber” (so to speak).
Protective cap
3) Distribution of wiring and selection of circuit
Next, distribute the wiring in the order you require, depending on the selected scheme (this is discussed above in the article). After distributing the wires according to the desired pattern, trim them with pliers to about 1 cm (you can also trim them with scissors if you are not afraid of ruining them :)).
4) Inserting wires into the connector
Next, you need to carefully insert the network cable into the RJ45 connector. The screenshot below shows how to do this.
It is important to note that if the wires are not trimmed enough - they will stick out from the RJ45 connector, which is highly undesirable - any slight movement you make against the cable can disable your network and interrupt the connection.
How to connect a cable to RJ45: correct and incorrect options.
5) Crimping
After this, carefully insert the connector into the pliers (crimper) and squeeze them. After this, our network cable is crimped and ready for use. The process itself is very simple and fast, there is nothing special to comment on here...
The process of crimping a cable in a crimper.
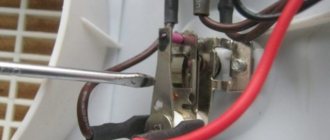
How to crimp a network cable using a screwdriver
This is, so to speak, a purely homemade manual method, which is useful for those who want to quickly connect computers, and not look for pliers. By the way, this is a feature of the Russian character; in the West people don’t do this without a special tool :).
1) Cable trimming
Everything is similar here (a regular knife or scissors can help).
2) Scheme selection
Here you are also guided by the diagrams given above.
3) Inserting the cable into the RJ45 connector
Similarly (the same as in the case of crimping with a crimper (pliers)).
4) Fixing the cable and crimping it with a screwdriver
And here is the most interesting thing. After the cable is inserted into the RJ45 connector, place it on the table and press it and the cable inserted into it with one hand. With your other hand, take a screwdriver and carefully begin to press the contacts (picture below: red arrows show crimped and uncrimped contacts).
It is important here that the thickness of the end of the screwdriver is not too thick and you can press the contact all the way, securely fixing the wire. Please note that you need to fix all 8 wires (only 2 are fixed in the screenshot below).
Screwdriver compression
After fixing the 8 wires, you need to fix the cable itself (the braid that protects these 8 “cores”). This is necessary so that when the cable is accidentally pulled (for example, it gets touched while being pulled), there is no loss of connection, so that these 8 cores do not fly out of their sockets.
This is done simply: fix the RJ45 connector on the table, and press on top with the same screwdriver.
crimp-braid
This way you have a reliable and fixed connection. You can connect a similar cable to your PC and enjoy the network :).
By the way, an article on the topic of setting up a local network:
https://pcpro100.info/kak-sozdat-lokalnuyu-set-mezhdu-dvumya-kompyuterami/ - creating a local network between 2 computers.
That's all. Good luck!
A little about connecting cables
It wouldn’t hurt to talk a little about the cables themselves. This will make it easier for the user to understand what he is dealing with.
And if he has some non-standard cable at his disposal, he will know everything about it.
Cable categories by protection class
Protection of the data cable is needed in cases where you need to connect a device to a computer that is located at a considerable distance from it.
If you use a protected cable, you can minimize speed losses. According to the protection class, the following types are distinguished.
Fig.8. Classic twisted pair (UTP) with stripped insulation
- UTP. The most common type of cable that is used when connecting a router to a PC or two computers on a network. Also called "twisted pair". Does not have any protection (except for the insulating material).
- FTP. A network cable that is equipped with a protective layer of foil. This layer is located immediately after the insulating material. Such a cable is more protected from any magnetic radiation than the notorious “twisted pair”.
- SSTP. A cable that is protected not only by a general foil shield. Each wire is also shielded. It is used in cases where it is necessary to extend the network over considerable distances with minimal speed losses.
- SFTP. The most secure of all cables. There is a foil shield for each pair of cores, copper woven mesh, and an overall foil shield. Used in the most difficult situations. Provides complete speed preservation. But it's also worth a lot.
A little about connectors
As strange as it may sound, there are different types of connectors. And not all are suitable for crimping a standard Internet cable.
By the way, there are corresponding connectors for protected (shielded) cables.
Main types of connectors
In order to understand which connector is required to crimp a particular cable, you need to consider the main types of these components.
This is the only way to choose the one that is suitable in a given situation.
Fig. 10. Regular and shielded connectors
- RJ 11 4 P 4 C . This is the simplest type of connector. It is used in the creation of telephone cable. There are only three contacts on it. Therefore, the crimping scheme is quite primitive. There are only three strands of telephone wire.
- RJ 12 4 P 4 C . A type of telephone connector. It differs from the previous type solely in the number of contacts. There are four of them here. Otherwise everything is the same. Used quite often.
- RJ 45 UTP 5 E. _ Connector for crimping classic twisted pair (UTP). It has 8 contacts and is equipped with a special latch for fixing the cable. Most often used to connect equipment at home.
- RJ 45 FTP 5 E. _ Used exclusively in conjunction with shielded cables. It is distinguished by the presence of a metal casing that protects the data flow from various magnetic radiation.
It is very important to select the appropriate connector for a specific cable type.
If you neglect this rule, then at best you simply will not be able to crimp the cable.
At worst, such a cable will damage your equipment.
Twisted pair pinout diagrams
There are two main twisted pair wiring diagrams:
- Straight.
- Cross (cross).
Block diagram of the possibility of data transfer between devices with direct and cross connection schemes
Direct crimping of internet cable
Direct scheme - used if you need to connect a PC to a hub (switch) or router (router).
Pinout of an Internet cable for 8 wires in a straight line
Cross-crimp network cable
Cross circuit - used to connect two devices of the same type - computers or routers.
Colored twisted pair pinout diagram for 8 wires - cross arrangement for communication between similar equipment
Types of cable
There are many different types of cable used to create a network between different computers as well as networking equipment.
The most common types of communication cables today are:
Optic Fiber (fiber optic);
Twisted Pair (twisted pair).
Coaxial was the first to be used to build local networks of various kinds.
It’s quite easy to crimp this kind of Internet cable at home; it doesn’t even require a specialized tool - just a regular utility knife and screwdriver. This is where the benefits end.
This wire consists of three main parts:
insulation (braided with copper or aluminum);
The data transfer speed using this cable is only 10 Mbit. It is extremely susceptible to various kinds of electromagnetic interference; repairing damage to this type of wire is very complex and problematic. Today it is practically not used anywhere.
Optical Fiber is the most modern method for data transmission today.
It consists of the following components:
additional communication wires (some modifications).
Optical fiber is not subject to any type of interference; the data transfer speed with its help is 2 Gbit. The distance between individual nodes that are connected by this type of wire can reach 100 km. There is only one drawback - the rather high cost.
Twisted Pair (twisted pair) - most often used both for building local networks and for connecting to the Internet.
It consists of the following components:
8 copper wires;
Can provide relatively high data transfer rates - from 10 Mbit/s to 1 Gbit/s.
Twisted pair can be:
Twisted pair cables are less susceptible to various types of interference and are easily repaired. Correctly crimping a wire for this type of Internet is quite simple, but a special tool is required - a crimper.
Four-core cable
You can crimp a twisted pair onto 4 cores in the same way as 8 cores, the only difference is in the number of wires that are used to transmit data.
Instructions on how to crimp a 4-wire cable for the Internet:
- 1,2,3 and 6 channels of RJ45 connector are used. The first pair of cores is inserted into channels 1 and 2, the second pair into channels 3 and 6. The procedure is performed on both sides of the cable;
- remove a few centimeters of insulation;
- unravel and straighten all the veins;
- arrange them by color: white-orange, orange, white-green, green;
- with other colors, it is necessary to correctly hit the first and second pairs in the corresponding channels indicated above;
- hold the RJ45 connector with the plastic clip down;
- then do the same on the other end of the cable.
Using these instructions, you can crimp the cable yourself and get a maximum data transfer speed of up to 100 Mbit/s.
Installation diagrams
The twisted pair installation diagram is the order of the cores by color. Another name is pinout.
The following types of pinouts are most often used today:
Contacts are numbered from left to right with the copper conductors on top and the connector facing the user.
Each type of wiring diagram has its own purpose. First type scheme STRAIGHT-THROUGHT
(also marked as T568) is intended for connecting end equipment (personal PC, printer) with any switching equipment (router, hub).
The crossover scheme is used when there is a need to connect two pieces of network equipment - a router, a computer.
Straight-through
A direct wiring diagram called Straight-through can be implemented in two ways - there are two standards:
The first option is generally accepted, but there are situations in which only the second can be implemented.
Color order when using 568 A:
Color order when using 568 B:
Cross-Over
The Cross-Over scheme is more complex in terms of color marking - their order is somewhat confusing.
There are also two standards, they differ depending on the network bandwidth:
standard – for a 100 Megabit/s network (100 base-TXcrossover);
standard – for a 1 Gbit/s network (1000 base-T/T4).
The standard for a 100 Mbit network has the following color order:
Number
The second type standard - for a network with a transmission speed of 1 Gbit/s - requires wire pinout as follows:
Today, almost all network devices are able to recognize the connection method independently (they have a function called Auto-MDIX). But there is quite a large amount of equipment still in use that cannot do this.
Crimping diagrams and twisted pair markings
When crimping a twisted pair of 8 cores, be sure to take into account the markings of the conductors. Each connection necessarily corresponds to a specific color scheme, which requires strict adherence. Otherwise, the signal will not pass through, and the network will not function.
Lazy crimp 2 pairs
In the considered option, direct crimping of the cord is used, where not 8, but only 4 cores are involved. Therefore, this method got its name for those who do not want to bother with all the veins. However, such a connection is only suitable for low-speed networks.
This type of crimping is not recommended for use at this time. The fact is that Internet speed is constantly growing, equipment is improving, and the 4-wire circuit stops working under new conditions. Therefore, sooner or later, you will have to switch to the standard scheme. If the network was initially laid with an 8-core cable, then all that remains is to crimp the RJ connectors in a new way, and everything will work. But, if the network is equipped with a four-core cord, then it will have to be completely changed and re-laid.
Pinout for a local network with more than 2 computers
When using RJ 45 connectors, pinout for connecting more than two computers to a network is carried out according to the standard scheme. All veins are untwisted and laid from top to bottom or from left to right as shown in the figure.
The conductors are aligned, cut, and then they can be crimped. After this, each twisted pair connector is connected to its own socket.
Direct pinout is marked as 568B
Direct connection is necessary in order to connect a HUB, router or switch to a computer. This method is most widespread in Russia. It is marked as 568V, and the wiring is carried out according to the usual scheme, starting with a white-orange conductor and ending with a brown one. There is a direct crimp here, since the wires are located the same on both connectors.
Crossover pinout is marked as 568A
Another way to crimp a twisted pair cable. To connect devices of the same type, for example, two computers, a crossover circuit or crossover labeled 568A is used. In this case, the first plug is connected in the usual way, and the second is connected by replacing the orange and white-orange wires with green and white-green wires. The conductors end up upside down, which is why the circuit got its name.
Direct crimp with 4 core twisted pair double pair wire
A cable with four cores is used when installing internal networks with low speeds. With large volumes, you can save significant money, since such a cable is much cheaper than a conventional twisted pair cable with 8 cores. Crimping is performed in the sequence shown in the figure.
However, the use of such networks has a number of limitations, primarily in terms of speed. In addition, it is not possible to supply power to the device when needed.
RJ 45 twisted pair compression circuit with POE standard IEEE 802 3AF
This circuit, made using PoE technology, allows not only to transmit information signals, but also to supply power to the router, switch, adapter and other devices. For example, when connecting video cameras, a separate power cable is not required. Thus, the connector combines two functions at once - data transmission and power supply to the device. The voltage in this pinout is supplied through blue and brown conductors.
It is strictly forbidden to use twisted pair to supply 220 volts, as this can lead to unpredictable consequences. The fact is that the cross-section of the cable in the network is only 0.51 mm2 and is designed for a current of up to 1.5 A. If the current needs to be increased, two conductors are connected in parallel and then the figure increases to 3A.
Cross-circuit for pumping speed of 1 Gbit/s
The connection scheme is used in high-speed networks, up to 1 Gbit/s. Eight wires are crimped in the sequence shown in the figure.
Rollover Cable console cable crimping diagram
Each end in such a connection is crimped mirrored in relation to each other. This scheme is used to configure a switch or router using a computer.
How to crimp an internet cable with your own hands
Pinouting the communication wire with your own hands is quite simple. To do this, you will only need a few items; you can find and purchase them at your nearest computer store. You also need to know the parameters of your network equipment that needs to be connected. Because the crimp type (straight or cross) is selected depending on whether Auto-MDIX is supported.
Tools and accessories
To manually crimp a twisted pair of eight cores, you must have the following tools:
stationery or mounting knife.
Also, in addition to the tool itself, it is advisable to stock up on several connectors, in case the first attempt is unsuccessful.
Work order
The process itself is not complicated, it is only important to follow the procedure:
The top layer of insulation is cut lengthwise to a length of approximately 3 cm - using a stationery or mounting knife. It is important not to damage individual wiring - this may lead to communication problems;
after this, each of the 8 wires must be carefully moved to the side;
all cores are disassembled in order as they should be crimped in the connector;
The connector has special grooves, and each core should be inserted into them in order.
When all of the above operations are completed, it is necessary to perform crimping. This can be done either using special pliers or using a regular slotted screwdriver.
Cable check
Checking a crimped twisted pair is quite simple using a multimeter set to continuity mode. It is necessary to connect the wires by color using contact probes - they should all ring well. If the sound signal is not heard, you should press the connector contacts - they are not tightly pressed to the copper conductors.
You can also check the connection using a special device. It checks the strength of the transmitted signal - accordingly, this device will make it easy to detect poor-quality pinouts.