Author of the article
Yuri Sanaev
System Administrator. Sales manager of computers and wi-fi equipment. Work experience – 10 years. Knows everything and even more about hardware and software.
If a user wants to create a local network at home in order to have shared access to files from all devices, he may have problems crimping a twisted pair cable into 8 cores or 4 cores.
To cope with the task, let’s figure out what types there are, what wires, plugs and tools are needed. We will provide crimping diagrams and tell you which one is suitable in a particular situation.
What does twisted pair and Wi-Fi have to do with it?
Dear reader, I have a free blog here - so if everything is not interesting, immediately scroll through the Contents to the sections of the article that interest you. I'll start from afar. In a galaxy far, far away...
The fact is that the central element of a home Wi-Fi network is now a router. A modern router usually has wired connections:
- From the router to the provider's network - the same cable from the entrance. There is regular Ethernet and telephone under ADSL - all these wires are called “twisted pair”. The first occurs more often, the second less and less often.
- From a router to a computer or laptop - sometimes the connection is made not via Wi-Fi, but via wire. Likewise, computers without an adapter can be connected to the Internet, and seasoned players say the ping will be better.
So in a home network there is nowhere without a twisted pair cable.
Computer socket and its types
To connect computer equipment and any other peripheral equipment, use a computer socket of the RJ-45 standard. It complies with uniform communication norms and standards designed to automate most tasks.
The device includes a plastic case, inside of which one to four connectors are placed.
A computer socket is a device whose main function is to transfer connections from the computer’s network card to cable networks
To organize a home network, devices equipped with one or two connectors are most often used. In devices with two connectors, the first is intended for connection to the data cable going to the computer, and the second is for connecting to the punch panel.
The cable transmitting information, called “twisted pair,” is simply inserted into the dedicated module with a contact. Through another twisted pair, information goes to the network.
Telephone modules of the RJ11 standard are equipped with two-pair connectors with four contacts, and telecommunication devices of the RJ45 type are equipped with 8 contacts
Externally, the RJ45 computer connector is similar to the telephone analogue of the RJ11. But the main difference between the devices is the number of contacts. Telephone models have 4 contacts, and information models have 8 contacts. For this reason, although an RJ45 computer socket can be used as a telephone socket, it will no longer be possible to connect computer equipment to the RJ11 socket.
The sequence of work for installing most types of computer sockets is typical. You need to perform a number of almost similar steps:
Let's disassemble the device. Structurally, a computer socket is not much different from standard electrical installation equipment; it includes a mounting plate, a mechanism and a front part.
We connect the twisted pair cable to the computer outlet according to the diagram indicated on the device case.
Before connecting, strip 0.5 cm of insulation from the wires.
Having installed the edge of the wire, stripped of insulation, in its intended place, we secure it with a spring device.
We cover the terminal with the connected twisted pair cable with a metal cover, which is used as additional protection for the connections.
Let's fix the body of the Internet socket to the wall using fasteners that match the wall material.
We fix the container with the Internet socket mechanism in the housing by tightening the screws into the complementary holes.
We fix the part of the front panel that hides the socket terminal and serves as a guide for the plug.
We check the functionality of the power outlet, test the quality of the connection and signal.
Problem
One of the most common reasons for the loss of Internet at home is a cable problem. There are many options:
- A wire has frayed somewhere in the corner connections - it happens that someone shuffled it or kicked it.
- The connection in the connector is broken - the wire there is open, so it may break. Sometimes the connection just drops. And over time, the crimp “dries out,” so you still have to improve the connection.
The bottom line is that when replacing a wire or repairing a connector, you still have to somehow reattach those same connectors. But this procedure is called crimping. And you can do this completely at home yourself (I’m telling you as a seasoned admin, and it wasn’t in times like these that you were cutting the cable). But you need a little theory - this is not electrical wiring. So first, a little theory, and then let's move on to practice.
Errors when connecting internet outlets
Before connecting an Internet outlet, be sure to familiarize yourself with the errors typical for this procedure. Their presence is indicated by the absence of a useful signal at the input of the connected device (no Internet connection). Typical errors include the following situations:
When the connector and modem purchased ready-made used one type of connection (“A”, for example), and when installing the socket, the “B” standard was taken as the basis.
After laying in the split contacts, cut off the excess wires only after closing the cover.
You cannot remove the external insulation of a twisted pair cable over a long distance, right up to the walls of the electrical outlet. The length of wires without insulation should be no more than 13mm.
When the first error is detected, you should check the switching standards and, if differences are found, bring them to the same type. In a situation where there is too long a section of the cable left without insulation, you should shorten it and re-make the connection.
And finally, a very unpleasant situation is possible when everything seems to be done correctly - but the outlet still does not work. This case is typical for a defective product that will need to be replaced.
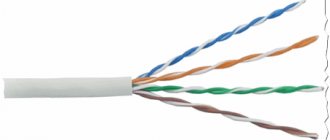
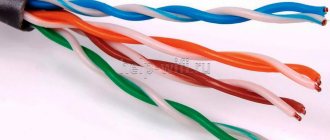
twisted pair
In the last section, we found out that twisted pair is a wire used for network connections in computer technology. Especially used at home to connect to the Internet.
It got its name from the building. Inside there are copper wires in a sheath, twisted in pairs. Twisting is done with a certain step depending on the number of such pairs. The whole point of such twisting is mutual cancellation of interference to improve the quality of the signal in the working network (after all, this wire also carries electricity, although not 220V, and reliability here is needed at a high level, but this is a topic for standards).
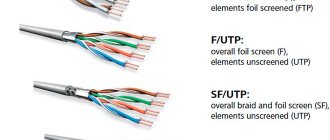
There are several types of twisted pair... Even many. The main classification is by device, not the main one - by protection. When installing at home, you will usually be dealing with a category 5 cable (if you want, look for it yourself, that’s not what the article is about).
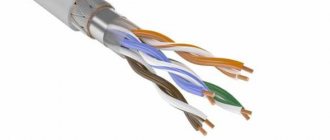
In terms of protection, there is also nothing difficult - there is with protection, there is without protection. Protection does not mean from falling stools, but from the same interference that creates interference. This is usually not required at home, but you never know what you can get your hands on. The section is larger for the fact that you will have to open the cable during crimping, and you need to be prepared for anything) So a little anatomy for the system administrator and the home enthusiast to surf VKontakte.
So, there are pairs of wires inside - usually 2 or 4. The wire can be protected - we are talking about foil or braid. In this case, protection can be either for the whole wire or separately for each pair. There are a lot of subtleties, it’s better to open it right away and look locally. In home cable there is usually nothing like this - one braid, and there are pairs in it at once.
Twisted pair markings:
- UTP – regular, without protection, for home. If you need to restore a piece of your house and go to the store, just look for something like UTP5 - it will do just fine.
- FTP - with foil, also sometimes used indoors.
- SFTP – metal braid, used outdoors.
- STP – protection on each pair. When the wire is on the street near power lines (I hope you didn’t get caught there).
In total, the different options are arranged in the following figure:
An additional bonus is that there are multi-core and single-core cables. Stranded ones are used at home - the wire comes out flexible, just for active movements. It is better to use a single-core wire for industrial installation - up to the socket, the wire does not bend, but the signal transmission is much better.
I don’t even want to mention flammable and non-flammable, round and flat here - after all, this is not a system administrator’s textbook, but simply helping those in need at home. So if you have questions, run to the comments.
Reasons for extending twisted pair
The most likely reason to increase the length of the network cable is moving a laptop or desktop PC to a distant room.
Over a long distance in an apartment with reinforced concrete walls and ceilings, the signal weakens, and doing homework or preparing a project becomes problematic.
You can reduce the distance from the router to the computer if you rearrange the router, but then you will still have to extend another cable leading from the landing to the apartment
The second reason is related to repairs. If the twisted pair is not sewn under a plasterboard wall or into a baseboard, but lies on the floor, unprotected, then it can easily be damaged. This can be done with a chair leg or a door.
Often small children or animals “help” to break the cable - the former by accident, and the latter for some reason love to chew on ownerless, unattended cords.
To repair, you need to cut off the damaged area and connect using one of the methods listed below - for example, twisting or using an RG-45 connector
Thrifty owners of computer equipment do not buy long cables if they have several short ones on hand. Some manage to assemble an almost 6-meter functioning cable from 3-2-meter sections.
Wire selection and standards
In the last section I mentioned the categories of twisted pair, here we will consider this point in a little more detail. After all, the anatomy and transmission speed on the cord also depend on the category.
I recommended that you take category 5, but category 6 (CAT5, CAT6) is also suitable. All options are shown in the following table:
It will be important to choose a cable for the required speed. And this also depends on the number of wires inside. It usually happens like this:
- 2 pairs (4 wires) – up to 100 Mbps
- 4 pairs (8 wires) – from 100 Mbit/s
Typically, ISP technology limits you to 100 Mbps internet speed. But soon this threshold will be passed. What do I mean - usually there will be exactly 2 pairs on the Internet cable, but on home cables (from the router to the computer) there are already 4 pairs.
4 pairs, or 8 wires
How to choose a network cable
We will tell you what you need to pay attention to when choosing a twisted pair cable.
- A very important point, you need to understand whether you will be laying the network cable indoors or outdoors. Because the simplest and cheapest twisted pair cable is suitable for internal installation. But for external use (outdoors), you need to take it with additional protection (double braiding that protects from natural phenomena, such as sun, rain, snow, frost).
- If the cable length is long, then take a twisted pair cable with additional wire. It will reliably keep the wire from breaking.
- Pay attention to the composition of the wire; it can be made of bimetal or copper. Of course, copper is better, but its price is several times higher. So, here you need to look at the budget allocated for the purchase and decide.
- The thickness of each core should be about 0.50 mm, ideally. But, alas, many manufacturers underestimate these figures to 0.40 mm.
- Look at the markings on the cable; a self-respecting manufacturer makes it clear and understandable. And an unscrupulous manufacturer applies such markings that when touched, they are erased, or they are not even on the cable at all.
- You can buy a network cable that has additional protection against various interference (thunderstorm, static). This cable has a foil-shaped shield.
- Availability of a quality certificate.
Crimping theory
And now we are approaching the crimping procedure. But there is still something to clarify, the final frontier.
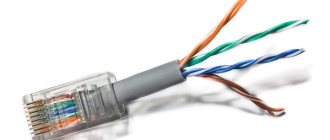
You have all seen the connector at the end of a twisted pair cable, which also goes into the network connector of a network card or router. This plug has a special marking. The one that is mainly used now in the home local network is RG-45. A little about the connector design and connection.
- The twisted pair is installed in the connector socket.
- The twisted pair wires are routed through special grooves in the connector.
- The contact mechanism of the connector is knives. In store condition, they are separated, providing a path for the cable wires.
- When crimping, apply pressure to the knives, and they cut through the sheath and ensure tight contact with the wire cores.
- On the other hand, the contacts of the knives remain open - they provide a connection to the network adapter when connected.
Here is a picture of how the knives work:
And here is the connector in an enlarged view (the same wire tip or “jack”):
This connection is reliable and transmits the signal perfectly. But beginners may not be able to do enough at first - and either there will be no connection, or it will be established at a low speed (this is one of the reasons for the decrease in speed on the network). The best way to fix it is to squeeze it harder again, or re-press it again. In practice, at our university this procedure did not work out for everyone the first time - so everyone starts somewhere.
Does Wi-Fi cause cancer?
According to our statistics, only 7% of users know the correct answer to this question YES NO Reply
Classification of sockets for Internet connection
It is known that when carrying out renovations in an apartment, electrical wires suitable for sockets are hidden in the walls or behind decorative coverings. In exactly the same way, the wiring for the Internet connector should be securely hidden so as not to spoil the interior of the rooms.
Internet sockets installed in an apartment or private house are manufactured according to a different standard and are called computer or information sockets. These products have different designs, but the most common are models equipped with an RJ45 connector (universal standard).
Connectors (contact blocks) installed in Internet sockets from different manufacturers are shown in the photo below.
Please note: The simplicity of the design of such a product allows you to independently connect it to an existing Internet network, without the help of specialists.
The features of this type of sockets include not only their unusual appearance, but also the presence of a connector with a large number of contacts, as well as a special connection method. Accordingly, Internet sockets are classified (by type of connector). In addition to the option already discussed, there are the following connection designs: RJ11, RJ14 and RJ48.
The first two names are positioned as special type connectors with 6P4C format contacts. They provide a reliable connection between the cable and the actuator. Their case is equipped with a special latch that prevents the case from accidentally falling out of the Legrand socket. The RJ14 connector, along with RJ48, is classified as an interface used for connecting to various models of computer equipment.
Any model of Internet outlet comes with the manufacturer’s instructions:
- Schneider Electric Unica –
- Legrand –
- Lezard
Depending on the method of installation on apartment walls, Internet sockets can be built-in or surface-mounted. The first ones are intended for hidden wiring and are recessed deep into the wall along with the supply cable. In this case, their front plane is located on the same level with the wall surface. Overhead products are attached to a smooth wall or any other hard surface using hardware included in the delivery set.
Depending on the number of sockets available on the front panel, such products can be single or double. In all of the listed models, the so-called “twisted pair” is used as a connecting wire.
Tools
The main thing when crimping is to make a high-quality cut with knives on the shell. And for this you need to create the right strong pressure on the contacts. Well, we couldn’t do it without creating tools, although we can do without them.
Pros use a special tool - crimping pliers, or crimper. I’ve also seen names like “wire crimpers” or “connector crimpers.” Here, who already has what taste, you will probably hear some other versions.
This thing isn't that expensive. You can find a working copy for less than 1000 rubles. For a one-time repair at home, the thing is useless. But their main feature is their functionality tailored for twisted pair cables:
- Cut the braid exactly to the level of the wires
- Stripping wire insulation down to the core
- Simultaneous crimping of all knives with the required force
- Sometimes there is a socket for crimping and telephone cable (RG-11)
This is what they look like:
How to crimp VICO?
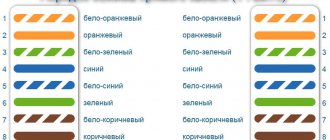
I personally installed these models in my home to connect the TV via a router to the Internet. The principle there is approximately the same as in previous versions, but there is a small feature that I would like to talk about. The “wiring” diagram is the same as “B” and it is located below (if you look at the picture, then from above):
- Brown
- White-brown
- Green
- White-green
- Blue
- White-blue
- Orange
- White-orange
Now comes the important point. Since the knives inside are arranged differently, you shouldn’t insert all the wires at once - some may fly out during crimping or get into an adjacent groove. So you can do it simply:
- Insert the first two wires
- Then you slam a plastic lid on top to crimp it.
- Next, open the cover and make sure the wires are crimped.
- Well, then the rest of the wires.
This is advice for those who have just started crimping these sockets and have not gained the skill to crimp all 4 pairs at the same time - this way there will be less swearing and nerves. As soon as the socket is crimped, insert it into the base and screw it to the box with self-tapping screws.
No tool
In my life I have seen many crimping methods. But the most interesting of them was teeth, because... a person’s mother-in-law was a dentist... So sometimes you don’t even need a tool at all.
Another handy tool that everyone has is a screwdriver. Moreover, this is perhaps the most popular tool at home. The main thing is not to break anything and push through the contacts efficiently. If the connection is not established during the test, you just need to try again. The working method is difficult, everything constantly slides off - but without fish there is fish.
Another home helper is pliers. But my advice is that it’s better to suffer with a screwdriver. The pliers do not provide strong indentation (especially in the middle), and with great Russian heroic prowess they easily break the connector into small pieces.
Friends! Especially for lovers of something interesting and secret, we have our own closed club “Atlantis”.
- Daily up-to-date earnings schemes.
- Breakdown by level - at level 1 there is a bare public, at level 4 - a highly profitable private.
- For free. You just need to be on time. Only 3000 places for level 1.
Be sure to register, otherwise only 5 guest articles will be visible - LET'S GO.
Procedure for working with the crimper
It is much easier to crimp an Internet cable with a crimper. In this case, the main problem is not to confuse the order of connecting pairs of wires. There are a lot of color connection schemes, so listing and analyzing each one will take a lot of time. I will present the main standard “T568A” (about 80% of connections will be made according to this standard).
- Insert the straightened and stripped wire into the connector.
- We insert the “plug” into the appropriate connector of the “Crimper”.
- Press down the pressure mechanism until you hear a characteristic sound and crimp the wire (the connector knives correctly crimp the 8 strands of twisted wires).
- Remove the ready-to-use cable from the Pincers.
Good day, dear visitors! I then remembered that I have not yet written about how to crimp a network cable and how to crimp it. I think you know what a network cable is. This is the cable through which you most likely receive the Internet, connect a computer to a router, or two computers directly, simply by connecting the network cable to the network cards of two computers.
And you probably know that the network cable is sold without connectors. Connectors are a thing at the end of a network cable that connects to a network card, router, etc. Why is this? Can you imagine what holes would have to be drilled in order to push the connector through :). And so, a network cable is laid and after that RJ-45 connectors are crimped onto it, everything is very convenient and thought out. Well, now we have come to the point that the network cable needs to be crimped, this means that you need to put a connector on the cable and fix it.
I just have a network cable, several RJ-45 connectors, a special tool and a phone with which I will photograph all this, so that my instructions are clear and you quickly learn how to crimp a twisted pair cable.
Crimping diagram - pinout
And now the science itself. It’s one thing to apply pressure, another thing is to correctly insert the wires into the cores (and this is the most important thing in order to correctly crimp a twisted pair), and into both connectors - a random set will not work here. The order is very important. In total, the connector has 8 grooves for 8 cores. If 4-core wires are crimped, some of the grooves are left empty, the main thing is to get it right.
First, let's look at the classic crimping of an 8-core wire. There are 2 ways:
- Direct cable crimping (type B, 568B) is used in 99% of cases. Used to connect peripheral devices to a router/hub/switch.
- Cross crimp (crossover, type A, 568A) - used for direct computer-to-computer connections.
For reference . Now modern adapters understand both of these methods, but the first option of direct crimping remains preferable.
The names of twisted pair crimping circuits are taken from the way the wires are arranged in relation to each other. Look at the images below and you will understand everything. The main thing here is a view of the connectors from below (where there is no leg).
Direct crimp
Use this pinout diagram!
If the pictures are suddenly unavailable for some reason, the arrangement by color is:
1. White-orange 2. Orange 3. White-green 4. Blue 5. White-blue 6. Green 7. White-brown 8. Brown
Cross circuit
Four wires
Another option for 4 cores is the case when there are only 2 pairs. This is how they usually do it:
The whole point of proper pinout is to match the wires on both sides of the cable, without even knowing how the connector on the other side was crimped. An unspoken standard where you don’t have to run to the provider’s shield. The numbers 1-8 in the pictures are sometimes squeezed out on the sockets, this is for those who do not want to confuse the order.
Crimping the external model
It looks like an ordinary box, which can have one or several connectors for a network connection.
- Carefully remove the top cover.
- And so we look at the crimping diagram. For us, this is diagram “B”; the Internet cable is connected according to the colors in the picture: Left side (top to bottom) – white-orange, orange, white-green, green;
- Right side (top to bottom) – white-blue, blue, white-brown, brown.
- If there is no such device, then you can use a thin screwdriver or, better yet, a paper knife. But be careful - this way you can easily break the socket. At the very end, screw the socket to the base with a self-tapping screw.
Crimping procedure
Now let's move on to the correct way to crimp the cable. Be careful when working - the main thing is not to damage yourself, and the connectors are cheap)
Step 1. Remove the insulation
First, remove the insulation from the wire - you can carefully pry it off with scissors or use a stripper on a crimper - insert it, turn it, and the wrapper comes off. It is fragile and can be removed quite easily. You don't need to remove much insulation - a couple of centimeters from the end is enough. If anything happens, you can trim everything later. The pliers have special marks indicating at what level the coating should be cut.
Step 2. Straighten the wires
Now we take our wires, straighten them and arrange them according to the pinout diagram. From the recommendations - try straightening them with a pencil or hand - they become smooth and closely spaced to each other - which is what we need.
Step 3. Trim
Now is the time to cut and straighten our wires. We cut it either with wire cutters, or with the same pliers, or even with a knife. Leave about a centimeter of clean wire. With practice, you will learn to accurately check the distance.
Step 4. Getting into the connector
The hardest part. Now we need to insert our design into the connector. When inserted, the connector is positioned with the leg down. Why is it difficult - the wires try not to fall into their grooves, they crawl into neighbors, bend, and get tangled. Here the recommendation - patience and once again paying attention to the pencil treatment - helps.
Step 5. Insert all the way
After the hit, we press on the cable so that the wires go all the way. In this case, the wrapper will be hidden in the connector itself. If the wrapper does not fit into the connector, fractures are possible in the future. If the opposite turns out to be short, the wires will not reach the knives. So everything is done with experience and by eye.
Step 6. Crimping
Now is the time to tighten our knives - the methods were discussed above, but it is better to use pliers. Take it and live it.
Step 7. Check and refinement
Be sure to check the connection on your computer or router before putting away your tools. Sometimes it may not work out the first time. The easiest way to correct the situation before getting upset is to squeeze the knives again, but harder. It helps a lot.
If there is no connection, pay attention to this:
- Are the wires routed exactly according to the diagram? Didn't they fly out? Look through the connector.
- Have the wires reached the stop of the connector? Were the knives able to reach them?
The rest can only be attributed to cable failure.
Initially, before crimping the network cable, you can install these casings. They perfectly protect against bending near the connector, but in practice everything works without them. There are a lot of species, that’s not what the article is about. For reference.
Straight and cross crimp
To connect an apartment or house to the network, two types of patch cords are used, each of which corresponds to a specific group of communication devices. Direct patch cords are used to pair equipment with a network card. The ends of the cable are connected to the connector in the same way, according to the T568A or T568B scheme.
Electronic devices of the same type are connected using crossover or crossover patch cords. To connect two computers, one end of the connecting cable is crimped according to the T568A scheme, and the T568B scheme is used to crimp the second.
Note! In direct crimping, both ends of the wire are crimped in the same way. Cross crimping involves working in accordance with both generally accepted standards.
Errors
To make sure that you did everything correctly, you can connect the network cable to the gadget, for example, or to another device to check its functionality.
Then make sure that the wires in the Internet cable connector have been inserted correctly and in the correct order.
The network cable is crimped using a crimper. It is important to check the tightness of the wires until the adapter contacts. If you find an inaccuracy, then it is better to cut off the connector. After this, it is important to crimp the Internet cable again.
You can crimp the Internet cable yourself. If, after the end of the process, the supply of the connection occurs intermittently, then the connector is checked again. If everything works, the device appears on the network, then you did everything correctly.
Examination
After the wires have been crimped, their functionality should be checked.
- Set up the tester. To do this, set the switch to resistance diagnostics. The second option is to sound a sound signal. Each cord is tested individually.
- If the indicator does not respond, you should crimp the cable again, then repeat the test.
- After this, you need to put on protection in the area between the creeper and the cord.
Read also: Content of precious metals in imported capacitors