How to connect an old switch
The wires should be routed well, fixing them with plaster.
It is important that the new wire has a cross-section no smaller than the one that was connected to the switch. If the wiring is carried out externally, it can be laid using cable ducts
Before dismantling the wiring from the old box, you need to find the phase wire, which can be determined with a voltage indicator, temporarily turning on the electricity supply. Next, you need to insert a junction box into the new switch socket, strengthening it with alabaster, cement or plaster.
Then all that remains is to connect the wires in this sequence: first the phase, and then everything else. The wires running in the groove must be covered with cement or putty. Next, all that remains is to fix the switch in its new location and complete its assembly.
In fact, the question of how to move the switch to another place or to another wall is not difficult; the main thing is to adhere to safety rules when working with electricity.
Technical issues of the transfer
In order to move the switch correctly and safely, it is necessary to carry out preparatory work, after which you can begin laying the wire for the new device.
Preparing for the transfer
It may seem that moving a switch is a difficult, dangerous, dusty, time-consuming process. Gouging and drilling damage the wallpaper, you can get an electric shock from the wires, and improper installation can cause a short circuit. However, if you break down the whole process, carefully prepare for installation, and follow safety measures, the work will not seem so difficult. To get started you need:
- prepare the instrument;
- cut off power to the apartment;
- calculate and purchase the required quantity of materials;
- if a wall chaser or impact drill will be used during the transfer, use a non-contact voltage detector to check for wires hidden in the wall.
Features of transfer in houses of various constructions
Grooves for electrical wiring
Differences in the methods of lengthening or shortening the wiring connected to the outlet appear mainly in the material of its walls. On this basis, city houses are divided into panel-type buildings, which are modular structures made from standard reinforced concrete slabs and brick buildings
From the point of view of transfer, walls that can be of particular importance are:
- Purely concrete surfaces covered with wallpaper, for example.
- Finished with plaster or plasterboard boards.
- With decorative fiberboard coating.
For each of the wall conditions, a different method of laying cable cores is suitable. In the case of concrete and plastered surfaces, if it is necessary to extend the electrical wiring, it will be necessary to make grooves in them, into which an additional piece of cable is then laid.
The correct approach to laying an extension cord in the presence of decorative trim involves running it under the finishing material. In a new location, a hole is drilled to the diameter of the transferred socket. Current regulations do not prohibit external laying directly over decorative material, which is sometimes done if you want to design the wiring in a “retro” style.
Process Features
Yes, the height of placement of sockets and switches in most apartments cannot be called appropriate, and if in the case of a switch the only inconvenience is that it is difficult for a child to reach it, then sockets are a completely different story. As a rule, they are placed in the most unexpected places, and sometimes “hide” from the owners of an apartment or house behind a closet, sometimes behind a carpet, or they loom like an eyesore against the background of freshly hung wallpaper, and rise above the headboards of beds and sofas. It’s difficult to call it interior decoration, even if you bought the most expensive and stylish sockets. Sooner or later, it will suffer the fate of many - they will stick a tee and many plugs of different types and shapes with wires that are twisted, which will completely ruin the mood and finish you off. In order not to see such a disgrace, it would be reasonable to move the switch lower (the same applies to sockets).
If you have open electrical wiring, then moving the switch should not cause any inconvenience at all. But if the wiring is hidden, then you can’t do without a hammer drill. To begin with, you should note the new location of the switch about 1 meter from the floor and on the axis with the old switch, and then you can start drilling a hole whose diameter will be 6 cm. You will not need a drill of this diameter - you will only need a special bit that has a carbide cutting edge.
It will do an excellent job on concrete and brick walls. At the same time, you can drill on brick using a regular impact drill, but for concrete you only need a hammer drill, since otherwise (when using a drill) there is a high chance that you will soon say goodbye to this electric tool.
The second question is how deep to drill? To answer this question, you will first need to purchase plastic of the required diameter in the store. Although in the future there will be a light switch in the chosen place, the box for it is still called a socket box. It is a cylindrical cup that needs to be inserted and secured inside the wall, and it has the official name - a round mounting box for internal wiring. It will need to be “recessed” completely into the wall, and even a little deeper by a few millimeters - this will be the depth of the hole. After the crown is placed deep into the wall at the required depth, it should be replaced with a blade, i.e. a device that is similar to a chisel. Switch the hammer drill to impact mode without drilling, deliver an unnecessary round fragment of the wall, and use the hammer drill like a jackhammer. This way you can make a socket for the switch.
Possible causes of malfunction
To start repairing, you need to follow the following algorithm:
- Check all outlets. If one product does not work, they look for the reason in it.
- The electrical circuit is susceptible to breakage in weak points, for example, when connected by twisting or unreliable insulation. If everything is fine in the electrical outlet, a break is looked for in the junction box.
- Find out how the voltage went out - the devices stopped functioning or the machine was triggered before that.
- Determine whether the outlet is regular or special for high-power electrical appliances.
In one room there is light, but the socket does not work
The most common problem is when the lights in the room turn on, but the sockets do not work. At the same time, voltage is supplied to other rooms. Possible reasons for inoperability:
- exceeding the permissible load;
- failure of a cable section.
It is necessary to check the electrical wires in the panels, the working part of the power points. If the cable breaks or breaks, call an electrician, as new wiring may be required.
The most common problem is careless installation or damaged insulation. In this case, the indicator will show a power failure in the faulty area.
One outlet does not work, but the rest are working in one room
When one power point does not work, the cause may be a loose connection or melted insulation.
If during a visual inspection the cover is melted and the socket does not function, then the contact wire has burnt out. When disassembling the device, the burnt area is visible.
The problem may be in the wire itself, then you need to inspect the cable, check the condition of the core and insulation.
If overheating occurs repeatedly, there is a high probability of destruction of the core, so you will have to replace the faulty piece.
If the insulation breaks, put a cambric or electrical tape on the exposed area. Darkened contacts are carefully cleaned with sandpaper.
Another cause of failure is a short circuit (short circuit). A short circuit is determined simply - the closed section of the conductor is missing, and the inner part is covered with an oily coating. In this case, the socket cannot be repaired - only replaced with a new one.
The socket in the kitchen near the stove or hood stopped working
A stove, hood, and washing machine are appliances with a power above 2000 Watts that require separate sockets. The most common problem is choosing the wrong power point, which is designed for less power. In this case, replace the electrical outlet with a new one with the required value.
If the permissible power is exceeded, the wire may break. The problem should be fixed by a professional.
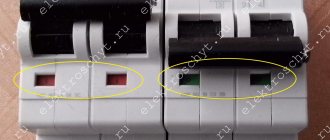
A separate machine is installed for powerful devices. It can be triggered by a current drop. To return the voltage to the outlet, you need to look at the machine and turn on the toggle switch leading to the kitchen.
What to do if the socket itself is broken, but there is voltage
Before starting repairs, make sure that the outlet can be repaired. The burnt device is replaced with a new one. If there is no voltage when checking with a multimeter, the wires are checked. After making sure that everything is in order with the conductors, proceed with the repair.
To repair you will need:
- screwdrivers;
- sharp knife;
- insulating tape;
- pliers;
- multimeter
Procedure:
- Before carrying out work, turn off the power to the apartment. It is prohibited to repair a live power point.
- Unplug devices from the electrical outlet.
- Use a screwdriver to remove the housing.
- Unscrew the clamping bolt and check the quality of the connections. Loose contacts are strengthened.
- Trim the melted ends with a knife or wire cutters. Repair damaged insulation using electrical tape.
- If the clamping bolt is broken, install a new one.
- After troubleshooting, reassemble the socket.
- Turn on the electricity and make sure the problem is corrected. To do this, you need to connect a low power device. If the outlet works without unusual sounds or odors, the repair was successful.
Safety precautions when moving the socket
The work of moving sockets does not present any particular difficulty either organizationally or technically.
But when dealing with electrical wiring elements, it is important to ensure the maximum level of safety. When choosing a new model of socket to be transferred, they are guided by the purpose for which the product is intended, as well as what type of plug will be used
When choosing a new model of socket to be transferred, they are guided by the purpose for which the product is intended, as well as what type of plug will be used
When connecting yourself, it is important to follow four main rules:
- Connecting an apartment electrical outlet can be done using a VVGng power cable with a cross-section of at least 1.5 mm2.
- According to NBP and GOST, cable laying is allowed only in vertical and horizontal directions. Horizontally laid routes are placed at a distance of 200 mm from the ceiling level and 100 mm from beams and cornices, and vertical routes are placed at a distance of 100 mm from door and window openings, as well as room corners.
- The devices are placed at a height from the floor level within 50-80 cm. They are not allowed to be placed closer than half a meter from radiators, steel pipelines and gas stoves.
- All connections and branches of the electrical cable must be made through boxes designed for these purposes, or in the housings of electrical installation devices, which include sockets.
Before moving the outlet to another location, you need to decide where the distribution box is located, from which the “old point” is powered. The type of metal the cores of the old electrical wiring are made of is also of key importance.
Compliance with this condition will allow you to protect the “points” both during the installation process and in the future, if necessary, drive in the same nail so as not to accidentally hit the wiring
To simplify installation, experienced craftsmen recommend drawing up a preliminary diagram before starting work. This will allow you to determine the most rational option for placing the connection point. Based on the diagram, it will be easy to determine the area within which hidden wiring is not laid.
Knowing the layout and basic operational parameters of indoor electrical wiring, installation work can be completed with minimal financial and labor costs.
Tools for work
Before starting work, you must prepare all the necessary tools:
- Preparing a groove for electrical wiring - a wall chaser or hammer drill, chisel, chisel, hammer.
- Making a nest - a hammer drill with a concrete crown of the required diameter.
- Repair, dismantling and installation - a Phillips screwdriver, a minus screwdriver with a narrow and wide tip, pliers.
- Laying and connecting wires - wire cutters, mounting knife.
- Control and measurements - tester or indicator screwdriver, tape measure, ruler.
- Sealing and finishing work - spatula for plastering and putty, sandpaper or grinding machine.
We should not forget that the work is carried out with the electricity turned off, which means a flashlight may come in handy. For work at height you will need a stepladder.
Don't want to spoil the walls? Need to extend the wire
Destruction of walls is justified only during a major renovation, which is equal in stressful moments to a fire in an apartment. A gentle way to preserve beautiful wallpaper on the walls is to increase the length of the wire. It is necessary to repeat the points of “jewelry installation of a socket”: from No. 1 to No. 3 and remember one more algorithm - increasing the length of the wire:
- Remove the cover panel from the old outlet and pull out the block.
- Strip the new cable and connect its cores to the conductors in the socket.
- Install a junction box into the old niche and insert the bonded and insulated wire into it.
- Fix the box in the recess, the stripped cable cores are connected with terminals to the connector.
- The ready-to-use block is placed in a box and covered with a panel.
Perhaps, this concludes the step-by-step instructions on how to move an outlet in the house, without unnecessary noise and dust, saving time and money by doing it yourself.
Wire extension options
When connecting wires, complete electrical contact must be ensured. A poor-quality connection will become very hot, which can lead to a fire. Good contact is ensured by 3 connection options: terminals, insulating clamps and soldering.
Via terminals
Two types of devices are used:
- spring terminals. They are disposable and reusable (the wires can be disconnected and reconnected many times). The conductor inserted into the terminal is automatically grasped by a spring-loaded lever mechanism. The device is suitable for cores made of any material;
- terminal blocks. The conductors in the terminals are fixed with a screw clamp. Undesirable for aluminum wires due to their fragility.
Terminal connectors are selected according to the diameter of the cores.
On connecting insulating clamps (PPE)
PPE has the form of a cap with a spring inside that fixes the ends of the connected wires. The connector is made of non-flammable material, which reduces the risk of fire in the contact area to zero. PPE is produced in different colors, which allows you to observe color markings during installation: phase, neutral and grounding are marked in different colors.
Connecting insulating clamps (PPE)
Soldering
Soldering iron skill required. The stripped ends of the wires are twisted and dipped into molten solder. The cooled connection is wrapped in several layers of electrical tape.
Forced cooling of a solder joint by immersion in cold water is not permitted. The temperature difference will cause microcracks to appear in the solder, causing the electrical conductivity of the connection to significantly decrease.
How to connect the wires?
It is important to create a reliable connection of wires. The best methods are crimping, soldering and welding
At home, the first and second are usually used. For crimping, sleeves made of the same material as the wires are used (Fig. a). This requires special pliers. The sleeve into which the wires are inserted is crimped on both sides.
Wire connection methods
For welding and soldering, twisting is first done (Fig. b, c). It is also a separate connection method, but it is used as a temporary connection or at currents not exceeding 2 A. This method is not suitable for a powerful consumer (electric stove, boiler, etc.). It is not allowed to twist different materials, but if this is absolutely necessary, the copper wire should be tinned first. You can twist one wire around another if the curl is done by both, the number of turns on each should be at least two.
Soldering connects copper wire well. To join aluminum, heated TOC type solder is rubbed between the twisted turns.
Welding is performed by melting the wires at the end of the twist using a graphite electrode made from the commutator brush of an electric motor. The inconvenience is the need to connect a welding machine. Now compact inverters have appeared everywhere, greatly facilitating the process.
It is convenient to connect wires from different materials using a bolt with a nut and washers (Fig. d). The figure shows one of the simple ways to create threaded connections. Among them there are varieties: terminal blocks and slip-on terminals.
For screw connections, the wire is bent into a ring between the contact pad and the nut (Fig. below left). If you flatten it slightly, the contact area will increase several times and its resistance will decrease significantly (picture below on the right). This will allow electric current to pass through the wire connections for an electric stove or other powerful load.
Bending the wire for a threaded connection
Shortening the power cable
The method is rarely used when it is possible to move the socket along the power wire, which is connected from below. To do this, the old socket is dismantled, the wire is carefully removed from the wall, the excess part is cut off, a new socket is installed, and the connection is made.
Extension of the supply wire
This option is the most common, although it is not recommended. If this is absolutely necessary, wiring is pulled through the socket of the old one to the new outlet. The connection to the additional wire is made in the old junction box, or a new junction box is installed instead. This will not be entirely according to the rules, but it can be done. The box should be closed with a lid that allows access to it.
It is prohibited to twist wires made of different materials together!
If possible, it is better to completely replace the supply wire by laying a new one along the old furrow. If the wiring is done in pipes, replacement is even easier.
In the apartment, from time to time you have to rearrange the furniture, and you need to change the location of the sockets. Old sockets can be left disconnected, but at the same time they are reliably disguised. They may be useful in a new rearrangement in the future.
Adding a new outlet to an old one
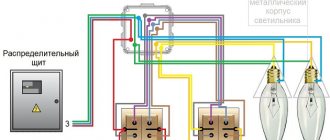
In this option, you do not need to remove the old outlet and put a junction box in its place. The figure below shows a daisy chain connection when two outlets are located on the same power line. There may be more of them, as much as the cross-section of the supply cable allows. Sometimes you can simply install a double socket instead of a single one. Connecting light switches to sockets is not permitted.
Connecting sockets with a cable
Daisy chain connection is only suitable for low-power energy consumers: portable light sources, irons, TV, vacuum cleaner. The washing machine, boiler, electric stove and pumps require connection through a junction box or a separate cable from the power switchboard.
Sockets for powerful consumers
Sockets for heavy loads, such as electric stoves, require special attention. They need to be checked more often and replaced if the contacts are burned or other defects.
The maximum current of the device should be 25 A or 32 A. A larger outlet may be needed. It can be installed outside or mounted into a wall.
Wall-mounted socket for electric stove
How to move an outlet
After studying safety standards and drawing up a preliminary diagram, the home master is faced with the question: how to properly move the outlet without disturbing the wall decor? A household socket has a dielectric base inside and a front panel on the outside. Dismantling the old socket begins with the front panel - it must be removed, that is, using a screwdriver, unscrew the screw with which it is attached to the dielectric base. In some types of models, the panel is secured to the inside using latches. In this case, you can pry it off with a knife with a thin blade. The front panel also needs to be removed when wallpapering a wall. In this case, the base of the socket is not removed from the installation box. Once the panel is removed, the dielectric base becomes accessible. Spacer tabs securely fix it in the box. By loosening both screws securing the tabs using a screwdriver, the dielectric base can be removed. Then the socket must be disconnected from the network wiring. The socket should be carefully inspected for damage, and if any is found, replace it with a new one.
Correct dismantling of an old socket
Before you put your hands on electricity, you need to turn off the power to the entire house or, if possible, the room where the work will be done to replace the outlet. Make sure there is no voltage at the outlet. Now you can start dismantling it from the wall. You can pick out an outlet with anything, but to install it in a new location, you need specialized tools. Materials and tools required when moving sockets:
- Screwdrivers.
- Pliers.
- Stationery knife.
- Hammer.
- Ring cutter.
- Shovel blade.
- Mounting box.
- Socket assembly with frame.
- Three-wire cable 2.5 mm².
- Cable coupling.
- putty
- Putty knife.
- Dowels for fixing the socket mounting block.
- Extension.
Having this minimal set of materials and tools with you, you can easily move the socket with your own hands. Let's not write a lot of unnecessary information, let's get straight to the point. We present to your attention the step-by-step instructions.
STEP 1: turn off the power to the outlet. As we have already said, before starting all work (even dismantling an old outlet), it is necessary to turn off the voltage in the house or directly in the room where the relocation of the outlet with gating will take place. We turn off the machine or unscrew the safety cartridges from the shield. You can check this with a special screwdriver with a signal diode. You can also check the voltage in the outlet with any device that is powered by 220 Volts. If it does not work, then you can proceed with dismantling.
STEP 2: front panel. To get to the core and main part of the socket, you first need to unscrew the front (facing) part of the socket. Basically it is held on by 1-2 screws using a Phillips screwdriver. Remove it and move on to the next step.
STEP 3: base of the socket. In order to move sockets in the kitchen or in any other room, you need to get to the power wires. They are connected to the conductive elements of the socket, which are located in the main part of the socket. At one time, it is held in the mounting block with the help of special claws, which, when twisted, expand and dig into the mounting box with their sharp edges. We unscrew the two screws, the claws loosen, and the base of the socket easily comes out of the mounting box.
STEP 4: wiring. How to move an outlet in the wall and connect it? Now you need to disconnect the wires from the conductive elements of the socket. The old sockets only had two wires. Zero and phase. But, modern safety requirements provide for a third wire - ground. Naturally, not everyone connects it. Disconnect the wires from the conductive elements of the socket, and disconnect the base of the socket. In no case do we intertwine the wiring.
STEP 5: installation box. Is it possible to move an outlet without removing the mounting box from the wall? Of course you can. But we decided that it did not belong there, and therefore decided to remove it forever. Now it's time to remove the electrical outlet box from the wall for good. We won't need it in that place anymore. In some cases, it happens that it is simply pressed into the wall, but it also happens that it is fixed with dowels. We find the right way to remove the mounting box from the wall and pull it out.
This completes the dismantling of the old socket and mounting box. But there are no step-by-step instructions on how to move the outlet to another location. We've only done half the work. And that was the fastest part of it. After all, breaking does not build. Therefore, we do not give up and move on to the most difficult and basic process of installing an outlet in another location. It will be a little dusty now. It is advisable to remove or cover all soft items and furniture in the room. In our case, everything is done in a completely empty room, and there is no need to do such manipulations.
Tips and tricks
- Twisting of cores is carried out subject to removal of 3 cm of insulation on both sides.
- Cleaning the contacts with fine-grained paper (sandpaper) is mandatory for better contact adhesion.
- If twisting is carried out rather than connecting using special devices, it is better to solder the finished structure with a lead-tin mixture.
- Always calculate the degree of load on the wiring and select a cable of the required cross-section. You should not play it safe by buying a cross section of a larger value; this is also unsafe.
- It is better to cut off the excess cable, twist the rest and hide it in the junction box.
Using a cable channel
Relocating the switch with laying the wiring in the grooves provides for subsequent repairs of the wall covering. If the apartment has undergone a new renovation and you don’t want to damage the walls, then open wiring is done. It is also necessary on wooden walls where grooves are not allowed. Plastic cable channels are used for it.
From the junction box to the switch socket, the base of the cable channel is vertically fixed to the wall surface in a new location. Fastening is provided with dowels. The wires are neatly placed in the cavity of the base, and a plastic cover is installed on top.
Tools for work
Before starting work, you must prepare all the necessary tools:
- Preparing a groove for electrical wiring - a wall chaser or hammer drill, chisel, chisel, hammer.
- Making a nest - a hammer drill with a concrete crown of the required diameter.
- Repair, dismantling and installation - a Phillips screwdriver, a minus screwdriver with a narrow and wide tip, pliers.
- Laying and connecting wires - wire cutters, mounting knife.
- Control and measurements - tester or indicator screwdriver, tape measure, ruler.
- Sealing and finishing work - spatula for plastering and putty, sandpaper or grinding machine.
We should not forget that the work is carried out with the electricity turned off, which means a flashlight may come in handy. For work at height you will need a stepladder.
Installation of cable channel
When laying cable ducts, many experienced electricians prefer to work “from the end”.
Laying wires when moving sockets into a cable channel is one of the safest ways
But first you need to decide on the new location of the outlet. It is necessary to take into account that the standard length of plastic channels is 2 m. It is recommended to make as few joints as possible during the work, if possible laying the cable in a single channel.
The cable channel is cut to the required length, applied to the wall and secured with self-tapping screws or glue.
An important note must be made during installation. Most often, the internal walls of apartments or individual houses are nothing more than a partition made of blocks about 60 mm thick. Its hardness, with the exception of rare cases, does not exceed the hardness of wood, and therefore you can easily do without dowels, a hammer drill, dust and unnecessary noise
It is quite sufficient to use self-tapping screws approximately 20 mm long with a sharp end, attached together with a press washer
With the exception of rare cases, its hardness does not exceed the hardness of wood, and therefore you can easily do without dowels, a hammer drill, dust and unnecessary noise. It is quite sufficient to use self-tapping screws approximately 20 mm long with a sharp end, attached together with a press washer.
For the same reason, on internal walls, due to their insufficient thickness, it is difficult to carry out internal wiring, and therefore preference should be given to an externally installed socket.
When tightening self-tapping screws, the work can be made easier by using a screwdriver, which allows installation to be carried out with minimal effort and at high speed.
To improve the fit of the channel to the wall surface, you should inspect the material in advance for the presence of special holes in it. If they are missing, then you need to drill them with a small diameter drill - approximately 4.5 mm.
Loop creation technology
The loop method is the safest of all options. It involves not simply moving the old outlet up or down, but creating a new “point” in close proximity to the old one.
The main advantage of the daisy chain method is the ability to connect a new outlet, placing it on the section of the wall required for work, and at the same time keep the old one
The only drawback of this connection is that the cable from socket to socket is laid horizontally. Knowing that traditionally the branching to the same switches and sockets is laid in a vertical route, due to your forgetfulness you can inadvertently damage the wire.
In addition, if one of the cores is damaged at the switching point, then all the elements following it will stop working. Therefore, the fewer connection points the system includes, the more reliable it will be.
Selection of required materials
When using this method, material costs are minimized. In addition to purchasing the newest outlet for work, you need to prepare:
- wire of the appropriate cross-section;
- plastic socket box;
- hammer drill with crown D70 mm;
- indicator screwdriver;
- pliers;
- hammer;
- flat screwdriver;
- braid removal tool.
The wire itself does not have to be laid in a groove, but can be laid openly using a cable channel.
To transfer the connection point to a new location and avoid the procedure of wall slitting, it is recommended to use an overhead cable channel model
The choice of socket box model depends on the base material into which it is supposed to be buried. For concrete and brick walls, ordinary plastic “glasses” are chosen, and for plasterboard bases, models equipped with spacer legs are chosen.
Making a niche and installing a socket box
Before moving the hidden socket to another place, you need to prepare a place for installing a socket box and make a groove for laying a section of the electrical network. Having outlined the location of the future connection point, use a crown to drill a hole.
In the absence of one, you can use a hammer drill equipped with an impact drill or a grinder. In this case, holes are first drilled along the marking contour, and then individual fragments of the wall material are chopped off using a chisel.
The depth of the niche is made such that the floor is completely recessed into it, and at the same time there remains a margin of 3-4 mm
A “glass” is immersed in the prepared niche. The electrical cable coming from the junction box is inserted through its back wall.
The socket box is fixed in a concrete wall using gypsum mortar. After the mixture has hardened, the product is cleaned of gypsum residues, and its inner walls are wiped with scraps of fabric. To secure the socket box into a plasterboard or wooden base, the “glass” is immersed in the made niche and fixed using the side spacer tabs
Connecting a new point
Having measured the cable of the required length to power the new point, one end of it is connected to the terminal blocks of the old socket, and the other to the contact part of the new “point”. The neutral, phase and ground wires are connected in parallel directly to the socket contacts.
To prevent short circuits between conductors, each core is insulated with a plastic braid. When connecting the cable, it must be removed. To make the task easier, use a cross-connecting knife, which can easily remove the insulation without damaging the core.
The work of stripping the braid should be done as carefully as possible, because if the core turns out to be damaged or defective, it will certainly “prove” itself very soon.
Neutral and phase conductors are allowed to be connected directly to the contacts of the socket, and the protective PE conductor only through a branch using a terminal block
When dealing with a PE conductor, keep in mind that according to the PUE, it is important to maintain its continuity. After all, if the grounding conductor on one of the sockets breaks, all other devices will be ungrounded. Having connected the neutral, phase and grounding conductors, all that remains is to fix the working part of the product in the installation box and install the decorative cover
Having connected the neutral, phase and grounding conductors, all that remains is to fix the working part of the product in the installation box and install the decorative cover.
Questions and answers
Relocating a switch is a fairly rare procedure. Even experienced people sometimes get confused when solving this problem, since they have never had to do such work before. Let's look at the most common questions that arise from users during the process of moving a switch.
What is the easiest transfer method?
The simplest method should be considered to be making an outlet using an open method. However, if you have certain skills, you can use a wireless switch - here you don’t even need to drill sockets for fasteners.
Is it possible to hide wires in the baseboard?
Yes, you can. However, the outlet from the old switch and the area from the baseboard to the new control element will still have to be designed somehow, using an open or hidden placement method.
Is it possible to combine and place part of the wiring in a cable channel, and the other part in a groove?
Yes, you can. Moreover, in some situations this is the only possible installation option.
Is it allowed to make a tap from a multi-channel switch?
Yes, it is allowed. The main condition will be to connect the tap to the required contacts. Otherwise, the procedure is performed in the usual way.
Which wiring connection method is the most reliable?
It is generally accepted that the most reliable method is soldering. However, it is not always available - there are no tools, skills, and it is inconvenient to do the work. Therefore, choose either connecting caps (if the thickness of the wire allows it) or terminal blocks.
How to putty walls with your own hands - detailed instructions and life hacks from the masters
Insulation of walls inside an apartment: choice of material and installation technology
Deep penetration primers for walls: features, rules of use and rating of the best
How to paint plaster: choosing paint, life hacks from professionals
Primer for wallpaper: what functions it performs, types, advice from professionals
Leveling walls with beacons with your own hands: choosing plaster, methods and step-by-step instructions
Do-it-yourself plasterboard ceiling: step-by-step instructions, tips, installation nuances
Wallpaper putty: types, rating of the best and application technique
Also see : How to hang a TV on the wall with and without a bracket. Additionally, you may be interested in choosing the best heating radiator.
Why move the switch?
In real conditions, the need to move a light switch indoors may arise for various reasons:
- Inconvenient height position. The switch is too high for small children to reach. Or, on the contrary, the children have already grown up, and he is too low - he has to bend down.
- Access limitation. For example, he ended up behind a cabinet or bar counter.
- The desire to rearrange the furniture, and the switch turns out to be closed.
- Increased convenience. Ensuring that the light is turned on from another room or from several places, bringing the switch closer to the bed or chair, etc.
- Consequences of repair. A good reason is to combine several rooms. Moving, for example, the kitchen into the living room, dividing a large room into several rooms, reinstalling the front door, etc.
Perhaps the opportunity has arisen to install a new structure, but it does not fit in its original place.
Connecting and installing a new outdoor outlet
Please note that we are not touching the old socket yet, it is waiting in the wings to go on its final journey. Accordingly, there is no need to turn off the voltage in the floor panel yet
In this case I use AVVG 2x2.5 cable with aluminum conductors.
We connect and install a new outdoor outlet. There are types of sockets that are more convenient to connect first and then screw to the wall; this must be taken into account and not rushed with installation.
Remember what I said about the wall? Here, too, dowels were not needed; wood screws 25 mm long worked perfectly.
Moving the outlet in the apartment to another location. Connecting and installing a new external double socket
The same view, only from the side, is given at the beginning of the article.
Of course, if there is an opportunity and the slightest need, it is better to install a double socket. Installing a double socket will solve the problem of recharging gadgets that have filled modern apartments...
Important clarification. Will be useful to everyone without exception
The socket box is purchased either plastic (for working with brick and concrete walls) or with spacer legs (for wood or drywall). This is a modern, fairly fast and budget option for how you can easily move an outlet in the house without gating. It is becoming an increasingly popular way of equipping offices, shops, and small businesses with the required number of sockets and other electrical parts, especially if this work must be carried out in panel structures.
We must not forget (just!) to always leave an installation wire margin of 10-15 cm and never connect aluminum and copper wires to each other.
Output of a new branch
This method requires more time and effort, but allows for the safest transfer of an electrical outlet.
The method, which involves installing a new line, is often used in panel houses, where the wires are literally walled up in a concrete wall, and therefore it is not possible to remove them. In this situation, they are simply de-energized and left in place, and a separate groove is laid to power the new outlet.
Grilling the wall and installing the “glass”
To install a new line, the first step is to turn off the electricity in the room where the work will be carried out. On the wall, using a ruler and pencil, mark the route along which the new groove will be laid.
Using a hammer drill or grinder, a groove is cut out in the wall along the intended route. The depth of the groove is made such that the wire laid in its cavity does not protrude above the surface after installation is completed.
To install a new connection point in the intended location, using a hammer drill equipped with a crown, hollow out a “nest” 50 mm deep. The walls of the niche are thoroughly cleaned of construction chips and dust.
The installed “glass” should not protrude above the surface. If the depth of the niche is not enough, you can carefully cut off the back wall of the socket box.
Tips and tricks
- Twisting of cores is carried out subject to removal of 3 cm of insulation on both sides.
- Cleaning the contacts with fine-grained paper (sandpaper) is mandatory for better contact adhesion.
- If twisting is carried out rather than connecting using special devices, it is better to solder the finished structure with a lead-tin mixture.
- Always calculate the degree of load on the wiring and select a cable of the required cross-section. You should not play it safe by buying a cross section of a larger value; this is also unsafe.
- It is better to cut off the excess cable, twist the rest and hide it in the junction box.
Installation of wires and gating of walls for them
In principle, you can attach new wires to the wires protruding from the niche, and use the switch socket as a distribution box. But this is only possible if the length of the remaining wires is at least 15 centimeters. Now you will need to start drilling out the socket for the new switch. This is done using a drill and a concrete drill. As a rule, a diameter of 70 mm is sufficient, but, depending on the switch model, this size can be changed. When the socket is drilled to the required depth, you will need to groove the wall. First you need to make sure that no other wires or cables pass through the gating area. To do this, the hammer switches to impact mode. The depth of the gutter usually does not exceed 25 millimeters. As for the width, it should ensure that the cable is completely immersed in the groove. In addition, the smaller the width and depth of the channel, the less plaster material will be required to seal the groove. For gating, a special drill attachment is used. Safety glasses or even a respirator mask won't hurt either: the process is quite dusty.
Before gating begins, a project for the electrical supply of the apartment must be completed, namely a wiring plan with installation locations for switches and sockets.
When the cable is laid in a trench, it does not need to be secured further: immobility will be ensured through plastering. Then you can start sealing the mounting box. This is done using pre-diluted alabaster. After the alabaster mixture has dried, you need to make sure that the switch socket is securely held in its socket. If this is the case, then you can begin installing the core.
We move the device to the adjacent wall
When deciding how to properly move the outlet, you need to understand which method will be optimal:
- extension using a cable;
- extension by adding a new one, similar in cross-section;
- creation of a parallel leased line.
The last option is to pull a new wire from the junction box and is considered the most reliable and safe. Moving a socket this way with your own hands allows you to bring a separate point to any wall of the apartment, but it requires significant material and time costs. The work is carried out sequentially:
- Check whether the electricity is turned off at the switchboard; if not, then turn off the power to the room.
- Open the junction box from which the cable of the point intended for installation is powered, disconnect the wire, dismantle the old device and wiring.
- Fill the hole remaining after the dismantled line with construction plaster.
- In accordance with the developed scheme for moving the socket in the apartment, lay a new groove. The size of the new groove is calculated depending on the diameter of the wiring, taking into account a layer of finishing material 15-20 mm thick. Before punching a groove with a hammer drill, it is advisable to mark the wall.
- Once the groove is ready, lay the wire along it.
- At the site of the future device, use a hammer drill with a special attachment to punch a hole for installing a mounting box with a diameter of 60 mm and a depth of 50 mm. Coat the made nest with alabaster or building plaster, install the box, wait until the solution dries.
- To fix the cable in the groove, dowel clamps are used, securing them every 50 cm.
- When laying the cores, the end must be inserted into the junction box, connected to the new wire by soldering, and secured at the top with electrical tape. It is not recommended to twist the wires, although it is easier and faster, as it can lead to overheating and short circuit.
- Pull the other end to the new mounting box and secure it. For a more reliable connection of the wires to the connectors, the cores can be wrapped around the installation bolt.
- Fill the groove with new wiring with concrete mortar.
Using the Remote Light Switch
The most effective and simple way to move a light switch without cutting at all, literally in 10 minutes, to almost any convenient point in an apartment or room, and in addition, if necessary, change the control circuit, is to use a remote light switch.
Currently, there are many different options for remote lighting control systems - from a simple remote control to complex multi-mode systems with a radio switch identical to a regular one.
Their main drawback is the cost of the kits themselves, which, if you use advanced models, will turn out to be somewhat higher than the installation of external wiring; in addition, some inconvenience is caused by the need to change the batteries of the remote control or remote switch every few years.
Otherwise, using remote lighting control kits is the best option if you need to move the switch without gating and even without any difficulties at all. See for yourself how easy it is to do:
1. The contact closes in the old switch, which needs to be moved. You can do this physically - by connecting the wires, or you can simply turn on the key.
2. A miniature control unit is placed at the installation location of the lamp, in this case a chandelier, and connected to the chandelier. If you don't have a niche in this area, like we do, it hides in the base of the chandelier.
3. The remote switch is programmed and installed in the desired location, often simply glued to the wall with double-sided tape.
4. EVERYTHING. At this point, the installation is complete, you can immediately use the switch. In addition, you can make several switches for this chandelier or change its operating mode and much more, depending on the model of the kit and its capabilities.
You can find out more about connecting a dual-mode remote control kit HERE. The method of transferring the switch is described there, with detailed step-by-step instructions, a connection diagram and everything that is necessary for successful installation.
Switch repair
It is not always necessary to throw out the old switch and replace it with a new one. Sometimes it is enough to repair it. The design of the switch is quite simple and in the event of a breakdown it can be repaired without much difficulty. If you carefully examine the disassembled switch, you can understand that the main function in it is performed by a contact pair, which moves from one position to another by mechanical force. In one position the electrical circuit is connected, in the other it is disconnected.
Required tools and materials
To disassemble and reassemble the switch, you only need one tool - a flat-head screwdriver, 3-5 mm in size. To clean the contacts, you need a piece of fine-grain sandpaper or a needle file.
The switch is disassembled using a regular flathead screwdriver.
How to disassemble a switch
The process of disassembling the switch was described above. For convenience, we present it here again.
- If the switch is already in (on) the wall, disassembly begins by removing the key. This is easy to do by prying it off from the side with a screwdriver.
- Next, unscrew the two screws securing the protective frame to the base.
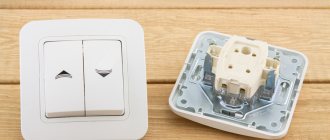
- After this, the base is removed from the socket box, for which two screws of the spacer mechanism are loosened. There is no need to unscrew them completely; after one or two turns on both sides, the spacer legs will loosen and the switch will fall out freely, hanging on the wires.
- Next, the wires are disconnected. To do this, loosen the two screws that hold the wire in the terminal. Disassembly is complete. The switch is removed from the socket box, then the wires are disconnected from it
Modern switches consist of a non-removable base, which is simply replaced in case of damage.
Cleaning contacts
If the switch is unstable (it turns on and sometimes does not turn on the lamp), most likely the reason lies in burnt contacts. Upon careful inspection, such contacts may appear slightly charred or even melted. This happens because the wire is not firmly secured in the terminal block. Another reason may be a voltage surge in the network at the moment of switching on. A lamp that is too powerful can also cause damage to the contacts over time. Be that as it may, the contact needs to be restored, then it will continue to serve properly. To do this, it is sanded with fine sandpaper until a uniform metallic color appears.
Use fine sandpaper to clean the contacts.
Sometimes the conductor may be tinned, that is, treated with tin. Then, instead of sandpaper, it is better to use a small file - a needle file.
Other possible problems and solutions
Other problems with switches rarely occur. But there are times when a foreign body or some kind of debris gets inside the switch. For example, during renovation. Then it needs to be disassembled and thoroughly cleaned of all excess; it is advisable to blow out the base with a vacuum cleaner. As a rule, after this the operation of the switch is restored.
How to assemble a switch
Assembly occurs in reverse order. If the repair is being carried out for the first time, you can lay out the parts on the table in the order of disassembly or photograph them step by step. When repairing a single-key switch, the location of the wires does not matter. But if it has two or three keys, then in order to avoid confusion, it is better to immediately mark the incoming core with a marker. They can also mark the place where it is connected.
When installing a double-lever switch, it is necessary to correctly connect the input conductor (phase), which is best marked during disassembly
You can check the result of the repair after installing the base in the socket box. To do this, you need to turn on the power supply on the panel and test the switch. If it works normally, you can complete the assembly and install the protective case and key.
Output of a new branch
This method requires more time and effort, but allows for the safest transfer of an electrical outlet.
The method, which involves installing a new line, is often used in panel houses, where the wires are literally walled up in a concrete wall, and therefore it is not possible to remove them. In this situation, they are simply de-energized and left in place, and a separate groove is laid to power the new outlet.
Grilling the wall and installing the “glass”
To install a new line, the first step is to turn off the electricity in the room where the work will be carried out. On the wall, using a ruler and pencil, mark the route along which the new groove will be laid.
Using a hammer drill or grinder, a groove is cut out in the wall along the intended route. The depth of the groove is made such that the wire laid in its cavity does not protrude above the surface after installation is completed.
To install a new connection point in the intended location, using a hammer drill equipped with a crown, hollow out a “nest” 50 mm deep. The walls of the niche are thoroughly cleaned of construction chips and dust.
To secure the plastic “glass”, the inner walls of the made niche are covered with a layer of gypsum mortar, and the outer edges of the socket box are treated with the same composition
The installed “glass” should not protrude above the surface. If the depth of the niche is not enough, you can carefully cut off the back wall of the socket box.
Cable laying and terminal connections
The cable is laid in the created recess, fixing it every 5-7 cm with plastic clamps or alabaster.
Having opened the junction box from which the “old point” was powered, they find the junction of the output cable with the wire going to the former outlet and disconnect the wires. After this, the old line is dismantled along with the socket. If the old groove was opened, then after removing the wire it is sealed with gypsum or alabaster mortar.
To power a new line, the end of the output cable is connected to the new wire using spring terminals or insulating clamps
The connected unit is buried in the mounting box and secured with bolts
When installing the socket, it is important not to allow even the slightest play. Otherwise, over time, it will fall out of the “socket” along with the plug. Since it is difficult to ensure a tight fit of the wires inside the box, it is advisable to connect the wires not by twisting, but by installing terminal blocks, spring terminals or plastic caps
Since it is difficult to ensure a tight fit of the wires inside the box, it is advisable to connect the wires not by twisting, but by installing terminal blocks, spring terminals or plastic caps.
When laying a new conductor, you need to ensure that there is a small margin left at both ends. It will be required in order to create a high-quality electrical connection.
The free stripped ends of the conductors are connected to the socket block of the new “point” through screw or spring terminals. When connecting via terminals, they are guided by the rule that the phase wire is installed on the left terminal, and the neutral wire on the right. The grounding conductor is connected to a terminal equipped with antennae, which is located on the device body.
The connected working unit is installed in the socket box and fixed using spacer tabs and clamping screws. A decorative panel is mounted on top.
Read with this
Methods for transferring a connection point
There are two simple methods that allow you to transfer sockets without destroying the wall finish:
- By creating a loop - involves creating a jumper from the old “point” to the new connection point.
- By extending the wire - involves extending the electrical line in the cavity of the new groove.
If the new chosen location is much further than the previous one, you can make a complete replacement of the entire line by laying a separate wire from the distribution box located at a slight distance. But, unlike the two methods described above, laying a new line requires large-scale repair work.
An important point: it is necessary to extend the conductor with an electric cable, the cores of which have the same cross-section and are made of the same material
When choosing a daisy chain method for connecting a new outlet, keep in mind that such a connection is very unreliable for installing three or more power points. If one section or socket is damaged, the entire sequential chain of devices will be inoperative. And, according to the rules of the PUE, it is not allowed to be used to power powerful electrical appliances: microwaves, electric stoves, refrigerators, washing machines, etc.
Another negative side is that when two sockets are connected with a single cable, the current load sequentially passes from one device to another. Therefore, when several devices are plugged into sockets connected through jumpers at the same time, there may not be enough voltage for their operation.
Installation of socket boxes in gypsum board
When working with drywall, the cable is laid in advance or pulled through using technical holes and broaches. In the places of future switching (connections) of the cable, or in those places where there should be a socket box, leave a supply of cable, and mark outside where this cable is located. Mark the location of the future hole for the socket box in any way convenient for you, for example, screw in a self-tapping screw in this place.
Markings for socket boxes are made in the same way as markings on concrete. The distance between the centers of the circle is the same 71mm
It is important to consider that a drilled hole can no longer be fixed (or rather, nothing is impossible for a good electrician), but before you call an electrician, you need to try to do it yourself
Holes in drywall can be made with a regular wood bit, 68mm in diameter, using a screwdriver or drill.
After drilling the hole, you need to find the necessary wires, which should be right behind the wall. It happens that they are hidden in a junction box, or hang on a cable, with the help of which the wires can be pulled to the hole. Each master has his own way of pulling wires into hidden cavities, but that's a different story.
Now comes the fun part. The most painful procedure is the correct installation of the socket box in the drywall. This is due to the fact that different manufacturers of socket boxes for plasterboard (or wood) have lugs for securely fixing the socket box to the ceiling wall (plasterboard, plywood, or whatever you have). In some cases, because of these ears, the rosette does not fit into the prepared hole, but this problem does not occur on all rosettes!
It is best to take care of this in advance when buying socket boxes. Make sure that the ears, when open, do not go beyond the circumference of the socket itself, for example, like here
If, nevertheless, you manage to buy the “wrong” socket box, then you can use one little trick: eyelets are made in plywood or drywall at a slight angle (it is enough to make them only on one side), after which the socket box can be installed normally. The socket box should fit into the hole normally at an angle. The main thing is not to overdo it and not to make a hole with a larger diameter than the outer edges of the socket box.
Some final tips
- Wall grooves for wiring are performed parallel to the ceiling or walls, the angle is strictly 90.
- A minimum distance of 10 cm must be made from corners and windows, 40 cm or more from the gas pipe, and 15 cm from the ceiling.
- The maximum permissible groove depth is 25 mm.
- It is prohibited to lay grooves into load-bearing walls, columns and beams of multi-storey buildings.
- It is unacceptable to cross wires during their installation.
- If the wiring is planned through the bottom of the walls, and switches and sockets will be low, then you can make grooves in the floor or run the electrical cable through the baseboard.
- Scoring ceilings is prohibited as it can cause serious damage to the building structure.
Method No. 1 - Using a cable
Probably the most unsafe of all options, because... in this case, a jumper is created from the old electrical “point” to the new connection point. As a result, you don’t just move the socket down or up, you simply create another one nearby.
The advantage of this method is that as a result you will have a new outlet and at the same time be able to keep the old one. In addition, the cost of materials to move the outlet yourself is reduced to a minimum.
However, you will get much more disadvantages:
- A daisy chain connection is very unreliable and is highly not recommended by the rules of the PUE.
- The wire from point to point will be laid horizontally, which is also extremely dangerous (we are accustomed to the fact that branching to switches and other fittings is carried out only vertically). Due to your forgetfulness, you can accidentally run into electric shock if, for example, you decide to drill a hole in the wall. To prevent this from happening, we recommend that you search for electrical wiring in the wall before moving the outlet.
- The current load on the products will increase, because the two points will be connected to each other by a single loop. If you connect powerful electrical appliances (for example, an electric stove and a microwave oven) to both sockets, the wiring may fail and, as a result, a short circuit.
You can clearly see the process of connecting the cable in this video instruction:
Using a jumper
By the way, connecting with a cable can have another significant advantage - the wire does not have to be laid in the wall. You can move the socket yourself in an open way using a cable channel. Also in this case, it is more preferable to use an overhead model of the product, which will allow you to transfer it to another place without breaking a concrete wall! This option is most often used to beautifully move the socket to a cabinet in the kitchen or to the balcony.
Necessary tools and how to replace the missing ones
A good tool speeds up the work significantly. If you wish, you can make do with improvised means, but here you need to look at whether the loss of time is worth the money saved, for which you could rent the necessary tool.
- Wall chaser. Helps to quickly make grooves - works in tandem with a construction vacuum cleaner and does not leave dust. Having your own wall chaser is rare, so it can be replaced with a grinder with a disc for concrete or a hammer drill, but they will create a lot of dust.
- A powerful drill with an attachment for drilling a hole for a socket box. You can replace it with a concrete drill - drill holes around the perimeter of the circle and knock out the remaining concrete from the inside. It is also needed in conjunction with a wall chaser, if the groove goes along two walls - add 10-15 cm that the furrower will not grab near the corner.
In particularly difficult cases (there is no electricity), it will be possible to make a groove in the wall the old fashioned way - with a chisel and a hammer, but it is difficult to say how long this will take.
Wire clamps - help to make a quality connection. If necessary, you can do without them - you can simply twist the wires well and crimp them with pliers.
The rest is necessary in any case: a socket box, a socket, a wire, pliers, a knife, electrical tape, plaster or cement for installing the socket boxes and sealing the grooves.