Lighting in an apartment is an important component of all home electrical wiring. In turn, it is difficult to imagine lighting without switches. Therefore, installing a switch is a fairly popular type of electrical installation work, which will not be difficult to learn. In this article we will take a closer look at how to connect a switch with your own hands.
Features of connecting the switch
A switch is a switching device for closing and opening an electrical circuit by breaking a phase.
Attention! Therefore, it is the phase wire that must pass through the switch, not the neutral wire, which must pass to the installation site of the lamp directly from the junction box.
In some apartments, incorrect connections sometimes occur. This is fraught with the fact that when the light is turned off while replacing the light bulb, an electric shock may occur, since instead of a phase, zero is disconnected, and the light bulb socket is energized.
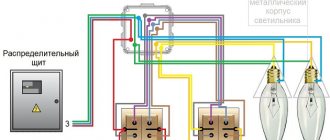
Switch connection diagram
If such an incorrect connection is detected, the phase phase of the wires should be changed. To do this, you need to change the circuit in the distribution box to the correct one.
When installing this device, the question arises at what height to install it, are there any rules and standards. According to the rules for electrical installations:
- It is recommended to install switches on the wall on the side of the door handle at a height of up to 1 m; they can be installed under the ceiling with control using a cord.
- Any switches and sockets must be located at a distance of at least 0.6 m from the doorway of the shower stall.
- The minimum distance from switches, sockets and electrical installation elements to gas pipelines must be at least 0.5 m.
In Soviet times, there were slightly different requirements for what height to install switches in an apartment. The standard height was 1.6 m. Therefore, in many apartments they are still located “at eye level”.
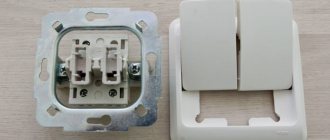
Device
Before installing the switch, let's look at how this switching device works. Let's do this using the example of the simplest single-key light switch.
switch operating mechanism
The most important part of this device is the operating mechanism. It is a metal frame on which a drive is attached, which directly turns the device on and off. Essentially, this drive is a moving contact that connects two fixed contacts of the switch.
One fixed contact is incoming, a wire from the power supply is connected to it, the second is outgoing, and the wire is connected to the lamp. The correct position of these two fixed contacts is open, in which case the switch is considered to be off, the circuit between the power supply and the lamp is not closed, and the lamp does not light. As soon as the switch drive is affected, the movable contact takes a position in which it closes a circuit between two fixed contacts, voltage is supplied from the power source to the light bulb and it lights up.
For safety reasons, the entire contact part is placed in some kind of dielectric (it can be plastic or porcelain).
The switch is installed in wall holes, but before this, special socket boxes must be installed in the holes made in the wall. And the working mechanism of the switches is already fixed in them. Their reliable fixation is ensured by sliding legs located on the sides of the working part.
Another design component of switches is protective elements. As a rule, they are made of plastic. The first of these elements is a key; it is attached to the drive of the working part and directly controls the switching device. The second element is a protective frame; it covers the working part and prevents a person from touching the live contacts of the switch. The frame is secured with screws or plastic latches.
Preparation of the workplace
When performing any electrical installation work, first of all, it is necessary to turn off the power supply, check that there is no voltage, and exclude the possibility of unauthorized re-switching on the voltage. Using a voltage indicator, determine which of the wires in the junction box is phase and mark it with a marker.
Prepare the necessary tools:
- pliers;
- voltage indicator;
- screwdriver;
- construction knife;
- marker.
Installing the wire to the switch
For a standard connection of wires to a switch, a cord consisting of three cores, the cross-section of which will be 1.5 mm (VVGngP one and a half), is perfect. To start:
- It is necessary to lay it from the distribution box to the socket box (and here and there it is worth leaving a small margin of about fifteen centimeters, which will be needed already at the connection stage).
- Another piece is laid, this time from the distribution box to the future lighting fixture.
- The wire is being laid from the machine to the distribution box to provide future power.
- A wire is laid from the meter showing the amount of electricity consumed or from the machine located at the entrance to the main machine, which goes to the main group.
At this point, the laying of the wire is completed, you can proceed to the next stage.
Connecting an internal single-key switch
This type of switch is installed in apartments with internal electrical wiring, that is, all wiring is hidden in the wall.
At the location where the socket is installed there should be a recess in which a special box for the switch is installed, into which the wire is routed.
Operating procedure:
- Preparing the switch for installation. It is necessary to disassemble the switch; to do this, unscrew the screws connecting the button to the frame and remove it from the frame.
- Trim the insulation from the wires where they connect, leaving about 1 centimeter of exposed area on each.
- Insert both phase wires into the holes for the wires: the one coming from the distribution box into the inlet hole and the one coming from the switch to the installation site of the lamp into the outlet hole.
- Tighten the screws tightly to securely fix the wires, which should not move freely.
- Install the mechanism in a special box in the wall and securely fix it to avoid loosening.
- Install the previously removed frame onto the mechanism and secure it with screws.
- Install switch keys.
If we are not talking about replacement, but about installing a new switch, it becomes necessary to install a special box for the switch. This is done as follows:
- At the location where the electrical wiring switch is installed, make a niche in the wall slightly larger than the size of the box.
- Lead the phase wire through the hole in the bottom of the box. Secure the box in the niche using any plaster solution.
Getting acquainted with the rules and preparing materials
First of all, everyone, and especially beginners, need to remember the basic safety rules when manipulating electricity:
- Always turn off the electricity and use a multimeter or an indicator screwdriver to make sure that there is no electricity directly at the work site.
- Do not touch exposed veins with your hands.
- Study the color and other markings of the wires, carefully ensure that the neutral wire is connected to the neutral, ground to ground, and phase to phase. Otherwise, a short circuit may occur and the wiring may catch fire.
- Choose high-quality electrical components and consumables, again do not use old switches and wires.
- To connect wires, use soldering, terminals, connecting blocks, and not twisting or insulating tape.
- Calculate the maximum voltage on the wires and, in connection with this parameter, select the cross-sectional diameter and other operational characteristics of the conductor.
- Familiarize yourself with the installation diagram of the switch of the selected type (with one, two or three keys).
Read here! Installing sockets with your own hands - instructions and diagrams for correctly connecting an socket in a private house or apartment (photo + video)
It is also necessary to prepare all the necessary tools and materials in advance. So, to install the electrical wiring of a switch, you will need a drill or hammer drill, a special attachment for making a hole, a multimeter, screwdrivers (including an indicator screwdriver), a spatula, pliers, a knife, a two-core wire, a socket box, a switch, putty or plaster mortar.
Attention! When purchasing a new switch, you must purchase a socket box suitable for the model, which differs from the standard iron versions of the old model in its compact size and is made of special non-flammable plastic.
Connecting an external single-key switch
If home electrical wiring is done in an open way, that is, on top of the walls, then external switches are used. In this case, a box for the switch is not used; the switch is mounted directly on the wall using self-tapping screws, and in some cases, dowels.
Operating procedure:
- Disassemble the switch. To do this, remove the keys from it and unscrew the screws securing the mechanism to the body.
- Having cut off the insulation at the ends of the wires, insert the phase wire coming from the junction box into the inlet of the mechanism, and going from the switch to the installation site of the lamp into the outlet.
- Tighten the screws to securely fix the wires.
- Attach the socket box with the mechanism to the wall and connect it to the switch body. Some models of switches come without a socket box, in which case the mechanism is mounted directly on the wall.
- Set a key.
External single-gang switch
Stages
As we have already figured out, first of all, you first need to take care of safety, and only then think about how to install the switch yourself. To do this, you need to turn off the power to the switch, if possible, or turn off the electricity in the apartment or private house
After this, if available, you need to remove the old switch. Do this gradually, because even if you are not sure what to do, you can see how the connection was made before.
Next you need to take the wires and connect them to the required holes in the switch, and carefully tighten the whole thing. Now you need to do the actual installation. To do this, place the switch in the socket box, then gradually tighten the screws on the brackets until they are completely fixed.
Next you will need to take care of the visual component - put on a button or buttons, a decorative frame, turn on the power and check the switch.
Connecting a two-gang switch
Installation of this type of switch is used in the following cases:
- The chandelier shades are divided into sections to regulate the level of illumination, each section is connected to a separate switch button.
- The switch is connected to autonomous lamps.
If with a single-key switch everything is clear and simple, then connecting a two-key switch seems much more complicated: the terminal box is different and there are more wires. In fact, this should not cause any big difficulties, the connection algorithm is the same. The device is not much different from a single-key device.
Operating procedure:
- Disassemble the switch. The mechanism is somewhat different from the single-key mechanism. But there’s nothing wrong with that: in modern switches, all contacts are marked. L - contact for the supply phase, outgoing contacts are indicated by downward arrows.
- Having cut off the insulation from the wires at the point of their connection, we connect the wires to the corresponding contacts of the mechanism.
- When installing internally, secure the mechanism in a special box in the wall and put on the previously removed frame. For outdoor use, mount it on the wall and install the switch housing.
- Set keys.
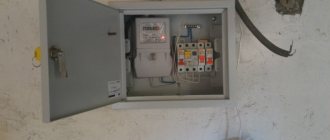
Installation of distribution box
At the very beginning of the installation work, it is worth starting with the installation of a distribution box, where all the necessary wiring will be located, connecting to each other in a certain order, creating a switch circuit with one key.
The box itself can be recessed into the wall, or maybe along the top, but this in no way affects the installation process itself, it will be exactly the same.
Next, the socket box is mounted - the base for installing the components of the socket or switch. The next step according to the instructions for connecting switches is to install a switch (automatic), which serves to protect the electrical network from sudden overloads, as well as from short circuits in the network. It is often placed in a power panel.
Connecting an illuminated switch
Who, at least once, while searching for a switch in complete darkness, did not trip over shoes and other objects lying on the floor, and, swearing, barely fumble for the treasured button on the wall? This situation is painfully familiar to everyone. Therefore, to make searching easier, an illuminated switch was created. When the light is off, the indicator lights up and indicates its location.
Principle of design and operation of an illuminated switch
Unlike a conventional one, a backlit switch is equipped with a light indication; the indicator is a neon lamp or LED connected in parallel to the contacts of the device and a current-limiting resistor that reduces the voltage in the network.
When we turn off the light, a phase break occurs in the switch contacts going to the lamp. But at the same time, the circuit to which the indicator LED is connected is not broken. The resistor lowers the incoming voltage to the minimum required to turn on the LED.
When the light is turned on, the indicator turns off. This occurs because the current follows the path of least resistance. The lamp is connected to a wire with a cross-section much larger than that of the wire going to the LED, which means the resistance is much less.
Illuminated switch
A reasonable question arises: if the indicator LED lights up, it means there is voltage, then why doesn’t the lamp in the lamp turn on? It's all about the resistor through which current passes to the LED. It lowers the voltage to a level that is not enough to turn on a light bulb in a chandelier, but enough to turn on an LED.
Connecting an illuminated switch is the same as a regular one.
It is not recommended to connect an illuminated switch together with fluorescent or LED lamps equipped with a ballast. The reason is that when the switch is off, the current flowing through the LED to the lamp charges the filter capacitor, which does not need much current to charge. The capacitor, in turn, tries to turn on the energy-saving lamp startup circuit. However, there is not enough charge on the capacitor, it discharges, and the lamp goes out again. And this can continue indefinitely.
Attention! The illuminated switch is installed only on incandescent or halogen lamps.
You should also pay attention to the fact that if the lamp is missing or burnt out, the backlight will not work. For the simple reason that an LED indicator needs both zero and phase to light up. And the zero to the indicator comes from the switched off chandelier on the ceiling. If the lamp is missing, then the power circuit is broken.
Illuminated switch connection diagram
Main types of switches
The time has long passed when all models were approximately the same and differed only in appearance. Today, the manufacturer produces a variety of types of switches. Based on the type of switching on/off, all of them can be divided into several groups.
No. 1: Keyboard type devices
Very simple and reliable design. The basis of the device is a swinging mechanism, which is pressed by a spring. When you press a key, it closes a contact, which turns the electrical device on or off.
For the convenience of consumers, one, two and three-key switches are available. This makes it possible to control not only one, but several lamps at once.
No. 2: Switches or changeover switches
Externally, these devices are indistinguishable from their keyboard counterparts, but their operating principle is completely different. When you press a key, the devices open one electrical circuit and transfer the contact to another.
This allows simultaneous control of lighting from two, three or even more places. Complex circuits that involve more than two switches are supplemented with crossover elements.
Dimmers not only turn on the lighting, but also regulate its intensity. There are also multifunctional types of devices that can simulate presence, operate on a timer, and much more.
#3: Dimmers or Light Intensity Controllers
A switch that allows you to adjust the lighting intensity. The external panel of such a device is equipped with keys, a rotating button or infrared sensors.
The latter option assumes that the device can receive signals from the remote control. Complex dimmers can perform several functions: activate dimming mode, simulate presence, turn off lights at a specified time.
The criteria for choosing a dimmable switch are described in this article.
No. 4: Switches with built-in motion sensor
Devices react to movement. The appearance of people is registered by a sensor that activates the lighting and turns it off if there is no movement. To operate the switch, an infrared sensor is used, which is capable of analyzing the intensity of infrared radiation and distinguishing a person from other objects.
Multifunctional switches with a motion sensor can not only turn on lighting fixtures, but also activate video cameras, sirens, etc.
No. 5: Touch-type devices
Turn the lighting off/on by lightly touching the sensor. Varieties are available that are triggered when a hand is passed near their body. The main difference between touch switches and traditional analogues is the presence of microcircuits.
This eliminates the risk of a short circuit, which significantly increases the service life of both the switch itself and the lighting fixture.
There are many types of switches. Illuminated models are designed to facilitate orientation in dark rooms
Compliance with safety regulations
Well, we’ve figured out how to install switches - one of the simplest electrical installation jobs that does not require special skills and talents. If you study everything in advance and understand what, how and why exactly this is done, then you can easily and quickly carry out this hitherto unfamiliar procedure for installing a switch.
And one of the most important points is compliance with safety precautions, otherwise the current strength will test your strength. And there are not so many safety rules:
- Before starting work, stop the power supply by turning off the circuit breakers in the electrical panel. Take measures to exclude the possibility of re-applying voltage.
- All tools must be in good working order. It is necessary to check for damage and chips on the insulating parts of the instruments.
Installation of pass-through switches
The method of installing pass-through switches differs from the usual one, since it is based on an understanding of the principle of constructing a circuit. Pass-through switches are also called changeover switches. One circuit is closed on one side and closed on the other and vice versa. Manufacturers show a diagram of the device on the housings of walk-through models, but not all have it, so let’s look at the installation in more detail.
1. You need to prepare a three-core cable with multi-colored insulation. Let us remind you that brown is phase, blue is zero, yellow is grounding.
2. De-energize the room, turn off the electricity in the panel.
3. In the switch located near the distribution box, we take out the phase wire and connect it to the common phase terminal in the box. The other two wires, according to the colors, are also connected to the corresponding wires in the box. If the groove is already sealed, then it is worth checking the compliance with a voltmeter.
4. We connect the phase of the lamp with the phase of the opposite switch. We connect the remaining two wires between the feedthroughs, observing the color.
5. We connect the wires from the junction box to the lamp.
6. Close the lid of the box and assemble the switch.
The installation work is similar to the procedure already described with other types of switches. We turn on the electricity in the panel and check whether the circuit works correctly. One and the other switch should both turn off the light and turn it on. If this does not happen with any of them, then you should take a closer look at the circuit and find the error.
The situation is more complicated with two-key pass-through switches. They operate as two separate lines, each to its own lighting fixture in different rooms or parts of the same room. They use two three-core cables or one five-core cable.
Features of installation of hidden and overhead types
According to the installation method, switches are divided into internal (hidden) and external (at the top). Although the principles of their installation and operation are the same, there are differences in the installation approach.
Installing an internal switch
Such devices are more aesthetically pleasing; they are built into the wall, but require the creation of a special niche in the surface and the installation of “glasses”. Therefore, they can only be mounted in a wall of sufficient thickness. Devices of this type are used in conjunction with hidden wiring.
Related videos.
Installing an external device
These devices have disadvantages, mainly of an aesthetic nature. They perform their function of opening and closing the circuit no worse than internal ones. But their installation is simpler - there is no need to install an outlet, a cover on the surface is enough. Another advantage is the ease of installation on walls and partitions made of plasterboard. Hanging devices are used in combination with external wiring, but they can also be used for hidden wiring - just bring the ends of the wires out near the installation site of the device.
Surface-mounted luminaire for outdoor installation.