Today, LEDs are recognized by ordinary users, radio amateurs and industrial enterprises as the most environmentally friendly, compact and energy-efficient light sources. Low-power diodes are used to backlight monitors, mobile phones and in various toys, and high-power LEDs are used in workshop spotlights and festive luminescence of buildings, in the advertising business. But the unusual light source has a number of maintenance features, in contrast to energy-saving analogues (ESL) and incandescent lamps. It is not so easy, for example, to solder LEDs. This article is devoted to this issue.
Structure of diode elements
The main difference from other lamps is that LEDs have a positive and negative contact (anode and cathode). When soldering a diode in a circuit, it is important to take this into account.
You also need to understand that there are DIP and SMD LEDs.
The positive contact in DIP is determined quite simply. It is worth taking a close look inside the flask. The positive terminal - the anode - is smaller than the negative one. In the picture, the plus is on the left.
There is a second way - look at the length of the leg. It is longer at the positive terminal.
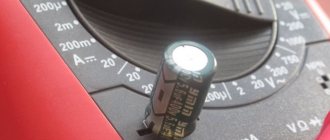
The third way is with a multimeter. The black terminal of the device is negative, the red terminal is positive. Let's call:
The last method is suitable for both types.
This is perhaps the most important thing to know about the structure of an LED. If you are interested in the theory, we recommend watching the video:
Resoldering light emitting diodes
LEDs are soldered and desoldered in the same way as any radio component. This is especially true for DIP LEDs that have conductive legs. Difficulties can only arise with SMD parts, since they have soldering pads and not conductive legs. Such LEDs are soldered onto strips or boards.
What you will need
In addition to a soldering iron, solder and flux, you may need:
- flux brush;
- tweezers;
- side cutters or scissors;
- adjustable stand.
Soldering temperature and other conditions
If you have no experience in soldering LEDs, then it is advisable to use a hair dryer. In this case, the likelihood of the part overheating is greatly reduced.
When using a soldering iron, the maximum tip temperature is 300 degrees. You can purchase a soldering iron with adjustable temperature.
How to desolder
To remove the board with LEDs from the lamp, you need:
- Separate the body. This can be done with a knife, but be careful not to damage anything.
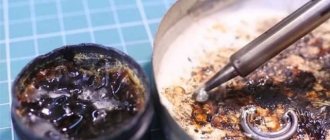
- The board is soldered to the base with two wires. They are soldered by soaking the soldering iron tip in flux. After this, the board is simply removed from the base.
- After this, using a tester, all tracks and LEDs are checked in resistance mode. Also, damaged LEDs will have darkening - black dots.
- You need to inspect the quality of soldering. It happens that a defect occurs in production that interferes with the normal operation of the lamp.
- After identifying the faulty elements, the board is secured in the holder. Take a soldering iron in one hand and tweezers in the other. The soldering iron is brought to one contact for a couple of seconds, and then to the other. In this case, the LED is carefully pulled out with tweezers.
You need to warm up the contacts one by one until the element is unsoldered.
How to solder
Step by step guide:
- Contact pads remain in the places where the LEDs are soldered off. A drop of flux should be applied to them.
- Working SMD LEDs are placed on top, observing polarity.
- The contacts are heated again until the legs enter the solder.
If there is no LED, you can solder a piece of wire instead. The lamp will start to shine a little dimmer, but it will still work. It is worth understanding that in this case it will work much less, because the current calculated for 10 LEDs (conditionally) will be distributed over 9.
Therefore, experienced craftsmen, instead of wire, select a resistor of the required value and solder it in place of the burnt-out LED.
After watching the video, you can clearly see the process of soldering SMD LEDs using a contact soldering iron and a hot-air soldering gun.
How to remove an LED from a strip
Another difficulty when soldering SMD type is replacing the old element with a new one in the LED strip. Solved in a simple way:
- Before unsoldering the diodes, secure the tape so as not to get the soldering iron on the conductive paths.
- Carefully melt the tin around the contacts and slide a blade under the diode. We lift it first on one side, then on the other, until the diode is free.
Connection Rules
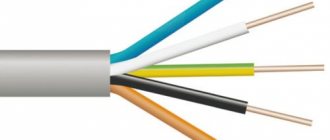
Pieces of LED strip are connected, observing polarity. The product with single-color bulbs has 2 contacts. There are 4 contacts on the RGB strip. The wire is used with a cross-section of 0.75–0.8 mm in multi-colored insulation so as not to confuse the poles.
Splicing over 5 m is not recommended. Due to the voltage drop, the distant LEDs will not glow at full power.
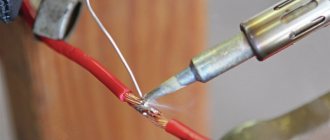
To solder wires, use a soldering iron with a power of 25–60 W. The maximum tip heating temperature is 300 °C. You will need flux, fine solder and rosin. Without a soldering iron, connections are made using connectors.
Soldering wires at an angle
When the LED backlight is made of several parallel strips, to pair them, it is better to solder the wires to each piece of strip at an angle of 90°. Moreover, the minus and plus are fixed on the contacts of two adjacent diode blocks.
This connection does not affect the glow of the diodes, but the wires are located without an overlay. For RGB strips, 4 wires are soldered at an angle.
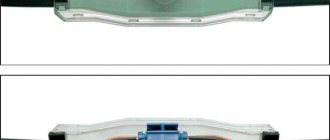
Soldering silicone coated tape
A protective silicone coating hides the current-carrying contacts. To get to them, clean them with a sharp knife.
If you have to solder wires to a tape with IP68 protection, then after the entire procedure the exposed edge is pushed inside the protective shell. The void is filled with liquid silicone to a depth of 10 mm and a plug is installed by threading current-carrying conductors through the technical holes.
When are connectors needed?
To quickly connect the tape with wires or two pieces together without soldering, connectors are used. Connecting elements are selected of the appropriate width. The most common sizes are 8 and 10 mm. The number of contacts in the connector and on the LED strip must match.
Connectors are divided into three types:
- straight elements for splicing two pieces of tape;
- to connect two pieces at an angle of 90°;
- for connecting with wires to obtain an arbitrary angle.
According to the type of connection, connectors are:
Disadvantages of connecting connectors
The connector is convenient for quick connection and does not require additional insulation. However, at the point of connection of current-carrying contacts, the cross-section decreases. During prolonged operation, heating occurs.
The contacts burn out, impairing current conductivity. The LEDs located next to the connector suffer from heating. Parts fail or the brightness of the light decreases.
Lack of soldering is accompanied by oxidation of contacts. Copper turns green when exposed to oxygen. The current flows weaker through the contacts. The diodes begin to dim, blink, and eventually stop lighting.
Overlapping connection without wires
To properly overlap two pieces, the ends of the LED strip are cut off close to the current-carrying contacts. The adhesive layer is peeled off the back side of one piece. The contacts are lubricated with flux and tinned with tin until a silver film appears.
Two pieces of tape are overlapped, observing polarity. The contacts are heated with a soldering iron for no more than 5 seconds. During this time, the tin will create a strong connection.
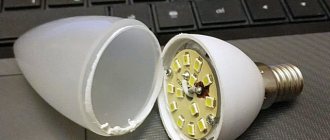
How to desolder an LED from an LED light bulb
Instead of incandescent light bulbs or energy-saving lamps, you cannot insert LEDs into the socket; you need a kind of intermediary. It is a lamp body in which several crystals are located on the board.
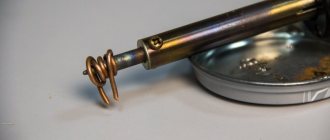
For convenience, it is recommended to tightly wrap copper wire around the tip, with a cross-section of no more than 4 mm.
Using tweezers or a needle, move the crystal down, parallel to the contacts.
How to easily repair an LED ceiling light (chandelier)?
If you can repair an LED light bulb, you can just as easily repair an LED lamp or chandelier. They are designed on a similar principle. Under the diffuser there are diodes connected to each other in series, but not one at a time, but most often in groups of 2-4 LEDs. If one or more diodes degrade, the others will not light up either.
How to quickly repair an LED ceiling lamp - step-by-step instructions:
- Remove the chandelier. The lampshade of lamps is most often removed by moving it counterclockwise or by moving the clamps away. If you can’t get to the fasteners to remove the chandelier from the ceiling, you can use your phone camera to film the gap at the base. This will help you understand the principle of fastening.
- Remove the cover from the housing and look for a degraded LED with or without a black dot. You can test diodes using the methods described above. You can also supply power to the lamp (preferably with a separate unit), and alternately close the contacts of the diodes with tweezers, a screwdriver or a wire with stripped contacts. When the contacts on the burnt out LED are closed, the lamp will light up.
- Remove the faulty elements and close the contacts using a soldering iron and a small amount of solder.
Examples of how you can quickly repair LED lamps (ceiling and wall):
How to solder a resistor to an LED
If your circuit does not provide for current limitation by the so-called driver, then you can use resistors the old fashioned way.
It is impossible to connect LEDs directly to the network, since in addition to the increased current, it is also variable. The resistor and driver convert the current to direct current.
Each LED ideally needs a separate resistor. This is if there are few diodes. If there are, for example, a hundred of them, as in some garlands, or even a couple of dozen, you will have to purchase a driver.
If you are encountering the concepts of “resistor” and “driver” for the first time, we have selected visual instructions:
The resistor must be connected in the circuit after the power supply and before the LED. It just solders. In the chapter “Features of soldering” we left a video on how to solder any contact (see above). There are no special features here. The only thing that can be doubted is the choice of flux, that is, a substance that cleans the contact surface from oxide and/or grease film. As an option - a special paste.
Safety precautions and preparation for work
When soldering LED lamps, you should follow the safety requirements:
- The room in which soldering will be carried out must have good ventilation. This is necessary to protect against vapors and gases released during operation.
- Before turning on the soldering iron, you need to check the integrity of the wire, socket and plug.
- After this, you should make sure that the soldering iron itself is intact. In this case, you need to pay attention to the presence of damage to the insulation.
- If there is a crackling sound when switching on, the soldering iron must be turned off immediately.
- Do not handle the device with wet hands or work in areas with high humidity.
- When unplugging the soldering iron from the outlet, do not pull the wire.
- Do not lean closer to the device than 20 cm. Otherwise, there is a risk of hot fumes getting into your eyes.
- During work, all flammable objects must be removed.
- A stand made of non-combustible materials should be used.
- After completing the work, do not touch the tip or body of the device until it cools completely.
For independent soldering you will need to prepare the required minimum:
- soldering iron or hot air hair dryer;
- rosin or solder paste;
- tin-lead solder.
Experienced DIYers recommend using a soldering iron with a tip that is sharpened at an angle. With its help, the soldering pad warms up more quickly, and the light-emitting diode does not deteriorate due to overheating.
Selecting soldering paste
The quality of any flux is expressed in the fact that during soldering it does not burn out, it only barely evaporates, and the products of its decomposition are easily removed with a solvent. The best flux is special pastes. We chose the top names based on the experience of familiar masters:
- Interflux 2005 and 8300
- Kingbo RMA-218
- Amtech RMA-223
- Rexant BGA and SMD flux gel
Just in case, keep in mind the old, “old-fashioned” ways of finding flux in a remote village. This is an aspirin tablet, fruit juice, olive oil, ammonia with glycerin, rosin with alcohol. The most obvious one for rural areas is pine or spruce resin. You need to melt the resin over low heat and then pour it into matchboxes.
What is a multimeter
A multimeter is a device that can measure AC or DC current, voltage and resistance. It replaces three analog or digital instruments at once: ammeter, voltmeter and ohmmeter. It is also capable of changing the main indicators of any electrical network and ringing it. There are two types of multimeters: digital and analog. The first are portable devices with a display to display the results. Most multimeters on the market today are digital. The second type is already outdated and is no longer popular. It looks like a regular measuring instrument with a graduation scale and an analog needle showing the measurement value.
Conclusions and useful video on the topic
How to eliminate typical failures of an LED light bulb with an E27 socket. Detailed instructions for disassembling the product, interesting practical tips on using available tools.
Tips on how to correctly remove the flask from the device without damaging it in the process.
An easy way to repair an ice-type light bulb without using a soldering iron. Instead of soldering, a special electrically conductive paste is used.
A complete description of the work on products of the Cosmos brand, which is owned by the KOSMOS Group, which controls about 25% of the domestic market for progressive and economical products for creating high-quality lighting.
How to fix an LED corn light bulb. Features of the disassembly process, design nuances and other educational points. A significant increase in the service life of the product after all work has been carried out.
An LED light bulb is a practical source of lighting. The only disadvantage of this product is the high price compared to other modules. True, LED devices are reliable and usually work out their lifespan completely. .
And if breakdowns suddenly occur during operation, most of them can be fixed with your own hands. Any home craftsman will have the necessary tools, and finding time for repair work will also not be difficult.
Do you know how to repair LED lamps yourself and can supplement the material we have presented with valuable recommendations? Write tips in the comments to the article, add unique photos - many beginners who have no experience in repairing lighting products will be grateful to you.
Nominal resistance
The main parameter of any resistor is the resistance value. The uniformity of this resistance is the unit of measurement Ohm. The nominal value of any purchased resistor is marked on itself, that is, on its body using markings in the form of stripes of different colors. This was done primarily for the convenience of conveyor assembly, where machines with machine vision can easily identify the element that needs to be used.
Important! You can find out the denomination in several ways: using special reference books and designation tables, as well as any measuring device.
The tables are presented in any reference book on electronics and electrical engineering, and are also included with the purchased set of resistors. The second method of determination is more convenient and understandable, since all you need to do is measure the resistance yourself. This will help determine how much the resistance differs from the nominal value and give a characteristic of the element.
Checking with a multimeter
To check the electrical resistor, proceed as follows:
- Take the radio element that needs to be checked;
- Turn on the multimeter and set it to measure resistance;
- Set the measurement scale and its boundaries;
- In any way, connect one multimeter probe to one of the sides of the resistor, and the second to the remaining side;
- Record the measurements on the screen or analog scale and finish testing.
If the value is zero or very different from the nominal value, then the element is faulty and must be disposed of, since changing the value can damage the entire circuit. If the value is normal, then the electrical resistor can be used to create electronic circuits. When checking the values without soldering the electrical resistor, the influence of the shunt circuits should be taken into account.
Thus, the question was addressed: how to check a resistor with a multimeter or tester. In fact, there is nothing complicated, since this radio element is one of the simplest and most common among all and has only two contact outputs without taking into account polarity. That is why anyone who has a multimeter, tester or ohmmeter can check it.
LEDs are one of the most popular electronic components, used in almost any circuit. The phrase “blinking LEDs” is often used to describe the first task when testing the viability of a circuit. In this article, we will learn how LEDs work, give a brief overview of their types, and also deal with practical issues such as determining polarity and calculating a resistor.