Selecting the power of the soldering iron
The power of the soldering iron must be selected based on the specifics of the work:
- From 20 to 50 W – for circuit boards, small electronics and thin wires;
- 100 W – for copper layers up to 1 mm thick;
- From 200 W – for large parts and wires.
The power is always indicated on the device packaging. In most models it is also indicated on the handle.
Preparing the soldering iron and parts
If the soldering iron is new, you need to turn it on for a few minutes and let it run “idle”. This is necessary for the factory grease to burn out. With such preparation, the soldering iron may smoke, so do not be alarmed.
Usually soldering irons are sold with a tinned tip (coated with a layer of tin). If the tip is uncovered, it needs to be lightly sanded with sandpaper, heated, then dipped in flux and coated with solder.
Sometimes even a tinned tip needs to be lightly cleaned before soldering. During operation, the tip becomes covered with an oxide film, which impairs the adhesion of solder. To do this, lightly clean it with sandpaper or a cloth, depending on the degree of contamination.
To prepare the parts you need:
- Remove the insulation (if wires are soldered).
- Degrease.
- Coat the part with flux.
- Tin with a soldering iron.
Then you can proceed directly to soldering. It is usually necessary to tin both parts. To remove oxides, you can use a soldering iron tip, sandpaper or a sharp knife.
Soldering different types of microcircuits
Now let's turn directly to soldering microcircuits of different shapes and configurations, and how they can be soldered:
DIP chips are the most common type of chips, which are simply and easily soldered by installing long mounting legs into the holes. To dismantle the DIP chip, it is best to use a thin needle, as indicated in the paragraph above.
SMD microcircuits - these microcircuits have a fundamentally different soldering method, on the so-called “spots”. However, this does not complicate the work process in any way and even makes it easier if you have such a friend and assistant at hand as an infrared hair dryer.
BGA microcircuits - the contacts of these microcircuits are located underneath them in the form of small balls of solder.
Wire soldering technique
Procedure for how to solder wires correctly:
- Remove the insulation to the desired length, usually 3-5 cm.
- If necessary, clean and degrease the wires (depending on the type of wire).
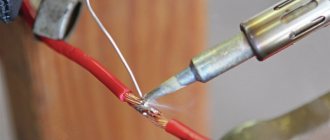
- Twist the wires tightly together.
- Cover the soldering area with flux.
- Place solder on the tip and solder the twist. It is important to heat the wires evenly so that the solder covers all surfaces and fills the cavities.
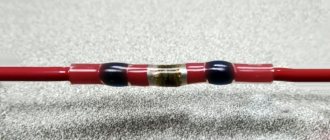
- Insulate the resulting connection using heat shrink tubing (must be put on before soldering) or regular electrical tape.
There are different ways to connect and solder wires. They don't always have to be twisted. If the wires are soft, for example made of copper, it is better to twist them to ensure reliable contact.
If the wires are hard and brittle, they can be placed next to each other and then soldered without twisting. This will eliminate the risk of fracture during twisting.
When soldering without twisting, it is highly recommended to pre-tin both wires. Instructions on how to tin wires with a soldering iron:
- Strip each wire of insulation.
- If necessary, remove the varnish from the wires. This is best done with a sharp knife or sandpaper.
- Treat the core with flux.
- Apply molten solder evenly to the surface using a soldering iron.
A properly tinned wire should be completely covered with a layer of solder. Next, these wires are twisted or tightly applied to each other and soldered. You don't need to use a lot of solder, since each of the wires is already coated with it.
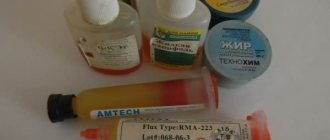
How to solder correctly with a soldering iron and rosin
Rosin has such unique qualities as ease of dissolution in various organic compounds, for example, acetone or alcohol. When heated, this substance can break down complex chemical compounds such as copper, tin or lead. Therefore, proper use of rosin helps reduce the likelihood of spreading of the substance, destruction of the oxide coating, as well as high-quality tinning of soldered elements.
You also need to take into account that the thinner the tip of the soldering iron, the easier it will be to work with it, especially when it comes to soldering very thin wires and parts. Therefore, if it has not yet been sharpened, this should be done before starting work.
Process description
- First, you should prepare the workspace where you plan to seal the parts. To do this, you need to open the window, since the fumes that come from the solder heavily pollute the air. You should also take any sponge, soak it thoroughly in water and place it as close to the soldering iron as possible. Well, in order not to stain your work area with drops of solder, it is best to cover the surface on which you will be working with thick cardboard or some other similar covering.
- There must be a stand for the device at hand.
- Then you need to plug the soldering iron into a power outlet and heat it up. As the device heats up, a specific smell and noticeable smoke may appear - this is normal. The device will be ready for use immediately after the tip is completely heated and the smoke and unpleasant aroma have evaporated.
- After the tool has been calcined, it should be turned off. This is necessary in order to pre-clean the tip from dirt and plaque. It is best to clean the instrument while it is hot. To do this, you can use a prepared sponge or cloth.
- Then you need to turn on the soldering iron again and let it warm up thoroughly.
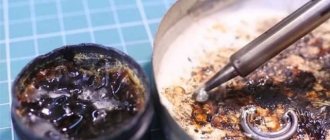
- After cleaning and heating the tool, you should carry out the process of tinning the tip of the soldering iron - covering the tip with a light layer of solder, in this case rosin. Thanks to this simple manipulation, the heat transfer between the parts that are intended for soldering will significantly increase.
- Next, you need to dip the tip of the heated device into rosin for a while so that a little solder accumulates on the tip. You should wait a little while until the solder heats up and begins to soften.
- Excess rosin can be removed using cardboard or other available tools.
- If you plan to solder one copper part, then one tinning will be enough - you need to touch the rosin once, then apply the tip of the soldering iron with solder to the working surface and wait a little until the wires are covered with solder. As a result of these manipulations, the rosin will begin to smoke, and the soldered parts will flow around the molten substance.
- In order to solder two parts efficiently, they also need to be tinned separately, that is, covered with solder. It should be remembered that the tinning process is a mandatory procedure, without which it will not be possible to properly solder the necessary parts.
- After finishing work with the soldering iron, while it is still warm, you need to remove the remaining solder. To do this, the tip of the tool just needs to be wiped with a damp cloth, or better yet, a sponge soaked in alcohol or any other composition intended for these purposes.
There should not be any particular difficulties when working with the tool. For everything to go smoothly, it is best to first practice working with rosin on parts that you won’t mind throwing away later. After all, experience always comes with practice.
Soldering boards
As a rule, on boards, radio components are soldered to current-carrying tracks or special “nickels”. If the tracks are already tin-plated (grey), they do not need to be tinned first.
If they are yellowish in color, they must first be coated with flux and then tinned with a soldering iron, similar to wires. After this, you can solder the parts.
Instructions on how to properly solder parts to the board:
- Using tweezers, bend the leads onto the parts so that they lie flat against the tracks (nickels) or fit into the mounting grooves.
- Fix the part evenly using tweezers.
- Treat the soldering area with flux.
- Take a small amount of solder onto the tip and apply it to the soldering point.
- Wait until the solder is evenly distributed. Do not hold the soldering iron for too long; overheating may cause the part to fail. To prevent the part from moving out of place, it should be held with tweezers.
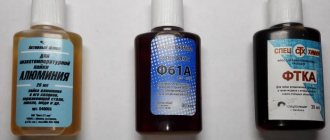
- After cooling, wash the soldering area to remove flux residues. To do this, it is optimal to use alcohol (ethyl or isopropyl) or Galosh gasoline.
If necessary, the contacts can be coated with protective varnish for circuit boards. This is necessary to protect against wet conditions and prevent the risk of shorting when coming into contact with other surfaces.
Preparing for work
Of course, in order to become a master and solder parts of any complexity, you need time and experience. However, in order to repair headphones, attach an LED strip, or change capacitors on a computer board at home, you do not need to have special knowledge. Compliance with the instructions and electrical safety rules will allow you to complete this work without difficulty.
The condition of the tip is of great importance for the quality and efficiency of soldering. The process of caring for it is called tinning - the process of covering its surface with a thin layer of solder. This is done so that the copper from which the soldering iron tip is made does not oxidize. A soldering iron with an oxidized tip interacts poorly with solder and the material being processed. Each time, before soldering with a soldering iron, you should prepare it. First, we treat the tip of a cold soldering iron with a file or a stiff brush, cleaning the copper from dirt.
Cleaning the soldering iron with a brush (you can also use a file)
After cleaning the soldering iron.
Then, after heating the soldering iron to operating temperature, you need to alternately touch the rosin and then the solder several times. The alloy should evenly cover the working part.
Dip the soldering iron into the flux.
We touch the solder tip.
Below is a video on how to tin a soldering iron and prepare it for use. Perhaps the video shows it even better than our photographs, so we recommend watching it.
Common Problems
Beginners often encounter the following difficulties when soldering:
- Insufficient heating of components. Due to lack of temperature, “cold” soldering occurs. It can be identified by the dull color of the solder at the soldering site and its easy destructibility under mechanical stress.
- Overheating of parts. In this case, the surface is not covered with solder at all.
- Displacement of parts before the solder hardens, which often leads to broken contact.
To eliminate these problems, it is necessary to re-solder.
If overheating occurs, you need to reduce the soldering time or use a less powerful soldering iron. When cold soldering, on the contrary, you need to use a higher power soldering iron.